第76篇 | HarmonyOS 保险箱详情页:私密照片如何浏览、恢复和导出
第 76 篇讲保险箱详情页。私密照片解锁后不能只显示一个列表,用户还需要像普通相册一样查看前后镜头、滑动浏览、恢复公开相册、导出到系统相册或再次锁定。区别在于这些动作都必须在保险箱上下文里完成。 这一篇从详情查看器、选中记录、私密帧列表、恢复/导出按钮和锁定按钮五个角度拆代码。重点是理解:保险箱复用了普通相册的数据和预览能力,但它在入口、状态和操作上加了更严格的边界。 本篇目标
第76篇 | HarmonyOS 保险箱详情页:私密照片如何浏览、恢复和导出
第 76 篇讲保险箱详情页。私密照片解锁后不能只显示一个列表,用户还需要像普通相册一样查看前后镜头、滑动浏览、恢复公开相册、导出到系统相册或再次锁定。区别在于这些动作都必须在保险箱上下文里完成。
这一篇从详情查看器、选中记录、私密帧列表、恢复/导出按钮和锁定按钮五个角度拆代码。重点是理解:保险箱复用了普通相册的数据和预览能力,但它在入口、状态和操作上加了更严格的边界。
本篇目标
- 理解保险箱详情页为什么要先检查
vaultUnlocked。 - 掌握
getFeaturedVaultRecord和getFeaturedVaultFrames如何支撑预览。 - 理解私密照片恢复、导出、系统分享和锁定按钮的状态条件。
- 学会让详情查看器复用普通相册帧数据,同时保留保险箱边界。
对应源码位置
superImage/entry/src/main/ets/pages/Index.ets
解锁后才进入私密照片详情
保险箱详情页的体验和普通相册相似:全屏黑底、可滑动查看前后镜头、顶部返回和页码、底部标题地点信息。但进入这个页面之前,用户必须先完成本地认证。
这种设计减少了重复开发。普通相册已经有前后镜头帧的组织方式,保险箱详情只需要在入口处做解锁校验,在页面表现上继续复用图像预览能力。隐私边界放在状态和入口上,而不是重写一套图片查看逻辑。
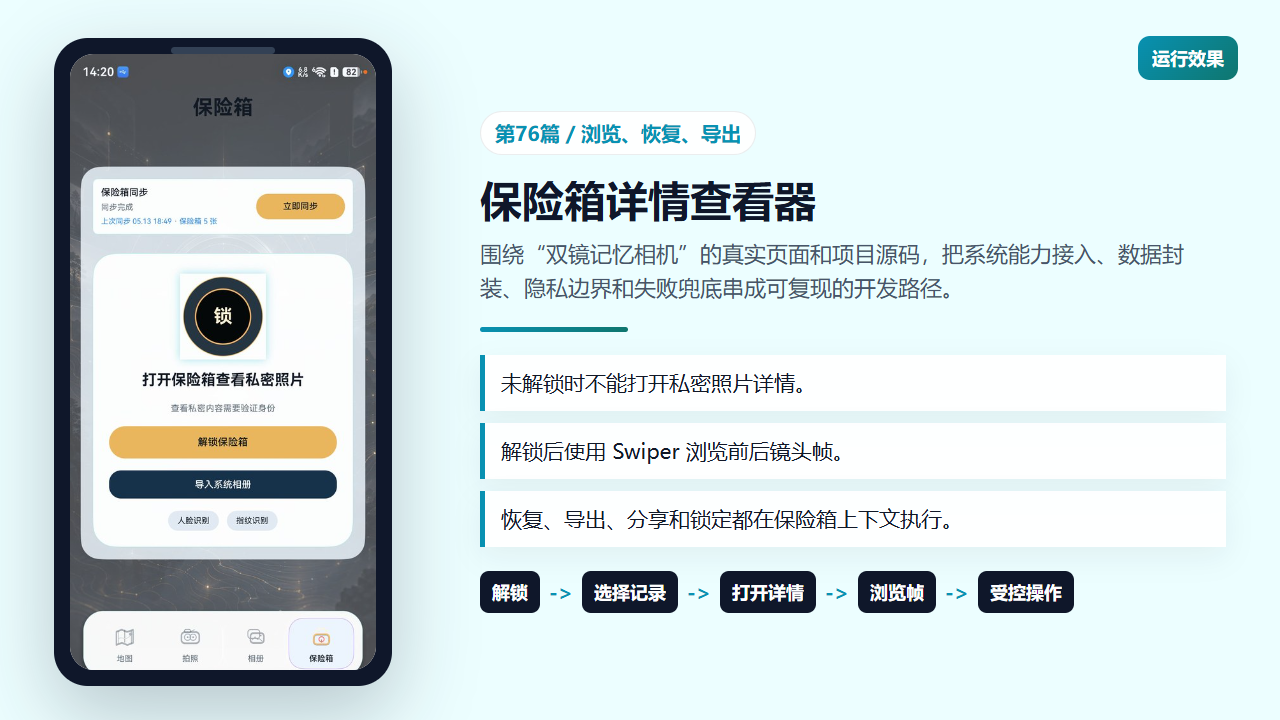
保险箱详情页在解锁后展示私密照片浏览能力
打开详情前先检查解锁状态
openVaultRecordViewer 的第一行就是 if (!this.vaultUnlocked) return。这行代码把入口挡在最前面:不管哪个 UI 元素误触发了打开详情,只要保险箱未解锁,就不会显示私密照片。
getFeaturedVaultRecord 通过选中 id 找当前记录,找不到时回退到第一条私密记录;getFeaturedVaultFrames 复用普通相册的 getGalleryDetailFrames。这样保险箱既有自己的入口控制,又不用重复维护前后镜头帧构造逻辑。
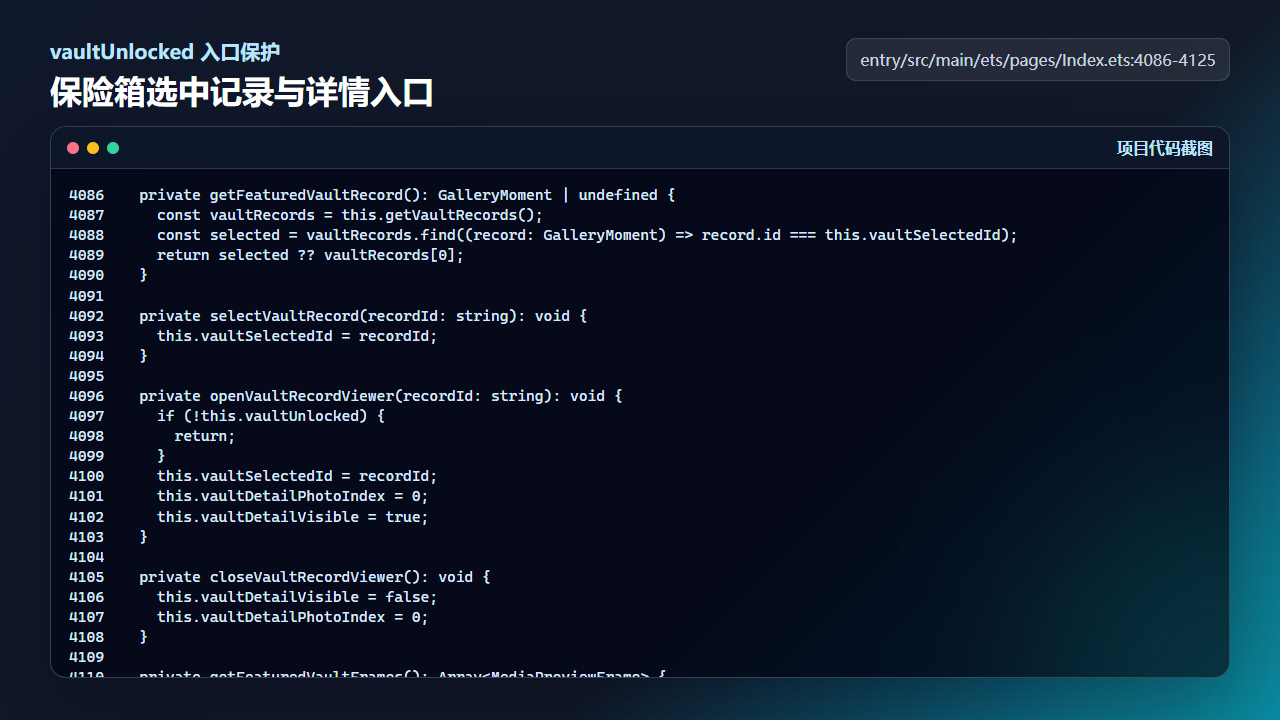
openVaultRecordViewer 在未解锁时直接返回
  private getFeaturedVaultRecord(): GalleryMoment | undefined {
    const vaultRecords = this.getVaultRecords();
    const selected = vaultRecords.find((record: GalleryMoment) => record.id === this.vaultSelectedId);
    return selected ?? vaultRecords[0];
  }

  private selectVaultRecord(recordId: string): void {
    this.vaultSelectedId = recordId;
  }

  private openVaultRecordViewer(recordId: string): void {
    if (!this.vaultUnlocked) {
      return;
    }
    this.vaultSelectedId = recordId;
    this.vaultDetailPhotoIndex = 0;
    this.vaultDetailVisible = true;
  }

  private closeVaultRecordViewer(): void {
    this.vaultDetailVisible = false;
    this.vaultDetailPhotoIndex = 0;
  }

  private getFeaturedVaultFrames(): Array<MediaPreviewFrame> {
    const record = this.getFeaturedVaultRecord();
    if (!record) {
      return [];
    }
    return this.getGalleryDetailFrames(record);
  }

  private getVaultPreviewRecords(): Array<GalleryMoment> {
    const featuredRecord = this.getFeaturedVaultRecord();
    if (!featuredRecord) {
      return [];
    }
    return this.getVaultRecords()
      .filter((record: GalleryMoment) => record.id !== featuredRecord.id)
      .slice(0, 3);
详情查看器复用 Swiper 浏览双镜帧
buildVaultDetailViewer 使用 Swiper 遍历 getFeaturedVaultFrames。每一帧先铺一层低透明度背景图,再用 contain 模式展示主体图,这样竖图、横图和双镜照片都能在黑底里保持可看性。
顶部的返回按钮和页码、底部的记忆标题和地点时间都来自当前记录。这个实现说明保险箱详情不是简单的图片弹窗,而是保留了双镜记忆的上下文信息。用户知道自己正在看哪一组私密记忆,也能在多帧之间切换。
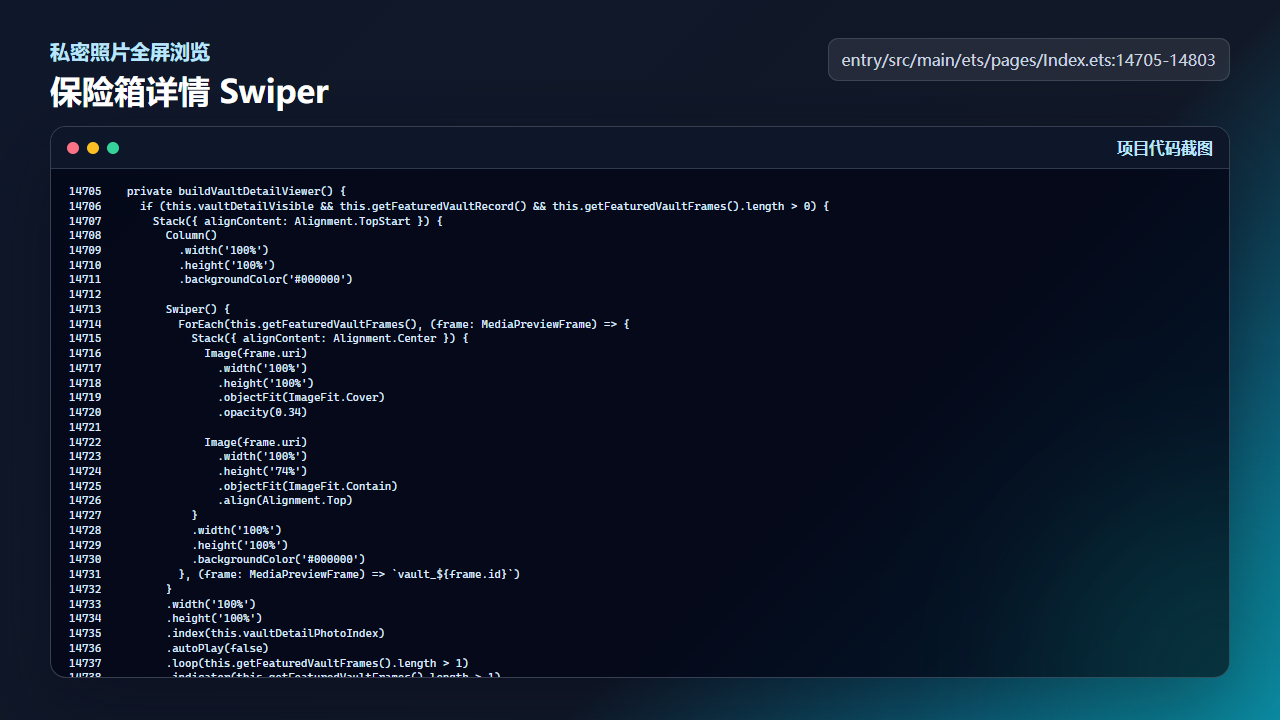
buildVaultDetailViewer 使用 Swiper 展示私密照片帧
  private buildVaultDetailViewer() {
    if (this.vaultDetailVisible && this.getFeaturedVaultRecord() && this.getFeaturedVaultFrames().length > 0) {
      Stack({ alignContent: Alignment.TopStart }) {
        Column()
          .width('100%')
          .height('100%')
          .backgroundColor('#000000')

        Swiper() {
          ForEach(this.getFeaturedVaultFrames(), (frame: MediaPreviewFrame) => {
            Stack({ alignContent: Alignment.Center }) {
              Image(frame.uri)
                .width('100%')
                .height('100%')
                .objectFit(ImageFit.Cover)
                .opacity(0.34)

              Image(frame.uri)
                .width('100%')
                .height('74%')
                .objectFit(ImageFit.Contain)
                .align(Alignment.Top)
            }
            .width('100%')
            .height('100%')
            .backgroundColor('#000000')
          }, (frame: MediaPreviewFrame) => `vault_${frame.id}`)
        }
        .width('100%')
        .height('100%')
        .index(this.vaultDetailPhotoIndex)
        .autoPlay(false)
        .loop(this.getFeaturedVaultFrames().length > 1)
        .indicator(this.getFeaturedVaultFrames().length > 1)
        .onChange((index: number) => {
          this.vaultDetailPhotoIndex = index;
        })

        Column() {
          Row({ space: 12 }) {
            Button('\u8fd4\u56de')
              .height(40)
              .fontSize(13)
              .fontWeight(FontWeight.Medium)
              .fontColor('#FFF7E6')
              .backgroundColor('#80111317')
              .borderRadius(18)
              .onClick(() => {
                this.closeVaultRecordViewer();
              })

            Blank()

            if (this.getFeaturedVaultFrames().length > 1) {
              Text(`${this.vaultDetailPhotoIndex + 1}/${this.getFeaturedVaultFrames().length}`)
                .fontSize(12)
                .fontColor('#FFF7E6')
                .padding({ left: 12, right: 12, top: 8, bottom: 8 })
                .backgroundColor('#80111317')
                .borderRadius(16)
            }
          }
          .width('100%')
          .padding({ left: 16, right: 16, top: this.getPageTopPadding(18) })

          Blank()

          Column({ space: 5 }) {
            Text(this.getCompactMemoryTitle(
              (this.getFeaturedVaultRecord() as GalleryMoment).memoryTitle,
              (this.getFeaturedVaultRecord() as GalleryMoment).place
            ))
              .fontSize(17)
              .fontWeight(FontWeight.Bold)
              .fontColor('#FFF7E6')
              .maxLines(1)
              .textOverflow({ overflow: TextOverflow.Ellipsis })

            Text(`${(this.getFeaturedVaultRecord() as GalleryMoment).place} / ${(this.getFeaturedVaultRecord() as GalleryMoment).createdLabel}`)
              .fontSize(12)
              .fontColor('#D8CBB2')
              .maxLines(1)
              .textOverflow({ overflow: TextOverflow.Ellipsis })
          }
          .width('100%')
          .padding(14)
          .backgroundColor('#D8111317')
          .borderRadius(22)
          .margin({ left: 16, right: 16, bottom: this.getPageBottomPadding(18) })
          .alignItems(HorizontalAlign.Start)
        }
        .width('100%')
        .height('100%')
      }
      .width('100%')
      .height('100%')
      .backgroundColor('#000000')
    }
  }
锁定态和解锁态是两个 UI 分支
buildEnhancedVaultTab 里先判断是否有私密照片,再判断 vaultUnlocked 和当前记录。未解锁时显示认证按钮;解锁后才显示私密照片数量、马赛克网格和操作按钮。这比在每个按钮上单独隐藏更清晰。
状态分支写清楚后,后续维护会轻松很多。新增一个私密照片操作时,只需要放在解锁分支里,并根据 busy 状态控制按钮可用性。未解锁分支始终保持认证路径,不会意外露出私密内容。
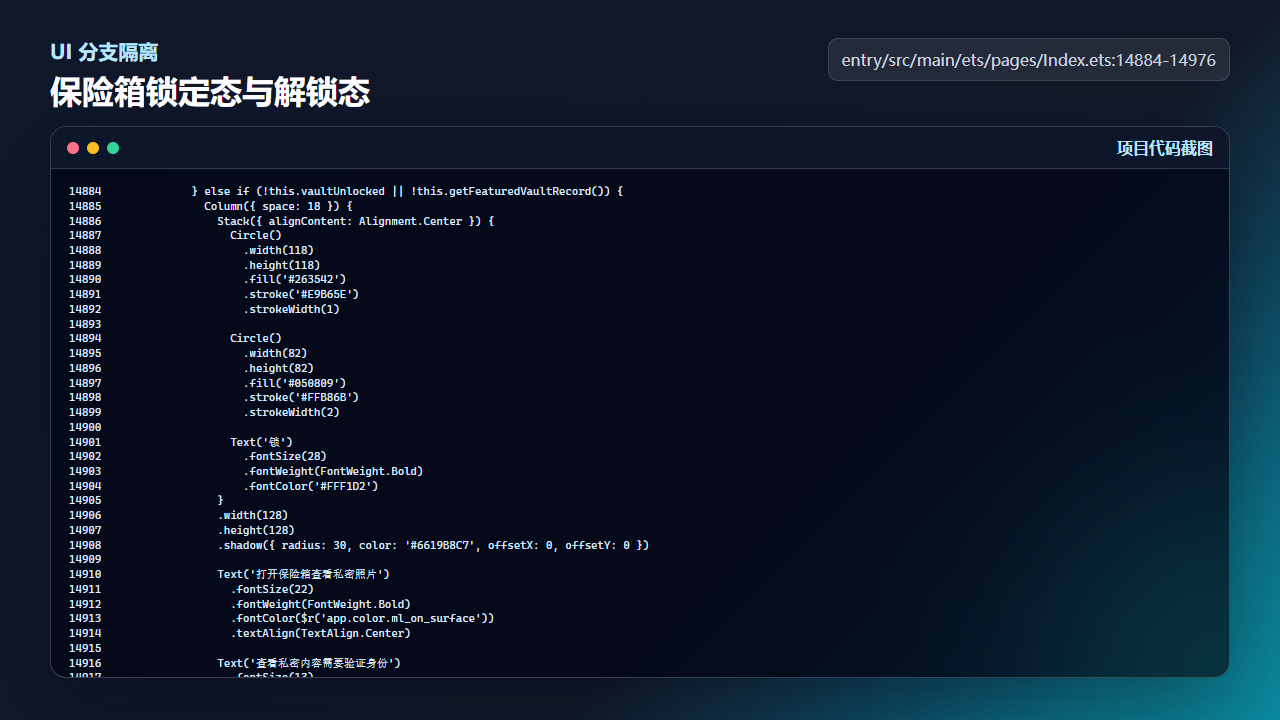
保险箱未解锁时只显示认证和导入入口
            if (this.getVaultRecords().length === 0) {
              Column({ space: 12 }) {
                Text('还没有私密照片')
                  .fontSize(18)
                  .fontWeight(FontWeight.Medium)
                  .fontColor($r('app.color.ml_on_surface'))

                Button(this.mediaImportBusy ? '导入中...' : '导入系统相册')
                  .height(42)
                  .width('100%')
                  .enabled(!this.mediaImportBusy)
                  .fontSize(14)
                  .fontWeight(FontWeight.Medium)
                  .fontColor(this.getWarmActionTextColor())
                  .backgroundColor(this.getWarmActionBackgroundColor())
                  .borderRadius(18)
                  .onClick(() => {
                    void this.importSystemAlbumPhotos('vault');
                  })

                Button('去相册选择')
                  .height(42)
                  .width('100%')
                  .fontSize(14)
                  .fontWeight(FontWeight.Medium)
                  .fontColor(this.getSecondaryActionTextColor())
                  .backgroundColor(this.getSecondaryActionBackgroundColor())
                  .borderRadius(18)
                  .onClick(() => {
                    this.switchTab('gallery');
                  })
              }
              .width('100%')
              .padding(18)
              .backgroundColor($r('app.color.ml_panel_glass'))
              .borderRadius(28)
              .alignItems(HorizontalAlign.Start)
            } else if (!this.vaultUnlocked || !this.getFeaturedVaultRecord()) {
              Column({ space: 18 }) {
                Stack({ alignContent: Alignment.Center }) {
                  Circle()
                    .width(118)
                    .height(118)
                    .fill('#263542')
                    .stroke('#E9B65E')
                    .strokeWidth(1)

                  Circle()
                    .width(82)
                    .height(82)
                    .fill('#050809')
                    .stroke('#FFB86B')
                    .strokeWidth(2)

                  Text('锁')
                    .fontSize(28)
                    .fontWeight(FontWeight.Bold)
                    .fontColor('#FFF1D2')
                }
                .width(128)
                .height(128)
                .shadow({ radius: 30, color: '#6619B8C7', offsetX: 0, offsetY: 0 })

                Text('打开保险箱查看私密照片')
                  .fontSize(22)
                  .fontWeight(FontWeight.Bold)
                  .fontColor($r('app.color.ml_on_surface'))
                  .textAlign(TextAlign.Center)

                Text('查看私密内容需要验证身份')
                  .fontSize(13)
                  .lineHeight(20)
                  .fontColor($r('app.color.ml_on_surface_variant'))
                  .textAlign(TextAlign.Center)

                Button(this.vaultAuthBusy ? '认证中...' : '解锁保险箱')
                  .height(48)
                  .width('100%')
                  .enabled(!this.vaultAuthBusy)
                  .fontSize(15)
                  .fontWeight(FontWeight.Medium)
                  .fontColor(this.getWarmActionTextColor())
                  .backgroundColor(this.getWarmActionBackgroundColor())
                  .borderRadius(24)
                  .onClick(() => {
                    void this.unlockVaultWithFace();
                  })

                Button(this.mediaImportBusy ? '导入中...' : '导入系统相册')
                  .height(42)
                  .width('100%')
                  .enabled(!this.mediaImportBusy && !this.vaultAuthBusy)
                  .fontSize(14)
                  .fontWeight(FontWeight.Medium)
                  .fontColor(this.getSecondaryActionTextColor())
                  .backgroundColor(this.getSecondaryActionBackgroundColor())
                  .borderRadius(18)
                  .onClick(() => {
                    void this.importSystemAlbumPhotos('vault');
                  })

                Row({ space: 12 }) {
                  Text('人脸识别')
                    .fontSize(12)
                    .fontColor($r('app.color.ml_on_surface'))
                    .padding({ left: 14, right: 14, top: 8, bottom: 8 })
                    .backgroundColor(this.getDarkChipBackgroundColor())
                    .borderRadius(16)
                    .onClick(() => {
                      void this.unlockVaultWithFace();
                    })

                  Text('指纹识别')
                    .fontSize(12)
                    .fontColor($r('app.color.ml_on_surface'))
                    .padding({ left: 14, right: 14, top: 8, bottom: 8 })
                    .backgroundColor(this.getDarkChipBackgroundColor())
                    .borderRadius(16)
                    .onClick(() => {
                      void this.unlockVaultWithFingerprint();
                    })
                }
              }
              .width('100%')
              .padding({ left: 24, right: 24, top: 30, bottom: 24 })
              .backgroundColor($r('app.color.ml_panel_glass'))
              .borderRadius(34)
              .border({ width: 1, color: '#5519B8C7' })
              .alignItems(HorizontalAlign.Center)
            } else {
恢复、导出、分享和锁定都在解锁分支
解锁分支里的操作按钮很集中:恢复照片调用 restoreRecordFromVault,导出到相册调用 exportRecordToSystemAlbum,系统分享调用 shareRecordWithSystemShare,锁定按钮调用 lockVault。每个按钮都结合 busy 状态限制点击。
这组按钮体现了保险箱详情的完整闭环:用户可以把私密照片恢复公开,也可以导出或分享当前记录,操作完还能手动锁定。对实战文章来说,这比只展示解锁页更有价值,因为它覆盖了用户真正会反复使用的路径。
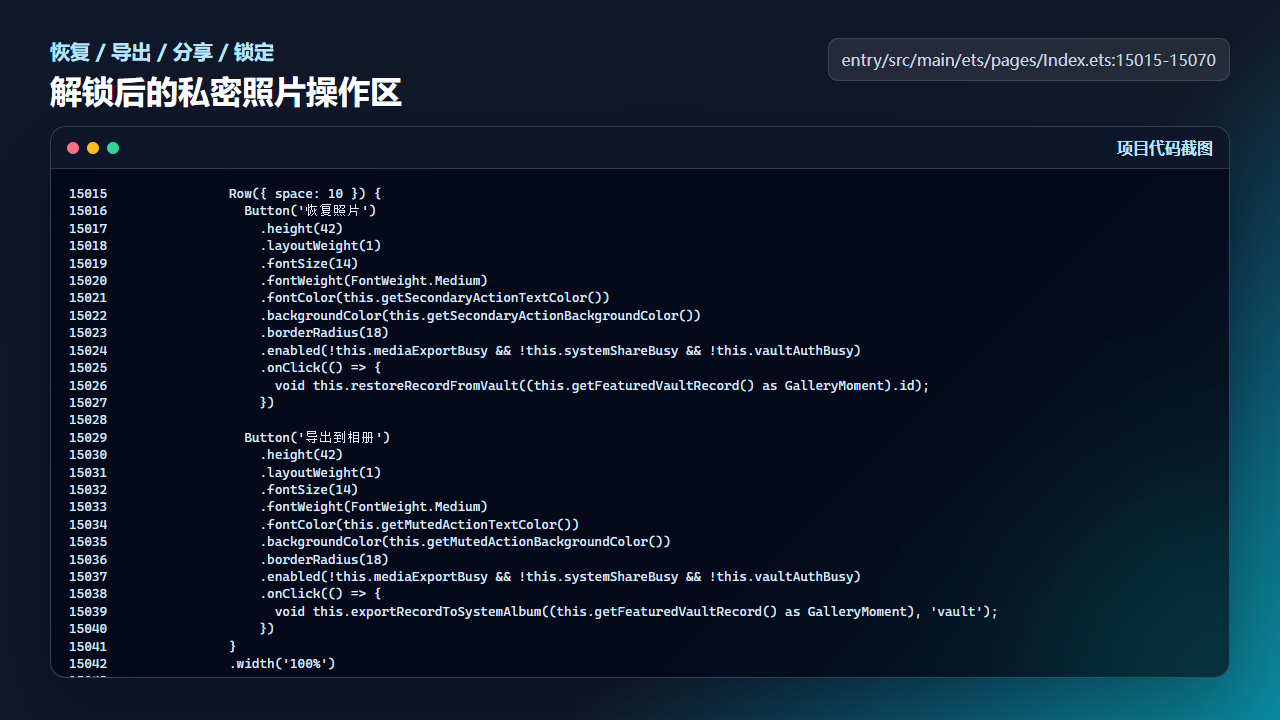
保险箱解锁后提供恢复、导出、系统分享和锁定操作
              Row({ space: 10 }) {
                Button('恢复照片')
                  .height(42)
                  .layoutWeight(1)
                  .fontSize(14)
                  .fontWeight(FontWeight.Medium)
                  .fontColor(this.getSecondaryActionTextColor())
                  .backgroundColor(this.getSecondaryActionBackgroundColor())
                  .borderRadius(18)
                  .enabled(!this.mediaExportBusy && !this.systemShareBusy && !this.vaultAuthBusy)
                  .onClick(() => {
                    void this.restoreRecordFromVault((this.getFeaturedVaultRecord() as GalleryMoment).id);
                  })

                Button('导出到相册')
                  .height(42)
                  .layoutWeight(1)
                  .fontSize(14)
                  .fontWeight(FontWeight.Medium)
                  .fontColor(this.getMutedActionTextColor())
                  .backgroundColor(this.getMutedActionBackgroundColor())
                  .borderRadius(18)
                  .enabled(!this.mediaExportBusy && !this.systemShareBusy && !this.vaultAuthBusy)
                  .onClick(() => {
                    void this.exportRecordToSystemAlbum((this.getFeaturedVaultRecord() as GalleryMoment), 'vault');
                  })
              }
              .width('100%')

              Row({ space: 10 }) {
                Button(this.systemShareBusy ? '分享中...' : '系统分享')
                  .height(42)
                  .layoutWeight(1)
                  .fontSize(14)
                  .fontWeight(FontWeight.Medium)
                  .fontColor(this.getMutedActionTextColor())
                  .backgroundColor(this.getMutedActionBackgroundColor())
                  .borderRadius(18)
                  .enabled(!this.mediaExportBusy && !this.systemShareBusy)
                  .onClick(() => {
                    void this.shareRecordWithSystemShare((this.getFeaturedVaultRecord() as GalleryMoment), 'vault');
                  })

                Button('锁定保险箱')
                  .height(42)
                  .layoutWeight(1)
                  .fontSize(14)
                  .fontWeight(FontWeight.Medium)
                  .fontColor(this.getMutedActionTextColor())
                  .backgroundColor(this.getMutedActionBackgroundColor())
                  .borderRadius(18)
                  .enabled(!this.mediaExportBusy && !this.systemShareBusy)
                  .onClick(() => {
                    this.lockVault();
                  })
              }
工程检查清单
- 详情入口必须先判断
vaultUnlocked。 - 私密照片帧复用普通相册详情帧构造。
- 锁定态和解锁态用清晰 UI 分支隔离。
- 恢复、导出和分享按钮都要受 busy 状态控制。
今日练习
- 在未解锁状态下调用
openVaultRecordViewer,验证详情不会打开。 - 切换不同私密记录,观察
getFeaturedVaultRecord的回退逻辑。 - 导出过程中连续点击恢复按钮,确认 enabled 条件能阻止并发操作。
训练营里的每一篇都建议按同一个节奏复盘:先看页面行为,再回到源码定位状态和服务层,最后自己改一个很小的参数验证结果。这样写文章时不会停留在 API 名词,读者也能沿着真实工程把功能跑通。

讨论HarmonyOS开发技术,专注于API与组件、DevEco Studio、测试、元服务和应用上架分发等。
更多推荐
 0
0 0
0- 0


 已为社区贡献228条内容

所有评论(0)