网络请求基础:使用http模块发起GET/POST请求(12)
在鸿蒙(HarmonyOS)ArkTS 开发中,网络请求是应用与服务器进行数据交互的核心能力。系统提供了 @ohos.net.http(或新版 @kit.NetworkKit)模块来支持 GET、POST 等常见的 HTTP 方法。
以下是使用 HTTP 模块发起网络请求的完整指南:
一、 前置准备:配置网络权限
在使用任何网络请求功能之前,必须在应用的配置文件 module.json5 中声明网络访问权限:
{
  "module": {
    "reqPermissions": [
      {
        "name": "ohos.permission.INTERNET"
      }
    ]
  }
}
二、 核心 API 设计哲学
需要特别注意的是,鸿蒙的 HTTP API 设计中不存在独立的 get() 或 post() 方法。所有的 HTTP 请求(GET/POST/PUT/DELETE等)均通过统一的 request() 方法实现,开发者需要在配置参数中通过 method 字段来指定具体的请求类型。
一个标准的请求生命周期包括:创建对象 (createHttp) -> 发起请求 (request) -> 处理响应 -> 销毁对象 (destroy)。
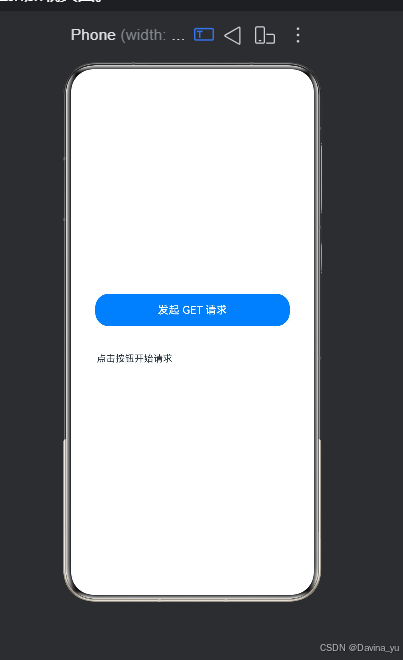
三、 GET 请求实战(获取数据)
GET 请求通常用于从服务器拉取列表或详情数据。以下是一个结合 UI 状态更新的完整示例
entry/src/main/module.json5
{
  "module": {
    "name": "entry",           // 【新增】模块名称,通常与文件夹同名
    "type": "entry",           // 【新增】模块类型,主模块必须为 "entry"
    "description": "$string:module_desc",
    "mainElement": "EntryAbility",
    "deviceTypes": [
      "phone",
      "tablet"
    ],
    "deliveryWithInstall": true,
    "pages": "$profile:main_pages",
    "abilities": [
      {
        "name": "EntryAbility",
        "srcEntry": "./ets/entryability/EntryAbility.ets",
        "description": "$string:EntryAbility_desc",
        "icon": "$media:layered_image",
        "label": "$string:EntryAbility_label",
        "startWindowIcon": "$media:startIcon",
        "startWindowBackground": "$color:start_window_background",
        "exported": true,
        "skills": [
          {
            "entities": ["entity.system.home"],
            "actions": ["action.system.home"]
          }
        ]
      }
    ],
    "requestPermissions": [    // 【修正】将 reqPermissions 改为 requestPermissions
      {
        "name": "ohos.permission.INTERNET"
      }
    ]
  }
}
// src/main/ets/pages/GetExample.ets
import http from '@ohos.net.http';
@Entry
@Component
struct GetExample {
@State data: string = '点击按钮开始请求';
@State isLoading: boolean = false; // 控制加载动画的状态
async fetchData() {
this.isLoading = true; // 开始请求,显示加载状态
const httpRequest = http.createHttp(); // 1. 创建请求对象
try {
const response = await httpRequest.request(
'https://jsonplaceholder.typicode.com/posts/1', // 测试接口地址
{
method: http.RequestMethod.GET, // 2. 指定为 GET 方法
header: { 'Content-Type': 'application/json' },
connectTimeout: 60000, // 连接超时时间 (ms)
readTimeout: 60000 // 读取超时时间 (ms)
}
);
// 3. 处理响应数据
if (response.responseCode === 200) {
this.data = JSON.stringify(JSON.parse(response.result as string), null, 2);
} else {
this.data = `请求失败: ${response.responseCode}`;
}
} catch (error) {
// 4. 捕获并展示异常信息
this.data = `请求异常: ${(error as Error).message}`;
} finally {
httpRequest.destroy(); // 5. 【关键】请求完毕后必须销毁,防止内存泄漏
this.isLoading = false; // 结束请求,隐藏加载状态
}
}
build() {
Column({ space: 20 }) {
Button('发起 GET 请求')
.onClick(() => this.fetchData())
.width('80%')
.height(48)
// 根据加载状态显示不同内容
if (this.isLoading) {
Progress({ value: 50, total: 100, type: ProgressType.Ring })
.width(40)
.height(40)
} else {
Text(this.data)
.fontSize(14)
.padding(20)
.width('90%')
.wordBreak(WordBreak.BREAK_ALL) // 允许长文本自动换行
}
}
.width('100%')
.height('100%')
.justifyContent(FlexAlign.Center)
.alignItems(HorizontalAlign.Center)
}
}// src/main/resources/base/profile/main_pages.json
{
"src": [
"pages/Index",
"pages/GetExample"
]
}
四、 POST 请求实战(提交数据)
POST 请求常用于表单提交或向服务器推送数据。与 GET 不同,POST 的数据需要放在请求体中,通过 extraData 字段传递:
async submitData() {
  const httpRequest = http.createHttp();
  const requestData = { title: 'foo', body: 'bar', userId: 1 };

  try {
    const response = await httpRequest.request(
      'https://jsonplaceholder.typicode.com/posts',
      {
        method: http.RequestMethod.POST, // 指定为 POST 方法
        header: { 'Content-Type': 'application/json' },
        extraData: JSON.stringify(requestData) // 将对象序列化为 JSON 字符串放入请求体
      }
    );

    if (response.responseCode === 201) {
      console.info('创建成功:', response.result);
    }
  } catch (error) {
    console.error('提交异常:', error);
  } finally {
    httpRequest.destroy();
  }
}
五、 进阶封装:打造通用请求工具类
在实际工程中,为了避免在每个页面重复编写 createHttp 和 destroy 逻辑,建议将其封装为通用的 Promise 函数:
import http from '@ohos.net.http';

// 通用请求方法
function httpRequest(url: string, method: http.RequestMethod, params?: string): Promise<string> {
  let req = http.createHttp();
  return req.request(url, {
    method: method,
    header: { 'Content-Type': 'application/json' },
    connectTimeout: 10000,
    readTimeout: 10000,
    extraData: params
  }).then((value: http.HttpResponse) => {
    req.destroy(); // 成功时销毁
    if (value.responseCode === 200) return value.result as string;
    throw new Error(`Server Error: ${value.responseCode}`);
  }).catch((err: Error) => {
    req.destroy(); // 异常时也要确保销毁
    throw err;
  });
}

// 快捷调用方法
export function get(url: string) { return httpRequest(url, http.RequestMethod.GET); }
export function post(url: string, data: object) {
  return httpRequest(url, http.RequestMethod.POST, JSON.stringify(data));
}
高级进阶:拦截器与全局状态管理
在大型应用中,通常需要处理统一的 Token 注入、错误码拦截以及全局加载状态。结合 @State 管理和拦截器模式,可以实现更优雅的网络层封装。
1. 添加请求拦截器
在工具类中增加拦截器逻辑,用于处理鉴权或日志:
// 定义拦截器接口
interface Interceptor {
  onRequest(config: http.HttpRequestOptions): http.HttpRequestOptions;
  onResponse(response: http.HttpResponse): http.HttpResponse;
  onError(error: Error): void;
}

// 在请求工具中集成拦截器
class HttpClient {
  private interceptors: Interceptor[] = [];

  addInterceptor(interceptor: Interceptor) {
    this.interceptors.push(interceptor);
  }

  async request(url: string, options: http.HttpRequestOptions) {
    // 执行请求拦截
    this.interceptors.forEach(interceptor => {
      options = interceptor.onRequest(options);
    });

    const httpRequest = http.createHttp();
    try {
      const response = await httpRequest.request(url, options);

      // 执行响应拦截
      this.interceptors.forEach(interceptor => {
        interceptor.onResponse(response);
      });

      return response;
    } catch (error) {
      this.interceptors.forEach(interceptor => {
        interceptor.onError(error as Error);
      });
      throw error;
    } finally {
      httpRequest.destroy();
    }
  }
}
2. 全局加载状态管理
结合 @State 和拦截器,可以实现全局的加载动画控制,避免在每个页面重复编写加载逻辑:
// 全局状态管理类
class LoadingManager {
  @State static isLoading: boolean = false;
  private static requestCount: number = 0;

  static show() {
    if (this.requestCount === 0) {
      this.isLoading = true;
    }
    this.requestCount++;
  }

  static hide() {
    this.requestCount--;
    if (this.requestCount <= 0) {
      this.requestCount = 0;
      this.isLoading = false;
    }
  }
}

// 在拦截器中使用
const loadingInterceptor: Interceptor = {
  onRequest(config) {
    LoadingManager.show();
    return config;
  },
  onResponse(response) {
    LoadingManager.hide();
    return response;
  },
  onError(error) {
    LoadingManager.hide();
    console.error('Global error handler:', error);
  }
};
3. 使用示例
// 在页面中使用
@Entry
@Component
struct AdvancedPage {
  @State data: string = '';

  async fetchData() {
    try {
      const response = await get('https://jsonplaceholder.typicode.com/posts/1');
      this.data = response;
    } catch (error) {
      // 错误已被全局拦截器处理
    }
  }

  build() {
    Column() {
      // 页面内容
      Button('加载数据').onClick(() => this.fetchData())

      // 全局加载遮罩
      if (LoadingManager.isLoading) {
        LoadingComponent()
      }
    }
  }
}
避坑指南与最佳实践
- 资源释放:每一个
httpRequest对象对应一个独立的任务且不可复用,最多只能创建 100 个。务必在finally块或.catch()中调用destroy()释放资源。 - 大小限制:默认的
request()接口仅支持接收 5MB 以内的数据。如果需要下载大文件或视频流,请使用requestInStream()配合dataReceive事件监听。 - 异步处理:推荐使用
async/await语法代替传统的 Callback 回调,这能让你的网络请求代码具备更好的可读性和错误捕获能力。 - 拦截器模式:对于复杂的业务应用,建议引入拦截器模式来处理统一的鉴权、日志和错误处理,保持业务代码的纯净。

讨论HarmonyOS开发技术,专注于API与组件、DevEco Studio、测试、元服务和应用上架分发等。
更多推荐

 5
5 0
0- 0


 已为社区贡献10条内容

所有评论(0)