鸿蒙版瑞幸咖啡开发日记(二)首页功能实现
鸿蒙版瑞幸咖啡开发日记之首页功能实现1.需开发的功能归纳2.首页功能开发2.1 顶部TabList开发2.2 一级分类数据渲染其实首页的功能目前来看是简单的,后面肯定也有点单等逻辑的实现,但是本文先从获取后端数据并渲染模板这一层面展开1.需开发的功能归纳首页需要开发的功能主要如下所示:前面开发日记(一)中的顶部信息栏中的TabList页签初始化底部导航栏每一个标签模板渲染中间菜单栏访问后端接口后,
鸿蒙版瑞幸咖啡开发日记之首页功能实现
其实首页的功能目前来看是简单的,后面肯定也有点单等逻辑的实现,但是本文先从获取后端数据并渲染模板这一层面展开
1.需开发的功能归纳
首页需要开发的功能主要如下所示:
- 前面开发日记(一)中的顶部信息栏中的TabList页签初始化
- 底部导航栏每一个标签模板渲染
- 中间菜单栏访问后端接口后,进行模板渲染,最终展示到我们的首页中去
2.首页功能开发
2.1 顶部TabList开发
我们封装了成了一个方法,在onStart方法中进行调用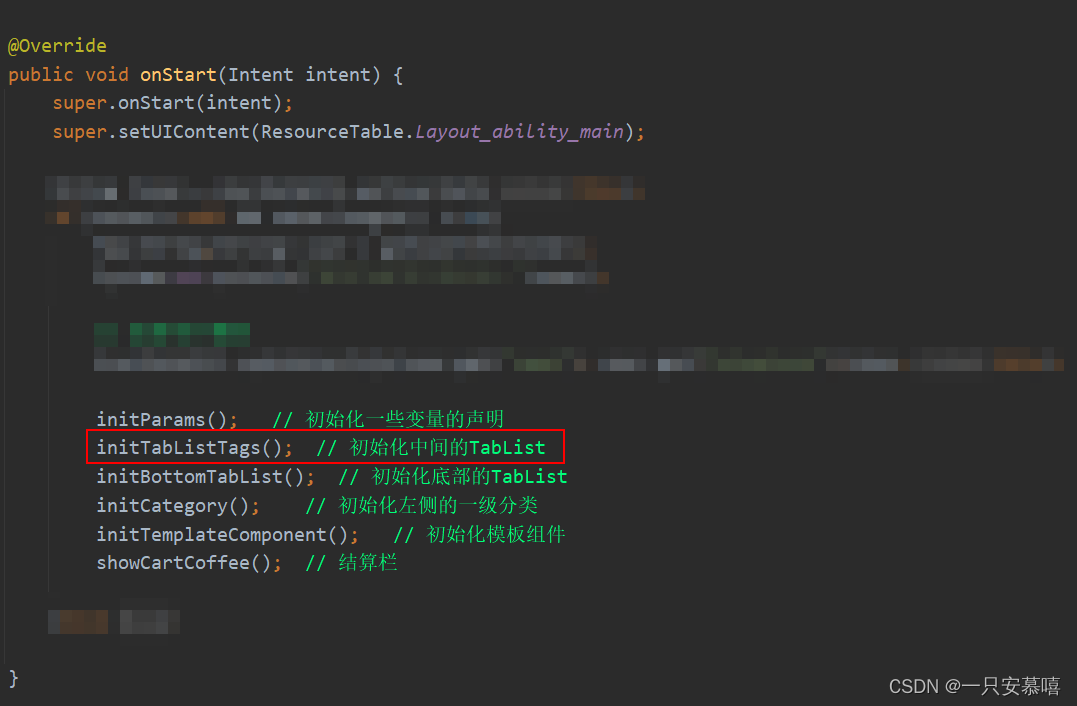
public void initTabListTags(){
    //1.初始化中部的TabList
    TabList tabList = (TabList) findComponentById(ResourceTable.Id_tab_list);
    String[] tabListTags = {"经典菜单","9.9元♥","冰雪季❄","我的常点"};
    if (tabList != null){
        for (String tabListTag : tabListTags) {
            TabList.Tab tab = tabList.new Tab(this);
            tab.setText(tabListTag);
            tabList.addTab(tab);
        }
    }
}
我们来总结一下开发流程,这样下次初始化的时候也有头绪:
- 找到对应的TabList组件
- 初始化页签的名称放在一个字符串数组中
- 新建Tab,将字符串数组中的对应文字设置好以后添加到步骤1中的组件中
另外,我们可以发现,其实爱心图标,雪花图标都只是简单的文字符号
2.2 一级分类数据渲染
因为我们的一级分类数据都是从后端接口中拿到的,所以拿到数据后需要将数据渲染到模板文件中,然后将其添加到首页对应的布局组件中去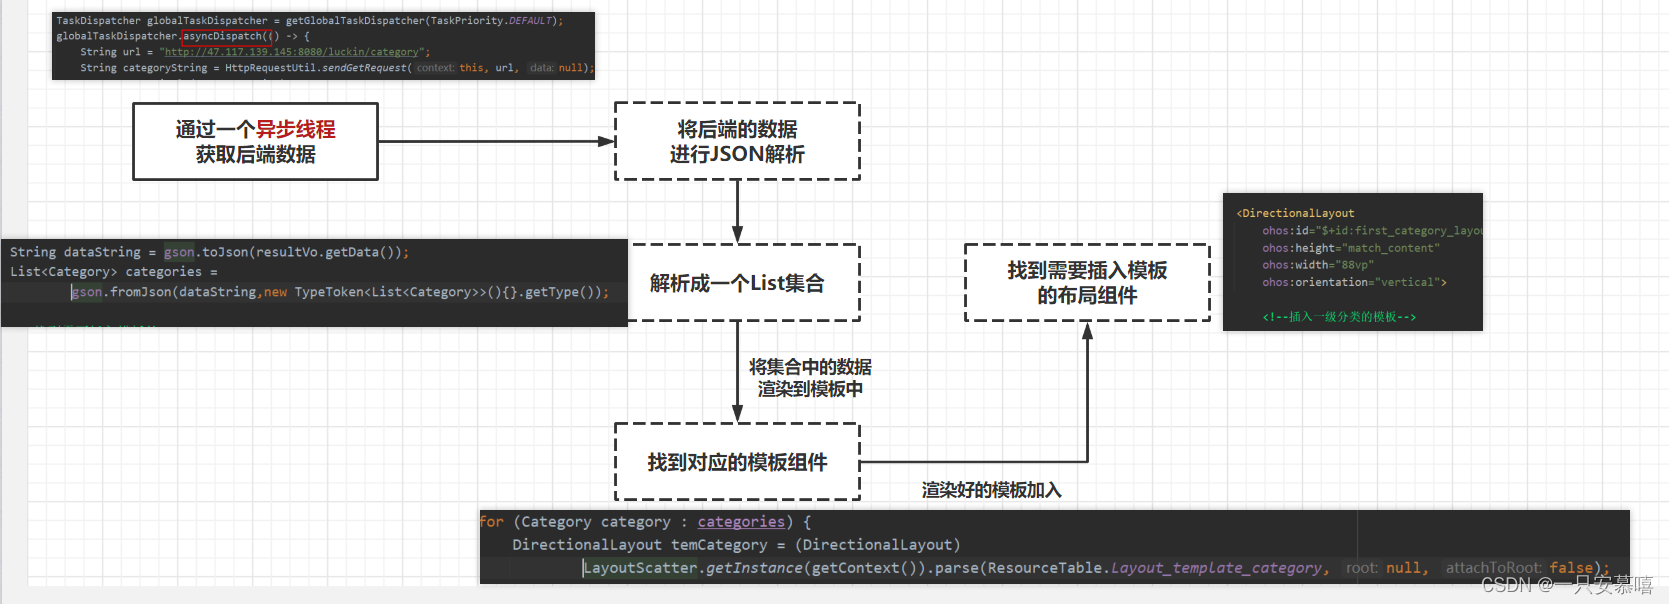
public void initCategory(){
    TaskDispatcher globalTaskDispatcher = getGlobalTaskDispatcher(TaskPriority.DEFAULT);
    globalTaskDispatcher.asyncDispatch(() -> {
        String url = "http://47.117.139.145:8080/luckin/category";
        String categoryString = HttpRequestUtil.sendGetRequest(this, url, null);

        ResultVo resultVo = gson.fromJson(categoryString,ResultVo.class);
        if (resultVo.getCode() == 200){
            String dataString = gson.toJson(resultVo.getData());
            List<Category> categories = gson.fromJson(dataString,new TypeToken<List<Category>>(){}.getType());

            // 找到需要插入模板的Layout
            DirectionalLayout categoryLayout = (DirectionalLayout) findComponentById(ResourceTable.Id_first_category_layout);

            getUITaskDispatcher().asyncDispatch(()->{
                for (Category category : categories) {
                    DirectionalLayout temCategory = (DirectionalLayout) LayoutScatter.getInstance(getContext()).parse(ResourceTable.Layout_template_category, null, false);
                    Text categoryTxt = (Text) temCategory.findComponentById(ResourceTable.Id_category_txt);

                    categoryTxt.setText(category.getTitle());

                    categoryLayout.addComponent(temCategory);

                    initFirstCoffee(category.getId(), category.getTitle(), category.getDesc());
                }
            });
        }
    });
}
2.3 右侧大分类模板渲染
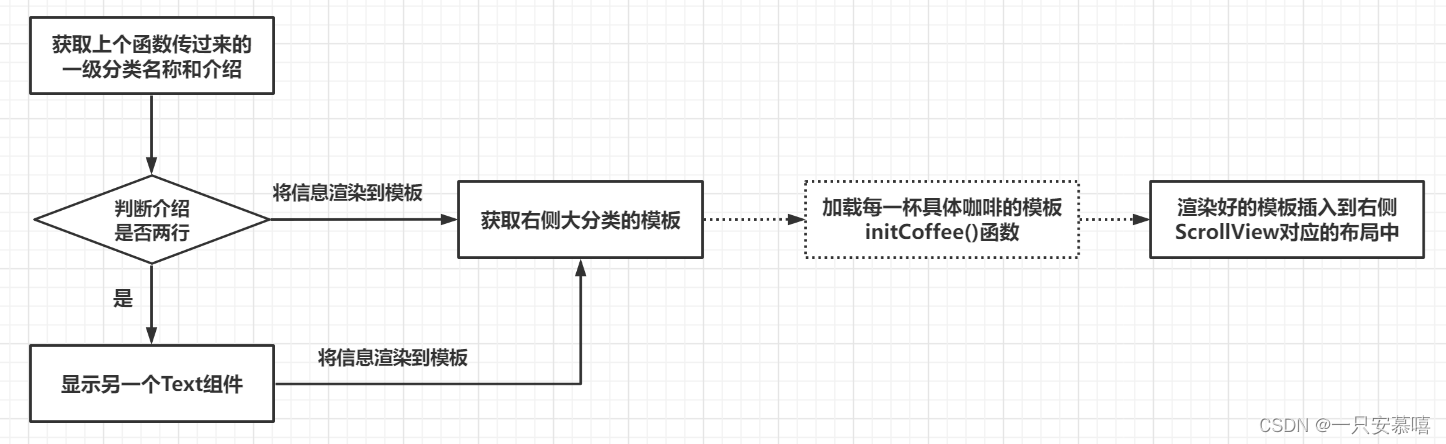
我们先观察一下我在数据库设计的时候,有两行数据的记录,以两行开头,并以\n进行分割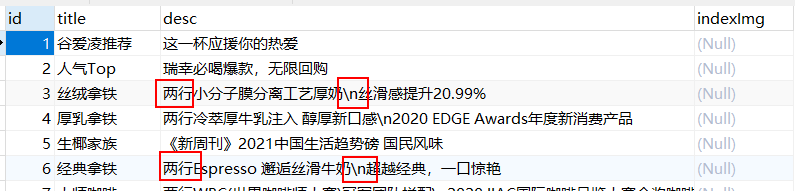
所以在处理的时候我们利用正则split("\\\\n")进行分割进行,将相应的Text组件进行可见化desc_second.setVisibility(Component.VISIBLE);
public void initFirstCoffee(int id,String categoryTitle,String categoryDesc){
    // 找到需要插入模板文件的布局空间
    DirectionalLayout coffeeLayout = (DirectionalLayout) findComponentById(ResourceTable.Id_coffee_layout);

    // 渲染右侧每一个大类
    getUITaskDispatcher().asyncDispatch(()->{
        DirectionalLayout temFirstCoffee = (DirectionalLayout) LayoutScatter.getInstance(getContext()).parse(ResourceTable.Layout_template_coffee_first,null,false);

        Text categoryTxt = (Text) temFirstCoffee.findComponentById(ResourceTable.Id_category_title);
        categoryTxt.setText(categoryTitle);

        Text desc = (Text) temFirstCoffee.findComponentById(ResourceTable.Id_category_info);

        // 判断有没有换行符
        if (categoryDesc!=null && !categoryDesc.equals("")){
            if (categoryDesc.startsWith("两行")){
                String[] texts = categoryDesc.substring(2).split("\\\\n");
                Text desc_second = (Text) temFirstCoffee.findComponentById(ResourceTable.Id_category_info_second);
                desc.setText(texts[0]);
                desc_second.setText(texts[1]);
                desc_second.setVisibility(Component.VISIBLE);
            }else {
                desc.setText(categoryDesc);
            }
        }

        initCoffee(id,temFirstCoffee);

        coffeeLayout.addComponent(temFirstCoffee);
    });
}
2.4 右侧具体咖啡数据渲染
这边是最为复杂的,因为涉及到的逻辑是最多的,我们在编写逻辑之前写梳理一下有哪些逻辑需要实现:
- 从后端获取数据进行模板渲染
- 点击
+号购买咖啡时进入详情页【我们后面开发】,并且显示-号按钮和数量文本 - 点击
-号以后如果数量为0,+和数量再次隐藏
因此我们对模板中的加减按钮设置了监听事件!至于后期的价格计算和已点菜单结算栏的开发我们会在后面进行介绍!
注意:这里函数的参数里面我们携带了coffeeDirectionalLayout也就是2.3中的右侧大分类模板,这样我们才能将这个大分类下对应的具体咖啡加入到对应的布局中,以至于不会乱套!
public void initCoffee(int id,DirectionalLayout coffeeDirectionalLayout){
    TaskDispatcher globalTaskDispatcher = getGlobalTaskDispatcher(TaskPriority.DEFAULT);
    globalTaskDispatcher.asyncDispatch(() -> {
        String url = "http://47.117.139.145:8080/luckin/coffee?id=" + id;
        String coffeeString = HttpRequestUtil.sendGetRequest(this, url, null);

        ResultVo resultVo = gson.fromJson(coffeeString,ResultVo.class);
        if (resultVo.getCode() == 200){
            String dataString = gson.toJson(resultVo.getData());
            List<Coffee> coffees = gson.fromJson(dataString,new TypeToken<List<Coffee>>(){}.getType());

            getUITaskDispatcher().asyncDispatch(()->{
                for(int i = 0;i< coffees.size();i++){
                    Coffee coffee = coffees.get(i);
                    DirectionalLayout temCoffee = (DirectionalLayout) LayoutScatter.getInstance(getContext()).parse(ResourceTable.Layout_template_coffee, null, false);

                    //  Image coffeeImg = (Image) temCoffee.findComponentById(ResourceTable.Id_coffee_img);
                    //  LoadImageUtil.loadImg(this, coffee.getImage(), coffeeImg);

                    Text coffeeTitle = (Text) temCoffee.findComponentById(ResourceTable.Id_coffee_title);
                    coffeeTitle.setText(coffee.getTitle());

                    Text coffeePrice = (Text) temCoffee.findComponentById(ResourceTable.Id_coffee_price);
                    coffeePrice.setText("¥"+coffee.getPrice());

                    //获取加减
                    Component btn_minus =  temCoffee.findComponentById(ResourceTable.Id_minus);
                    Component btn_add =  temCoffee.findComponentById(ResourceTable.Id_add);
                    Text txt_num = (Text) temCoffee.findComponentById(ResourceTable.Id_num);

                    btn_add.setClickedListener(component -> {
                        if (btn_minus.getVisibility() == Component.HIDE) {
                            btn_minus.setVisibility(Component.VISIBLE);
                            txt_num.setVisibility(Component.VISIBLE);
                        }

                    });

                    btn_minus.setClickedListener(component -> {
                        int num = Integer.parseInt(txt_num.getText()) - 1;
                        if (num >= 1){
                            txt_num.setText(num + "");
                        }

                        if (num == 0) {
                            btn_minus.setVisibility(Component.HIDE);
                            txt_num.setVisibility(Component.HIDE);
                            txt_num.setText(0+"");
                        }
                        int curTotalNum = Integer.parseInt(txt_totalNum.getText());
                        txt_totalNum.setText(curTotalNum - 1 + "");

                    });
                    coffeeDirectionalLayout.addComponent(temCoffee);
                }
            });
        }
    });
}
2.5 踩坑记录
设置VISIBLE的时候只能取父组件Component,不能取具体的组件名称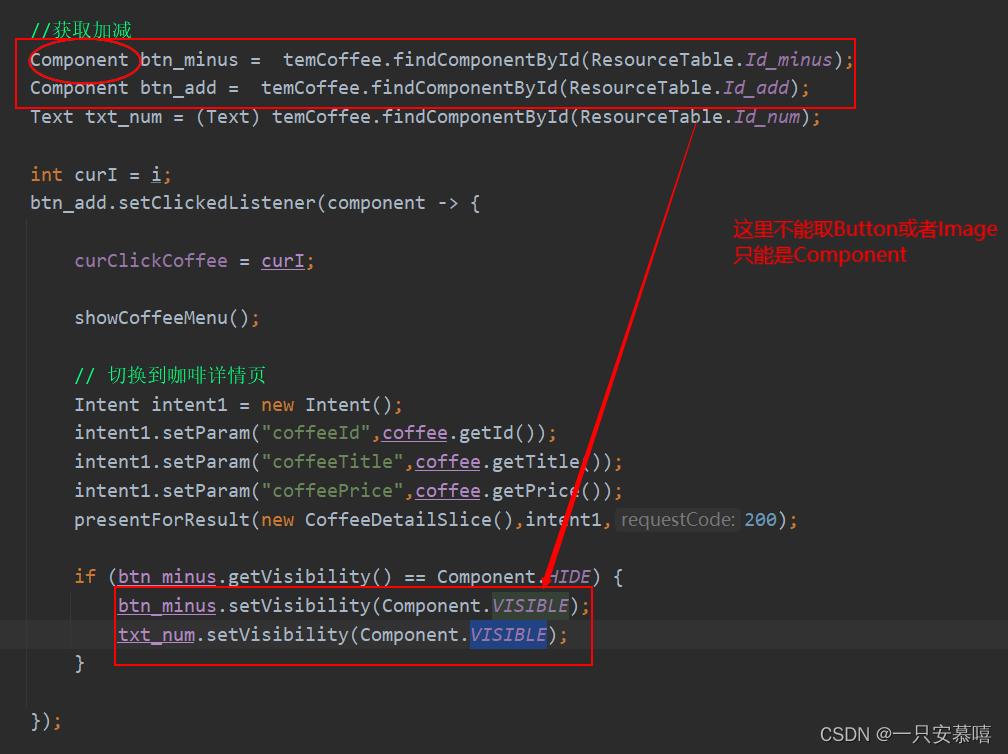
2.6 底部导航栏
这边还是一样的套路,找到对应的模板,然后将图片和文本进行模板渲染【这里的ResourceTable.Media_home是指我们上面的图标,我将其放在了Media目录下】
public void initBottomTabList(){
    DirectionalLayout bottomLayout = (DirectionalLayout) findComponentById(ResourceTable.Id_bottom_layout);

    initOneBottomTab("首页",ResourceTable.Media_home,bottomLayout);
    initOneBottomTab("菜单",ResourceTable.Media_menu,bottomLayout);
    initOneBottomTab("潮品",ResourceTable.Media_chaoping,bottomLayout);
    initOneBottomTab("自由卡",ResourceTable.Media_card,bottomLayout);
    initOneBottomTab("我的",ResourceTable.Media_user,bottomLayout);
}

public void initOneBottomTab(String name,int pixel,DirectionalLayout directionalLayout){
    getUITaskDispatcher().asyncDispatch(() -> {
        DependentLayout temBottom = (DependentLayout) LayoutScatter.getInstance(getContext()).parse(ResourceTable.Layout_template_bottomtab, null, false);

        Image image = (Image) temBottom.findComponentById(ResourceTable.Id_image);
        image.setPixelMap(pixel);

        Text text = (Text) temBottom.findComponentById(ResourceTable.Id_name);
        text.setText(name);

        directionalLayout.addComponent(temBottom);
    });
}

讨论HarmonyOS开发技术,专注于API与组件、DevEco Studio、测试、元服务和应用上架分发等。
更多推荐

 0
0 0
0- 0


 已为社区贡献1条内容

所有评论(0)