鸿蒙连接WebSocket服务器实现长连接
想知道原生鸿蒙怎么连接WebSocket实现长连接吗,这篇文章非常实用,教你从接口实现一个案例,清晰易懂。
·
本文章的内容源于作者想要做一个实时聊天功能,但是网上的教程不是隔官网上复制粘贴就是啥也不是,所以基本等于从0开始研究怎么连接。搭建WebSocket就使用了Node.js的ws库在电脑上搭建了一个WebSocket服务,并在鸿蒙中写了客户端,如果你觉得对你有用,那就来个一键三连吧谢谢。下面,教程开始。
一、WebSocket服务的搭建
const WebSocket = require('ws');

// 创建 WebSocket 服务器
const wss = new WebSocket.Server({ port: 9099 });

// 存储所有成功连接的客户端
const clients = new Set();

// 存储连接失败的客户端信息
const failedClients = new Set();

// 当客户端连接时触发
wss.on('connection', (ws, req) => {
    const headers = req.headers

    console.log('客户端已连接, 连接者:', headers.userid);
    clients.add(ws);

    // 当客户端发送消息时触发
    ws.on('message', (message) => {
        console.log(`收到消息: ${message}`);
        const sendUser = JSON.parse(message).sendUser
        const theMessage = JSON.parse(message).message
        console.log(`解析后消息为: ${theMessage}, 发送者id为: ${sendUser}`)
        // 广播消息给所有其他客户端
        clients.forEach((client) => {
            if (client.readyState === WebSocket.OPEN) {
                client.send(theMessage);
            }
        });
    });

    // 当客户端断开连接时触发
    ws.on('close', () => {
        console.log('客户端已断开连接');
        clients.delete(ws);
    });
});

// 监听升级请求事件
wss.on('upgrade', (request, socket, head) => {
    console.log('收到升级请求');
    // 模拟连接失败的情况
    if (request.url === '/fail') {
        socket.destroy();
        failedClients.add({
            ip: socket.remoteAddress,
            port: socket.remotePort,
            timestamp: new Date().toISOString(),
        });
        console.log('客户端连接失败');
    } else {
        // 正常处理升级请求
        wss.handleUpgrade(request, socket, head, (ws) => {
            wss.emit('connection', ws, request);
        });
    }
});

// 监听服务器关闭事件
wss.on('close', () => {
    console.log('WebSocket 服务器已关闭');
    // 清理失败的连接
    failedClients.clear();
});

// 监听错误事件
wss.on('error', (error) => {
    console.error('WebSocket 服务器错误:', error);
});
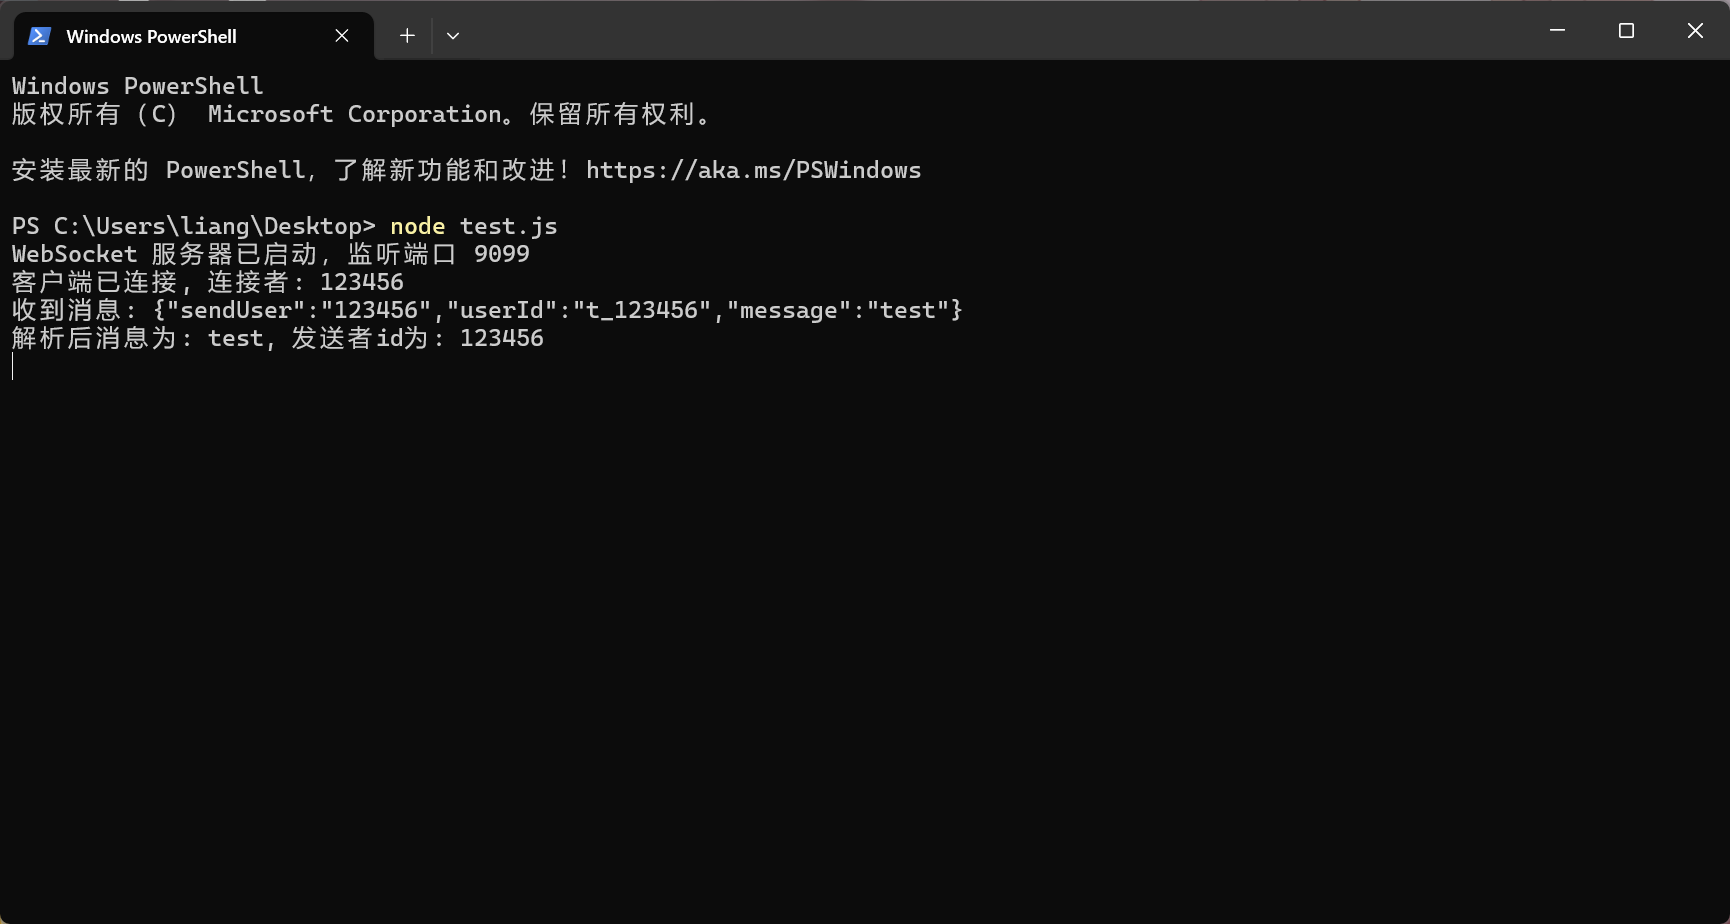
console.log('WebSocket 服务器已启动,监听端口 9099');- 以上代码创建一个js文件,将代码复制进去即可,作用如注释,怎么用之后会提到,这里作者开放的端口为9099,也可以自己换
二、原生鸿蒙代码
- 页面部分
interface SendMessageType {
  sendUser: string
  userId: string
  message: string
}
@Entry
@Component
struct TalkPage {
  aboutToAppear(): void {
    this.initWebSocket()
  }
  @State userID: string = '123456'
  @State sendMessage: string = ''
  @State getMessage: string[] = []
  build(){
    Column(){
      TextInput({placeholder: '请输入需要发送的信息', text: this.sendMessage})
        .onChange(val => {
          this.sendMessage = val
        })
      Row() {
        Button('点击连接')
          .onClick(() => {
            this.connectWebSocket()
          })
        Button('点击发送信息')
          .onClick(() => {
            this.sendMessageAction(this.sendMessage)
          })
      }
      .margin({
        top: 20
      })
      .width('100%')
      .justifyContent(FlexAlign.SpaceEvenly)
      Column({space: 5}) {
        ForEach(this.getMessage, (item: string) => {
          Text(item)
            .width('100%')
        })
      }
      .margin({
        top: 5
      })
      .width('100%')
      .layoutWeight(1)
    }
    .width('100%')
    .height('100%')
  }
}页面部分就是一个用于发送信息的输入框,和两个按钮,基础会了,功能的扩展就交给你们自己了,还有一个用于显示当前进行到哪一步的getMessage: Array<string>, 命名不是很规范,别学嗷,只是作者懒得改了,单纯这个代码肯定是会报错的,别着急,接下来写连接WebSocket的函数。
- 连接WebSocket部分
import { webSocket } from '@kit.NetworkKit';
import { BusinessError } from '@kit.BasicServicesKit';
import { util } from '@kit.ArkTS';

let defaultIpAddress = "ws://10.0.2.2:9099";
let ws = webSocket.createWebSocket();
let options: webSocket.WebSocketRequestOptions = {
  header: {}
}

function arrayBufferToString(arrayBuffer: ArrayBuffer | string): string {
  if(typeof arrayBuffer === 'string') return arrayBuffer
  const decoder = util.TextDecoder.create('utf-8');
  const uint8Array = new Uint8Array(arrayBuffer);
  return decoder.decodeToString(uint8Array, { stream: false });
}
initWebSocket() {
  ws.on('open', (err: BusinessError, value: Object) => {
    console.log(`userAction: 连接已打开`)
    this.getMessage.push('连接已打开')
    // 当收到on('open')事件时,可以通过send()方法与服务器进行通信
  });
  ws.on('message', (err: BusinessError, value: string | ArrayBuffer) => {
    console.log(`userAction: 接收到消息: ${arrayBufferToString(value)}`)
    // 当收到服务器的`bye`消息时(此消息字段仅为示意,具体字段需要与服务器协商),主动断开连接
    this.getMessage.push(arrayBufferToString(value))
    if (value === 'bye') {
      ws.close((err: BusinessError, value: boolean) => {
        if (!err) {
          console.log("Connection closed successfully");
        } else {
          console.log("Failed to close the connection. Err: " + JSON.stringify(err));
        }
      });
    }
  });
  ws.on('close', (err: BusinessError, value: webSocket.CloseResult) => {
    console.log("on close, code is " + value.code + ", reason is " + value.reason);
    this.getMessage.push('连接已关闭')
  });
  ws.on('error', (err: BusinessError) => {
    console.log("on error, error:" + JSON.stringify(err));
    this.getMessage.push(`错误: ${err.message}`)
  });
  console.log(`userAction: WebSocket监听事件初始化完毕`)
  this.getMessage.push('WebSocket监听事件初始化完毕')
}
connectWebSocket() {
  options.header = {
    userId: this.userID
  }
  ws.connect(defaultIpAddress, options, (err: BusinessError, value: boolean) => {
    if (!err) {
      console.log("userAction: 连接成功");
    } else {
      console.error("userAction: 连接失败. Err:" + JSON.stringify(err));
    }
  });
}
sendMessageAction(value: string) {
  const theMessage: SendMessageType = {
    sendUser: this.userID,
    userId: 't_123456',
    message: value
  }
  ws.send(JSON.stringify(theMessage), (err, value) => {
    if(err) {
      console.error(`userAction: 发送信息错误,原因: ${JSON.stringify(err)}`)
      return
    }
    console.log(`userAction: 发送信息成功, 返回值: ${value}`)
  })
  this.sendMessage = ''
}- 这部分是重点(敲黑板),连接WebSocket服务器第一步,先创建一个WebSocket对象
- 然后需要在aboutToAppear函数中进行初始化,而且这步必须在进行连接之前。
- connectWebSocket函数是用于连接WebSocket服务器,使用了WebSocket对象中的connect方法,需要提供一个地址,一个参数,然后是回调函数,地址非常重要,其他开发中一般常用localhost访问本地的服务,但是,在鸿蒙模拟器中,模拟器通过10.0.2.2:<localPort>访问本地计算机服务端,10.0.2.2是模拟器的默认网关。大部分失败都是因为这个,资料参考如下:
- arrayBufferToString函数是用于将ArrayBuffer类型的数据转换成字符串,传输是通过ArrayBuffer类型进行传输。
- 以上代码的接口,都可以从下面的参考资料找到(官方文档):
- 结合起来就是这样
import { webSocket } from '@kit.NetworkKit';
import { BusinessError } from '@kit.BasicServicesKit';
import { util } from '@kit.ArkTS';

let defaultIpAddress = "ws://10.0.2.2:9099";
let ws = webSocket.createWebSocket();
let options: webSocket.WebSocketRequestOptions = {
  header: {}
}

function arrayBufferToString(arrayBuffer: ArrayBuffer | string): string {
  if(typeof arrayBuffer === 'string') return arrayBuffer
  const decoder = util.TextDecoder.create('utf-8');
  const uint8Array = new Uint8Array(arrayBuffer);
  return decoder.decodeToString(uint8Array, { stream: false });
}
interface SendMessageType {
  sendUser: string
  userId: string
  message: string
}
@Entry
@Component
struct TalkPage {
  initWebSocket() {
    ws.on('open', (err: BusinessError, value: Object) => {
      console.log(`userAction: 连接已打开`)
      this.getMessage.push('连接已打开')
      // 当收到on('open')事件时,可以通过send()方法与服务器进行通信
    });
    ws.on('message', (err: BusinessError, value: string | ArrayBuffer) => {
      console.log(`userAction: 接收到消息: ${arrayBufferToString(value)}`)
      // 当收到服务器的`bye`消息时(此消息字段仅为示意,具体字段需要与服务器协商),主动断开连接
      this.getMessage.push(arrayBufferToString(value))
      if (value === 'bye') {
        ws.close((err: BusinessError, value: boolean) => {
          if (!err) {
            console.log("Connection closed successfully");
          } else {
            console.log("Failed to close the connection. Err: " + JSON.stringify(err));
          }
        });
      }
    });
    ws.on('close', (err: BusinessError, value: webSocket.CloseResult) => {
      console.log("on close, code is " + value.code + ", reason is " + value.reason);
      this.getMessage.push('连接已关闭')
    });
    ws.on('error', (err: BusinessError) => {
      console.log("on error, error:" + JSON.stringify(err));
      this.getMessage.push(`错误: ${err.message}`)
    });
    console.log(`userAction: WebSocket监听事件初始化完毕`)
    this.getMessage.push('WebSocket监听事件初始化完毕')
  }
  connectWebSocket() {
    options.header = {
      userId: this.userID
    }
    ws.connect(defaultIpAddress, options, (err: BusinessError, value: boolean) => {
      if (!err) {
        console.log("userAction: 连接成功");
      } else {
        console.error("userAction: 连接失败. Err:" + JSON.stringify(err));
      }
    });
  }
  sendMessageAction(value: string) {
    const theMessage: SendMessageType = {
      sendUser: this.userID,
      userId: 't_123456',
      message: value
    }
    ws.send(JSON.stringify(theMessage), (err, value) => {
      if(err) {
        console.error(`userAction: 发送信息错误,原因: ${JSON.stringify(err)}`)
        return
      }
      console.log(`userAction: 发送信息成功, 返回值: ${value}`)
    })
    this.sendMessage = ''
  }
  aboutToAppear(): void {
    this.initWebSocket()
  }
  @State userID: string = '123456'
  @State sendMessage: string = ''
  @State getMessage: string[] = []
  build(){
    Column(){
      TextInput({placeholder: '请输入需要发送的信息', text: this.sendMessage})
        .onChange(val => {
          this.sendMessage = val
        })
      Row() {
        Button('点击连接')
          .onClick(() => {
            this.connectWebSocket()
          })
        Button('点击发送信息')
          .onClick(() => {
            this.sendMessageAction(this.sendMessage)
          })
      }
      .margin({
        top: 20
      })
      .width('100%')
      .justifyContent(FlexAlign.SpaceEvenly)
      Column({space: 5}) {
        ForEach(this.getMessage, (item: string) => {
          Text(item)
            .width('100%')
        })
      }
      .margin({
        top: 5
      })
      .width('100%')
      .layoutWeight(1)
    }
    .width('100%')
    .height('100%')
  }
}

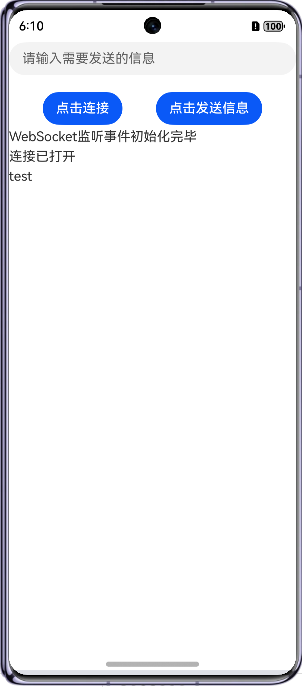
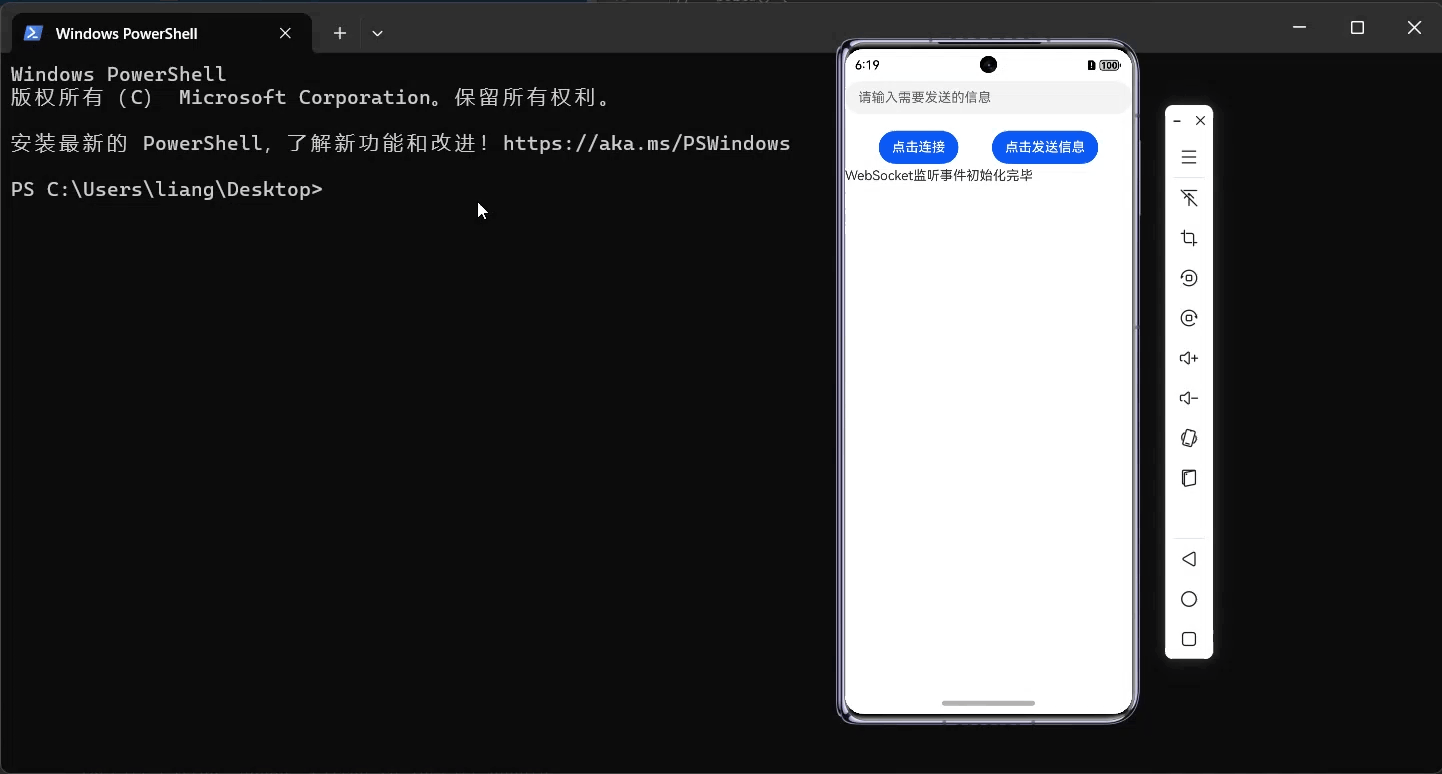
效果差不多这样,测试的时候先启动WebSocket,打开ws库写的js文件,在该目录打开cmd,输入指令:
node 文件名.js效果如下:

点击连接后可以在cmd窗口看见自己发送的信息了,并且可以在返回信息列表看见发送过去的消息。效果如下:
动画演示:
三、总结
- 难点
- 对于初学者来说,不清楚模拟器的默认网关,不清楚如何访问本地的服务。
- WebSocket服务端的搭建
以上就是本次的全部内容了,然后你就可以开始测试此段代码了,WebSocket用处广泛,比如实时聊天等,如果有疑问可以联系作者一起讨论,很乐意跟别人一起讨论问题,如果你觉得这篇文章对你有用,给个一键三连吧,谢谢了,有其他想实现的功能也可以联系作者。

讨论HarmonyOS开发技术,专注于API与组件、DevEco Studio、测试、元服务和应用上架分发等。
更多推荐
 54
54 0
0- 0


 已为社区贡献5条内容

所有评论(0)