实现自定义相机数据采集保存功能鸿蒙示例代码
·
本文原创发布在华为开发者社区,更多鸿蒙场景化示例请见华为开发者联盟官网“行业实践与常见问题”专题页。
介绍
本示例主要展示了相机的相关功能,实现相机的预览拍照、录像、变焦对焦、闪光灯、人脸检测等功能。
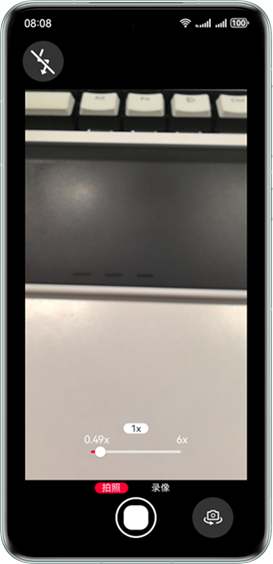
效果预览
使用说明
-
进入应用点击 “允许” 授权应用使用相机与麦克风。
-
滑动变焦条,预览界面会随着变焦条的滑动放大或缩小。点击左上方闪光灯图标会切换闪光灯模式。点击右下角相机翻转按钮,可切换前后置摄像头。
-
预览时,会调用人脸检测功能来识别相机中是否出现人脸。
-
拍照时,点击下方按钮,会跳转到图片预览页面,显示当前所拍照的图片。录像时,点击按钮开始录像,再次点击停止录像,并跳转到录像预览页面。
实现思路
- 调用 createSession 创建 Session,调用 beginConfig 开始配置会话,调用 addInput 把 CameraInput 加入到会话,调用 addPreviewOutput 把 previewOutput 加入到会话,调用 commitConfig 提交配置信息,调用 start 开始会话工作。
async sessionFlowFn(cameraManager: camera.CameraManager, cameraInput: camera.CameraInput,
  previewOutput: camera.PreviewOutput, imageReceiverOutput: camera.PreviewOutput,
  photoOutput: camera.PhotoOutput | undefined,
  videoOutput: camera.VideoOutput | undefined): Promise<void> {
  try {
    if (this.curSceneMode === camera.SceneMode.NORMAL_PHOTO) {
      this.session = cameraManager.createSession(this.curSceneMode) as camera.PhotoSession;
    } else if (this.curSceneMode === camera.SceneMode.NORMAL_VIDEO) {
      this.session = cameraManager.createSession(this.curSceneMode) as camera.VideoSession;
    }
    if (this.session === undefined) {
      return;
    }
    this.onSessionErrorChange(this.session);
    this.session.beginConfig();
    this.session.addInput(cameraInput);
    this.session.addOutput(previewOutput);
    this.session.addOutput(imageReceiverOutput);
    if (this.curSceneMode === camera.SceneMode.NORMAL_PHOTO) {
      if (photoOutput === undefined) {
        return;
      }
      this.photoOutputCallBack(photoOutput);
      this.session.addOutput(photoOutput);
    } else if (this.curSceneMode === camera.SceneMode.NORMAL_VIDEO) {
      if (videoOutput === undefined) {
        return;
      }
      this.session.addOutput(videoOutput);
    }
    await this.session.commitConfig();
    if (this.curSceneMode === camera.SceneMode.NORMAL_VIDEO) {
      this.setVideoStabilizationFn(this.session as camera.VideoSession, camera.VideoStabilizationMode.MIDDLE);
    }
    this.updateSliderValue();
    this.setFocusMode(camera.FocusMode.FOCUS_MODE_AUTO);
    await this.session.start();
  }
}
- 使用 initAndReleaseFaceDetector 函数来对照片进行人脸检测。调用 faceDetector.init() 初始化人脸检测服务。再将图片处理成位图后,经 faceDetector.detect() 传入,即可获取人脸检测数据 faceDetector.Face[]。
async initAndReleaseFaceDetector(nextImage: image.Image) {
  nextImage.getComponent(image.ComponentType.JPEG, async (err, imgComponent: image.Component) => {
    if (imgComponent.byteBuffer as ArrayBuffer) {
      let sourceOptions: image.SourceOptions = {
        sourceDensity: 0,
        sourcePixelFormat: image.PixelMapFormat.NV21, // NV21
        sourceSize: this.previewProfileObj.size
      }
      let imageSource: image.ImageSource = image.createImageSource(imgComponent.byteBuffer, sourceOptions);
      let opts: image.DecodingOptions = {
        editable: false,
        desiredPixelFormat: image.PixelMapFormat.NV21,
        desiredSize: this.previewProfileObj.size,
        rotate: 90.0
      }
      let pixelMap = imageSource.createPixelMapSync(opts);
      await imageSource.release();
      // 初始化人脸检测服务
      this.initResult = await faceDetector.init();
      if (this.initResult) {
        // 调用人脸检测接口
        let visionInfo: faceDetector.VisionInfo = {
          pixelMap: pixelMap
        };
        let data: faceDetector.Face[] = await faceDetector.detect(visionInfo);
        AppStorage.setOrCreate('faceRectangle',JSON.stringify(data))
      }
      // 使用完毕后,释放人脸检测服务
      await faceDetector.release();
    } else {
      return;
    }
    nextImage.release()
  })
}
-
在 releaseCamera 函数里完成对相机生命周期释放的过程,调用 output 的 release 方法释放流,调用 CameraInput 的 close 方法关闭相机,再调用 session 的 release 释放当前会话。
-
相机拍照预览功能实现。
async takePicture(): Promise<void> {
  Logger.info(TAG, 'takePicture start');
  let cameraDeviceIndex = GlobalContext.get().getT<number>('cameraDeviceIndex');
  let photoSettings: camera.PhotoCaptureSetting = {
    quality: camera.QualityLevel.QUALITY_LEVEL_HIGH,
    mirror: cameraDeviceIndex ? true : false
  };
  await this.photoOutput?.capture(photoSettings);
  Logger.info(TAG, 'takePicture end');
}
- 相机变焦功能实现。
Slider({
  value: this.zoomRatio,
  min: this.sliderValue?.min,
  max: this.sliderValue?.max,
  step: this.sliderValue?.step,
  style: SliderStyle.OutSet
})
  .showSteps(false)
  .trackColor($r('app.color.slider_track_color'))
  .selectedColor($r('app.color.theme_color'))
  .onChange((value: number) => {
    Logger.info(TAG, 'onChange');
    let val = Number(value.toFixed(this.fractionDigits));
    this.slideChange(val);
    this.zoomRatio = val;
  })
- 相机对焦功能实现。
.onTouch((e: TouchEvent) => {
  if (e.type === TouchType.Down) {
    this.focusPointBol = true;
    this.focusPointVal[0] = e.touches[0].windowX;
    this.focusPointVal[1] = e.touches[0].windowY;
    CameraService.setFocusPoint({
      x: e.touches[0].y / this.xComponentHeight,
      y: 1 - (e.touches[0].x / this.xComponentWidth)
    });
  }
  if (e.type === TouchType.Up) {
    if (this.areaTimer) {
      clearTimeout(this.areaTimer);
    }
    this.areaTimer = setTimeout(() => {
      this.focusPointBol = false;
    }, this.focusFrameDisplayDuration);
  }
})

讨论HarmonyOS开发技术,专注于API与组件、DevEco Studio、测试、元服务和应用上架分发等。
更多推荐
 0
0 0
0- 0


 已为社区贡献145条内容

所有评论(0)