H5实现区域避让开发指导
一、概述
在移动应用开发中,不同设备的屏幕形态各异,如刘海屏、全面屏、折叠屏等,同时系统状态栏、导航栏、软键盘等元素也会占据屏幕空间。为了确保应用内容在各种设备和场景下都能正常显示,不被遮挡,H5提供了一系列区域避让的机制。本文将详细介绍 H5 区域避让的实现原理、适配指导以及具体的场景案例。
使用场景
典型应用全屏窗口UI元素包括状态栏、应用界面和底部导航条,其中状态栏和导航条,通常在全屏沉浸式布局下称为避让区,避让区之外的区域称为安全区。界面元素在不同设备上存在差异,下面是不同设备上状态栏、挖孔区、导航栏的位置差异,包括:直板机、PAD、PC、折叠屏(阔折叠、双折叠、三折叠)。
说明
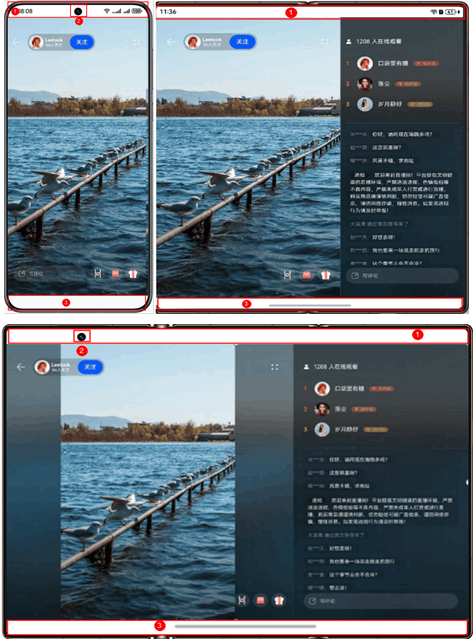
下图中标记区域含义:1为状态栏、2为挖孔区、3为导航栏。
图2-1 直板机界面元素示意图
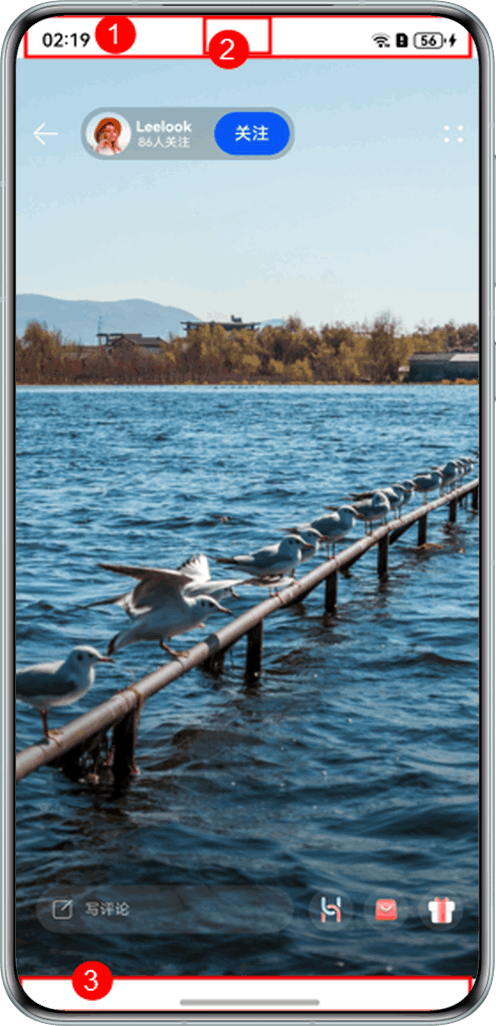
图2-2 PAD界面元素示意图
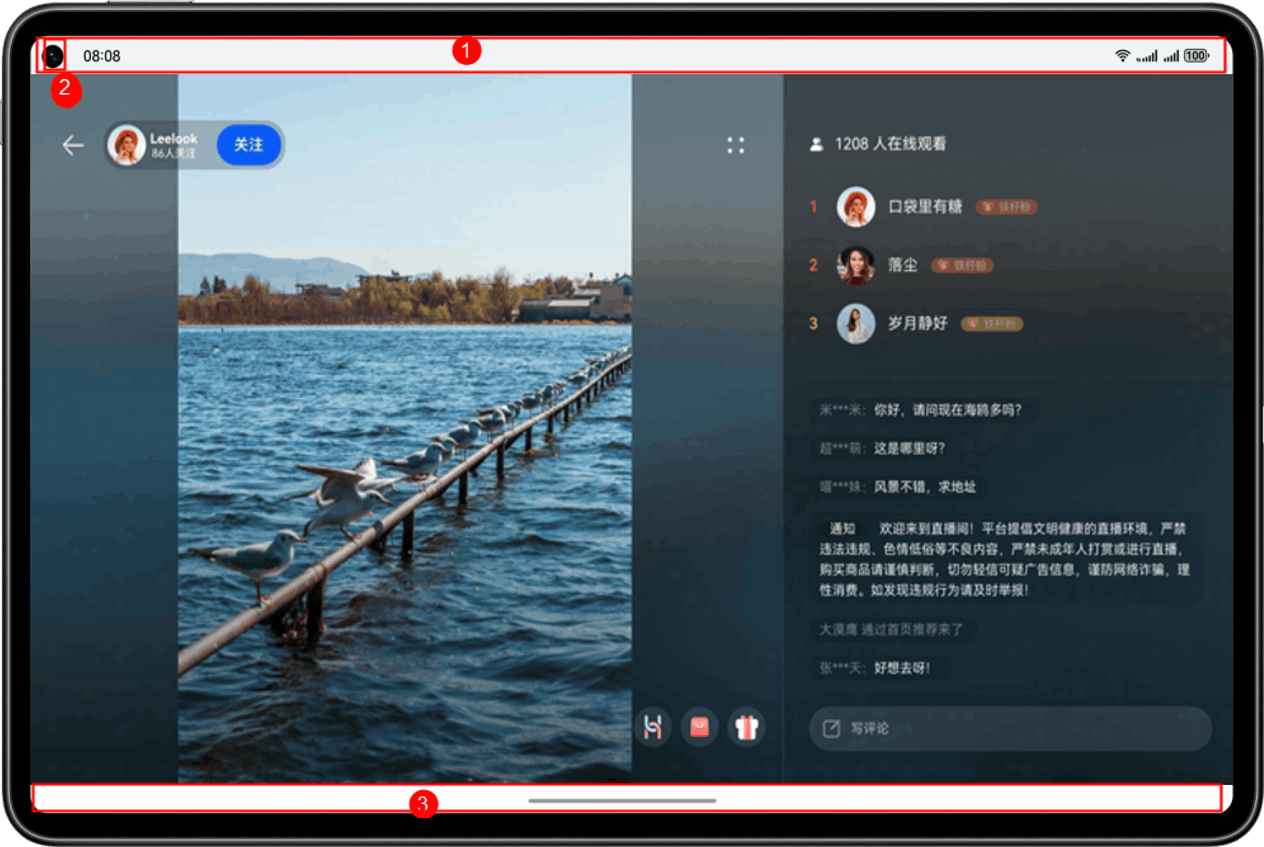
图2-3 PC界面元素示意图
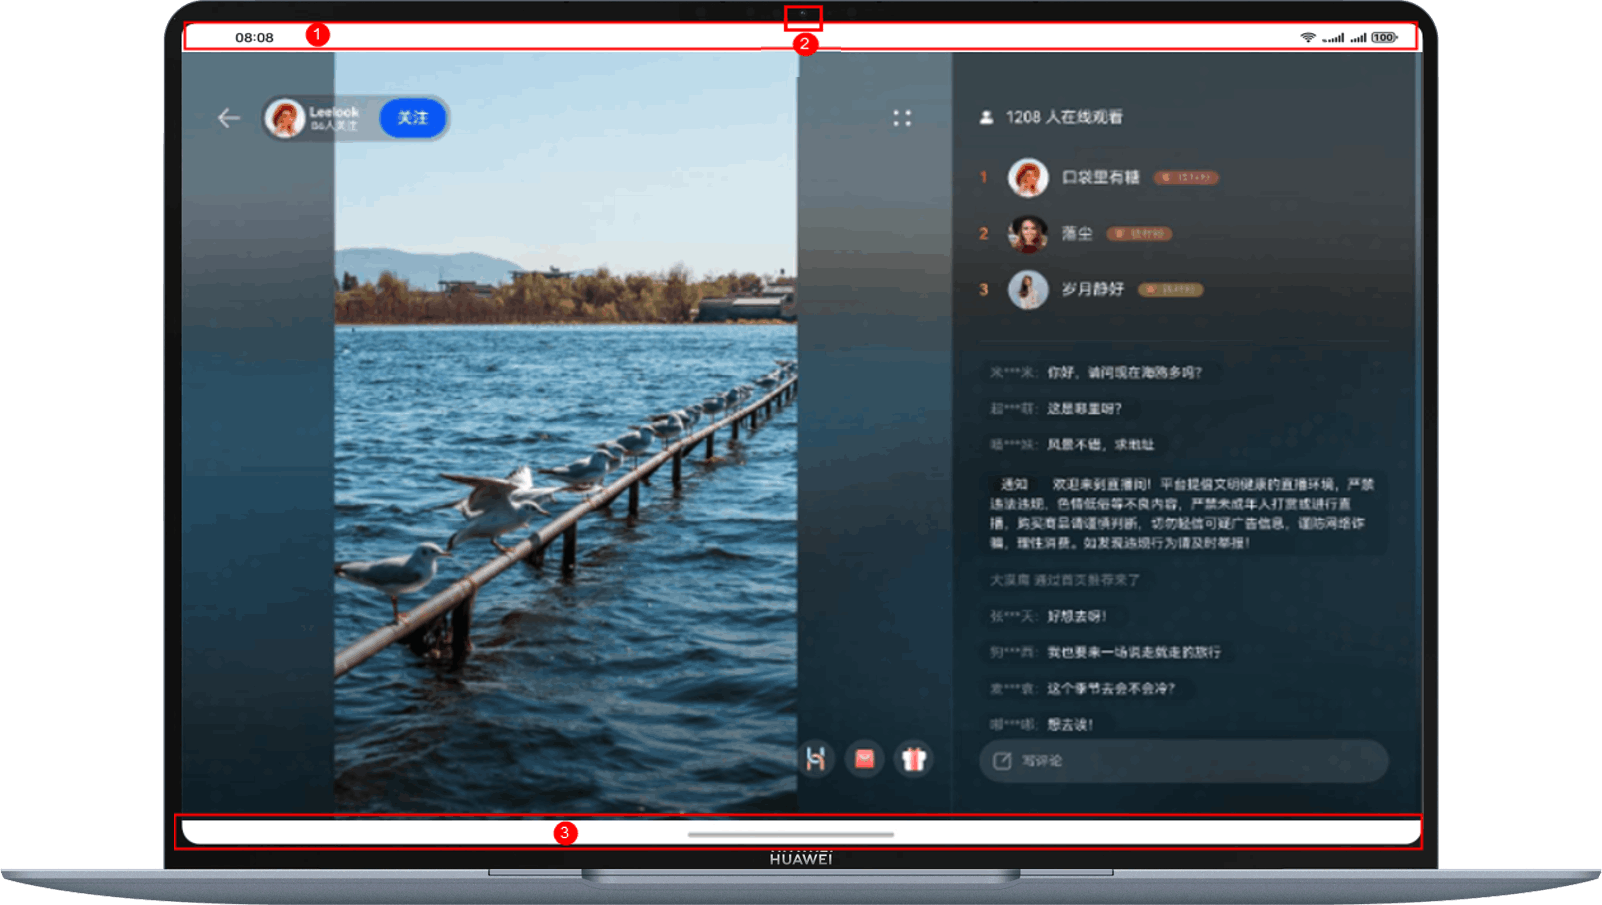
图2-4 折叠屏--阔折叠 界面元素示意图(左图展开态 右图折叠态)
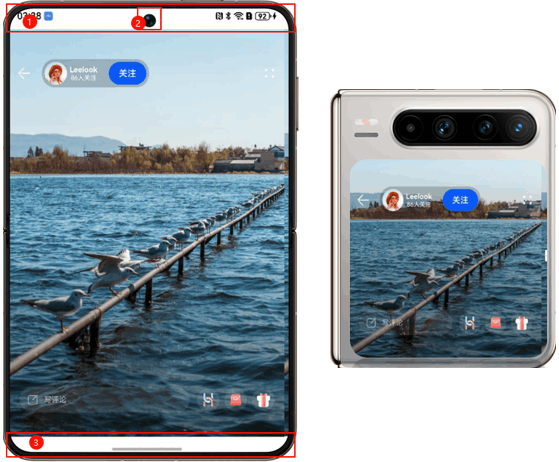
图2-5 折叠屏--双折叠 界面元素示意图(左图折叠态 右图展开态)
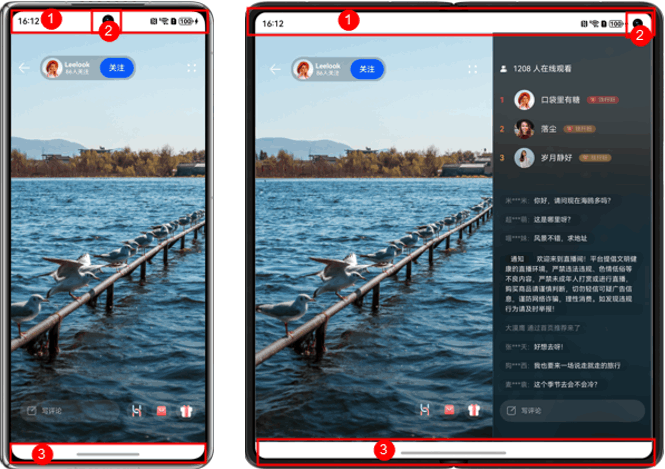
图2-6 折叠屏--三折叠 界面元素示意图(左图折叠态 右图二屏折叠态 下图三屏全展开态)
面对上述不同设备的避让区差异,可以按照如下三种场景实现应用沉浸式效果:
1.1 安全区布局场景
系统保持安全区内布局,确保应用内容不会延伸到状态栏、导航栏区域。
1.2 安全区布局+背景沉浸模式
系统保持安全区内布局,然后延伸绘制内容(如背景色、背景图)到状态栏和导航栏区域,实现沉浸式效果。
1.3 全屏布局+避让场景
系统保持全屏布局,通过相关接口获取避让区域位置、大小等信息,调整元素位置,确保不会被避让区遮挡。
二、区域避让实现原理
区域避让主要通过原生接口提供的能力实现,该接口包含几个核心方法,用于处理与区域避让相关的操作。
avoidAreaListener():该方法用于添加系统规避区变化事件的监听。通过监听"avoidAreaChange"参数,当系统规避区发生变化时,如软键盘弹出或收起、设备旋转等,会触发相应的回调函数,在回调中通过 runJavaScript() 的方法将变化的数据传递给H5页面。
async avoidAreaListener(): Promise<void> {
  const windowClass = await this.webClassProxy.getMainWindow();
  try {
    windowClass.on('avoidAreaChange', (data) => {
      this.webController.runJavaScript(`
        window.dispatchEvent(new CustomEvent('statusBarChange',{ detail: ${JSON.stringify(data)} }));
      `);
      Logger.debug('Succeeded in enabling the listener for system avoid area changes. type:' +
      JSON.stringify(data.type) + ', area: ' + JSON.stringify(data.area));
    });
  } catch (exception) {
    Logger.error(`Failed to enable the listener for system avoid area changes. Cause code: ${exception.code}, message: ${exception.message}`);
  }
}registerJavaScriptProxy():注入JavaScript对象到window对象中,并在window对象中调用该对象的方法。实现H5页面调用原生方法。
Web({ src: CommonConstants.H5_URL, controller: this.webController })
  .onControllerAttached(() => {
    this.webController.registerJavaScriptProxy(this.webClassProxy, 'webClass',
      ['getAvoidArea', 'pxToVp', 'isFoldAndTablet', 'getWindowStatusType'],
      [],
      `{"javascriptProxyPermission":{"urlPermissionList":[{"scheme":"http","host":"${CommonConstants.HOST}","port":"${CommonConstants.PORT}","path":""}]}}`);
    this.webController.refresh();
})getAvoidArea():Plugins 类中的 getAvoidArea() 接口负责获取系统默认避让区域信息。此方法接收一个 AvoidAreaType 类型的参数,通过该参数可以获取当前应用窗口内容需要规避的区域。这些区域可能包括系统栏、刘海屏、手势操作区、软键盘等与窗口内容重叠时需要避让的区域。通过原生接口获取窗口实例,然后调用窗口的 getWindowAvoidArea 方法获取相应类型的避让区域,接口返回信息中包含对应避让区域是否可见、位置信息及宽高信息,并将结果返回给 H5 端。
async getAvoidArea(type: window.AvoidAreaType) {
  const windowClass = await this.getMainWindow();
  let avoidArea = windowClass.getWindowAvoidArea(type);
  return avoidArea;
三、适配指导
下面以VUE3框架为例,从上述的三个主要场景来进行适配指导。
3.1 安全区布局场景
安全区布局场景主要是为了确保应用内容不会被系统状态栏、导航栏等遮挡。
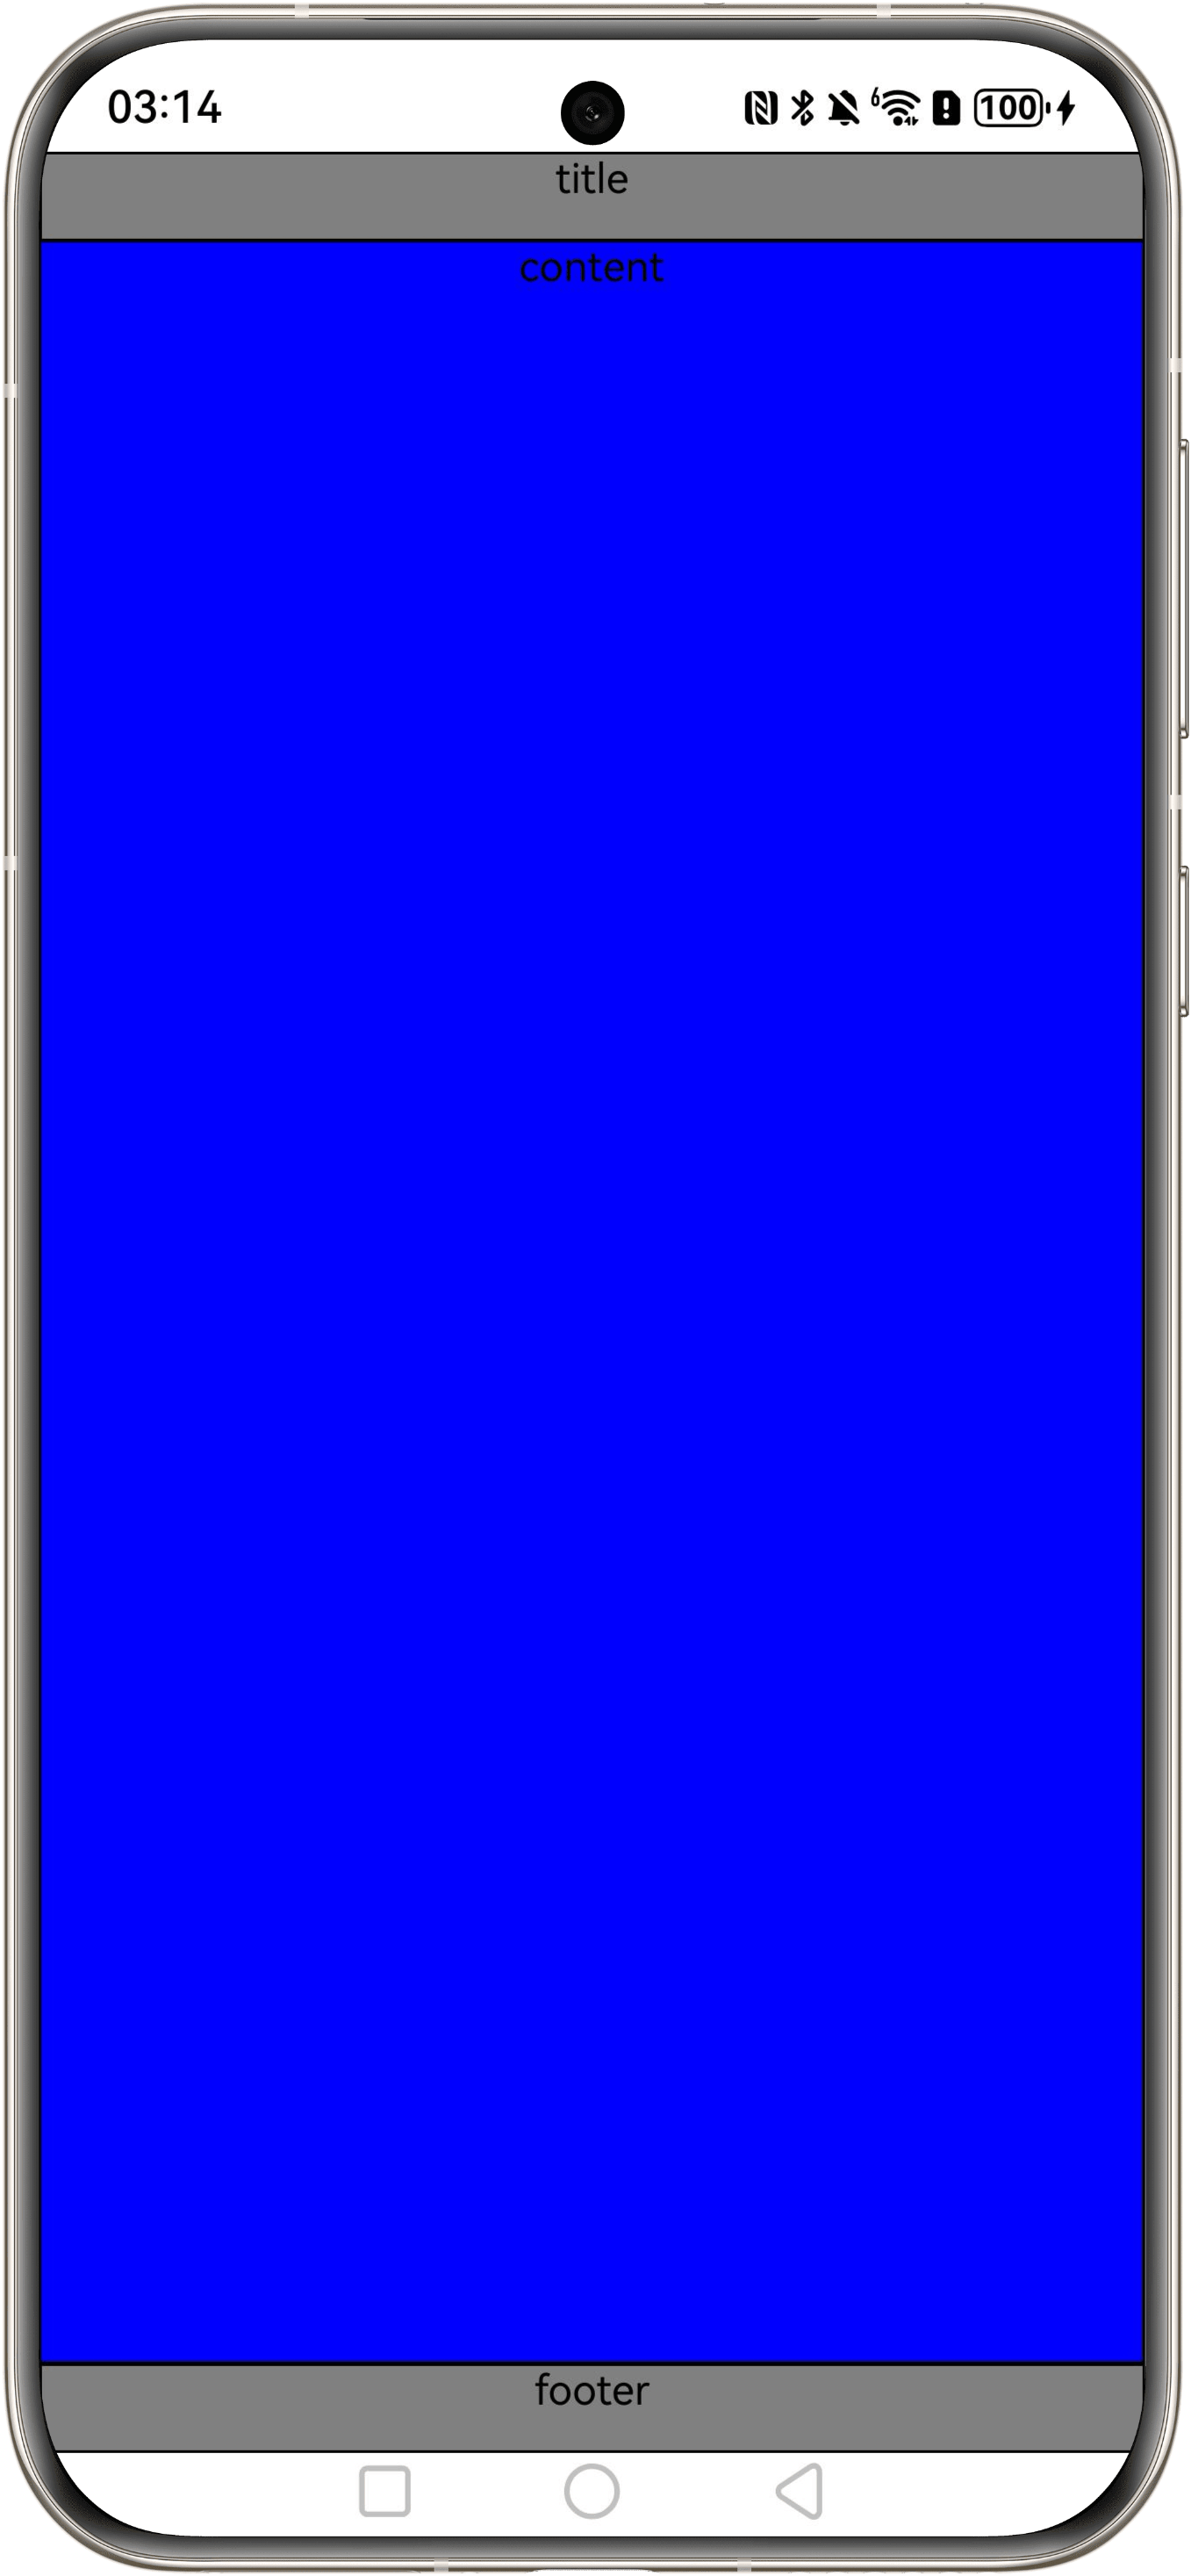
图2-7 AvoidArea实现安全布局
该场景有两种实现方法:
- webview在安全区布局,H5页面不需要做额外处理。应用内组件默认避让状态栏、导航栏。
import { webview } from '@kit.ArkWeb';

@Component
export struct CustomWebView {
  webController: webview.WebviewController = new webview.WebviewController();

  build() {
    RelativeContainer() {
      Web({ src: CommonConstants.H5_URL, controller: this.webController })
    }
    .height('100%')
    .width('100%')
  }
}- webview全屏布局,H5获取状态栏、导航栏高度,设置padding。
1、原生侧开启全屏布局
在HarmonyOS工程的EntryAbility.ets文件中的onWindowStageCreate()生命周期内,使用setWindowLayoutFullScreen()实现界面元素延伸到状态栏和导航区域;
示例代码如下:
windowObj: window.Window | undefined = undefined;
onWindowStageCreate(windowStage: window.WindowStage): void {
  windowStage.getMainWindow((err: BusinessError<void>, windowObj) => {
    this.windowObj = windowObj;
    // 设置全屏
    windowObj.setWindowLayoutFullScreen(true);
  })
}
2、注入JavaScript对象
使用registerJavaScriptProxy()接口将原生侧方法注入到H5页面中,H5页面可以调用原生方法获取状态栏和导航区域高度。
Web({ src: CommonConstants.H5_URL, controller: this.webController })
  .onControllerAttached(() => {
    this.webController.registerJavaScriptProxy(this.webClassProxy, 'webClass',
      ['getAvoidArea', 'pxToVp', 'isFoldAndTablet', 'getWindowStatusType'],
      [],
      `{"javascriptProxyPermission":{"urlPermissionList":[{"scheme":"http","host":"${CommonConstants.HOST}","port":"${CommonConstants.PORT}","path":""}]}}`);
    this.webController.refresh();
  })
3、H5页面示例代码
页面通过调用原生方法获取状态栏和导航条高度,并设置在外层容器中,实现状态栏和导航条的避让。
<template>
  <div class="contain" :style="{
      paddingTop: `${paddingTop}px`,
      paddingBottom: `${paddingBottom}px`
    }">
    <div class="header"></div>
    <div class="body"> </div>
    <div class="footer"></div>
  </div>
</template>

<script setup lang="ts">
import { onMounted, onBeforeUnmount } from 'vue';

const paddingTop = 0;
const paddingBottom = 0;
onMounted(() => {
  if ((window as any).webClass) {
    // 获取状态栏安全区高度
    const paddingTop = await (window as any).webClass.getAvoidArea(AvoidAreaType.TYPE_SYSTEM).area.topRect.height;
    // 获取导航条安全区高度
    const paddingBottom = await (window as any).webClass.getAvoidArea(AvoidAreaType.TYPE_NAVIGATION_INDICATOR).area.bottomRect.height;
  }
});
</script>
3.2 安全区布局+背景沉浸模式
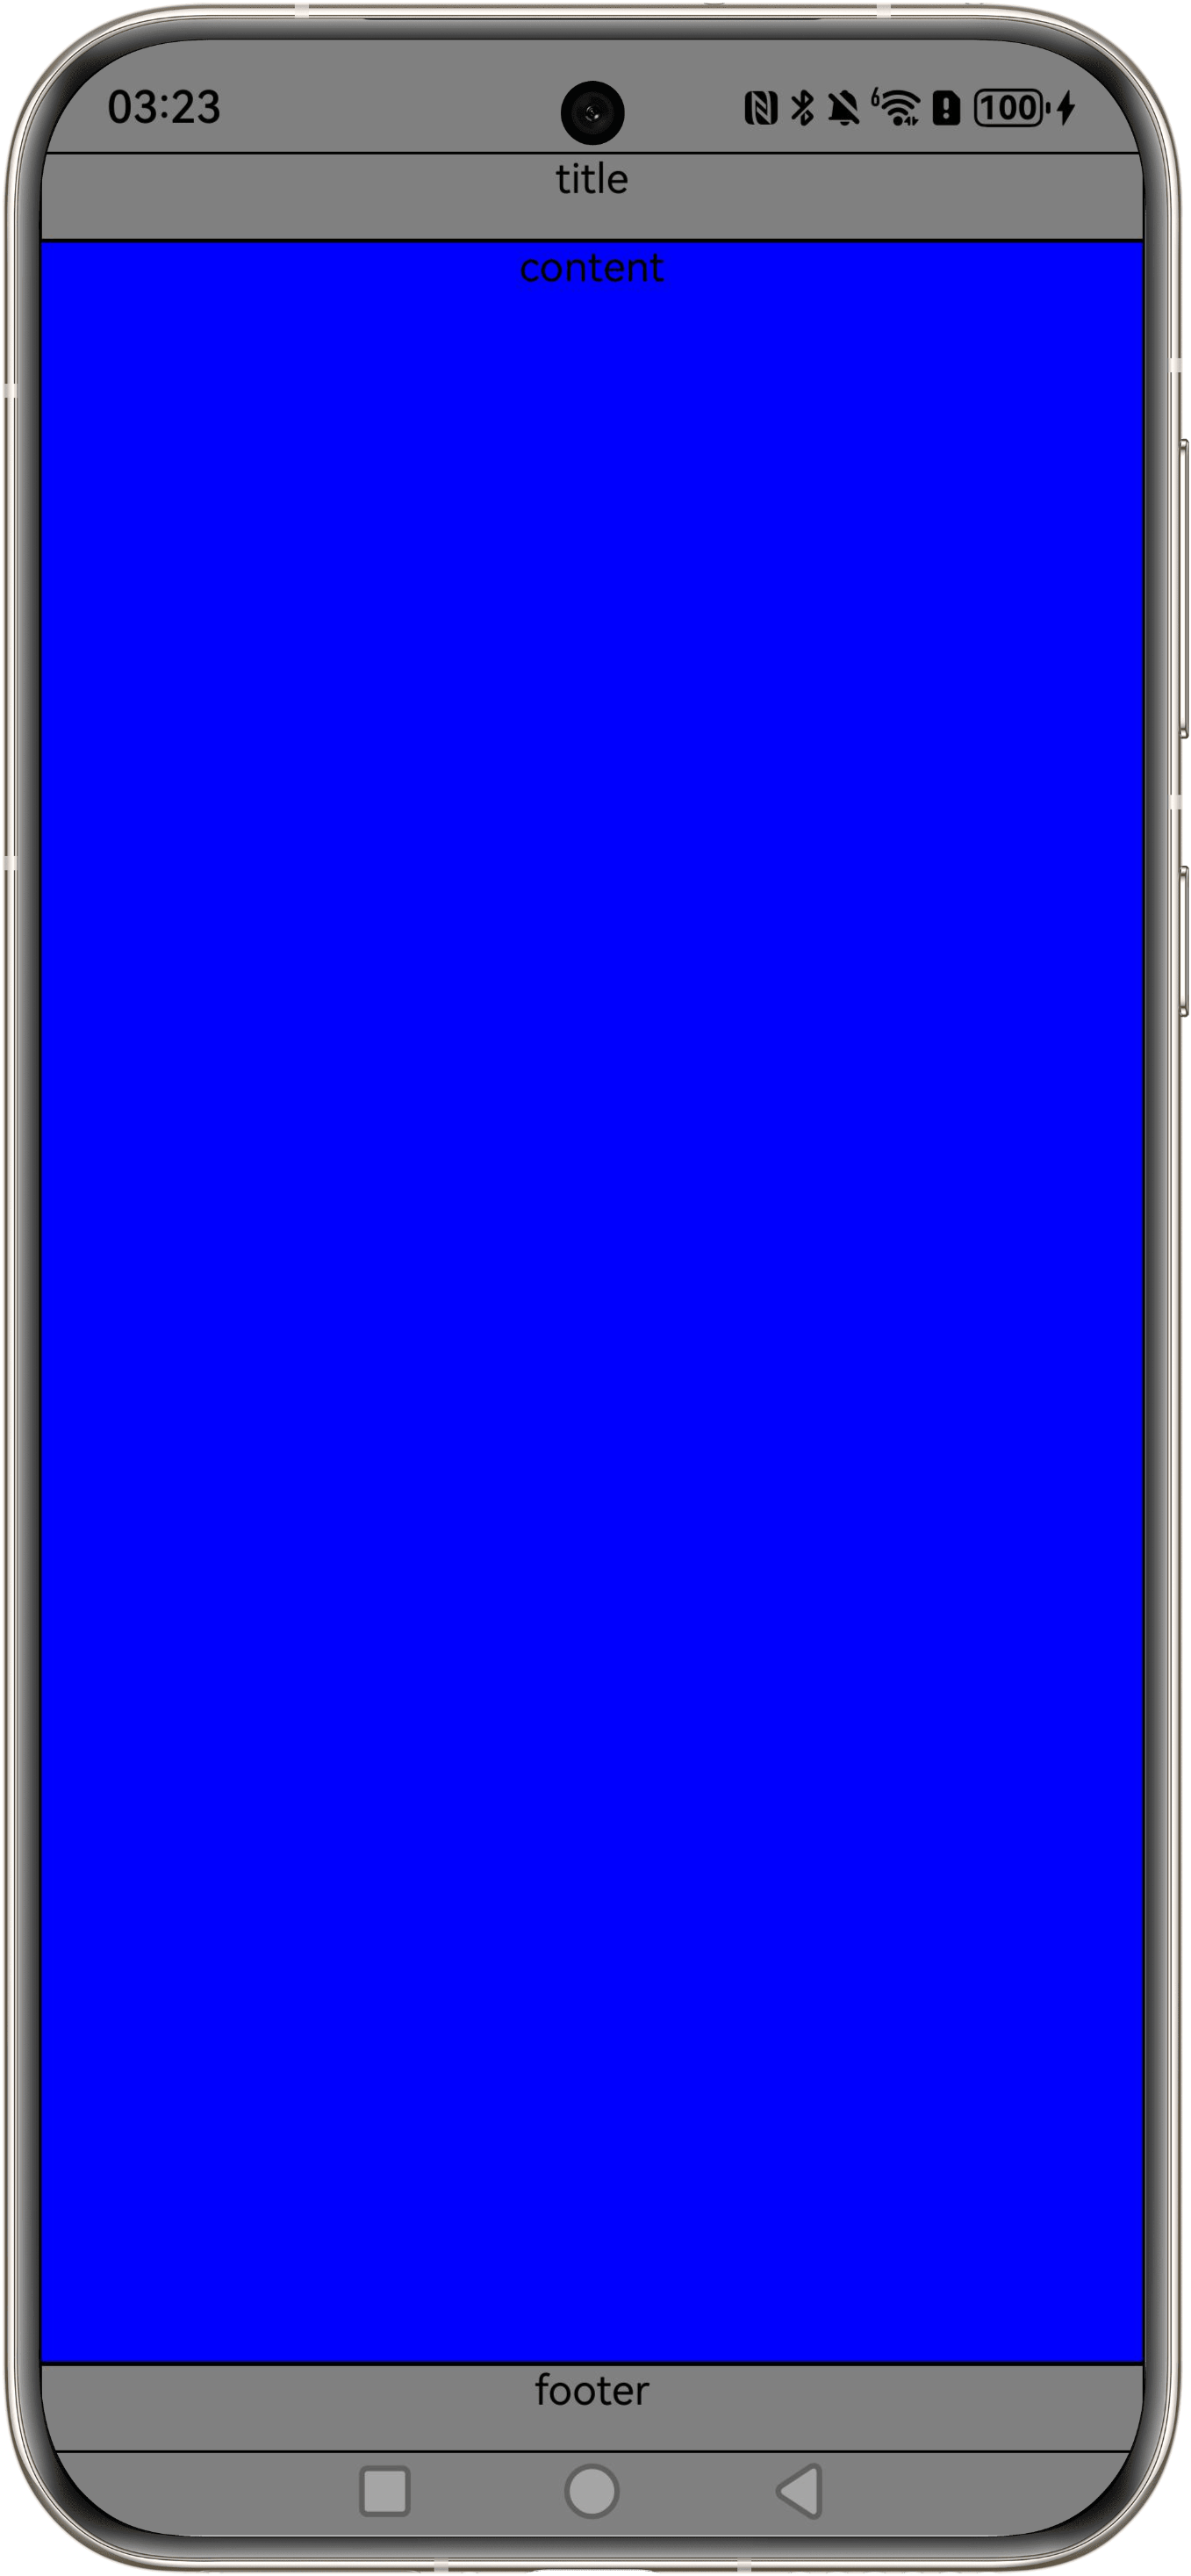
在安全区域布局的基础上,延伸绘制内容(如背景色、背景图)到状态栏和导航条区域,实现沉浸式效果。实现方式与安全区布局相似,将webview设置全屏沉浸式,H5背景全屏、内容设置padding。
图2-8 AvoidArea实现安全区布局+背景沉浸模式
3.2.1 原生侧开启全屏布局
在工程的EntryAbility.ets文件中的onWindowStageCreate()生命周期内,使用setWindowLayoutFullScreen()实现界面元素延伸到状态栏和导航区域。
示例代码如下:
windowObj: window.Window | undefined = undefined;
onWindowStageCreate(windowStage: window.WindowStage): void {
  windowStage.getMainWindow((err: BusinessError<void>, windowObj) => {
    this.windowObj = windowObj;
    // 设置全屏
    windowObj.setWindowLayoutFullScreen(true);
  })
}
3.2.2 注入JavaScript对象
使用registerJavaScriptProxy() 接口将原生侧方法注入到H5页面中,H5页面可以调用原生方法获取状态栏和导航区域高度。
Web({ src: CommonConstants.H5_URL, controller: this.webController })
      .onControllerAttached(() => {
        this.webController.registerJavaScriptProxy(this.webClassProxy, 'webClass',
          ['getAvoidArea', 'pxToVp', 'isFoldAndTablet', 'getWindowStatusType'],
          [],
          `{"javascriptProxyPermission":{"urlPermissionList":[{"scheme":"http","host":"${CommonConstants.HOST}","port":"${CommonConstants.PORT}","path":""}]}}`);
        this.webController.refresh();
      })
3.2.3 H5页面示例代码
页面通过调用原生方法获取状态栏和导航条高度,并设置在外层容器中,实现状态栏和导航条的避让。
<template>
  <div class="contain" >
    <div class="header" :style="{
      paddingTop: `${paddingTop}px`
    }">
    </div>
    <div class="body"> </div>
    <div class="footer" :style="{
      paddingBottom: `${paddingBottom}px`
    }">
    </div>
  </div>
</template>

<script setup lang="ts">
import { ref, reactive, onMounted, onBeforeUnmount } from 'vue';

const paddingTop = 0;
const paddingBottom = 0;
onMounted(() => {
  if ((window as any).webClass) {
    // 获取状态栏安全区高度
    const paddingTop = await (window as any).webClass.getAvoidArea(AvoidAreaType.TYPE_SYSTEM).area.topRect.height;
    // 获取导航条安全区高度
    const paddingBottom = await (window as any).webClass.getAvoidArea(AvoidAreaType.TYPE_NAVIGATION_INDICATOR).area.bottomRect.height;
  }
});
</script>
3.3 全屏布局+避让场景
在全屏布局中,需要隐藏系统状态栏和导航栏,并添加避让区域变化监听。根据避让区域的变化动态调整布局,确保应用在各种情况下都能正常显示。
图2-9 AvoidArea实现全屏布局+避让场景
3.3.1 原生侧开启全屏布局
在HarmonyOS工程的EntryAbility.ets文件中的onWindowStageCreate()生命周期内:
1、setWindowLayoutFullScreen()接口实现界面元素延伸到状态栏和导航区域;
2、再通过setWindowSystemBarEnable()接口将主窗口状态栏和底部导航条隐藏,实现页面的全屏布局。
示例代码如下:
windowObj: window.Window | undefined = undefined;
onWindowStageCreate(windowStage: window.WindowStage): void {
  windowStage.getMainWindow((err: BusinessError<void>, windowObj) => {
    this.windowObj = windowObj;
    // 隐藏状态栏、导航条
    windowObj.setSpecificSystemBarEnabled('status', false);
    windowObj.setSpecificSystemBarEnabled('navigationIndicator', false);
    // 设置全屏
    windowObj.setWindowLayoutFullScreen(true);
  })
}
3.3.2 注入JavaScript对象
使用registerJavaScriptProxy() 接口将原生侧方法注入到H5页面中,H5页面可以调用原生方法获取状态栏和导航区域高度。
Web({ src: CommonConstants.H5_URL, controller: this.webController })
.onControllerAttached(() => {
this.webController.registerJavaScriptProxy(this.webClassProxy, 'webClass',
['getAvoidArea', 'pxToVp', 'isFoldAndTablet', 'getWindowStatusType'],
[],
`{"javascriptProxyPermission":{"urlPermissionList":[{"scheme":"http","host":"${CommonConstants.HOST}","port":"${CommonConstants.PORT}","path":""}]}}`);
this.webController.refresh();
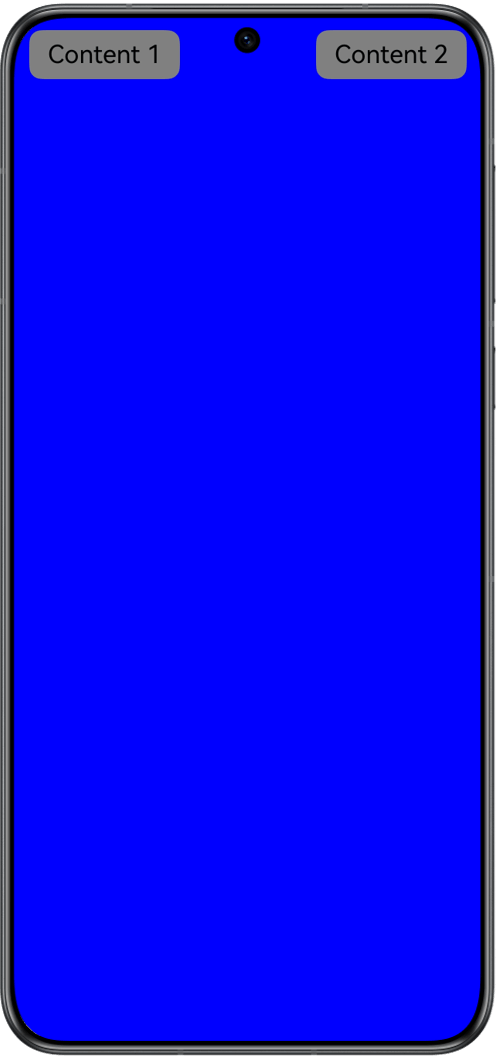
})3.3.3 在H5页面中计算刘海屏/挖孔区位置
页面通过调用原生方法获取刘海屏区域位置,通过计算转换成相对位置和避让的数值。
static async getAvoidAreaLocation(): Promise<AreaAndMargin> {
  let location = AreaLocation.none;
  if ((window as any).webClass) {
    const avoidArea = await (window as any).webClass.getAvoidArea();

    //根据取避让区信息计算并调整子元素的位置,并返回AreaLocation和距离,下面是避让区域处于顶部的情况
    if (this.cameraIsHere(avoidArea.topRect)) {
      const left = AreaUtils.px2vp(avoidArea.topRect.left);
      const right = AreaUtils.px2vp(avoidArea.topRect.left + avoidArea.topRect.width);
      const center = window.screen.width / 2;
      let marginValue = left;
      if (left <= center && center <= right) {
        location = AreaLocation.topCenter;
      } else if (center < left) {
        location = AreaLocation.rightTop;
        marginValue = window.screen.width - AreaUtils.px2vp(avoidArea.topRect.left);
      } else {
        location = AreaLocation.leftTop;
      }
      return { areaLocation: location, marginValue: marginValue };
    }
    //底部以及左右两边的情况也相应做处理
    ......
  }
  return { areaLocation: location, marginValue: 0 };
}
3.3.4 H5页面示例代码
页面通过调用原生方法获取避让区域,并监听避让区域变化事件,根据回调设定不同区域的样式,实现避让。
<template>
  <div class="contain">
    <div class="header" :style="{
      marginTop: `${topMargin}px`
    }">
    </div>
    <div class="body"> </div>
    <div class="footer" :style="{
      marginBottom: `${bottomMargin}px`
    }">
    </div>
  </div>
</template>

<script setup lang="ts">
import { ref, reactive, onMounted, onBeforeUnmount } from 'vue';
import { AreaUtils } from '../utils/AreaUtils';
import { AvoidAreaType } from '../common/windowCommon';

const topMargin = ref(AreaUtils.getInstance().getTopMargin());
const bottomMargin = ref(AreaUtils.getInstance().getBottomMargin());
const margins = reactive({
  leftTopMargin: 0,
  rightTopMargin: 0,
  leftBottomMargin: 0,
  rightBottomMargin: 0,
  leftCenterMargin: 0,
  rightCenterMargin: 0
});

const reCulcAvoidArea = () => {
  AreaUtils.getAvoidAreaLocation().then((res) => {
    AreaUtils.getInstance().setAvoidValue(res.areaLocation, res.marginValue);
    // 计算摄像头、刘海位置
    Object.assign(margins, AreaUtils.getAllMargin());
  });
};

// 监听回调事件
const handleStatusBarChange = (event: any) => {
  const data = event.detail;
  const areaType = data.type;
  reCulcAvoidArea();
  // 根据不同AvoidAreaType设定不同区域的区域的Margin
  if (areaType === AvoidAreaType.TYPE_SYSTEM) {
    topMargin.value = AreaUtils.px2vp(data.area.topRect.height);
  }
  if (areaType === AvoidAreaType.TYPE_CUTOUT) {
    reCulcAvoidArea();
  }
  if (areaType === AvoidAreaType.TYPE_NAVIGATION_INDICATOR) {
    bottomMargin.value = AreaUtils.px2vp(data.area.bottomRect.height);
  }
};

onMounted(() => {
  reCulcAvoidArea();
  // 注册事件监听
  window.addEventListener("statusBarChange", handleStatusBarChange);
});

onBeforeUnmount(() => {
  // 注销事件监听
  window.removeEventListener("statusBarChange", handleStatusBarChange);
});
</script>
四、场景案例
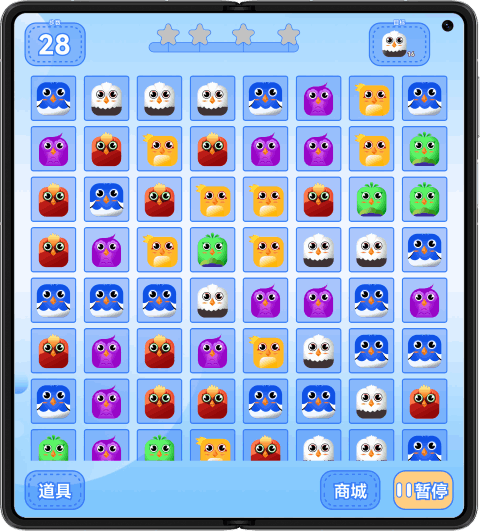
4.1 全屏布局+避让场景案例
1、以VUE3为例,通过调用 getAvoidArea() 接口获取初始化时的避让区域信息,并监听通过 addAvoidAreaListener() 接口注册的监听器发送的事件 'statusBarChange',以便在状态变化时(如横竖屏转换)更新区域避让信息。
2、利用获取到的区域避让信息数据,计算所需避让的区域及其边距,并相应地更新 UI。
// 计算需要避让的区域边距
const reCulcAvoidArea = () => {
  AreaUtils.getAvoidAreaLocation().then((res) => {
    AreaUtils.getInstance().setAvoidValue(res.areaLocation, res.marginValue);
    Object.assign(margins, AreaUtils.getAllMargin());
  });
};

// 监听事件回调,根据不同的区域类型计算不同区域的避让
const handleStatusBarChange = (event: any) => {
  const data = event.detail;
  const areaType = data.type;
  // 避让顶部状态栏
  if (areaType === AvoidAreaType.TYPE_SYSTEM) {
    topMargin.value = AreaUtils.px2vp(data.area.topRect.height);
    AreaUtils.getInstance().setTopMargin(topMargin.value);
  }
  // 避让刘海、摄像头区域
  if (areaType === AvoidAreaType.TYPE_CUTOUT) {
    reCulcAvoidArea();
  }
  // 避让底部导航条
  if (areaType === AvoidAreaType.TYPE_NAVIGATION_INDICATOR) {
    let bottomMargin = AreaUtils.px2vp(data.area.bottomRect.height);
    AreaUtils.getInstance().setBottomMargin(bottomMargin);
  }
};

onMounted(() => {
  reCulcAvoidArea();
  window.addEventListener("resize", reCulcAvoidArea);
  window.addEventListener("statusBarChange", handleStatusBarChange);
});

onBeforeUnmount(() => {
  window.removeEventListener("resize", reCulcAvoidArea);
  window.removeEventListener("statusBarChange", handleStatusBarChange);
});
图2-10 sample示例图
五、示例代码
H5区域避让的Sample示例代码地址:avoid_area_sample,开发者可以通过该地址查看完整的区域避让示例代码,并根据自己的需求进行修改和扩展。

讨论HarmonyOS开发技术,专注于API与组件、DevEco Studio、测试、元服务和应用上架分发等。
更多推荐

 0
0 0
0- 0


 已为社区贡献233条内容

所有评论(0)