ArkTs简单创建登录页面
目前为止,个人不太恰当的理解为flutter变体,其对有着js基础的人员 也比较友好。
·
简记
ArkTS是HarmonyOS优选的主力应用开发语言。ArkTs在TS生态基础上做了进一步扩展,继承了TS的所有特性,是TS的超集。
涉及点
对于这次页面的实现 主要涉及到 语法规范 和 页面路由(router)api 。
语法规范
首先我们看官方示意图:
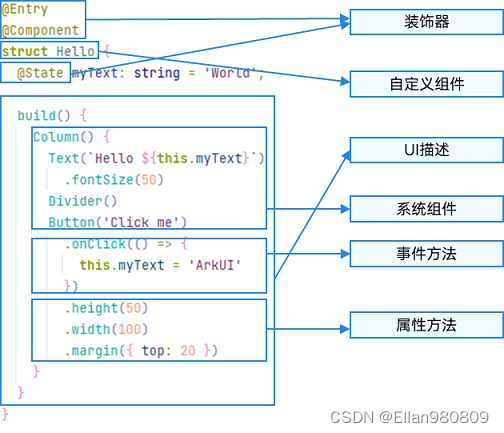
通过示例代码进行说明
@Entry
@Component
struct Index {
  @State message: string = 'Hello HarmonyOS'

  build() {
    Row() {
      Column({space:10}) {
        Text("Hello")
          .fontSize(40)
          .fontWeight(FontWeight.Bold)
          .textAlign(TextAlign.Start)
          .width("80%")
        Text("HarmonyOS")
          .fontSize(48)
          .fontWeight(FontWeight.Bold)
          .textAlign(TextAlign.Start)
          .width("80%")

        Row() {
          Button() {
            Text("welcome".toLocaleUpperCase())
              .fontSize(16)
          }.height(30).width(150).onClick(() =>{
            router.push({ url: 'pages/login' })
          })
        }.justifyContent(FlexAlign.End).width("80%")

      }
      .width('100%')
    }
    .height('100%')
  }
}
当需要实现一个按钮时,我们可以通过接口Button()进行创建
 Button()
//如果对按钮需要定义一些样式,则需要使用一般使用通用属性来自定义
//比如定义样式高为30 ,宽度为150
Button().height(30).width(150)
//此时再给该按钮增加文字 则需要进行 对ui进行声明的部分需要写入{}内
Button(){
//紧接者对文字进行定义样式
            Text("welcome".toLocaleUpperCase())
              .fontSize(16)
}.height(30).width(150)
//最后在加上点击事件
Button(){
            Text("welcome".toLocaleUpperCase())
              .fontSize(16)
}.height(30).width(150).onClick(() =>{
//注意:在页面跳转前 需要 对跳转的也面进行配置
//router api需要进行导入
            router.push({ url: 'pages/login' })
          })
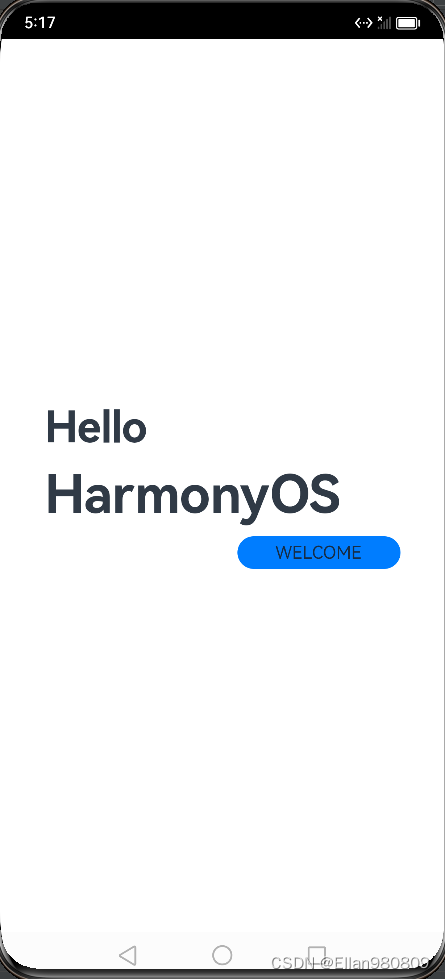
完整代码如下:
index.ets
import router from '@ohos.router';

@Entry
@Component
struct Index {
  @State message: string = 'Hello HarmonyOS'

  build() {
    Row() {
      Column({space:10}) {
        Text("Hello")
          .fontSize(40)
          .fontWeight(FontWeight.Bold)
          .textAlign(TextAlign.Start)
          .width("80%")
        Text("HarmonyOS")
          .fontSize(48)
          .fontWeight(FontWeight.Bold)
          .textAlign(TextAlign.Start)
          .width("80%")

        Row() {
          Button() {
            Text("welcome".toLocaleUpperCase())
              .fontSize(16)
          }.height(30).width(150).onClick(() =>{
            router.push({ url: 'pages/login' })
          })
        }.justifyContent(FlexAlign.End).width("80%")

      }
      .width('100%')
    }
    .height('100%')
  }
}
login.ets
@Entry
@Component
struct Login {
  @State message: string = 'Hello World'

  build() {
    // space 行与行间距
    Column({ space: 15 }) {
      Row(){
        Text("Welcome, this application is built by ArkTs.")
          .fontSize(14)
          .textAlign(TextAlign.Center)
          .width("100%")
          .fontColor("white")
      }
      .height(50)
      .width('90%')

      Row() {
        Image('assets/images/login.png')
          .height(400)
          .width("80%")
      }
      // 内容位置
      .justifyContent(FlexAlign.Center)
      // 输入框
      Row({}){
        TextInput({
              placeholder:"please entry your account"
            })
          // 默认输入类型
          .type(InputType.Normal)
      }
      .width('90%')
      .height(50)
      .backgroundColor("white")

      // 输入框
      Row({}){
        TextInput({
          placeholder:"please entry your password",
        })
          //  密码输入类型
          .type(InputType.Password)
      }
      .width('90%')
      .height(50)
      .backgroundColor("white")


        // 登录按钮
        Button("登录").width('90%')
      .height(50)


       // 注册按钮
       Button("注册").width('90%')
      .height(50)

      // 已有账户提示
      Row(){
        Text("Already have account?")
          .fontSize(14)
          .textAlign(TextAlign.Center)
          .width("100%")
          .fontColor("white")
      }
      .height(50)
      .width('90%')

    }
    .height("100%")
    .width('100%')
    .backgroundColor("#2db7f5")
  }
}
效果图
登录页
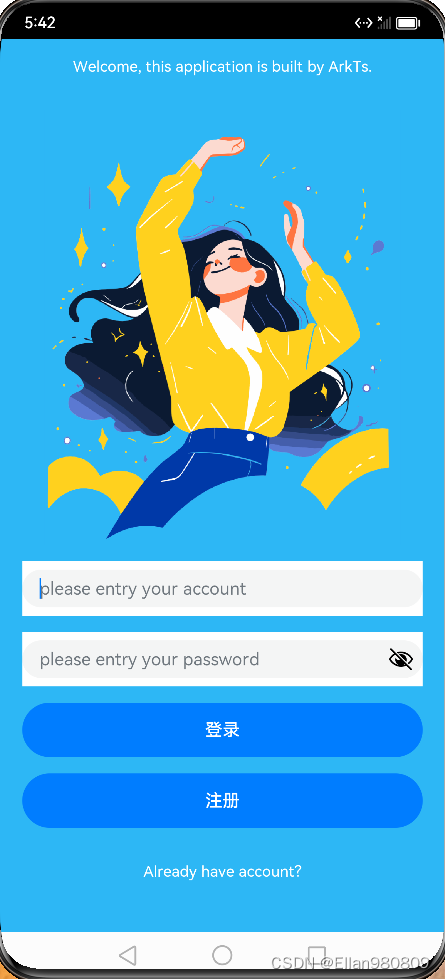
由于该实例已上传github,有需要可以进行拉取github ,后续该示例会进行更新,且增加更完整的备注,以便于学习。
结语
目前为止,个人不太恰当的理解为flutter变体,其对有着js基础的人员 也比较友好。

讨论HarmonyOS开发技术,专注于API与组件、DevEco Studio、测试、元服务和应用上架分发等。
更多推荐


 13
13 0
0- 0


 已为社区贡献1条内容

所有评论(0)