鸿蒙中Image白块问题分析与解决方案
布局跳动:图片从无到有加载时导致的页面布局重新计算白色闪烁:图片加载前显示的空白区域加载不一致:多张图片先后加载导致的视觉跳跃// 高级图片组件封装@Componenttry {// 网络图片,使用缓存管理器} else {// 本地资源// 让系统处理本地资源console.error('图片加载失败:', error);build() {Stack() {// 加载状态// 错误状态// 图片
在应用开发中,Image白块问题(又称图片加载闪烁、布局跳动)是影响用户体验的常见问题。无论是Web前端还是鸿蒙应用,都需要系统性的解决方案来确保图片平滑加载和显示
1.1 什么是Image白块问题?
Image白块问题是指在图片加载过程中出现的以下现象:
-
布局跳动:图片从无到有加载时导致的页面布局重新计算
-
白色闪烁:图片加载前显示的空白区域
-
加载不一致:多张图片先后加载导致的视觉跳跃
1.2 问题产生的根本原因
-
异步加载机制:图片资源需要时间下载和解码
-
尺寸未知:加载前无法确定图片的准确尺寸
-
网络延迟:网络状况影响加载速度
-
渲染时机:浏览器/渲染引擎的图片处理机制
2 前端白块解决方案
2.1 基础解决方案
2.1.1 尺寸预设与占位符
<!-- 优化前:没有尺寸预设 -->
<img src="image.jpg" alt="示例图片">

<!-- 优化后:预设尺寸 + 占位符 -->
<div class="image-container" style="width: 300px; height: 200px;">
  <img
    src="image.jpg"
    alt="示例图片"
    width="300"
    height="200"
    loading="lazy"
    onload="this.classList.add('loaded')"
  >
  <div class="image-placeholder"></div>
</div>

<style>
  .image-container {
    position: relative;
    background-color: #f5f5f5;
    overflow: hidden;
  }

  .image-placeholder {
    position: absolute;
    top: 0;
    left: 0;
    width: 100%;
    height: 100%;
    background: linear-gradient(90deg, #f0f0f0 25%, #e0e0e0 50%, #f0f0f0 75%);
    background-size: 200% 100%;
    animation: loading 1.5s infinite;
  }

  img {
    opacity: 0;
    transition: opacity 0.3s ease;
    width: 100%;
    height: auto;
  }

  img.loaded {
    opacity: 1;
  }

  @keyframes loading {
    0% { background-position: 200% 0; }
    100% { background-position: -200% 0; }
  }
</style>
2.1.2 CSS宽高比盒子
/* 宽高比容器解决方案 */
.aspect-ratio-box {
  position: relative;
  width: 100%;
  height: 0;
  padding-top: 56.25%; /* 16:9 比例 */
  background-color: #f0f0f0;
  overflow: hidden;
}

.aspect-ratio-box img {
  position: absolute;
  top: 0;
  left: 0;
  width: 100%;
  height: 100%;
  object-fit: cover;
  opacity: 0;
  transition: opacity 0.3s ease;
}

.aspect-ratio-box img.loaded {
  opacity: 1;
}
2.2 高级解决方案
2.2.1 响应式图片与srcset优化
<picture>
  <!-- WebP格式优先 -->
  <source
    srcset="image.webp 1x, image@2x.webp 2x"
    type="image/webp"
    onload="this.parentElement.classList.add('loaded')"
  >
  <!-- 传统格式回退 -->
  <source
    srcset="image.jpg 1x, image@2x.jpg 2x"
    type="image/jpeg"
    onload="this.parentElement.classList.add('loaded')"
  >
  <!-- 最终回退 -->
  <img
    src="image.jpg"
    alt="响应式图片示例"
    width="800"
    height="450"
    loading="lazy"
    onload="this.classList.add('loaded')"
  >
</picture>
2.2.2 Intersection Observer懒加载
class LazyImageLoader {
  constructor() {
    this.observer = null;
    this.initObserver();
  }

  initObserver() {
    this.observer = new IntersectionObserver((entries) => {
      entries.forEach(entry => {
        if (entry.isIntersecting) {
          this.loadImage(entry.target);
          this.observer.unobserve(entry.target);
        }
      });
    }, {
      rootMargin: '50px 0px',
      threshold: 0.01
    });
  }

  loadImage(imgElement) {
    const src = imgElement.dataset.src;
    const srcset = imgElement.dataset.srcset;

    if (src) {
      imgElement.src = src;
    }

    if (srcset) {
      imgElement.srcset = srcset;
    }

    imgElement.onload = () => {
      imgElement.classList.add('loaded');
      this.fadeInImage(imgElement);
    };

    imgElement.onerror = () => {
      this.handleImageError(imgElement);
    };
  }

  fadeInImage(imgElement) {
    imgElement.style.transition = 'opacity 0.3s ease';
    imgElement.style.opacity = '1';
  }

  handleImageError(imgElement) {
    imgElement.classList.add('error');
    imgElement.style.display = 'none';

    // 显示错误占位符
    const placeholder = document.createElement('div');
    placeholder.className = 'image-error';
    placeholder.innerHTML = '图片加载失败';
    imgElement.parentNode.appendChild(placeholder);
  }

  observeImage(imgElement) {
    this.observer.observe(imgElement);
  }
}

// 使用示例
const lazyLoader = new LazyImageLoader();
document.querySelectorAll('img[data-src]').forEach(img => {
  lazyLoader.observeImage(img);
});
3 鸿蒙应用白块解决方案
3.1 基础解决方案
3.1.1 使用Image组件优化
// 基础Image组件使用优化
@Component
struct OptimizedImage {
  @State private isLoaded: boolean = false;
  @State private isLoading: boolean = false;
  @State private hasError: boolean = false;

  private imageSrc: ResourceStr;
  private imageWidth: number | string;
  private imageHeight: number | string;

  build() {
    Stack() {
      // 占位符
      if (!this.isLoaded && !this.hasError) {
        this.buildPlaceholder();
      }

      // 错误状态
      if (this.hasError) {
        this.buildErrorState();
      }

      // 图片组件
      Image(this.imageSrc)
        .width(this.imageWidth)
        .height(this.imageHeight)
        .objectFit(ImageFit.Cover)
        .opacity(this.isLoaded ? 1 : 0)
        .onComplete((msg: { width: number, height: number }) => {
          this.isLoading = false;
          this.isLoaded = true;
          this.hasError = false;
          console.log('图片加载完成:', msg);
        })
        .onError(() => {
          this.isLoading = false;
          this.isLoaded = false;
          this.hasError = true;
          console.error('图片加载失败');
        })
        .interpolation(ImageInterpolation.High) // 高质量插值
    }
    .width(this.imageWidth)
    .height(this.imageHeight)
    .clip(true)
  }

  @Builder
  buildPlaceholder() {
    Column() {
      Progress()
        .width(20)
        .height(20)
    }
    .width('100%')
    .height('100%')
    .justifyContent(FlexAlign.Center)
    .backgroundColor('#f5f5f5')
  }

  @Builder
  buildErrorState() {
    Column() {
      Image($r('app.media.image_error'))
        .width(40)
        .height(40)
      Text('图片加载失败')
        .fontSize(12)
        .fontColor('#999')
    }
    .width('100%')
    .height('100%')
    .justifyContent(FlexAlign.Center)
  }
}
3.2 高级解决方案
3.2.1 图片预加载与缓存管理
// 图片缓存管理器
class ImageCacheManager {
  private static instance: ImageCacheManager;
  private memoryCache: Map<string, image.PixelMap> = new Map();
  private diskCache: Map<string, string> = new Map();
  private maxMemoryCacheSize: number = 50 * 1024 * 1024; // 50MB
  private currentMemoryUsage: number = 0;

  static getInstance(): ImageCacheManager {
    if (!ImageCacheManager.instance) {
      ImageCacheManager.instance = new ImageCacheManager();
    }
    return ImageCacheManager.instance;
  }

  // 预加载图片
  async preloadImage(url: string, priority: number = 0): Promise<void> {
    if (this.memoryCache.has(url)) {
      return; // 已在缓存中
    }

    try {
      const pixelMap = await this.loadImage(url);
      this.addToCache(url, pixelMap);
    } catch (error) {
      console.warn(`预加载图片失败: ${url}`, error);
    }
  }

  // 加载图片
  async loadImage(url: string): Promise<image.PixelMap> {
    // 检查内存缓存
    if (this.memoryCache.has(url)) {
      return this.memoryCache.get(url)!;
    }

    // 检查磁盘缓存
    if (this.diskCache.has(url)) {
      const cachedPath = this.diskCache.get(url)!;
      return await this.loadFromDiskCache(cachedPath);
    }

    // 从网络加载
    return await this.loadFromNetwork(url);
  }

  // 从网络加载图片
  private async loadFromNetwork(url: string): Promise<image.PixelMap> {
    try {
      const response = await http.createHttp().request(url, {
        method: http.RequestMethod.GET,
        connectTimeout: 10000,
        readTimeout: 10000
      });

      if (response.responseCode === 200) {
        const arrayBuffer = response.result;
        const imageSource = image.createImageSource(arrayBuffer);
        const pixelMap = await imageSource.createPixelMap();

        // 添加到缓存
        this.addToCache(url, pixelMap);

        return pixelMap;
      } else {
        throw new Error(`HTTP ${response.responseCode}`);
      }
    } catch (error) {
      throw new Error(`网络加载失败: ${error.message}`);
    }
  }

  // 添加到缓存
  private addToCache(url: string, pixelMap: image.PixelMap): void {
    const imageSize = this.calculateImageSize(pixelMap);

    // 检查缓存大小,必要时清理
    if (this.currentMemoryUsage + imageSize > this.maxMemoryCacheSize) {
      this.evictCache();
    }

    this.memoryCache.set(url, pixelMap);
    this.currentMemoryUsage += imageSize;
  }

  // 清理缓存
  private evictCache(): void {
    // LRU缓存清理策略
    const entries = Array.from(this.memoryCache.entries());
    // 保留最近使用的50%的图片
    const itemsToKeep = Math.floor(entries.length * 0.5);

    for (let i = itemsToKeep; i < entries.length; i++) {
      const [url, pixelMap] = entries[i];
      const size = this.calculateImageSize(pixelMap);
      this.memoryCache.delete(url);
      this.currentMemoryUsage -= size;
    }
  }

  // 计算图片内存大小
  private calculateImageSize(pixelMap: image.PixelMap): number {
    const info = pixelMap.getImageInfo();
    return info.size.width * info.size.height * 4; // 假设RGBA_8888格式
  }
}
3.2.2 自定义图片组件封装
// 高级图片组件封装
@Component
export struct AdvancedImage {
  private src: ResourceStr;
  private width: number | string;
  private height: number | string;
  private fit: ImageFit = ImageFit.Cover;
  private radius: number = 0;

  @State private imageState: 'loading' | 'loaded' | 'error' = 'loading';
  @State private pixelMap: image.PixelMap | null = null;

  aboutToAppear() {
    this.loadImage();
  }

  async loadImage() {
    try {
      this.imageState = 'loading';

      if (typeof this.src === 'string' && this.src.startsWith('http')) {
        // 网络图片,使用缓存管理器
        const cacheManager = ImageCacheManager.getInstance();
        this.pixelMap = await cacheManager.loadImage(this.src);
      } else {
        // 本地资源
        this.pixelMap = null; // 让系统处理本地资源
      }

      this.imageState = 'loaded';
    } catch (error) {
      console.error('图片加载失败:', error);
      this.imageState = 'error';
    }
  }

  build() {
    Stack() {
      // 加载状态
      if (this.imageState === 'loading') {
        this.buildLoadingState();
      }

      // 错误状态
      if (this.imageState === 'error') {
        this.buildErrorState();
      }

      // 图片内容
      if (this.pixelMap) {
        // 使用PixelMap渲染
        Image(this.pixelMap)
          .width(this.width)
          .height(this.height)
          .objectFit(this.fit)
          .borderRadius(this.radius)
      } else {
        // 使用资源路径渲染
        Image(this.src)
          .width(this.width)
          .height(this.height)
          .objectFit(this.fit)
          .borderRadius(this.radius)
          .onComplete(() => {
            this.imageState = 'loaded';
          })
          .onError(() => {
            this.imageState = 'error';
          })
      }
    }
    .width(this.width)
    .height(this.height)
    .clip(true)
  }

  @Builder
  buildLoadingState() {
    Column() {
      Progress()
        .width(20)
        .height(20)
    }
    .width('100%')
    .height('100%')
    .justifyContent(FlexAlign.Center)
    .backgroundColor('#f5f5f5')
  }

  @Builder
  buildErrorState() {
    Column() {
      Image($r('app.media.ic_error'))
        .width(40)
        .height(40)
      Text('加载失败')
        .fontSize(12)
        .fontColor('#999')
    }
    .width('100%')
    .height('100%')
    .justifyContent(FlexAlign.Center)
    .backgroundColor('#fff0f0')
  }
}
4 跨平台解决方案对比
4.1 技术方案对比
| 特性 | Web前端方案 | 鸿蒙应用方案 |
|---|---|---|
| 占位符实现 | CSS伪元素/渐变 | Stack布局+Progress组件 |
| 懒加载机制 | Intersection Observer | 自定义滚动监听 |
| 缓存策略 | Service Worker + Cache API | 内存+磁盘多级缓存 |
| 错误处理 | onerror事件监听 | onError回调处理 |
| 性能优化 | 响应式图片+WebP | PixelMap+内存管理 |
4.2 最佳实践对比
| 优化领域 | Web前端最佳实践 | 鸿蒙最佳实践 |
|---|---|---|
| 尺寸控制 | 宽高比盒子+CSS约束 | 固定尺寸+ObjectFit |
| 加载策略 | 懒加载+预加载 | 预加载+缓存优先 |
| 格式优化 | WebP+AVIF格式 | 合适的压缩格式 |
| 错误处理 | 错误占位符+重试机制 | 错误状态UI+重试功能 |
| 动画效果 | CSS过渡动画 | 属性动画+转场效果 |
5、 鸿蒙中Image白块解决方案
概述
在通过Image组件加载网络图片时,整个过程可分为四个关键阶段:组件创建、图片资源下载、图片解码和最终刷新显示。当加载的图片资源过大时,组件需等待下载与解码完成后才进行刷新。由于下载阶段耗时较长(尤其在网络波动或大文件场景下),图片在完全渲染前会显示为空白或浅色占位图,这种现象被称为“Image 白块”。它不仅影响视觉体验,还可能降低用户对应用性能的感知。
为减少白块出现,开发者可采用预下载与缓存机制:
- 预下载阶段:在组件创建前(如父页面初始化时),将网络图片通过应用沙箱的方式进行提前缓存。
- 缓存复用阶段:当Image组件加载时,首先检查应用沙箱是否存在缓存。若存在,则直接读取缓存数据;若不存在,再发起网络请求。非首次请求时,该机制可避免重复下载,从而缩短白块持续时间。
图1 Image加载网络图片两种方式对比
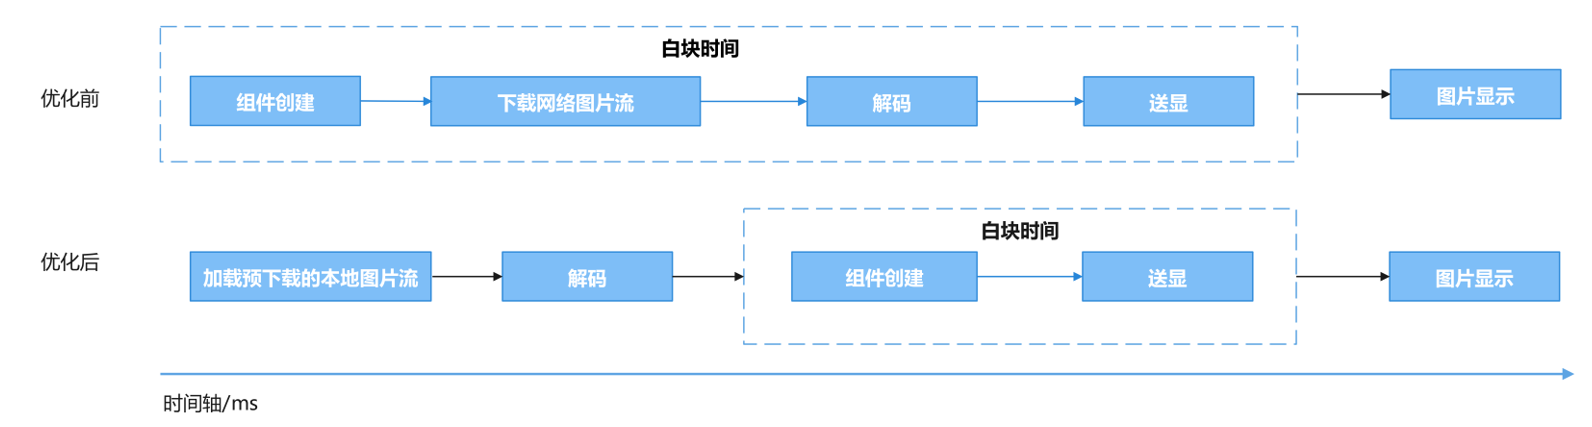
说明
1. 开发者在使用Image加载较大的网络图片时,网络下载推荐使用HTTP工具提前预下载。
2. 在预下载之后,开发者可根据业务自行选择数据处理方式,如将预下载后得到的ArrayBuffer转成BASE64、使用应用沙箱提前缓存、直接转PixelMap、或是业务上自行处理ArrayBuffer等多种方式灵活处理数据后,传给Image组件。
当子页面需要加载很大的网络图片时,可以在父页面提前将网络数据预下载到应用沙箱中,子组件加载时从沙箱中读取,减少白块出现时长。
场景案例
开发者使用Navigation组件时,通常会在主页引入子页面组件,在按钮中添加方法实现跳转子页面组件。当子页面中需展示一张较大的网络图片时,而Image未设置占位图时,会出现点击按钮后,子组件的Image组件位置出现长时间的Image白块现象。
本文将以应用沙箱提前缓存举例,给出减少Image白块出现时长的一种优化方案。
【优化前】:使用Image组件直接加载网络地址
使用Image组件直接加载网络地址。
@Builder
export function PageOneBuilder() {
PageOne();
}

@Component
export struct PageOne {
pageInfo: NavPathStack = new NavPathStack();
@State name: string = 'pageOne';
@LocalStorageLink('imageData') imageData: PixelMap | undefined = undefined;

build() {
NavDestination() {
Row() {
// Positive example: At this time, the Image has obtained the network image that has been loaded in advance,
// reducing the time for white blocks to appear.
Image(this.imageData)
.objectFit(ImageFit.Auto)
.width('100%')
.height('100%')
}
.width('100%')
.height('100%')
.justifyContent(FlexAlign.Center)
}
.title(this.name)
}
}说明
- 使用Image直接加载网络图片时,可以使用.alt()的方式,在网络图片加载成功前使用占位图,避免白块出现时长过长,优化用户体验。
- 使用网络图片时,需要申请权限ohos.permission.INTERNET。具体申请方式请参考声明权限。
【优化后】:通过预下载的方式
子页面PageOne中需展示一张较大的网络图片,在父组件的aboutToAppear()中提前发起网络请求,并做判断文件是否存在,已下载的不再重复请求,存储在应用沙箱中。当父页面点击按钮跳转子页面PageOne,此时触发pixMap请求读取应用沙箱中已缓存解码的网络图片并存储在LocalStorage中,通过在子页面的Image中传入被@StorageLink修饰的变量ImageData进行数据刷新,图片送显。
图2 使用预下载的方式,由开发者灵活地处理网络图片,减少白块出现时长
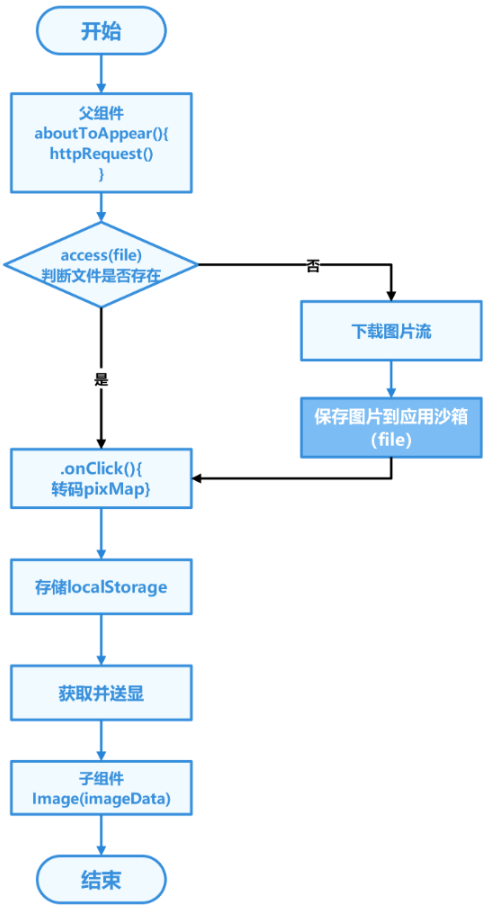
- 在父组件里aboutToAppear()中提前发起网络请求,当父页面点击按钮跳转子页面PageOne,此时触发pixMap请求读取应用沙箱中已缓存解码的网络图片并存储在localStorage中。非首次点击时,不再重复调用getPixMap(),避免每次点击都从沙箱里读取文件。
-
import { fileIo as fs } from '@kit.CoreFileKit';
import { image } from '@kit.ImageKit';
import { common } from '@kit.AbilityKit';
import { httpRequest } from '../utils/NetRequest';
import Logger from '../utils/Logger';

// Obtain the path of the application file
const uiContext: UIContext | undefined = AppStorage.get('uiContext');
let context = uiContext?.getHostContext() as common.UIAbilityContext;
let filesDir = context.filesDir;
let fileUrl = filesDir + '/xxx.png'; // The image's network address suffix needs to be replaced by the real url.
let para: Record<string, PixelMap | undefined> = { 'imageData': undefined };
let localStorage: LocalStorage = new LocalStorage(para);
const TAG = '[GetPixMapFunc]';

@Entry(localStorage)
@Component
struct MainPage {
@State childNavStack: NavPathStack = new NavPathStack();
@LocalStorageLink('imageData') imageData: PixelMap | undefined = undefined;

getPixMap() { // Read files from the application sandbox
try {
let file = fs.openSync(fileUrl, fs.OpenMode.READ_WRITE); // Open the file in a synchronous manner
const imageSource: image.ImageSource = image.createImageSource(file.fd);
const options: image.InitializationOptions = {
'alphaType': 0, // transparency
'editable': false, // Editable or not
'pixelFormat': 3, // Pixel format
'scaleMode': 1, // Abbreviated value
'size': { height: 100, width: 100 }
};
fs.close(file)
imageSource.createPixelMap(options).then((pixelMap: PixelMap) => {
this.imageData = pixelMap;
});
} catch (e) {
Logger.error(TAG, 'Resource loading error, file or does not exist!');
}
}

aboutToAppear(): void {
httpRequest(); // Initiate a network request ahead of the parent component
}

build() {
Navigation(this.childNavStack) {
Column() {
Button('push Path to pageOne', { stateEffect: true, type: ButtonType.Capsule })
.width('80%')
.height(40)
.margin({ bottom: '36vp' })
.onClick(() => {
// Do not call getPixMap() repeatedly except for the first click to avoid reading files from the sandbox with each click.
if (!localStorage.get('imageData')) {
this.getPixMap();
}
this.childNavStack.pushPath({ name: 'pageOne' });
})
}
.width('100%')
.height('100%')
.justifyContent(FlexAlign.End)
}
.backgroundColor(Color.Transparent)
.title('ParentNavigation')
}
}
-
- 在NetRequest.ets中定义网络请求httpRequest(),通过fs.access()检查文件是否存在,当文件存在时不再重复请求,并写入沙箱中。
-
import { http } from '@kit.NetworkKit';
import { BusinessError } from '@kit.BasicServicesKit';
import { fileIo as fs } from '@kit.CoreFileKit';
import { common } from '@kit.AbilityKit';

// Obtain the path of the application file
const uiContext: UIContext | undefined = AppStorage.get('uiContext');
let context = uiContext?.getHostContext() as common.UIAbilityContext;
let filesDir = context.filesDir;
let fileUrl = filesDir + '/xxx.png'; // The image's network address suffix needs to be replaced by the real url.

export async function httpRequest() {
fs.access(fileUrl, fs.AccessModeType.READ).then((res) => { // Check whether files exist
if (!res) { // If the address does not exist in the sandbox, re-request the network image resource
http.createHttp()
// Please fill in a specific network image address here, example: https://img.picui.cn/free/2024/09/09/66deb127cf1c0.png
// If you fill in the real address, you need to replace the global fileUrl with the real address suffix.
.request('https://example.com/xxx.png',
(error: BusinessError, data: http.HttpResponse) => {
if (error) {
// If the download fails, no subsequent logic is executed
return;
}
// Processing data returned by network requests
if (http.ResponseCode.OK === data.responseCode) {
const imageData: ArrayBuffer = data.result as ArrayBuffer;
// Save the image to the app sandbox
readWriteFileWithStream(imageData);
}
}
)
}
})
}

// Write to the sandbox
async function readWriteFileWithStream(imageData: ArrayBuffer): Promise<void> {
let outputStream = fs.createStreamSync(fileUrl, 'w+');
await outputStream.write(imageData);
outputStream.closeSync();
}
-
- 在子组件中通过在子页面的Image中传入被@StorageLink修饰的变量ImageData进行数据刷新,图片送显。
-
@Builder
export function PageOneBuilder(name: string, param: Object) {
PageOne()
}

@Component
export struct PageOne {
pageInfo: NavPathStack = new NavPathStack();
@State name: string = 'pageOne';
@LocalStorageLink('imageData') imageData: PixelMap | undefined = undefined;

build() {
NavDestination() {
Row() {
// Positive example: At this time, the Image has obtained the network image that has been loaded in advance,
// reducing the time for white blocks to appear.
Image(this.imageData)
.objectFit(ImageFit.Auto)
.width('100%')
.height('100%')
}
.width('100%')
.height('100%')
.justifyContent(FlexAlign.Center)
}
.title(this.name)
}
}
-
性能分析
下面,使用trace对优化前后性能进行对比分析。
【优化前】
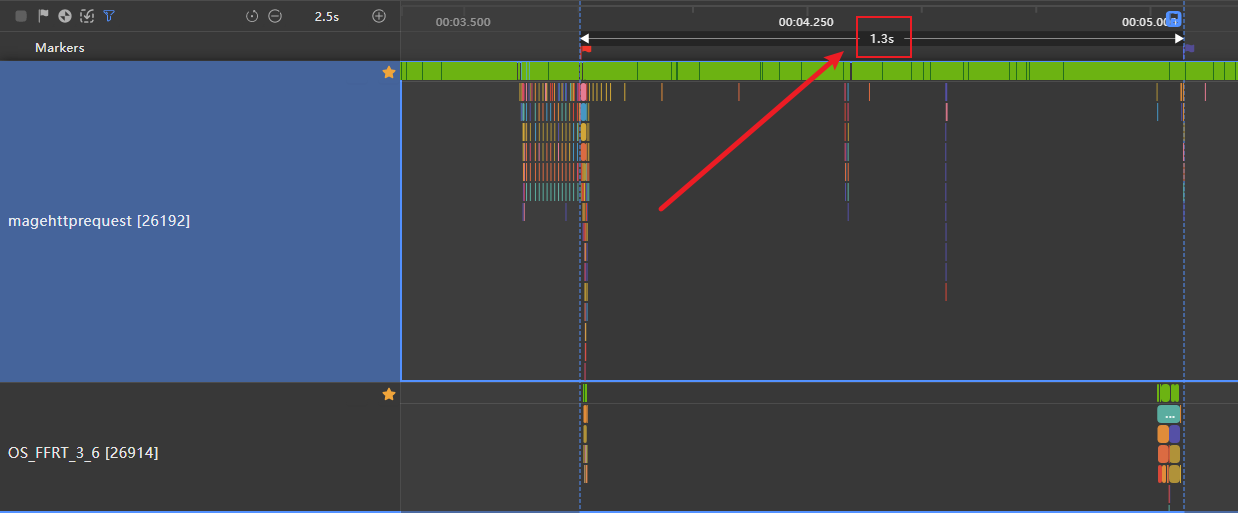
分析阶段的起点为父页面点击按钮开始计时即trace的H:DispatchTouchEvent,结束点为子页面图片渲染的首帧出现即H:CreateImagePixelMap标签后的第一个Vsync,记录白块出现时间为1.3s,其中以H:HttpRequestInner的标签起始为起点到H:DownloadImageSuccess标签结束为终点记录时间,即为网络下载耗时1.2s,因此使用Image直接加载网络图片时,出现长时间Image白块,其原因是需要等待网络下载资源完成。
图3 直接使用Image加载网络数据
【优化后】
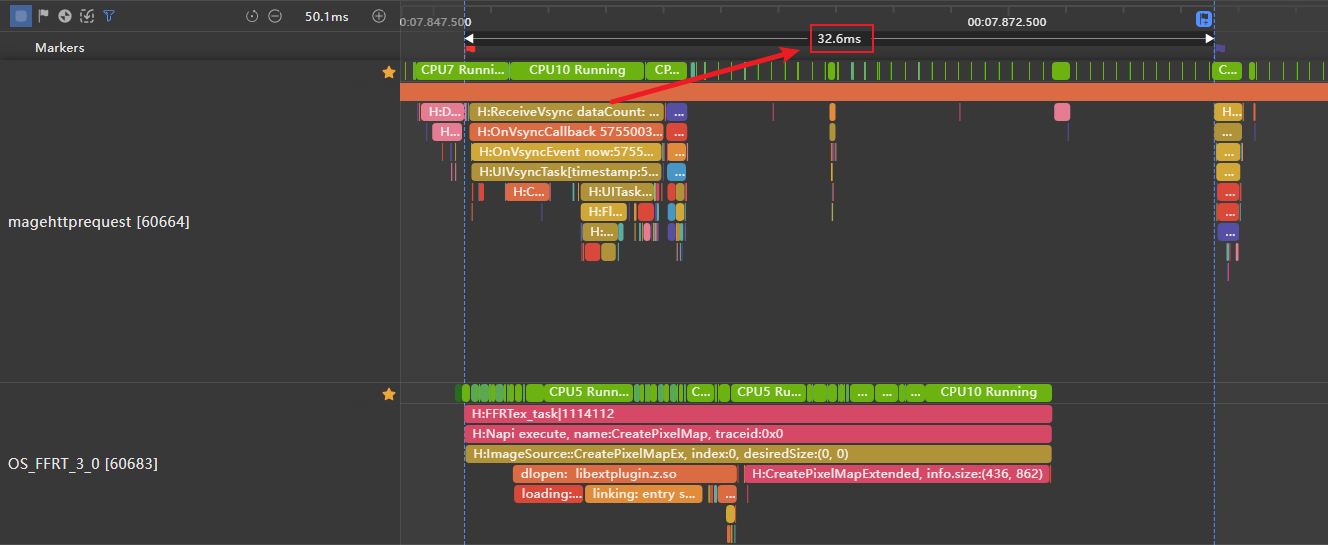
分析阶段的起点为父页面点击按钮开始计时即trace的H:DispatchTouchEvent,结束点为子页面图片渲染的首帧出现即H:CreateImagePixelMap标签后的第一个Vsync,记录白块出现时间为32.6ms,其中记录H:HttpRequestInner的标签耗时即为提前网络下载的耗时1.16s,对比白块时长可知提前预下载可以减少白块出现时长。
图4 使用预下载的方式
说明
网络下载耗时实际受到网络波动影响,优化前后的网络下载耗时数据总体差异在1s内,提供的性能数值仅供参考。
效果对比
|
(优化前)直接使用Image加载网络数据,未使用预下载 |
(优化后)使用预下载 |
|---|---|
|
|
|

性能对比
对比数据如下:
|
方案 |
白块出现时长(毫秒) |
白块出现时长 |
|---|---|---|
|
(优化前)直接使用Image加载网络数据,未使用预下载 |
1300 |
图片位置白块出现时间较长 |
|
(优化后)使用预下载 |
32.6 |
图片位置白块出现时间较短 |
说明
1.测试数据仅限于示例程序,不同设备特性和具体应用场景的多样性,所获得的性能数据存在差异,提供的数值仅供参考。
2.由于该方案仅将下载解码网络图片的步骤提前,不会影响内存等应用数据。开发者可自行管理解码后的PixelMap,主动实现图片的复用和缓存。
由此可见,加载网络图片时,使用预下载,提前处理网络请求并从应用沙箱中读取缓存数据的方式,可以减少用户可见Image白屏或白块出现时长,提升用户体验
总结与最佳实践
6.1 通用优化原则
-
尺寸预设:始终指定图片尺寸,避免布局重计算
-
渐进加载:先显示占位符,再加载实际图片
-
格式优化:使用现代图片格式(WebP/AVIF)
-
懒加载:只在需要时加载图片
-
错误处理:优雅处理加载失败情况
6.2 平台特定建议
Web前端:
-
使用
loading="lazy"属性 -
实施响应式图片(srcset/sizes)
-
利用CSS宽高比盒子
-
使用Intersection Observer实现懒加载
鸿蒙应用:
-
合理使用Image组件生命周期
-
实现多级缓存策略
-
使用PixelMap进行高效渲染
-
利用鸿蒙的动画系统实现平滑过渡
6.3 持续优化策略
-
性能监控:持续监控图片加载性能指标
-
A/B测试:测试不同的图片加载策略
-
用户反馈:收集用户感知的加载体验
-
技术迭代:跟进新的图片格式和加载技术
通过系统性的Image白块问题解决方案,可以显著提升应用的视觉稳定性和用户体验,为用户提供更加流畅、愉悦的使用感受。

讨论HarmonyOS开发技术,专注于API与组件、DevEco Studio、测试、元服务和应用上架分发等。
更多推荐
 12
12 0
0- 0


 已为社区贡献12条内容

所有评论(0)