鸿蒙开发实战:30分钟开发第一个完整应用 - 待办事项ToDo App
鸿蒙开发实战:30分钟开发第一个完整应用 - 待办事项ToDo App
专栏说明:本文是《鸿蒙HarmonyOS新手入门系列》第二篇,建议先阅读第一篇基础教程后再学习本文。本教程所有代码严格遵循华为官方ArkTS开发指南规范。
文章目录
一、项目概述
1.1 为什么选择待办事项应用?
在学完第一篇的基础知识后,很多新手会问:“我学会了语法和组件,但不知道如何开发一个完整的应用?”
待办事项(Todo)应用是最适合新手的第一个实战项目,原因如下:
功能简单清晰:增加、删除、完成任务,逻辑直观
知识点全面:涵盖列表、状态管理、数据持久化等核心技能
成就感强:能做出一个真正可用的应用
可扩展性好:后续可以添加分类、优先级、提醒等功能
1.2 应用功能预览
核心功能:
- ✏️ 添加新任务
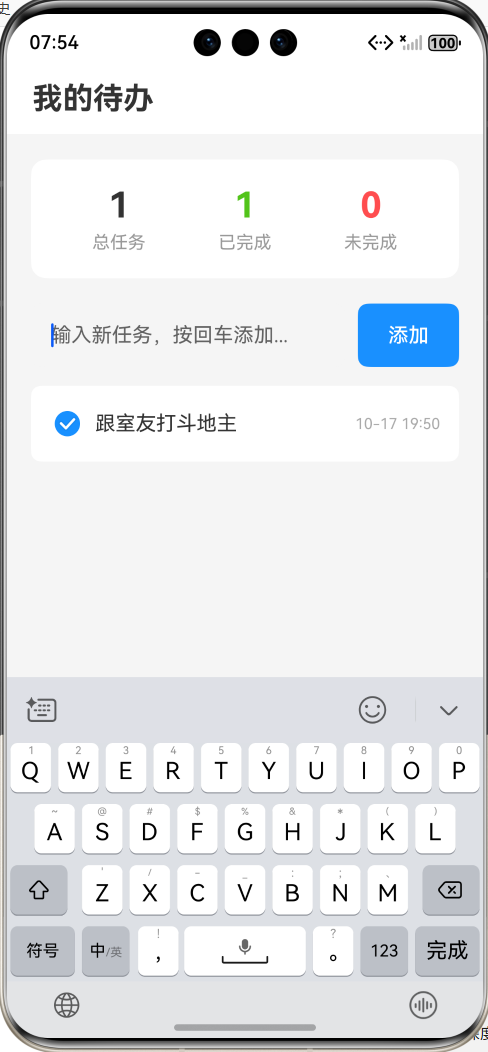
- ✅ 标记任务为已完成/未完成
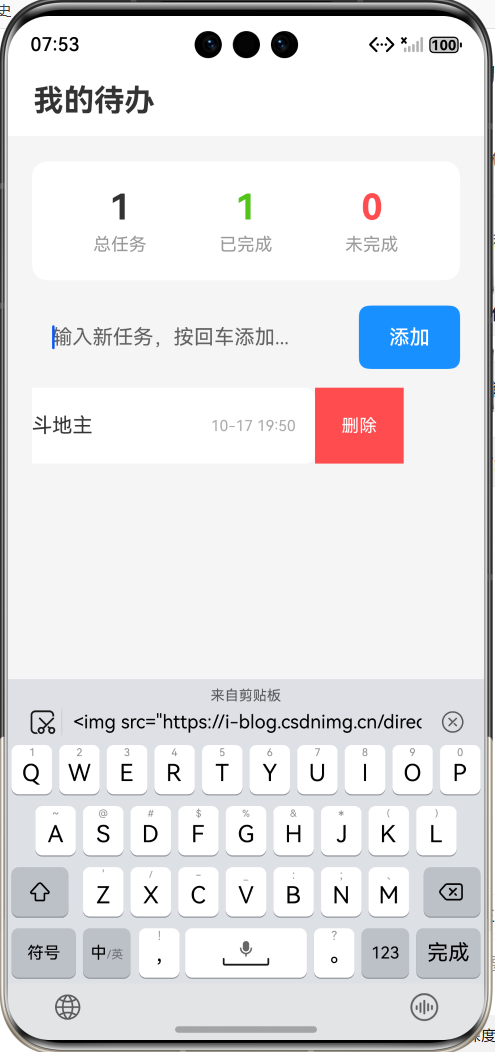
- 🗑️ 删除任务
- 💾 数据持久化存储(关闭应用后数据不丢失)
- 📊 显示任务统计信息
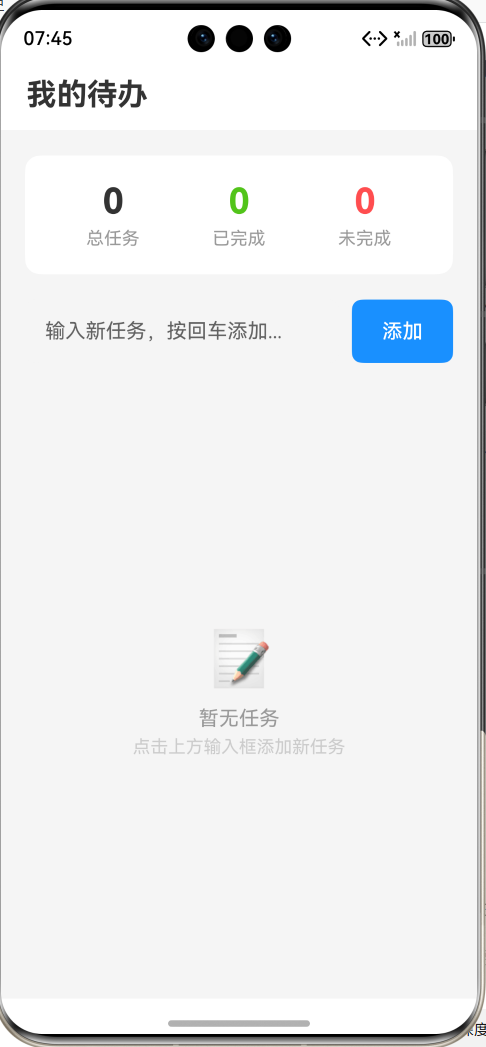
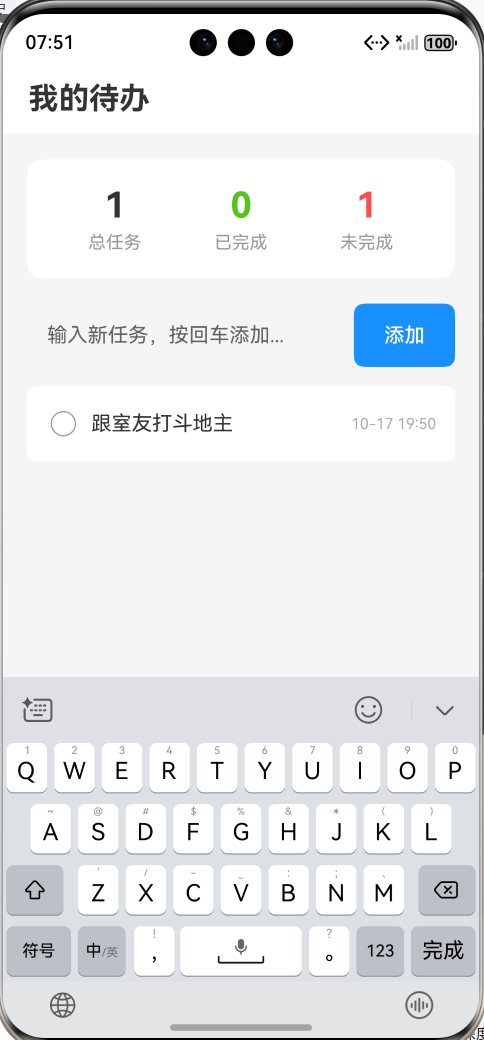
最终效果:
- 顶部显示任务统计(总数、已完成、未完成)
- 中部输入框用于添加新任务
- 底部列表展示所有任务
- 支持滑动删除任务
1.3 技术栈说明
| 技术 | 用途 | 官方文档 |
|---|---|---|
| ArkTS | 开发语言 | ArkTS语言 |
| List组件 | 任务列表展示 | List组件文档 |
| @State状态管理 | 响应式数据 | 状态管理 |
| Preferences | 数据持久化 | 首选项存储 |
二、数据模型设计
2.1 定义任务数据结构
首先,我们需要定义一个任务(Task)的数据模型。根据官方ArkTS语法规范,我们使用接口(interface)来定义:
// 任务数据模型
interface Task {
  id: number          // 任务唯一标识
  title: string       // 任务标题
  isCompleted: boolean // 是否已完成
  createTime: number  // 创建时间戳
}
设计说明:
id:使用时间戳确保唯一性title:任务内容文本isCompleted:布尔值,表示任务状态createTime:记录创建时间,便于后续排序
2.2 创建任务管理类
为了更好地组织代码,我们创建一个任务管理类:
// 任务管理类
class TaskManager {
  // 任务列表
  private tasks: Task[] = []

  // 获取所有任务
  getAllTasks(): Task[] {
    return this.tasks
  }

  // 添加任务
  addTask(title: string): Task {
    const newTask: Task = {
      id: Date.now(),
      title: title,
      isCompleted: false,
      createTime: Date.now()
    }
    this.tasks.push(newTask)
    return newTask
  }

  // 删除任务
  deleteTask(id: number): void {
    const index = this.tasks.findIndex(task => task.id === id)
    if (index !== -1) {
      this.tasks.splice(index, 1)
    }
  }

  // 切换任务完成状态
  toggleTask(id: number): void {
    const task = this.tasks.find(task => task.id === id)
    if (task) {
      task.isCompleted = !task.isCompleted
    }
  }

  // 获取统计信息
  getStatistics(): { total: number, completed: number, pending: number } {
    const total = this.tasks.length
    const completed = this.tasks.filter(task => task.isCompleted).length
    const pending = total - completed
    return { total, completed, pending }
  }
}
三、页面结构搭建
3.1 创建主页面框架
根据官方文档的页面结构规范,我们创建主页面:
@Entry
@Component
struct TodoListPage {
  // 使用@State装饰器,让数据变化时UI自动刷新
  @State taskList: Task[] = []
  @State inputText: string = ''

  build() {
    Column() {
      // 1. 顶部统计区域
      this.StatisticsSection()

      // 2. 输入框区域
      this.InputSection()

      // 3. 任务列表区域
      this.TaskListSection()
    }
    .width('100%')
    .height('100%')
    .backgroundColor('#F5F5F5')
  }

  // 统计区域组件(后续实现)
  @Builder StatisticsSection() {}

  // 输入区域组件(后续实现)
  @Builder InputSection() {}

  // 列表区域组件(后续实现)
  @Builder TaskListSection() {}
}
知识点说明:
@Entry:标记为应用入口页面@Component:声明为自定义组件@State:状态装饰器,数据改变会触发UI更新@Builder:自定义构建函数,用于抽取UI代码块(官方推荐的代码组织方式)
四、实现顶部统计区域
4.1 设计统计卡片
根据官方UI组件规范,使用Row和Column进行布局:
@Builder StatisticsSection() {
  Row() {
    // 总任务数
    Column() {
      Text(this.taskList.length.toString())
        .fontSize(28)
        .fontWeight(FontWeight.Bold)
        .fontColor('#333333')
      Text('总任务')
        .fontSize(14)
        .fontColor('#999999')
        .margin({ top: 5 })
    }
    .layoutWeight(1)

    // 已完成
    Column() {
      Text(this.getCompletedCount().toString())
        .fontSize(28)
        .fontWeight(FontWeight.Bold)
        .fontColor('#52C41A')
      Text('已完成')
        .fontSize(14)
        .fontColor('#999999')
        .margin({ top: 5 })
    }
    .layoutWeight(1)

    // 未完成
    Column() {
      Text(this.getPendingCount().toString())
        .fontSize(28)
        .fontWeight(FontWeight.Bold)
        .fontColor('#FF4D4F')
      Text('未完成')
        .fontSize(14)
        .fontColor('#999999')
        .margin({ top: 5 })
    }
    .layoutWeight(1)
  }
  .width('90%')
  .padding(20)
  .backgroundColor(Color.White)
  .borderRadius(12)
  .margin({ top: 20, bottom: 20 })
  .shadow({ radius: 8, color: '#00000010', offsetX: 0, offsetY: 2 })
}

// 计算已完成任务数量
private getCompletedCount(): number {
  return this.taskList.filter(task => task.isCompleted).length
}

// 计算未完成任务数量
private getPendingCount(): number {
  return this.taskList.filter(task => !task.isCompleted).length
}
UI设计要点:
- 使用
layoutWeight(1)实现三等分布局 - 使用
filter()方法统计已完成和未完成任务 - 使用不同颜色区分状态(绿色表示完成,红色表示待办)
五、实现输入框区域
5.1 创建任务输入框
根据官方TextInput组件规范:
@Builder InputSection() {
  Row() {
    // 输入框
    TextInput({
      placeholder: '输入新任务,按回车添加...',
      text: this.inputText
    })
      .layoutWeight(1)
      .height(50)
      .backgroundColor('#F5F5F5')
      .borderRadius(8)
      .fontSize(16)
      .onChange((value: string) => {
        this.inputText = value
      })
      .onSubmit(() => {
        this.addTask()
      })

    // 添加按钮
    Button('添加')
      .width(80)
      .height(50)
      .fontSize(16)
      .backgroundColor('#1890FF')
      .borderRadius(8)
      .margin({ left: 10 })
      .onClick(() => {
        this.addTask()
      })
  }
  .width('90%')
  .margin({ bottom: 15 })
}

// 添加任务方法
private addTask(): void {
  // 去除首尾空格
  const trimmedText = this.inputText.trim()

  // 验证输入不为空
  if (trimmedText.length === 0) {
    return
  }

  // 创建新任务对象
  const newTask: Task = {
    id: Date.now(),
    title: trimmedText,
    isCompleted: false,
    createTime: Date.now()
  }

  // 添加到任务列表(使用展开运算符创建新数组,触发UI更新)
  this.taskList = [...this.taskList, newTask]

  // 清空输入框
  this.inputText = ''
}
知识点详解:
-
TextInput组件:
placeholder:占位提示文本onChange:监听输入变化onSubmit:键盘回车时触发
-
数据更新技巧:
- 使用展开运算符
[...this.taskList, newTask]创建新数组 - 这样才能触发
@State的UI刷新机制
- 使用展开运算符
六、实现任务列表区域
6.1 使用List组件展示任务
根据官方List组件文档,实现滚动列表:
@Builder TaskListSection() {
  List({ space: 10 }) {
    ForEach(this.taskList, (task: Task) => {
      ListItem() {
        this.TaskItemBuilder(task)
      }
      // 支持滑动删除
      .swipeAction({ end: this.DeleteButton(task.id) })
    }, (task: Task) => task.id.toString())
  }
  .width('90%')
  .layoutWeight(1)
  .divider({
    strokeWidth: 1,
    color: '#E0E0E0',
    startMargin: 60,
    endMargin: 0
  })
}

// 任务项UI构建
@Builder TaskItemBuilder(task: Task) {
  Row() {
    // 完成状态复选框
    Checkbox({ name: task.id.toString(), group: 'taskGroup' })
      .select(task.isCompleted)
      .selectedColor('#1890FF')
      .onChange((isChecked: boolean) => {
        this.toggleTaskStatus(task.id)
      })
      .margin({ right: 12 })

    // 任务文本
    Text(task.title)
      .fontSize(16)
      .fontColor(task.isCompleted ? '#999999' : '#333333')
      .decoration({
        type: task.isCompleted ? TextDecorationType.LineThrough : TextDecorationType.None
      })
      .layoutWeight(1)

    // 时间标签
    Text(this.formatTime(task.createTime))
      .fontSize(12)
      .fontColor('#AAAAAA')
  }
  .width('100%')
  .height(60)
  .padding({ left: 15, right: 15 })
  .backgroundColor(Color.White)
  .borderRadius(8)
}

// 滑动删除按钮
@Builder DeleteButton(id: number) {
  Button({ type: ButtonType.Normal }) {
    Text('删除')
      .fontSize(14)
      .fontColor(Color.White)
  }
  .width(70)
  .height(60)
  .backgroundColor('#FF4D4F')
  .onClick(() => {
    this.deleteTask(id)
  })
}

// 切换任务完成状态
private toggleTaskStatus(id: number): void {
  this.taskList = this.taskList.map(task => {
    if (task.id === id) {
      // 手动创建新对象(ArkTS不支持对象展开运算符)
      return {
        id: task.id,
        title: task.title,
        isCompleted: !task.isCompleted,
        createTime: task.createTime
      }
    }
    return task
  })
}

// 删除任务
private deleteTask(id: number): void {
  this.taskList = this.taskList.filter(task => task.id !== id)
}

// 格式化时间
private formatTime(timestamp: number): string {
  const date = new Date(timestamp)
  const month = (date.getMonth() + 1).toString().padStart(2, '0')
  const day = date.getDate().toString().padStart(2, '0')
  const hours = date.getHours().toString().padStart(2, '0')
  const minutes = date.getMinutes().toString().padStart(2, '0')
  return `${month}-${day} ${hours}:${minutes}`
}
核心知识点:
| 知识点 | 说明 | 官方文档参考 |
|---|---|---|
| List组件 | 列表容器,支持滚动 | List组件文档 |
| ForEach | 循环渲染,第三个参数是键生成函数 | 渲染控制文档 |
| ListItem | 列表项 | ListItem组件文档 |
| swipeAction | 滑动操作(左滑删除) | List组件手势 |
| Checkbox | 复选框组件 | Checkbox组件文档 |
| TextDecorationType.LineThrough | 文本删除线样式 | Text组件文档 |
七、数据持久化存储
7.1 为什么需要数据持久化?
目前我们的应用有一个问题:关闭应用后,所有任务数据都会丢失。我们需要使用**Preferences(首选项存储)**来持久化数据。
根据官方Preferences文档,这是一种轻量级的键值型数据存储方式,非常适合我们的场景。
7.2 导入Preferences模块
首先在文件顶部导入所需模块:
import preferences from '@ohos.data.preferences'
import common from '@ohos.app.ability.common'
7.3 实现数据持久化管理类
// 数据持久化管理类
class PreferencesManager {
  private context: common.UIAbilityContext
  private preferences: preferences.Preferences | null = null
  private readonly STORE_NAME = 'TodoStore'
  private readonly KEY_TASKS = 'tasks'

  constructor(context: common.UIAbilityContext) {
    this.context = context
  }

  // 初始化Preferences
  async init(): Promise<void> {
    try {
      this.preferences = await preferences.getPreferences(this.context, this.STORE_NAME)
    } catch (err) {
      console.error('初始化Preferences失败:', JSON.stringify(err))
    }
  }

  // 保存任务列表
  async saveTasks(tasks: Task[]): Promise<void> {
    if (!this.preferences) {
      return
    }
    try {
      // 将任务数组转换为JSON字符串
      const tasksJson = JSON.stringify(tasks)
      await this.preferences.put(this.KEY_TASKS, tasksJson)
      // 持久化到磁盘
      await this.preferences.flush()
    } catch (err) {
      console.error('保存任务失败:', JSON.stringify(err))
    }
  }

  // 加载任务列表
  async loadTasks(): Promise<Task[]> {
    if (!this.preferences) {
      return []
    }
    try {
      const tasksJson = await this.preferences.get(this.KEY_TASKS, '[]') as string
      return JSON.parse(tasksJson) as Task[]
    } catch (err) {
      console.error('加载任务失败:', JSON.stringify(err))
      return []
    }
  }
}
7.4 在页面中集成持久化
修改主页面代码,添加持久化功能:
@Entry
@Component
struct TodoListPage {
  @State taskList: Task[] = []
  @State inputText: string = ''

  private preferencesManager: PreferencesManager | null = null

  // 组件即将出现时调用
  async aboutToAppear(): Promise<void> {
    // 获取UIAbility上下文
    const context = getContext(this) as common.UIAbilityContext

    // 初始化Preferences管理器
    this.preferencesManager = new PreferencesManager(context)
    await this.preferencesManager.init()

    // 加载已保存的任务
    const savedTasks = await this.preferencesManager.loadTasks()
    this.taskList = savedTasks
  }

  // 添加任务(修改版,添加保存逻辑)
  private async addTask(): Promise<void> {
    const trimmedText = this.inputText.trim()
    if (trimmedText.length === 0) {
      return
    }

    const newTask: Task = {
      id: Date.now(),
      title: trimmedText,
      isCompleted: false,
      createTime: Date.now()
    }

    this.taskList = [...this.taskList, newTask]
    this.inputText = ''

    // 保存到本地
    await this.saveTasksToLocal()
  }

  // 切换任务状态(修改版)
  private async toggleTaskStatus(id: number): Promise<void> {
    this.taskList = this.taskList.map(task => {
      if (task.id === id) {
        return { ...task, isCompleted: !task.isCompleted }
      }
      return task
    })

    await this.saveTasksToLocal()
  }

  // 删除任务(修改版)
  private async deleteTask(id: number): Promise<void> {
    this.taskList = this.taskList.filter(task => task.id !== id)
    await this.saveTasksToLocal()
  }

  // 保存任务到本地
  private async saveTasksToLocal(): Promise<void> {
    if (this.preferencesManager) {
      await this.preferencesManager.saveTasksToLocal(this.taskList)
    }
  }

  // ... 其他代码保持不变
}
知识点说明:
| 概念 | 说明 |
|---|---|
| aboutToAppear | 组件生命周期函数,在build()之前调用,适合做初始化 |
| async/await | 异步操作,Preferences的所有方法都是异步的 |
| getContext(this) | 获取当前组件的UIAbility上下文 |
| flush() | 将数据持久化到磁盘,确保数据不丢失 |
八、完整代码汇总
8.1 完整页面代码
import preferences from '@ohos.data.preferences'
import common from '@ohos.app.ability.common'

// ========== 数据模型定义 ==========
interface Task {
  id: number
  title: string
  isCompleted: boolean
  createTime: number
}

// ========== 数据持久化管理类 ==========
class PreferencesManager {
  private context: common.UIAbilityContext
  private preferences: preferences.Preferences | null = null
  private readonly STORE_NAME = 'TodoStore'
  private readonly KEY_TASKS = 'tasks'

  constructor(context: common.UIAbilityContext) {
    this.context = context
  }

  async init(): Promise<void> {
    try {
      this.preferences = await preferences.getPreferences(this.context, this.STORE_NAME)
    } catch (err) {
      console.error('初始化Preferences失败:', JSON.stringify(err))
    }
  }

  async saveTasks(tasks: Task[]): Promise<void> {
    if (!this.preferences) {
      return
    }
    try {
      const tasksJson = JSON.stringify(tasks)
      await this.preferences.put(this.KEY_TASKS, tasksJson)
      await this.preferences.flush()
    } catch (err) {
      console.error('保存任务失败:', JSON.stringify(err))
    }
  }

  async loadTasks(): Promise<Task[]> {
    if (!this.preferences) {
      return []
    }
    try {
      const tasksJson = await this.preferences.get(this.KEY_TASKS, '[]') as string
      return JSON.parse(tasksJson) as Task[]
    } catch (err) {
      console.error('加载任务失败:', JSON.stringify(err))
      return []
    }
  }
}

// ========== 主页面组件 ==========
@Entry
@Component
struct TodoListPage {
  @State taskList: Task[] = []
  @State inputText: string = ''

  private preferencesManager: PreferencesManager | null = null

  async aboutToAppear(): Promise<void> {
    const context = getContext(this) as common.UIAbilityContext
    this.preferencesManager = new PreferencesManager(context)
    await this.preferencesManager.init()
    const savedTasks = await this.preferencesManager.loadTasks()
    this.taskList = savedTasks
  }

  build() {
    Column() {
      // 标题栏
      this.TitleBar()

      // 统计区域
      this.StatisticsSection()

      // 输入框区域
      this.InputSection()

      // 任务列表
      this.TaskListSection()
    }
    .width('100%')
    .height('100%')
    .backgroundColor('#F5F5F5')
  }

  // ========== 标题栏 ==========
  @Builder TitleBar() {
    Row() {
      Text('我的待办')
        .fontSize(24)
        .fontWeight(FontWeight.Bold)
        .fontColor('#333333')
    }
    .width('100%')
    .height(56)
    .padding({ left: 20, right: 20 })
    .backgroundColor(Color.White)
  }

  // ========== 统计区域 ==========
  @Builder StatisticsSection() {
    Row() {
      Column() {
        Text(this.taskList.length.toString())
          .fontSize(28)
          .fontWeight(FontWeight.Bold)
          .fontColor('#333333')
        Text('总任务')
          .fontSize(14)
          .fontColor('#999999')
          .margin({ top: 5 })
      }
      .layoutWeight(1)

      Column() {
        Text(this.getCompletedCount().toString())
          .fontSize(28)
          .fontWeight(FontWeight.Bold)
          .fontColor('#52C41A')
        Text('已完成')
          .fontSize(14)
          .fontColor('#999999')
          .margin({ top: 5 })
      }
      .layoutWeight(1)

      Column() {
        Text(this.getPendingCount().toString())
          .fontSize(28)
          .fontWeight(FontWeight.Bold)
          .fontColor('#FF4D4F')
        Text('未完成')
          .fontSize(14)
          .fontColor('#999999')
          .margin({ top: 5 })
      }
      .layoutWeight(1)
    }
    .width('90%')
    .padding(20)
    .backgroundColor(Color.White)
    .borderRadius(12)
    .margin({ top: 20, bottom: 20 })
    .shadow({ radius: 8, color: '#00000010', offsetX: 0, offsetY: 2 })
  }

  // ========== 输入区域 ==========
  @Builder InputSection() {
    Row() {
      TextInput({
        placeholder: '输入新任务,按回车添加...',
        text: this.inputText
      })
        .layoutWeight(1)
        .height(50)
        .backgroundColor('#F5F5F5')
        .borderRadius(8)
        .fontSize(16)
        .onChange((value: string) => {
          this.inputText = value
        })
        .onSubmit(() => {
          this.addTask()
        })

      Button('添加')
        .width(80)
        .height(50)
        .fontSize(16)
        .backgroundColor('#1890FF')
        .borderRadius(8)
        .margin({ left: 10 })
        .onClick(() => {
          this.addTask()
        })
    }
    .width('90%')
    .margin({ bottom: 15 })
  }

  // ========== 任务列表 ==========
  @Builder TaskListSection() {
    if (this.taskList.length === 0) {
      // 空状态提示
      Column() {
        Text('📝')
          .fontSize(48)
          .margin({ bottom: 10 })
        Text('暂无任务')
          .fontSize(16)
          .fontColor('#999999')
        Text('点击上方输入框添加新任务')
          .fontSize(14)
          .fontColor('#CCCCCC')
          .margin({ top: 5 })
      }
      .width('100%')
      .layoutWeight(1)
      .justifyContent(FlexAlign.Center)
    } else {
      List({ space: 10 }) {
        ForEach(this.taskList, (task: Task) => {
          ListItem() {
            this.TaskItemBuilder(task)
          }
          .swipeAction({ end: this.DeleteButton(task.id) })
        }, (task: Task) => task.id.toString())
      }
      .width('90%')
      .layoutWeight(1)
    }
  }

  // ========== 任务项 ==========
  @Builder TaskItemBuilder(task: Task) {
    Row() {
      Checkbox({ name: task.id.toString(), group: 'taskGroup' })
        .select(task.isCompleted)
        .selectedColor('#1890FF')
        .onChange((isChecked: boolean) => {
          this.toggleTaskStatus(task.id)
        })
        .margin({ right: 12 })

      Text(task.title)
        .fontSize(16)
        .fontColor(task.isCompleted ? '#999999' : '#333333')
        .decoration({
          type: task.isCompleted ? TextDecorationType.LineThrough : TextDecorationType.None
        })
        .layoutWeight(1)

      Text(this.formatTime(task.createTime))
        .fontSize(12)
        .fontColor('#AAAAAA')
    }
    .width('100%')
    .height(60)
    .padding({ left: 15, right: 15 })
    .backgroundColor(Color.White)
    .borderRadius(8)
  }

  // ========== 删除按钮 ==========
  @Builder DeleteButton(id: number) {
    Button({ type: ButtonType.Normal }) {
      Text('删除')
        .fontSize(14)
        .fontColor(Color.White)
    }
    .width(70)
    .height(60)
    .backgroundColor('#FF4D4F')
    .onClick(() => {
      this.deleteTask(id)
    })
  }

  // ========== 业务方法 ==========

  // 添加任务
  private async addTask(): Promise<void> {
    const trimmedText = this.inputText.trim()
    if (trimmedText.length === 0) {
      return
    }

    const newTask: Task = {
      id: Date.now(),
      title: trimmedText,
      isCompleted: false,
      createTime: Date.now()
    }

    this.taskList = [...this.taskList, newTask]
    this.inputText = ''
    await this.saveTasksToLocal()
  }

  // 切换任务状态
  private async toggleTaskStatus(id: number): Promise<void> {
    this.taskList = this.taskList.map(task => {
      if (task.id === id) {
        // 手动创建新对象(ArkTS不支持对象展开运算符)
        return {
          id: task.id,
          title: task.title,
          isCompleted: !task.isCompleted,
          createTime: task.createTime
        }
      }
      return task
    })
    await this.saveTasksToLocal()
  }

  // 删除任务
  private async deleteTask(id: number): Promise<void> {
    this.taskList = this.taskList.filter(task => task.id !== id)
    await this.saveTasksToLocal()
  }

  // 保存到本地
  private async saveTasksToLocal(): Promise<void> {
    if (this.preferencesManager) {
      await this.preferencesManager.saveTasks(this.taskList)
    }
  }

  // ========== 工具方法 ==========

  // 获取已完成数量
  private getCompletedCount(): number {
    return this.taskList.filter(task => task.isCompleted).length
  }

  // 获取未完成数量
  private getPendingCount(): number {
    return this.taskList.filter(task => !task.isCompleted).length
  }

  // 格式化时间
  private formatTime(timestamp: number): string {
    const date = new Date(timestamp)
    const month = (date.getMonth() + 1).toString().padStart(2, '0')
    const day = date.getDate().toString().padStart(2, '0')
    const hours = date.getHours().toString().padStart(2, '0')
    const minutes = date.getMinutes().toString().padStart(2, '0')
    return `${month}-${day} ${hours}:${minutes}`
  }
}
九、运行与测试
9.1 运行应用
- 连接真机或启动模拟器
- 点击DevEco Studio的"Run"按钮
- 等待编译完成,应用将自动安装并启动
9.2 实际效果
🔗 参考资料
本文所有代码严格遵循华为官方文档规范:
结语
恭喜你!通过本教程,你已经:
✅ 完成了第一个完整的鸿蒙应用开发
✅ 掌握了List列表组件的使用
✅ 学会了使用Preferences进行数据持久化
✅ 理解了@State状态管理的核心原理
✅ 学会了如何组织和管理代码结构
这个待办事项应用虽然简单,但包含了真实项目开发的核心要素。建议你:
- 反复练习:尝试自己从零编写一遍代码
- 功能扩展:增加新功能
- 代码优化:思考如何让代码更优雅
- 举一反三:尝试开发其他类型的应用
作者寄语:学习编程最重要的是动手实践。不要只是看代码,一定要自己敲一遍,遇到问题时查阅官方文档,这样才能真正掌握知识。期待看到你开发出更多优秀的鸿蒙应用!
如果本文对你有帮助,欢迎点赞👍、收藏⭐、关注➕!有问题欢迎在评论区讨论!
这个链接是我参与鸿蒙培训的班级链接,该活动由鸿蒙官方组织。如果你感兴趣,可以进入班级一起学习。(https://developer.huawei.com/consumer/cn/training/classDetail/ffcb0f4a66a44a3f870797de8f4faa9b?type=1?ha_source=hmosclass&ha_sourceId=89000248)
标签:#HarmonyOS #鸿蒙开发 #ArkTS #实战教程 #待办事项 #Preferences #新手教程
版权声明:本文为作者原创文章,遵循 CC 4.0 BY-SA 版权协议,转载请附上原文出处链接和本声明。

讨论HarmonyOS开发技术,专注于API与组件、DevEco Studio、测试、元服务和应用上架分发等。
更多推荐


 36
36 0
0- 0


 已为社区贡献3条内容

所有评论(0)