鸿蒙开发之Page Ability
这里写自定义目录标题IntentAbilitySlice间导航1.创建两个AbilitySlice2.创建两个布局文件3.AbilitySlice路由配置4.注册Action5.页面间跳转6.测试相同Page的AbilitySlice间跳转与参数传递1.无参数跳转2.带参数跳转3.带参数跳转+返回值不同Page的AbilitySlice间跳转与参数传递不同的Page直接跳转Page1的MainAb
鸿蒙开发之Page Ability
一、Page Ability概述
Page模板(以下简称“Page”)是FA唯一支持的模板,用于提供与用户交互的能力。一个Page可以由一个或多个AbilitySlice构成,AbilitySlice是指应用的单个页面及其控制逻辑的总和。
当一个Page由多个AbilitySlice共同构成时,这些AbilitySlice页面提供的业务能力应具有高度相关性。例如,新闻浏览功能可以通过一个Page来实现,其中包含了两个AbilitySlice:一个AbilitySlice用于展示新闻列表,另一个AbilitySlice用于展示新闻详情。

二、Intent
Intent是对象之间传递信息的载体。例如,当一个Ability需要启动另一个Ability时,或者一个AbilitySlice需要导航到另一个AbilitySlice时,可以通过Intent指定启动的目标同时携带相关数据。Intent的构成元素包括Operation与Parameters。
| 属性 | 子属性 | 描述 |
|---|---|---|
| Operation | Action | 表示动作,通常使用系统预置Action,应用也可以自定义Action。例如IntentConstants.ACTION_HOME表示返回桌面动作。 |
| Operation | Entity | 表示类别,通常使用系统预置Entity,应用也可以自定义Entity。例如Intent.ENTITY_HOME表示在桌面显示图标。 |
| Operation | Uri | 表示Uri描述。如果在Intent中指定了Uri,则Intent将匹配指定的Uri信息,包括scheme, schemeSpecificPart, authority和path信息。 |
| Operation | Flags | 表示处理Intent的方式。例如Intent.FLAG_ABILITY_CONTINUATION标记在本地的一个Ability是否可以迁移到远端设备继续运行。 |
| Operation | BundleName | 表示包描述。如果在Intent中同时指定了BundleName和AbilityName,则Intent可以直接匹配到指定的Ability。 |
| Operation | AbilityName | 表示待启动的Ability名称。如果在Intent中同时指定了BundleName和AbilityName,则Intent可以直接匹配到指定的Ability。 |
| Operation | DeviceId | 表示运行指定Ability的设备ID。 |
| Parameters | - | Parameters是一种支持自定义的数据结构,开发者可以通过Parameters传递某些请求所需的额外信息。 |
三、AbilitySlice间导航
当发起导航的AbilitySlice和导航目标的AbilitySlice处于同一个Page时,可以通过present()方法实现导航。
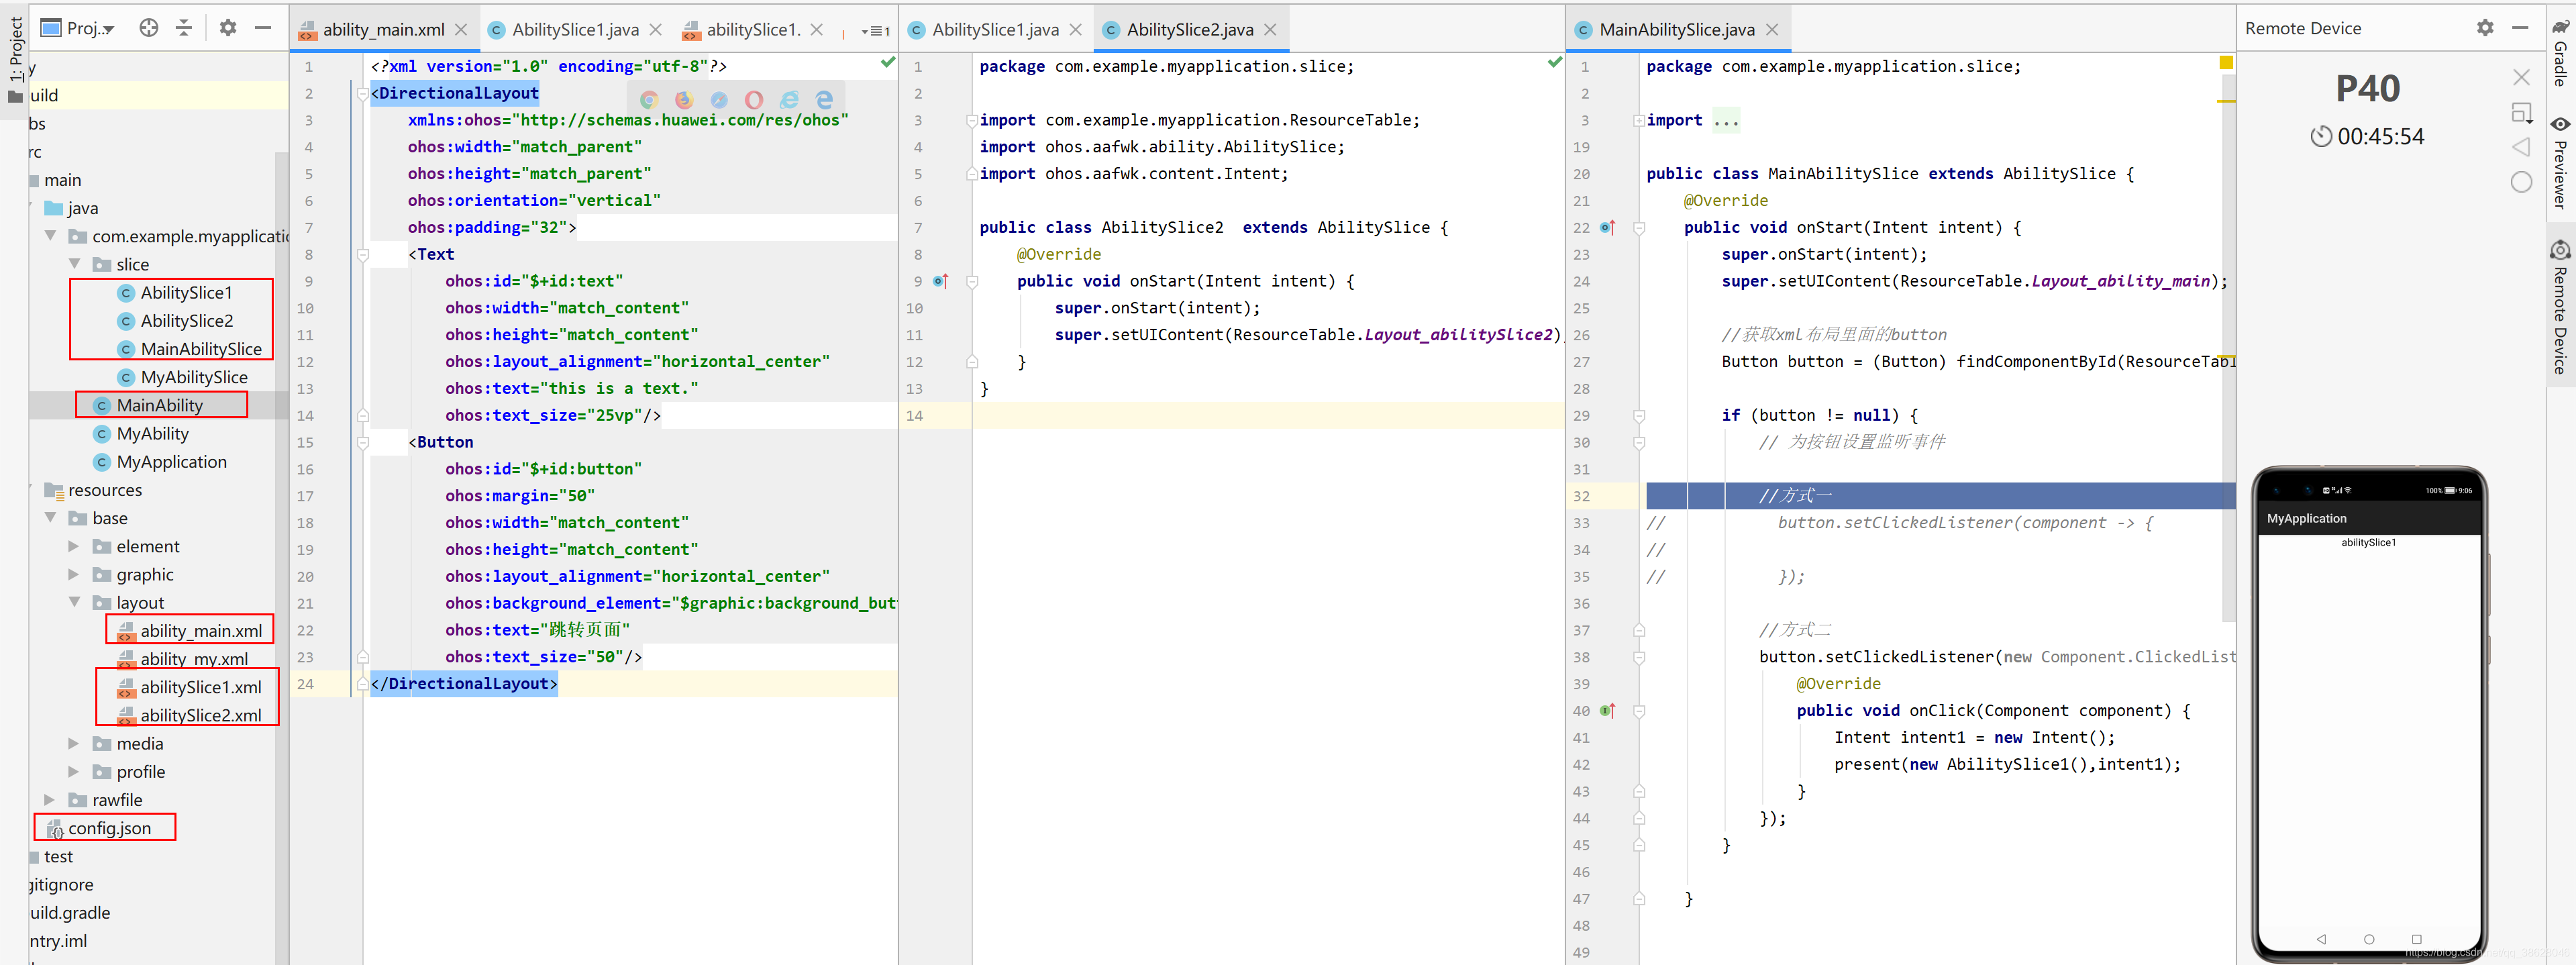
1.创建两个AbilitySlice
Page模板(简称“Page”)是FA唯一支持的模板,用于提供与用户交互的能力。一个Page可以由一个或多个AbilitySlice构成,AbilitySlice是指应用的单个页面及其控制逻辑的总和。
public class AbilitySlice1  extends AbilitySlice {
    @Override
    public void onStart(Intent intent) {
        super.onStart(intent);
        super.setUIContent(ResourceTable.Layout_abilitySlice1);
    }
}
public class AbilitySlice2  extends AbilitySlice {
    @Override
    public void onStart(Intent intent) {
        super.onStart(intent);
        super.setUIContent(ResourceTable.Layout_abilitySlice2);
    }
}
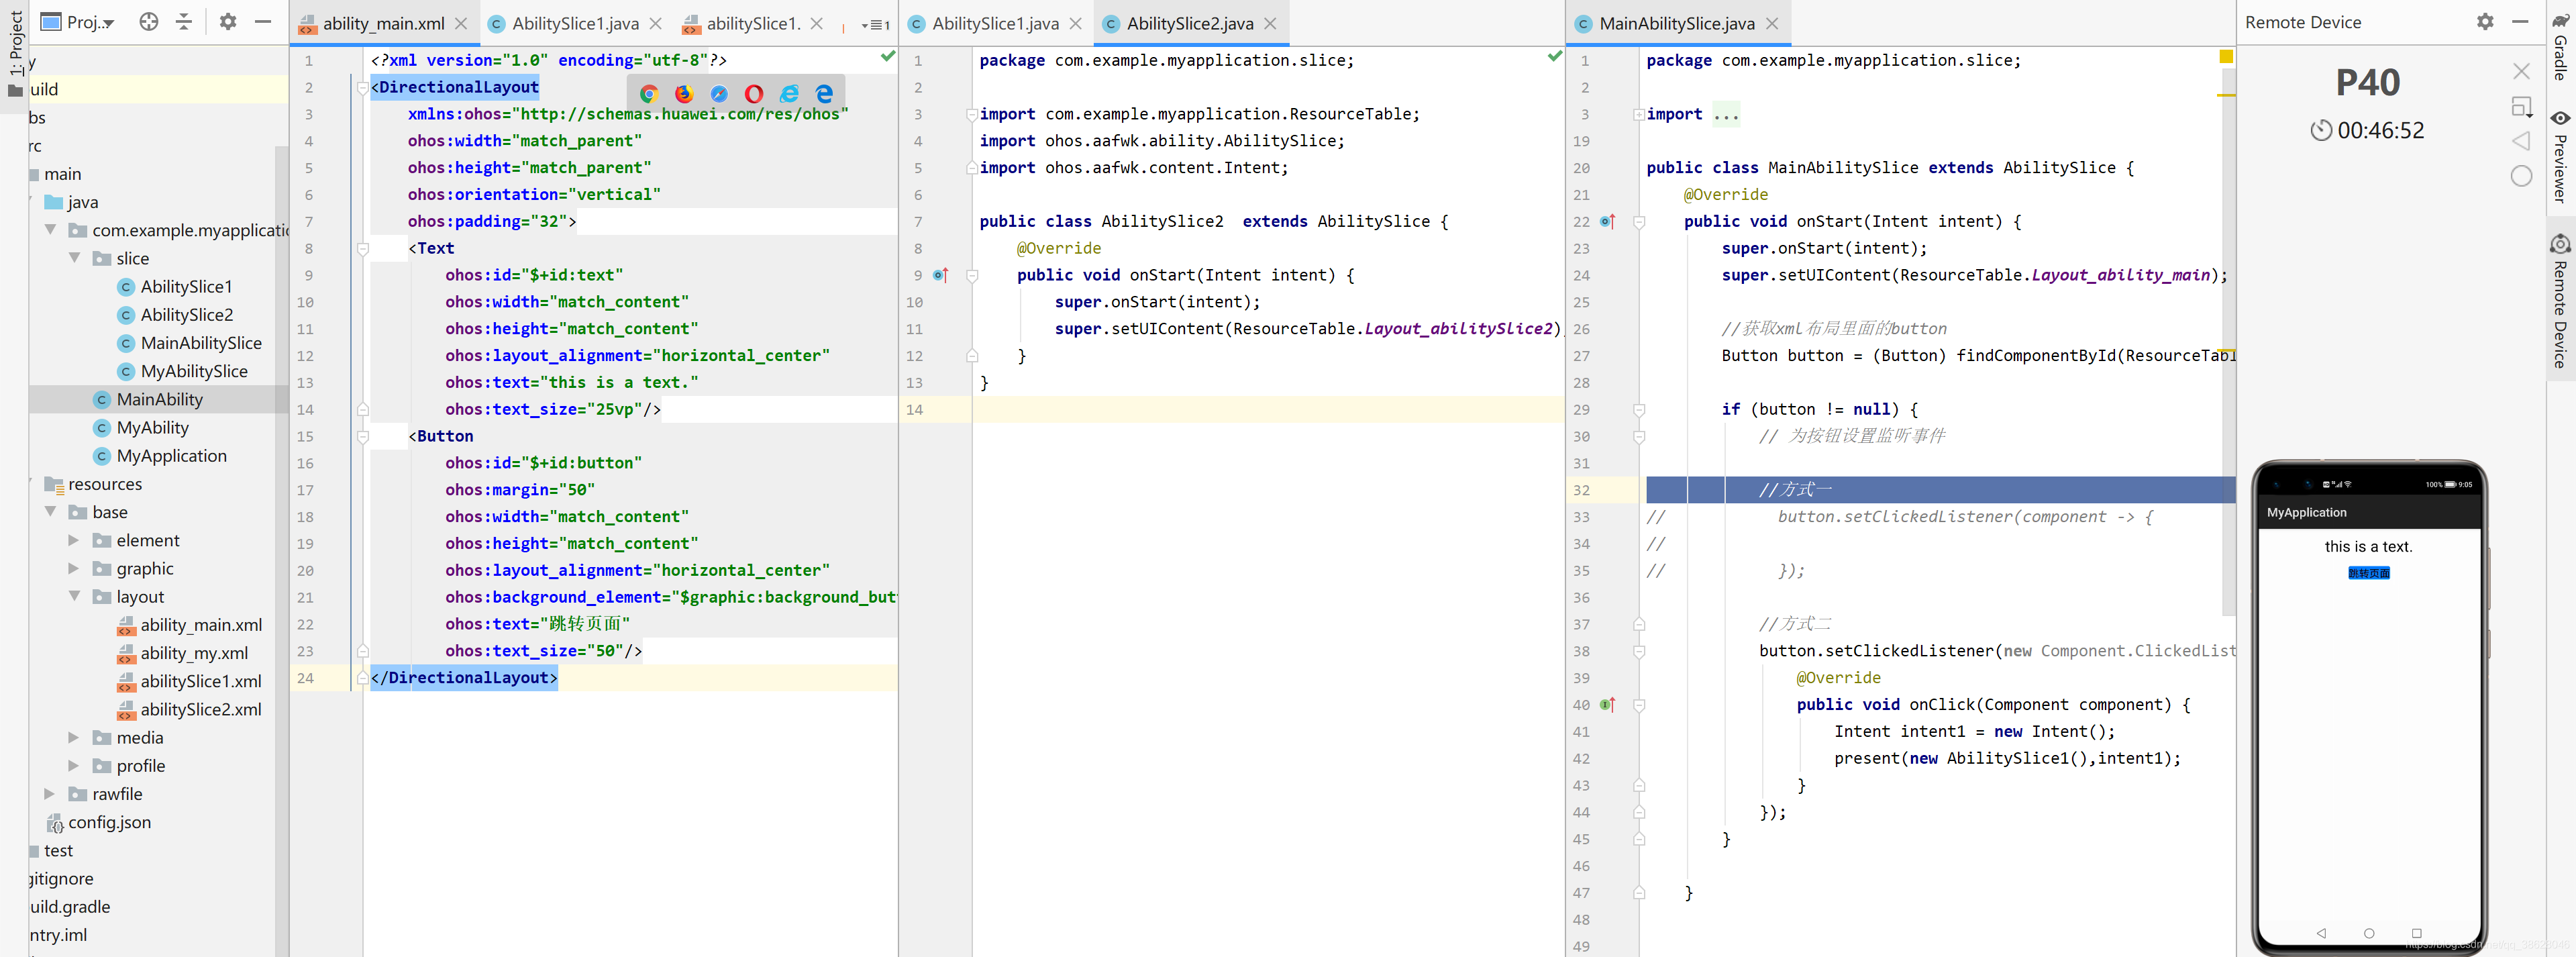
2.创建两个布局文件
<?xml version="1.0" encoding="utf-8"?>
<DirectionalLayout
    xmlns:ohos="http://schemas.huawei.com/res/ohos"
    ohos:height="match_parent"
    ohos:width="match_parent"
    ohos:orientation="vertical">

    <Text
        ohos:id="$+id:abilitySlice1"
        ohos:height="match_content"
        ohos:width="match_content"
        ohos:background_element="$graphic:background_ability_my"
        ohos:layout_alignment="horizontal_center"
        ohos:text="abilitySlice1"
        ohos:text_size="50"
        />
</DirectionalLayout>
<?xml version="1.0" encoding="utf-8"?>
<DirectionalLayout
    xmlns:ohos="http://schemas.huawei.com/res/ohos"
    ohos:height="match_parent"
    ohos:width="match_parent"
    ohos:orientation="vertical">

    <Text
        ohos:id="$+id:abilitySlice2"
        ohos:height="match_content"
        ohos:width="match_content"
        ohos:background_element="$graphic:background_ability_my"
        ohos:layout_alignment="horizontal_center"
        ohos:text="abilitySlice2"
        ohos:text_size="50"
        />
</DirectionalLayout>
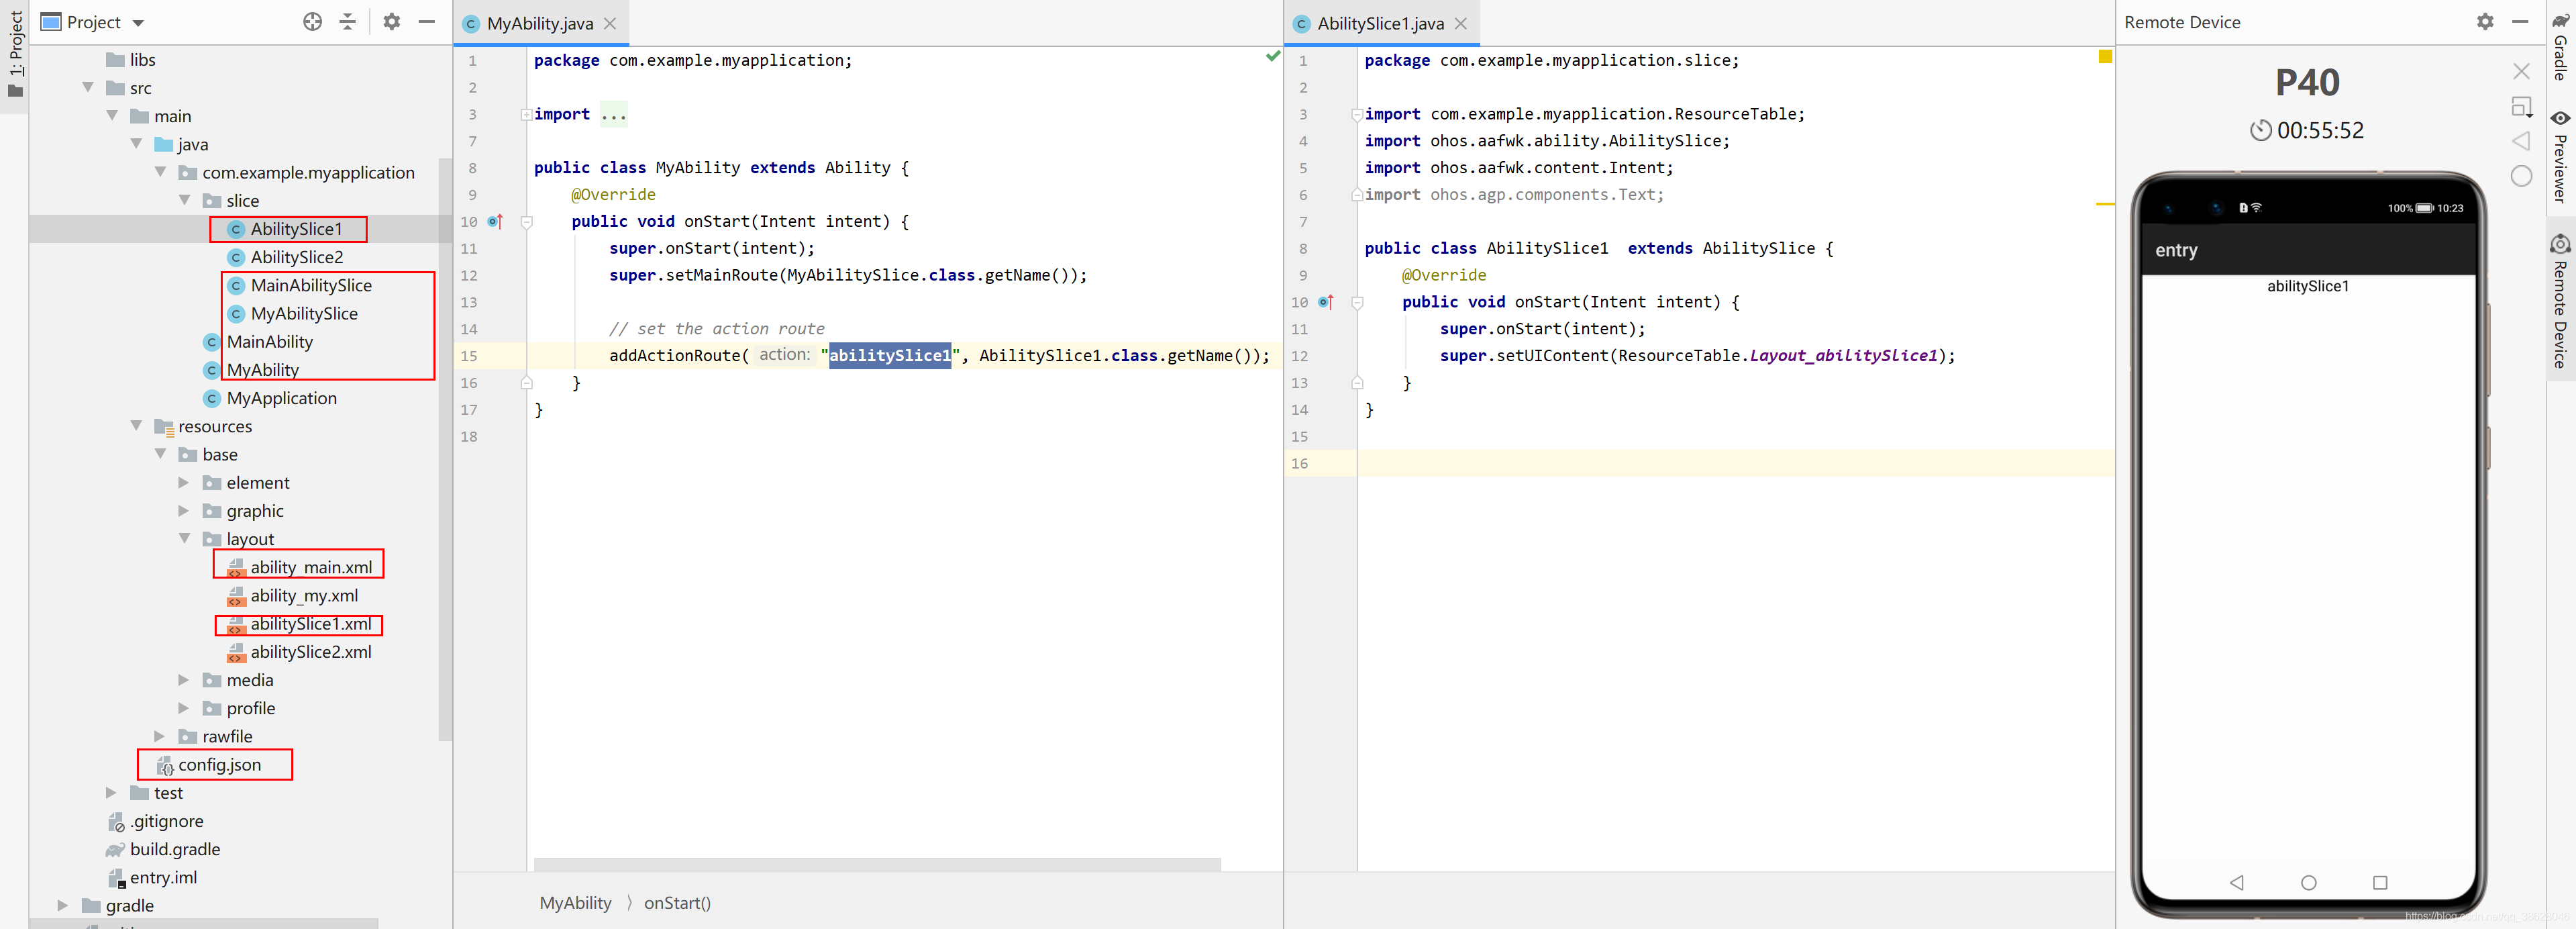
3.AbilitySlice路由配置
一个Page可以包含多个AbilitySlice,但是Page进入前台时界面默认只展示一个AbilitySlice。默认展示的AbilitySlice是通过setMainRoute()方法来指定的。如果需要更改默认展示的AbilitySlice,可以通过addActionRoute()方法为此AbilitySlice配置一条路由规则。此时,当其他Page实例期望导航到此AbilitySlice时,可以在Intent中指定Action
setMainRoute()方法与addActionRoute()方法
public class MainAbility extends Ability {
    @Override
    public void onStart(Intent intent) {
        super.onStart(intent);
        // set the main route
        super.setMainRoute(MainAbilitySlice.class.getName());

        // set the action route
        addActionRoute("abilitySlice1", AbilitySlice1.class.getName());
        addActionRoute("abilitySlice2", AbilitySlice2.class.getName());
    }
}
4.注册Action
addActionRoute()方法中使用的动作命名,需要在应用配置文件(config.json)中注册:
    "abilities": [
      {
        "skills": [
          {
            "entities": [
              "entity.system.home"
            ],
            "actions": [
              "action.system.home",
              "abilitySlice1",
              "abilitySlice2"
            ]
          }
        ],
        "orientation": "unspecified",
        "name": "com.example.myapplication.MainAbility",
        "icon": "$media:icon",
        "description": "$string:mainability_description",
        "label": "MyApplication",
        "type": "page",
        "launchType": "standard"
      },
5.页面间跳转
public class MainAbilitySlice extends AbilitySlice {
    @Override
    public void onStart(Intent intent) {
        super.onStart(intent);
        super.setUIContent(ResourceTable.Layout_ability_main);

        //获取xml布局里面的button
        Button button = (Button) findComponentById(ResourceTable.Id_button);

        if (button != null) {
            // 为按钮设置监听事件

            //方式一
//            button.setClickedListener(component -> {
//
//            });

            //方式二
            button.setClickedListener(new Component.ClickedListener() {
                @Override
                public void onClick(Component component) {
                    Intent intent1 = new Intent();
                    present(new AbilitySlice1(),intent1);
                }
            });
        }

    }

    @Override
    public void onActive() {
        super.onActive();
    }

    @Override
    public void onForeground(Intent intent) {
        super.onForeground(intent);
    }

}
6.测试
四、AbilitySlice间参数传递
1.无参数跳转
public class MainAbilitySlice extends AbilitySlice {
    @Override
    public void onStart(Intent intent) {
        super.onStart(intent);
        super.setUIContent(ResourceTable.Layout_ability_main);

        //获取xml布局里面的button
        Button button = (Button) findComponentById(ResourceTable.Id_button);

        if (button != null) {
            // 为按钮设置监听事件
            //方式二
            button.setClickedListener(new Component.ClickedListener() {
                @Override
                public void onClick(Component component) {
                    Intent intent1 = new Intent();
                    present(new AbilitySlice1(),intent1);
                }
            });
        }
    }

    @Override
    public void onActive() {
        super.onActive();
    }

    @Override
    public void onForeground(Intent intent) {
        super.onForeground(intent);
    }
}
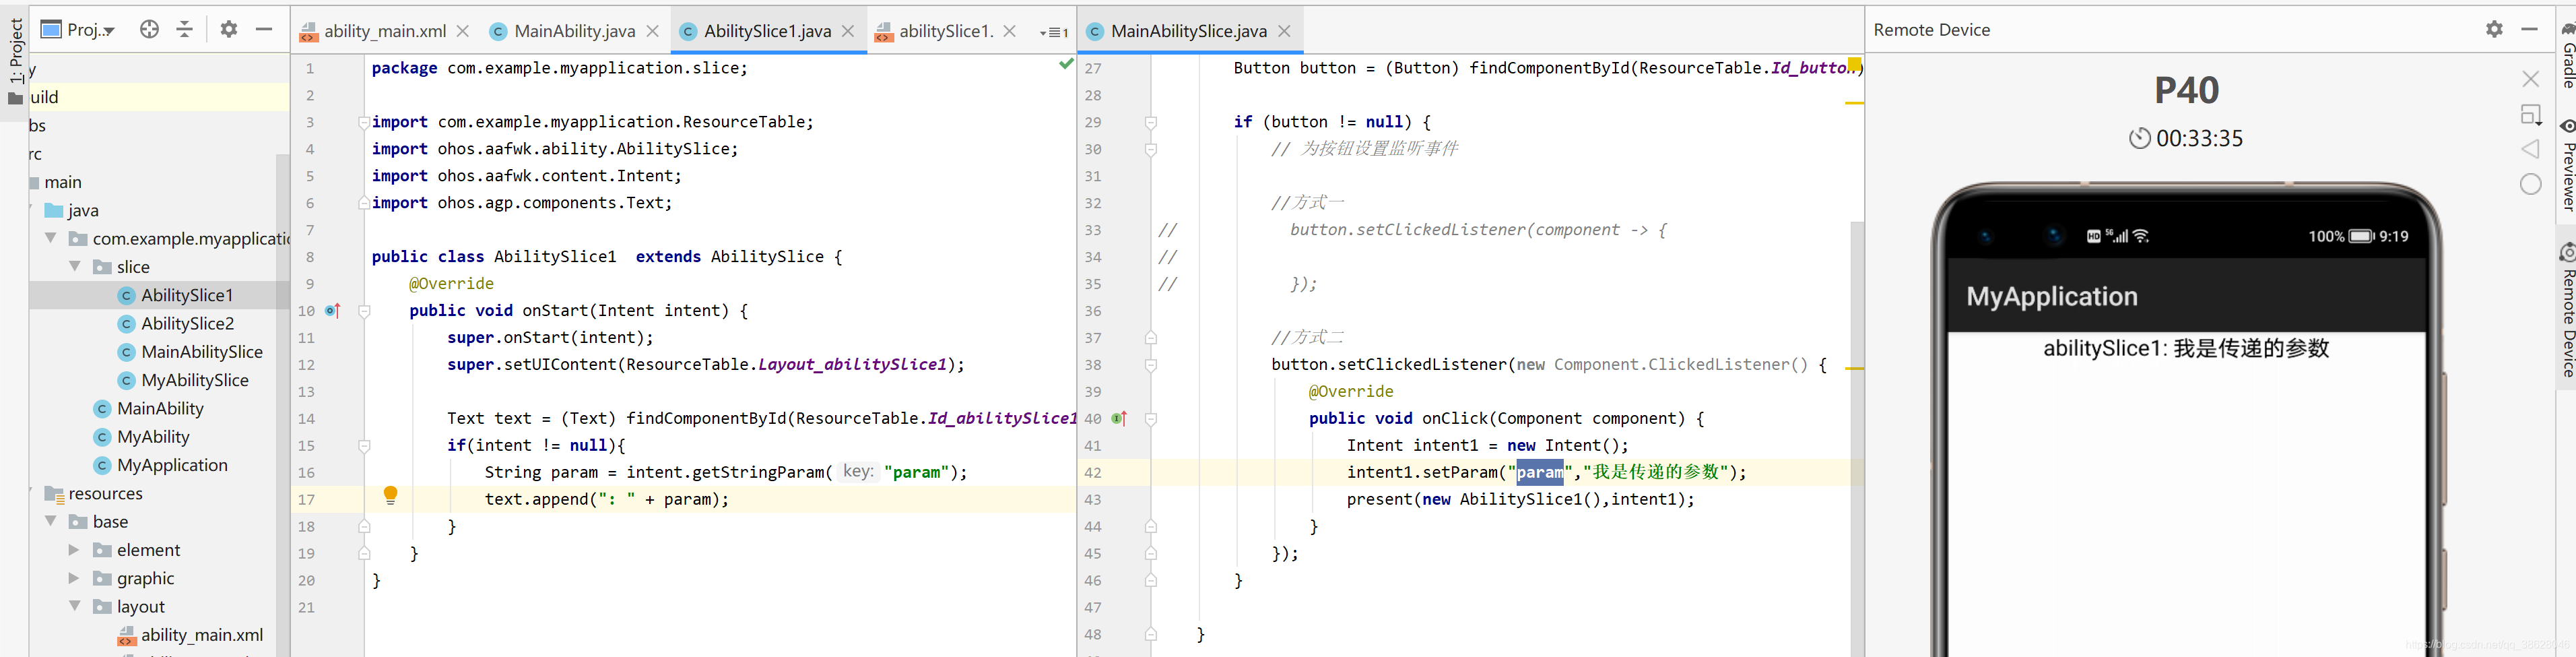
2.带参数跳转
产生参数端的AbilitySlice
public class MainAbilitySlice extends AbilitySlice {
    @Override
    public void onStart(Intent intent) {
        super.onStart(intent);
        super.setUIContent(ResourceTable.Layout_ability_main);

        //获取xml布局里面的button
        Button button = (Button) findComponentById(ResourceTable.Id_button);

        if (button != null) {
            // 为按钮设置监听事件

            //方式一
//            button.setClickedListener(component -> {
//
//            });

            //方式二
            button.setClickedListener(new Component.ClickedListener() {
                @Override
                public void onClick(Component component) {
                    Intent intent1 = new Intent();
                    intent1.setParam("param","我是传递的参数");
                    present(new AbilitySlice1(),intent1);
                }
            });
        }

    }


    @Override
    public void onActive() {
        super.onActive();
    }

    @Override
    public void onForeground(Intent intent) {
        super.onForeground(intent);
    }

}
接收参数端的AbilitySlice
public class AbilitySlice1  extends AbilitySlice {
    @Override
    public void onStart(Intent intent) {
        super.onStart(intent);
        super.setUIContent(ResourceTable.Layout_abilitySlice1);

        Text text = (Text) findComponentById(ResourceTable.Id_abilitySlice1);
        if(intent != null){
            String param = intent.getStringParam("param");
            text.append(": " + param);
        }
    }
}
3.带参数跳转+返回值
如果希望在用户从导航目标AbilitySlice返回时,能够获得其返回结果,则应当使用presentForResult()实现导航。用户从导航目标AbilitySlice返回时,系统将回调onResult()来接收和处理返回结果,需要重写该方法。返回结果由导航目标AbilitySlice在其生命周期内通过setResult()进行设置。
产生参数与接收返回值的AbilitySlice
public class MainAbilitySlice extends AbilitySlice {

    private Text text;

    @Override
    public void onStart(Intent intent) {
        super.onStart(intent);
        super.setUIContent(ResourceTable.Layout_ability_main);

        //获取xml布局里面的button
        Button button = (Button) findComponentById(ResourceTable.Id_button);
        text = (Text) findComponentById(ResourceTable.Id_text);

        if (button != null) {
            // 为按钮设置监听事件

            //方式一
            button.setClickedListener(component -> {
                Intent intent1 = new Intent();
                intent1.setParam("param", "我是传递的参数");
                presentForResult(new AbilitySlice1(), intent1, 666);
            });
        }
    }

    @Override
    protected void onResult(int requestCode, Intent resultIntent) {
        super.onResult(requestCode, resultIntent);
        if (requestCode == 666) {
            String password = resultIntent.getStringParam("result");
            text.setText("返回值:" + password);
        }
    }

    @Override
    public void onActive() {
        super.onActive();
    }

    @Override
    public void onForeground(Intent intent) {
        super.onForeground(intent);
    }

}
接收参数端的AbilitySlice
public class AbilitySlice1  extends AbilitySlice {
    @Override
    public void onStart(Intent intent) {
        super.onStart(intent);
        super.setUIContent(ResourceTable.Layout_abilitySlice1);

        Text text = (Text) findComponentById(ResourceTable.Id_abilitySlice1);
        if(intent != null){
            String param = intent.getStringParam("param");
            text.append(": " + param);
        }

        //参数接收端对text组件文本值点击
        text.setClickedListener(component -> {
            //给跳转来的页面返回值
            Intent intent1 = new Intent();
            intent1.setParam("result","我是返回的参数");
            setResult(intent1);
            //结束当前AbilityAlice,自动返回上一页
            terminate();
        });
    }
}
主界面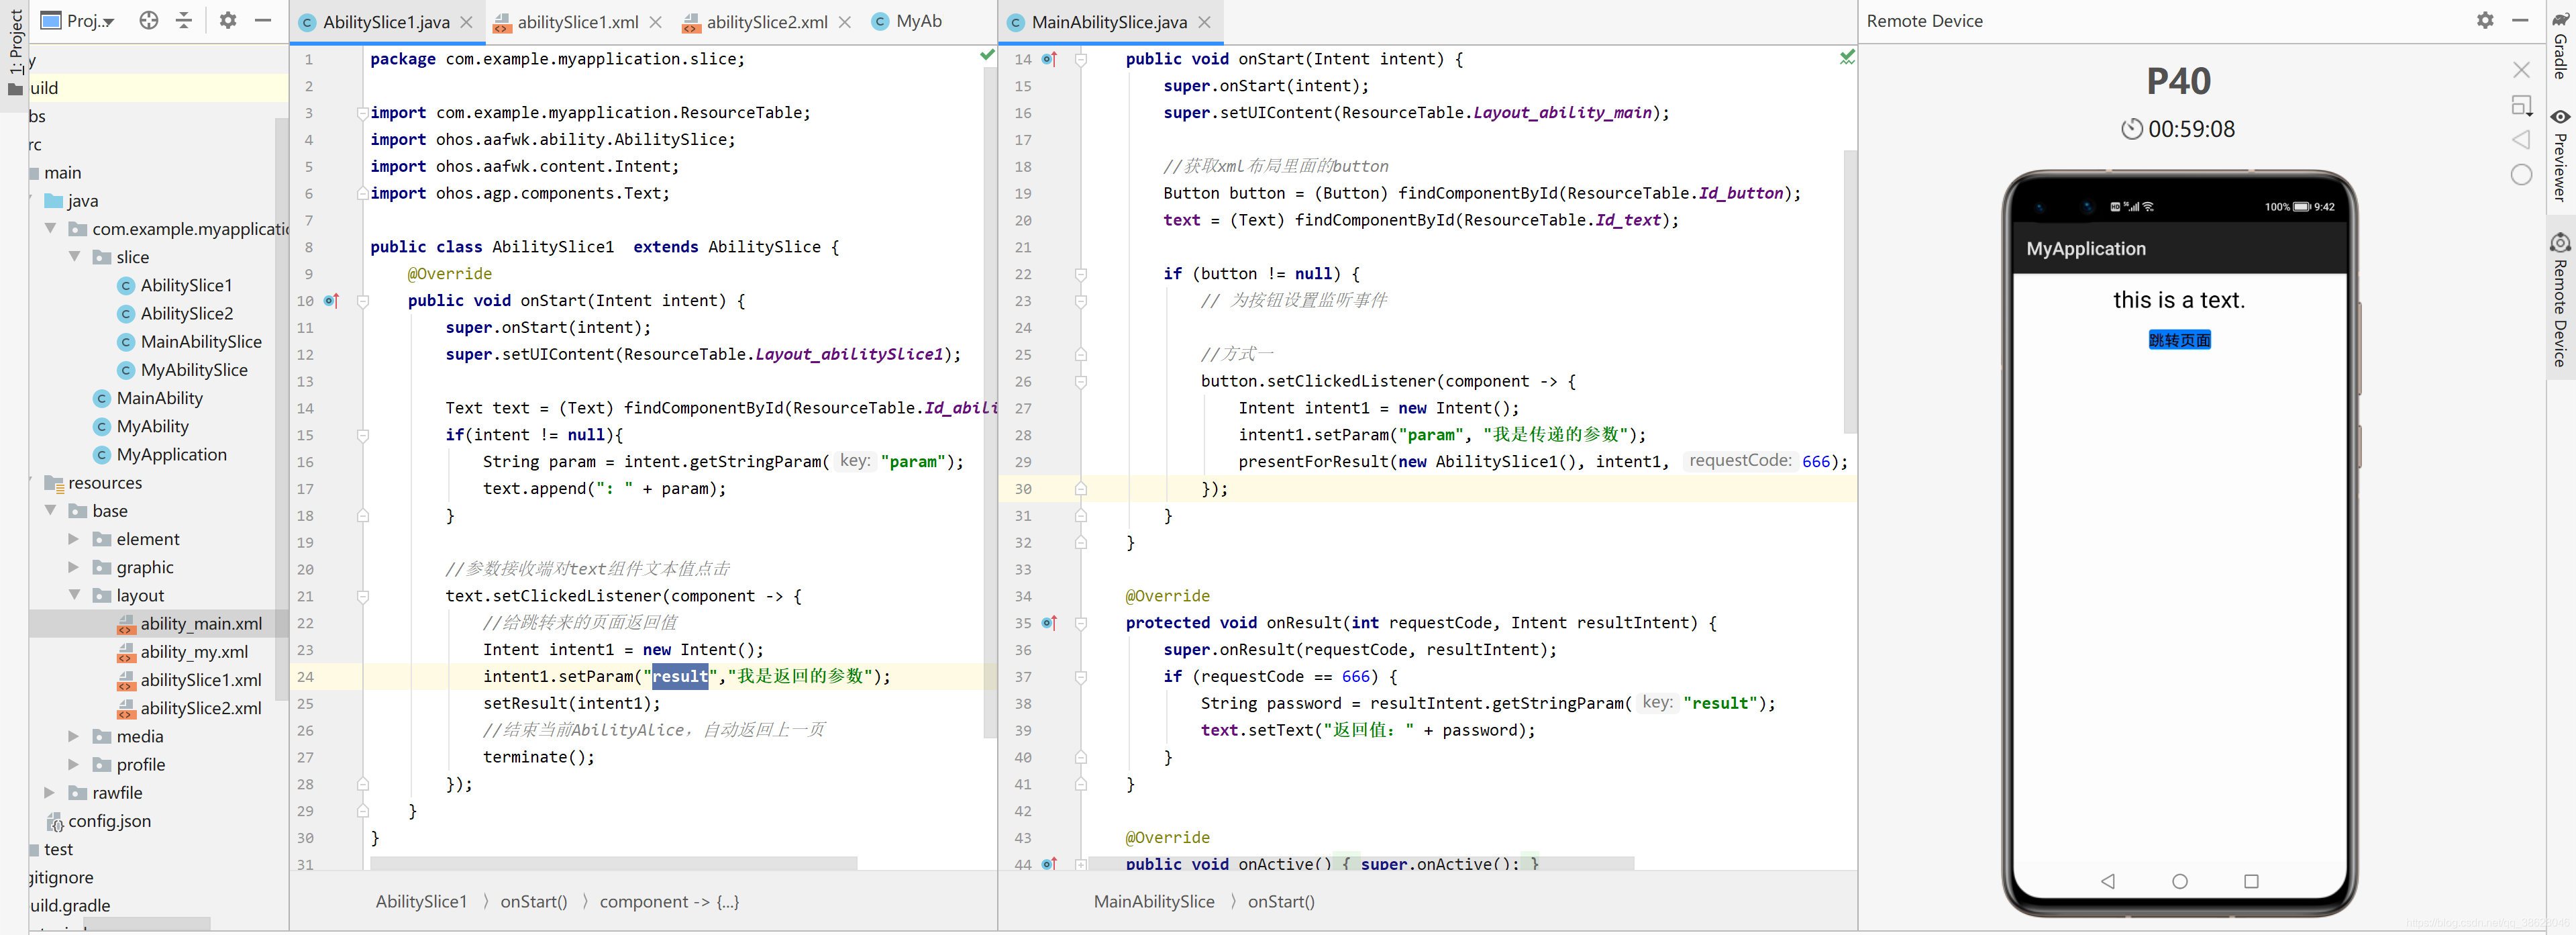
点击跳转按钮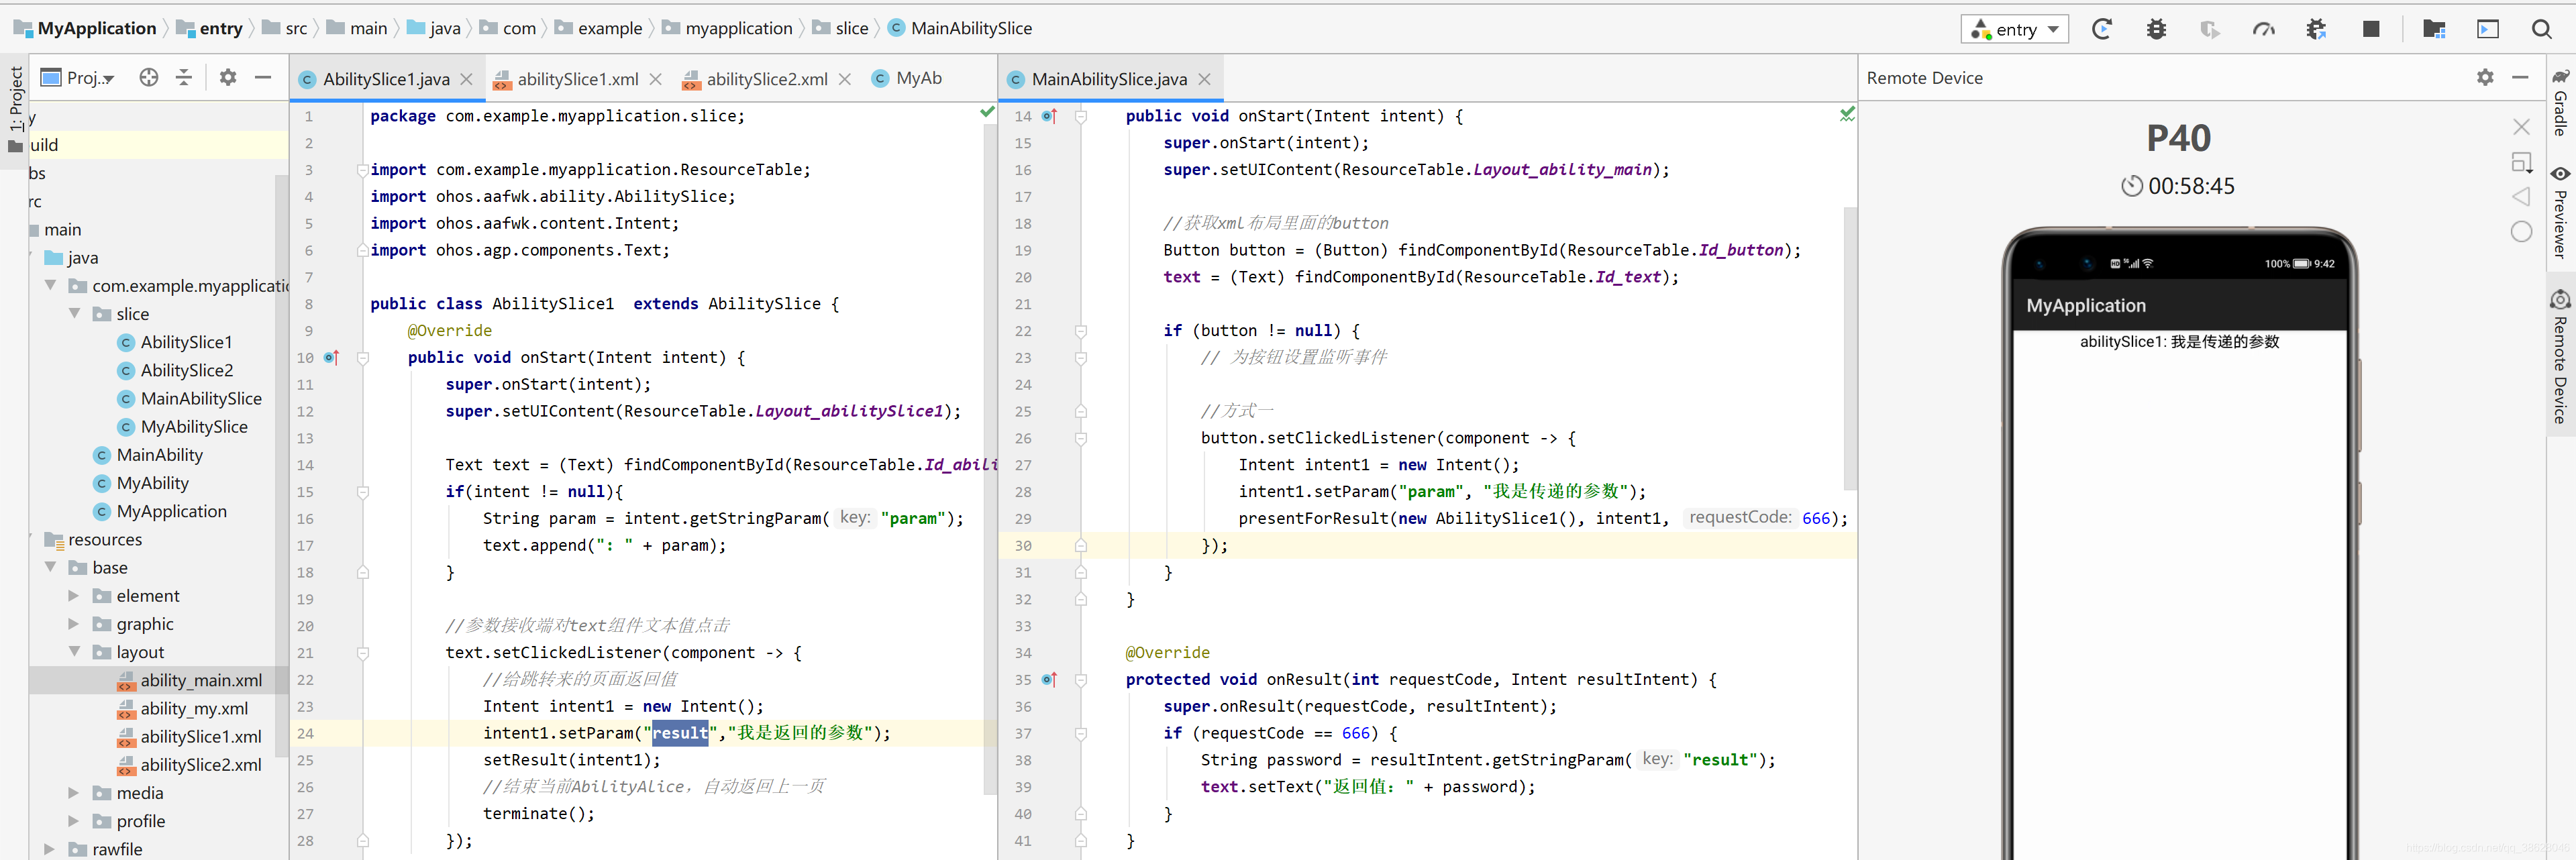
点击文本组件,自动放回上一页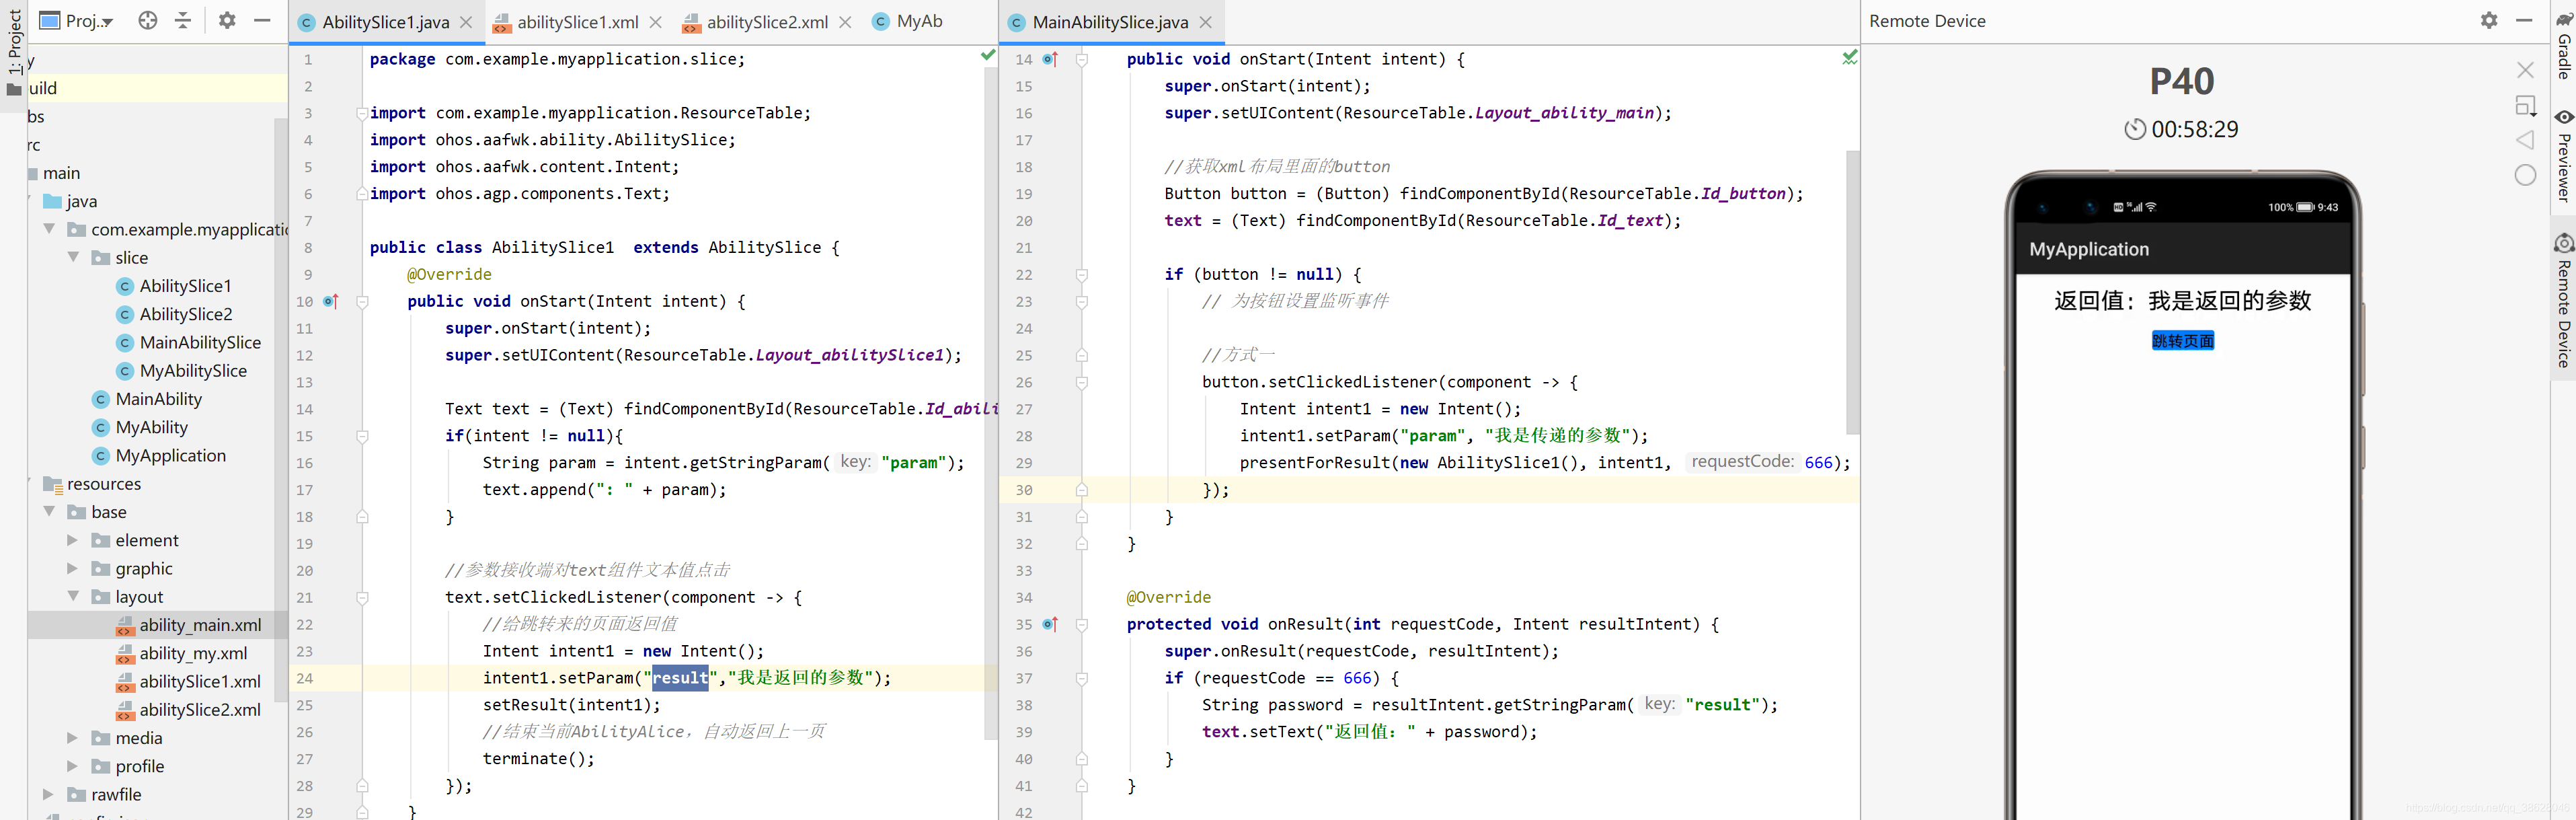
五、Page间的导航
Page1跳转Page2
1.创建Page MyAbility
public class MyAbility extends Ability {
    @Override
    public void onStart(Intent intent) {
        super.onStart(intent);
        super.setMainRoute(MyAbilitySlice.class.getName());
    }
}
2.创建MyAbilitySlice
public class MyAbilitySlice extends AbilitySlice {
    @Override
    public void onStart(Intent intent) {
        super.onStart(intent);
        //xml布局
        //super.setUIContent(ResourceTable.Layout_ability_my);
        // 1.声明布局
        DependentLayout myLayout = new DependentLayout(this);
        // 2.设置页面布局大小
        myLayout.setWidth(MATCH_PARENT);
        myLayout.setHeight(MATCH_PARENT);
        //3.设置布局背景色
        ShapeElement element = new ShapeElement();
        element.setRgbColor(new RgbColor(255, 255, 255));
        myLayout.setBackground(element);

        // 4.1创建一个文本组件
        Text text = new Text(this);
        text.setText("这是第二张页面");
        text.setTextSize(55);
        text.setTextColor(Color.BLACK);
        // 4.2设置文本的布局
        DependentLayout.LayoutConfig textConfig =
                new DependentLayout.LayoutConfig(MATCH_CONTENT,MATCH_CONTENT);
        textConfig.addRule(DependentLayout.LayoutConfig.CENTER_IN_PARENT);

        text.setLayoutConfig(textConfig);

        //5.将组件添加到布局中
        myLayout.addComponent(text);

        //6.将布局添加到组件树中
        super.setUIContent(myLayout);
    }

    @Override
    public void onActive() {
        super.onActive();
    }

    @Override
    public void onForeground(Intent intent) {
        super.onForeground(intent);
    }
}
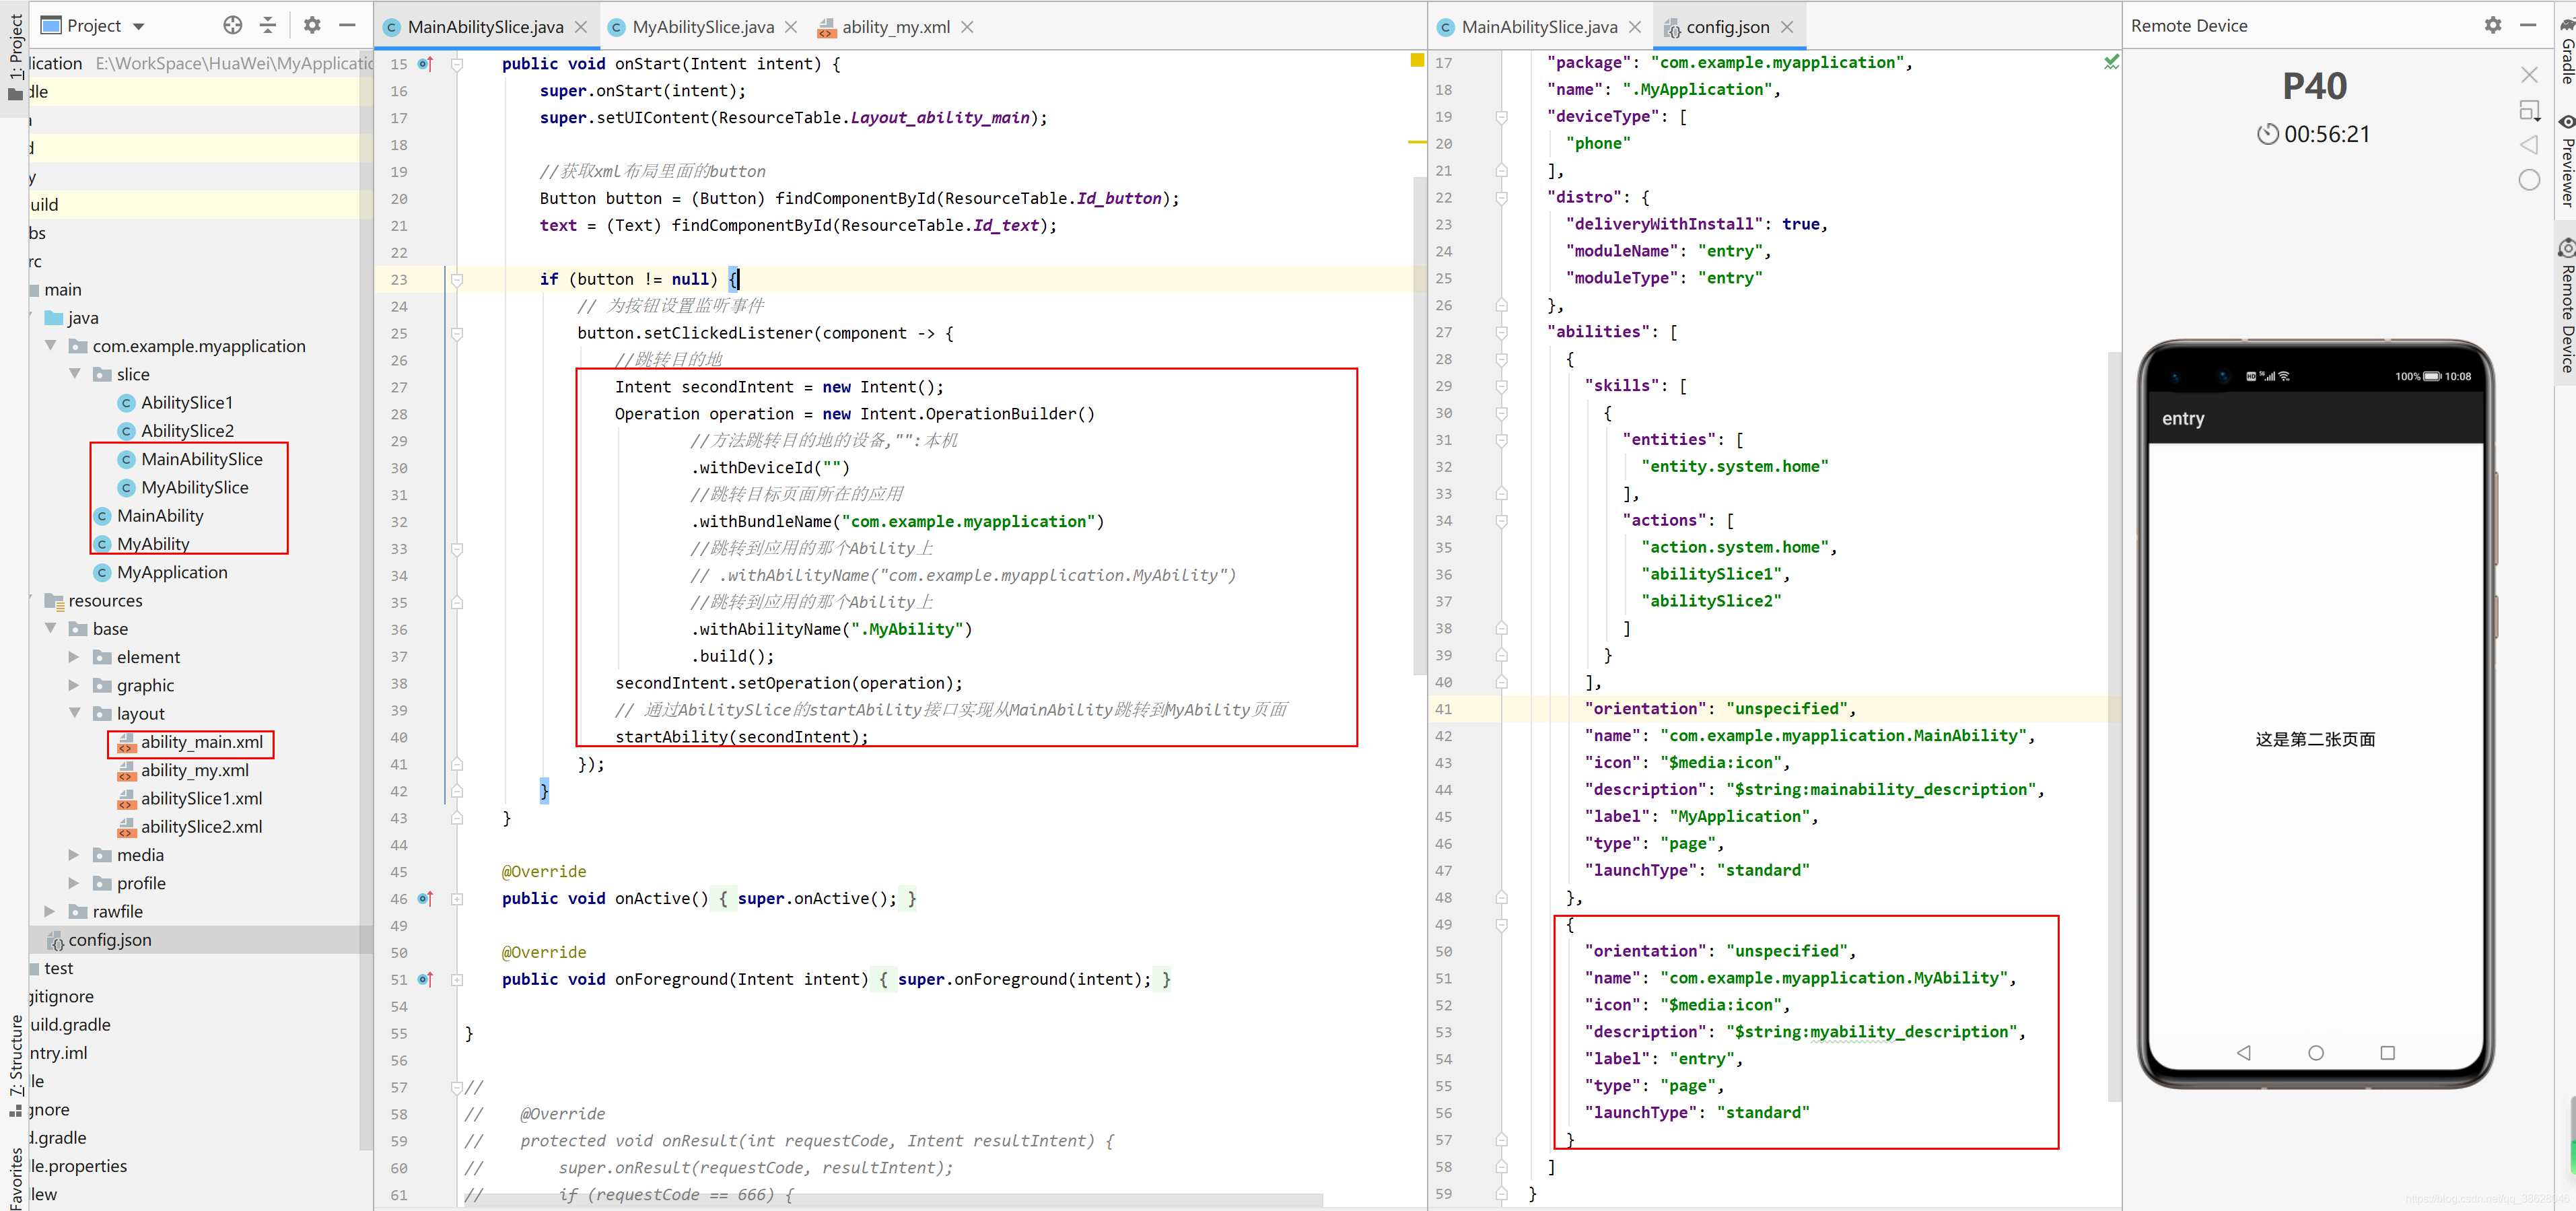
3.MainAbilitySlice设置跳转
public class MainAbilitySlice extends AbilitySlice {

    private Text text;

    @Override
    public void onStart(Intent intent) {
        super.onStart(intent);
        super.setUIContent(ResourceTable.Layout_ability_main);

        //获取xml布局里面的button
        Button button = (Button) findComponentById(ResourceTable.Id_button);
        text = (Text) findComponentById(ResourceTable.Id_text);

        if (button != null) {
            // 为按钮设置监听事件
            button.setClickedListener(component -> {
                //跳转目的地
                Intent secondIntent = new Intent();
                Operation operation = new Intent.OperationBuilder()
                        //方法跳转目的地的设备,"":本机
                        .withDeviceId("")
                        //跳转目标页面所在的应用
                        .withBundleName("com.example.myapplication")
                        //跳转到应用的那个Ability上
                        // .withAbilityName("com.example.myapplication.MyAbility")
                        //跳转到应用的那个Ability上
                        .withAbilityName(".MyAbility")
                        .build();
                secondIntent.setOperation(operation);
                // 通过AbilitySlice的startAbility接口实现从MainAbility跳转到MyAbility页面
                startAbility(secondIntent);
            });
        }
    }

    @Override
    public void onActive() {
        super.onActive();
    }

    @Override
    public void onForeground(Intent intent) {
        super.onForeground(intent);
    }

}
4.config.json注册MyAbility
  {
        "orientation": "unspecified",
        "name": "com.example.myapplication.MyAbility",
        "icon": "$media:icon",
        "description": "$string:myability_description",
        "label": "entry",
        "type": "page",
        "launchType": "standard"
      }
5.准备XML布局
<?xml version="1.0" encoding="utf-8"?>
<DirectionalLayout
    xmlns:ohos="http://schemas.huawei.com/res/ohos"
    ohos:width="match_parent"
    ohos:height="match_parent"
    ohos:orientation="vertical"
    ohos:padding="32">
    <Text
        ohos:id="$+id:text"
        ohos:width="match_content"
        ohos:height="match_content"
        ohos:layout_alignment="horizontal_center"
        ohos:text="this is a text."
        ohos:text_size="25vp"/>
    <Button
        ohos:id="$+id:button"
        ohos:margin="50"
        ohos:width="match_content"
        ohos:height="match_content"
        ohos:layout_alignment="horizontal_center"
        ohos:background_element="$graphic:background_button"
        ohos:text="跳转页面"
        ohos:text_size="50"/>
</DirectionalLayout>
6.启动测试

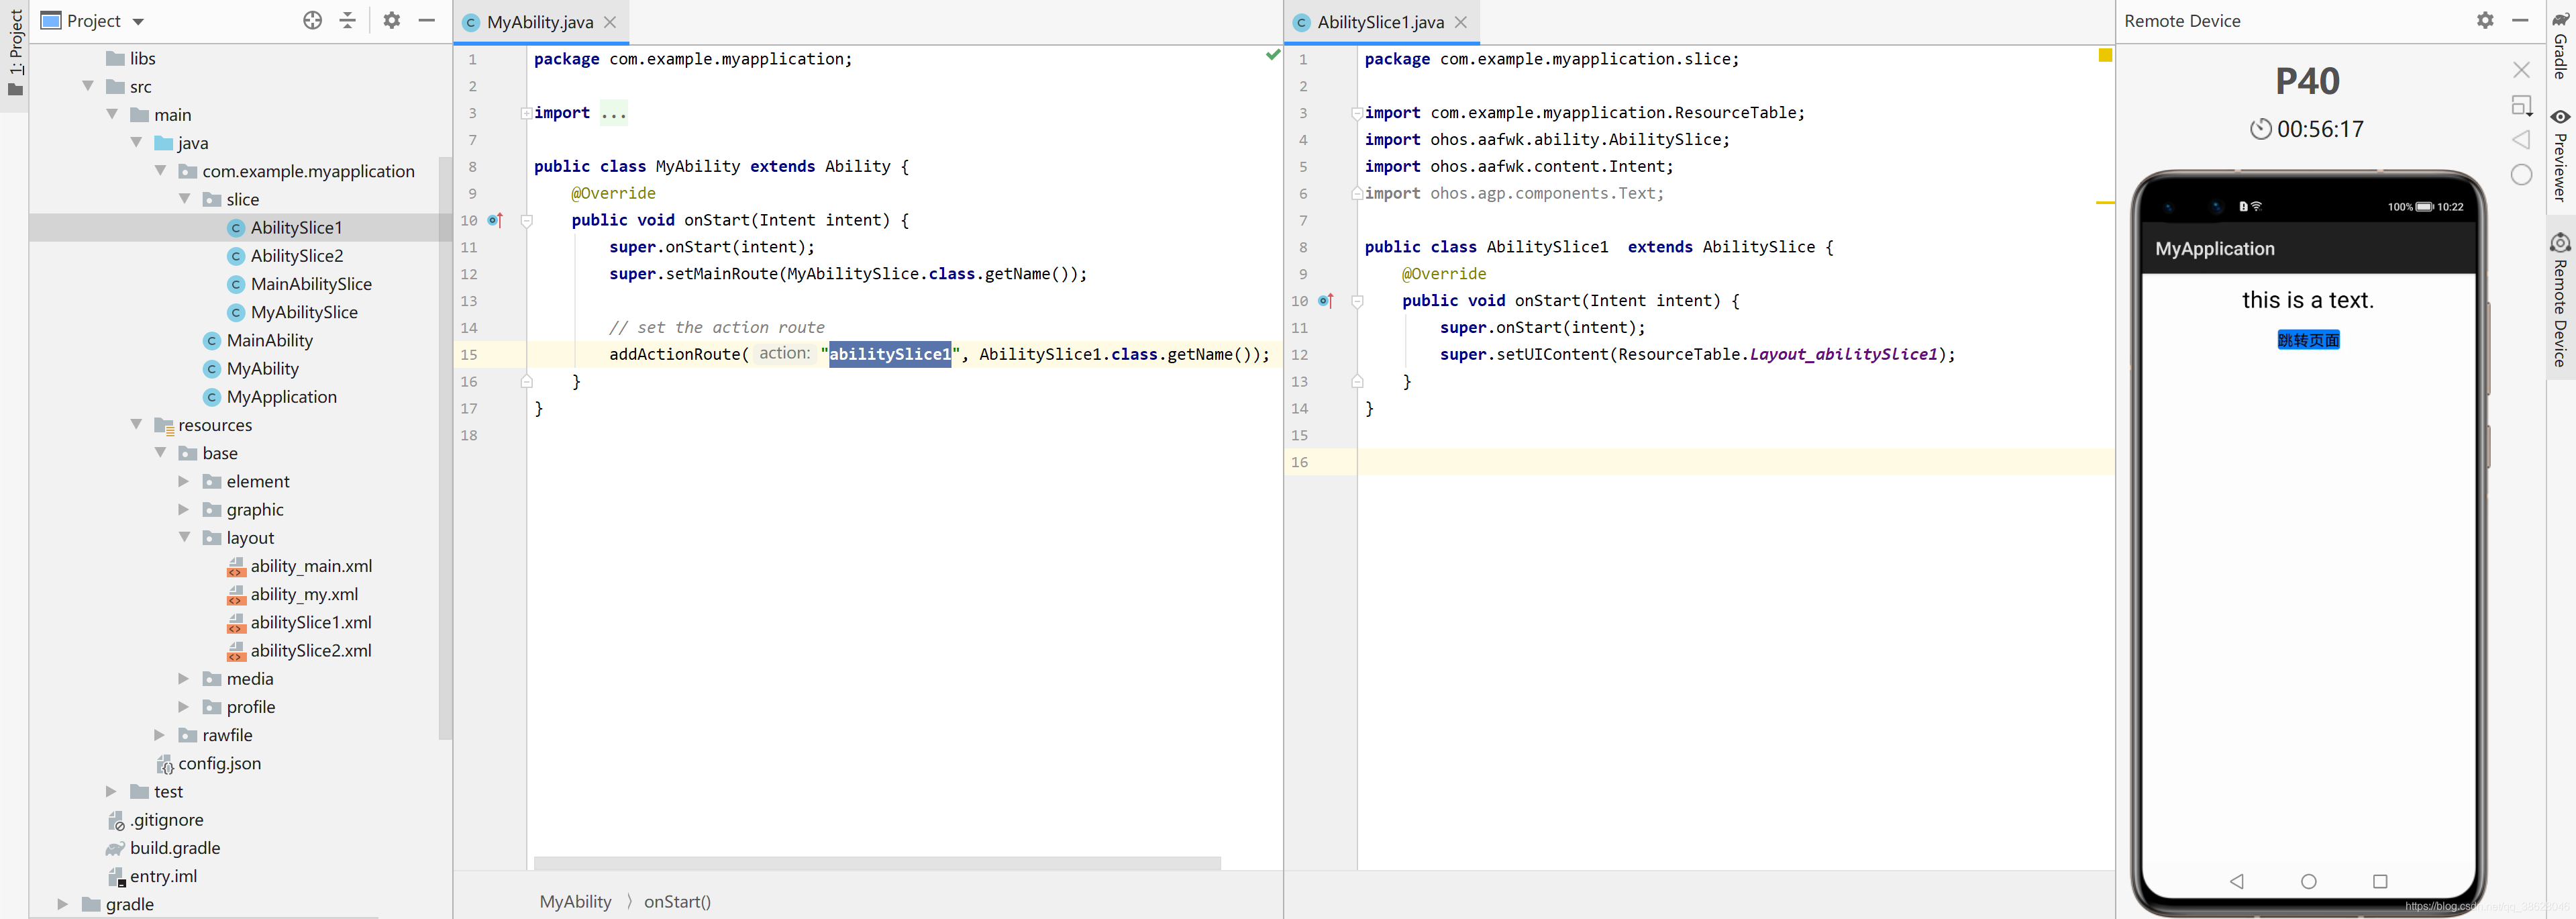
Page1的AbilitySlice跳转Page2的AbilitySlice
1.MyAbility 添加路由规则
public class MyAbility extends Ability {
    @Override
    public void onStart(Intent intent) {
        super.onStart(intent);
        super.setMainRoute(MyAbilitySlice.class.getName());

        // set the action route
        addActionRoute("abilitySlice1", AbilitySlice1.class.getName());
    }
}
2.创建AbilitySlice1 实例
public class AbilitySlice1  extends AbilitySlice {
    @Override
    public void onStart(Intent intent) {
        super.onStart(intent);
        super.setUIContent(ResourceTable.Layout_abilitySlice1);
    }
}
3.创建abilitySlice1.xml布局
<?xml version="1.0" encoding="utf-8"?>
<DirectionalLayout
    xmlns:ohos="http://schemas.huawei.com/res/ohos"
    ohos:height="match_parent"
    ohos:width="match_parent"
    ohos:orientation="vertical">

    <Text
        ohos:id="$+id:abilitySlice1"
        ohos:height="match_content"
        ohos:width="match_content"
        ohos:background_element="$graphic:background_ability_my"
        ohos:layout_alignment="horizontal_center"
        ohos:text="abilitySlice1"
        ohos:text_size="50"
        />

</DirectionalLayout>
4.config.json配置Page对应的abilitySlice1实例
 {
        "skills": [
          {
            "actions": [
              "abilitySlice1"
            ]
          }
        ],
        "orientation": "unspecified",
        "name": "com.example.myapplication.MyAbility",
        "icon": "$media:icon",
        "description": "$string:myability_description",
        "label": "entry",
        "type": "page",
        "launchType": "standard"
      }
5.启动测试
六、不同Page间参数传递
不同Page间参数传递与AbilitySlice间参数传递类似。

讨论HarmonyOS开发技术,专注于API与组件、DevEco Studio、测试、元服务和应用上架分发等。
更多推荐


 2
2 0
0- 0


 已为社区贡献5条内容

所有评论(0)