SpringCloud入门教程合集(2)-Consul简介与集群搭建、服务提供者集群、Feign集成服务消费者
Consul是HashiCorp公司推出的分布式服务网格解决方案,提供服务发现:自动注册与发现服务健康检查:实时监控服务状态键值存储:分布式配置管理多数据中心:原生支持跨地域服务通信访问控制:ACL和TLS安全机制核心组件Server 数据存储和复制 3-5个节点集群Client 轻量级代理 每个服务节点部署Agent 本地服务注册 与服务同节点核心术语解析Agent 运行在Consul节点上的守
场景
SpringCloud入门教程合集(1)-SpringCloud简介与Eureka+Feign实现服务注册中心、服务提供与服务消费:
SpringCloud入门教程合集(1)-SpringCloud简介与Eureka+Feign实现服务注册中心、服务提供与服务消费-CSDN博客
在上面的基础上,入门学习Consul的使用。
Consul核心概念
什么是Consul?
Consul是HashiCorp公司推出的分布式服务网格解决方案,提供
服务发现:自动注册与发现服务
健康检查:实时监控服务状态
键值存储:分布式配置管理
多数据中心:原生支持跨地域服务通信
访问控制:ACL和TLS安全机制
核心组件
Server 数据存储和复制 3-5个节点集群
Client 轻量级代理 每个服务节点部署
Agent 本地服务注册 与服务同节点
核心术语解析
Agent 运行在Consul节点上的守护进程,分为Server(服务端)和Client(客户端)
Service 注册到Consul的应用程序或微服务实例
Node 物理机、虚拟机或容器,代表集群成员
KV Store 分布式键值存储,用于配置共享
ACL 访问控制列表,管理安全策略
Raft 一致性算法,用于Server节点间的数据同步
Gossip Protocol 节点间通信协议,用于故障检测和消息广播
工作原理
1. 服务发现
服务注册:
服务启动时通过API或配置文件注册到Consul(示例:consul services register -name= web)
DNS/HTTP查询:
客户端通过consul.service.consul 域名或API获取服务地址
2. 健康检查
主动检查:Consul Agent定期调用服务的健康检查端点(如HTTP /health)
被动检查:服务主动上报状态(如TTL机制)
3. 多数据中心
通过WAN Gossip跨数据中心同步服务目录,支持异地多活架构
Consul健康检查机制
1. 核心检查类型
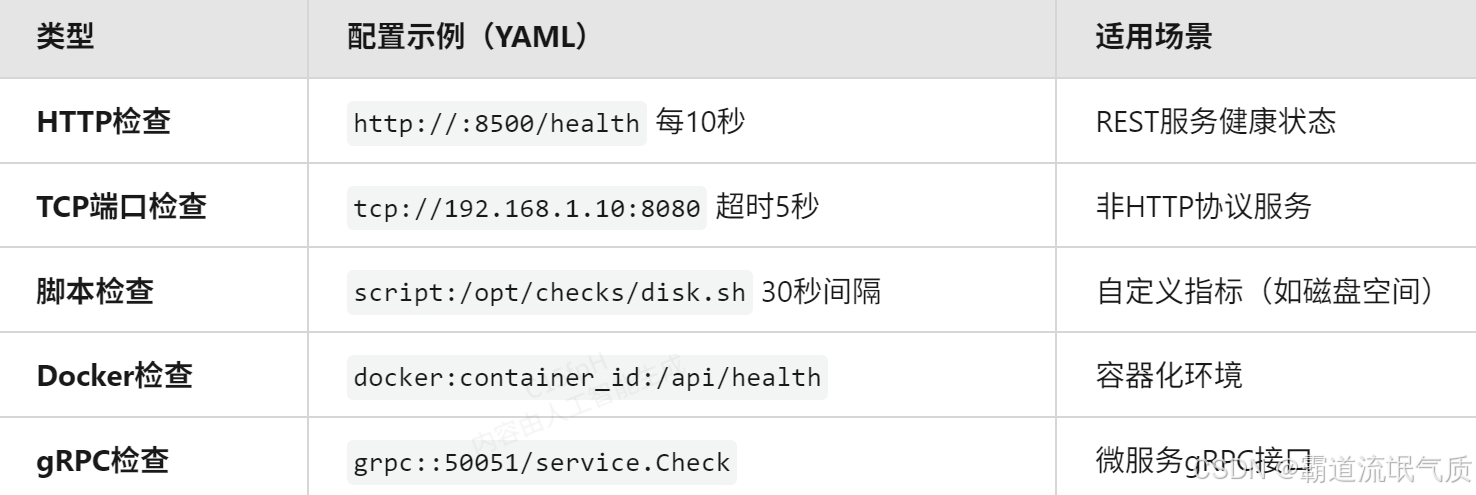
2. 关键参数优化
check:
  interval: "15s"           # 2025年推荐生产环境间隔
  timeout: "5s"             # 超时时间(需小于interval)
  deregister_critical_after: "30m" # 故障节点保留时间
  failures_before_critical: 3      # 连续失败阈值
3. 动态健康检查
# 通过API动态注册检查
curl -X PUT http://consul-server:8500/v1/agent/check/register \
-d '{
"ID": "mem-check",
"Name": "Memory Utilization",
"Args": ["/opt/checks/mem.py", "-limit=90%"],
"Interval": "10s"
}'
Consul集群搭建
搭建目的
服务发现
动态注册/发现微服务(支持K8s、VM、裸金属混合环境)
2025年新增:自动识别云厂商Metadata(如AWS AZ、阿里云Region)
健康监控
多协议检查(HTTP/gRPC/TCP/脚本)
实时剔除故障节点(毫秒级响应)
配置中心
分布式KV存储(支持10万级配置项)
动态推送变更(长轮询+事件通知)
安全治理
2025强化:自动mTLS证书轮换
细粒度ACL策略(基于HashiCorp Cloud IAM集成)
核心概念
Server节点 3-5个组成Raft集群,处理读写请求(2025年支持IPv6-only部署)
Client节点 轻量级代理,转发请求到Server(自动TLS加密)
Gossip协议 使用Serf库的SWIM算法,优化后的广播效率提升40%
ACL Token 新版JWT格式,支持OIDC联合认证
Service Mesh 与Istio 2025版深度集成,支持自动Sidecar注入
常用指令
consul members -status=alive 查看存活节点

consul operator raft list-peers 查看Raft集群状态

consul monitor -log-level=debug 实时日志监控
常用对外接口
Consul HTTP API Overview | Consul | HashiCorp Developer
注:
实现
基于DockerCompose在CentOS 7上搭建Consul集群
这里本地只有一台CentOS机器,为了演示Consul集群效果,直接使用Docker Compose的方式搭建。
拉取consul镜像
docker pull library/consul:1.15.4在服务器某路径下新建四个目录,用于做数据卷映射
mkdir -p ./{server1,server2,server3,client}在此目录下新建docker-compose.yml并修改其内容
version: '3.8'

networks:
  consul-net:
    driver: bridge
    ipam:
      config:
        - subnet: 172.30.0.0/16

services:
  consul-server1:
    image: consul:1.15.4
    container_name: consul-server1
    networks:
      consul-net:
        ipv4_address: 172.30.0.10
    ports:
      - "8500:8500"
      - "8600:8600/udp"
    volumes:
      - ./server1:/consul/data
    command: >
      agent -server -bootstrap-expect=3
      -bind=172.30.0.10 -node=server1
      -ui -client=0.0.0.0

  consul-server2:
    image: consul:1.15.4
    container_name: consul-server2
    networks:
      consul-net:
        ipv4_address: 172.30.0.11
    volumes:
      - ./server2:/consul/data
    command: >
      agent -server -bind=172.30.0.11 -node=server2
      -retry-join=172.30.0.10

  consul-server3:
    image: consul:1.15.4
    container_name: consul-server3
    networks:
      consul-net:
        ipv4_address: 172.30.0.12
    volumes:
      - ./server3:/consul/data
    command: >
      agent -server -bind=172.30.0.12 -node=server3
      -retry-join=172.30.0.10

  consul-client:
    image: consul:1.15.4
    container_name: consul-client
    networks:
      consul-net:
        ipv4_address: 172.30.0.20
    volumes:
      - ./client:/consul/data
    command: >
      agent -bind=172.30.0.20 -node=client1
      -retry-join=172.30.0.10
指令详解
关键参数
ipam指定子网172.30.0.0/16,确保容器IP固定(避免动态分配导致Consul节点失联)。
为何重要:Consul依赖稳定的IP进行节点发现和Gossip协议通信。
-server 以Server模式运行,参与Raft选举和数据存储
-bootstrap-expect=3 集群预期有3个Server节点,满足后自动触发选举
-bind 绑定容器内IP(必须与ipv4_address一致)
-ui 启用Web UI(仅需在一个Server节点开启)
-client=0.0.0.0 允许外部访问Consul API和UI(生产环境建议结合ACL限制IP)
Client节点配置
无-server标志,仅作为轻量级代理。
-retry-join指定初始连接节点(任意Server IP均可)。
端口用途
8500 TCP HTTP API和Web UI 必需(至少一个Server映射)
8600 UDP DNS接口服务发现 可选(按需开放)
扩展性设计
加密通信
-encrypt=TeE4JN0GxSP6mxUZqK1Lzw==
ACL集成(需手动添加)
environment:
CONSUL_HTTP_TOKEN: "your-root-token"
多数据中心
跨DC配置:在另一个Compose文件中使用不同-datacenter名称(如dc2),并通过-retry-join-wan连接。
这里不进行扩展,只演示基本使用。
快速验证命令
# 启动集群
docker-compose up -d
# 检查节点状态
docker exec consul-server1 consul members
# 访问Web UI
curl http://localhost:8500/ui
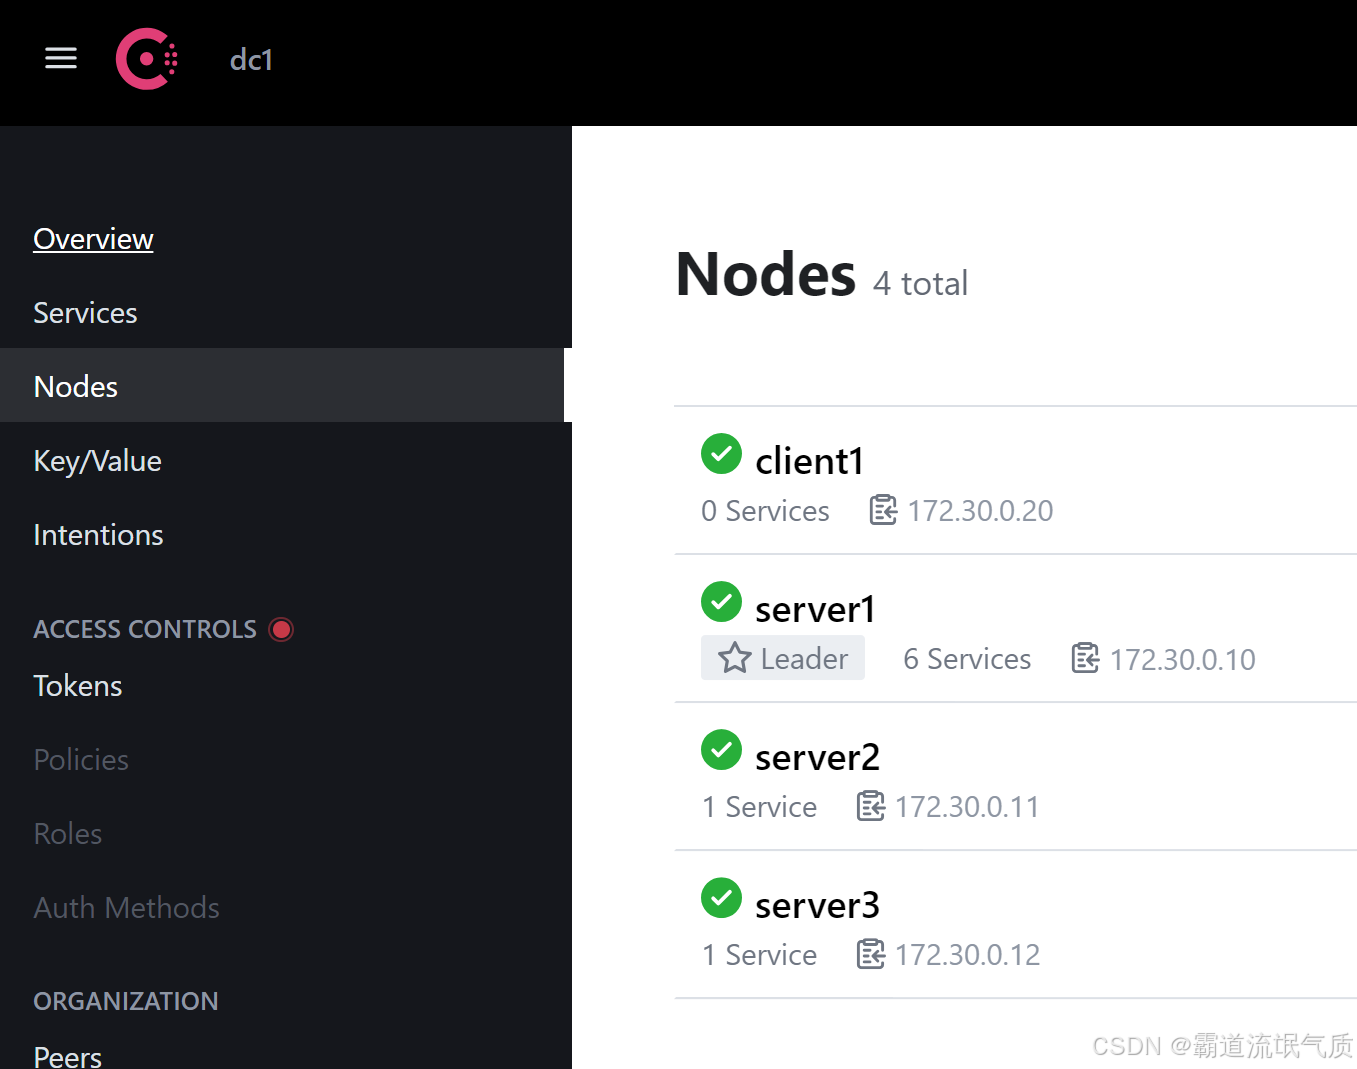
consul集群搭建效果

Consul实现“服务提供者”集群
所用JDK1.8,SpringBoot2.6.13,SpringCloud版本2021.0.8
新建SpringBoot项目,修改pom文件,添加依赖
        <dependency>
            <groupId>org.springframework.boot</groupId>
            <artifactId>spring-boot-starter-actuator</artifactId>
        </dependency>
        <dependency>
            <groupId>org.springframework.boot</groupId>
            <artifactId>spring-boot-starter-web</artifactId>
        </dependency>
        <dependency>
            <groupId>org.springframework.cloud</groupId>
            <artifactId>spring-cloud-starter-consul-discovery</artifactId>
        </dependency>
新建application.yml文件
# application.yml
spring:
  application:
    name: order-service
  cloud:
    consul:
      host: 192.168.148.128  # Consul Server1 IP
      port: 8500
      discovery:
        instance-id: ${spring.application.name}-${random.value}
        health-check-path: /actuator/health
        health-check-interval: 10s  # 缩短健康检查间隔
        health-check-critical-timeout: 20s # 快速剔除故障节点
        heartbeat:
          enabled: true  # 启用心跳机制
    loadbalancer:
      cache:
        ttl: 5s  # 缩短服务列表缓存时间
server:
  port: 0   # 随机端口
为了模拟集群效果,再新建两个yml文件,并设置不同端口
application-node1.yml
# application.yml
spring:
  application:
    name: order-service
  cloud:
    consul:
      host: 192.168.148.128  # Consul Server1 IP
      port: 8500
      discovery:
        instance-id: ${spring.application.name}-${random.value}
        health-check-path: /actuator/health
        health-check-interval: 10s  # 缩短健康检查间隔
        health-check-critical-timeout: 20s # 快速剔除故障节点
        heartbeat:
          enabled: true  # 启用心跳机制
    loadbalancer:
      cache:
        ttl: 5s  # 缩短服务列表缓存时间
server:
  port: 9001
application-node2.yml
# application.yml
spring:
  application:
    name: order-service
  cloud:
    consul:
      host: 192.168.148.128  # Consul Server1 IP
      port: 8500
      discovery:
        instance-id: ${spring.application.name}-${random.value}
        health-check-path: /actuator/health
        health-check-interval: 10s  # 缩短健康检查间隔
        health-check-critical-timeout: 20s # 快速剔除故障节点
        heartbeat:
          enabled: true  # 启用心跳机制
    loadbalancer:
      cache:
        ttl: 5s  # 缩短服务列表缓存时间
server:
  port: 9002
启动类添加如下注解
@EnableDiscoveryClient@EnableDiscoveryClient 注解的详细说明:
服务注册与发现
启用该注解的应用会:
自动将自身注册到服务注册中心(如Consul/Nacos/Eureka)
从注册中心获取其他服务的实例列表(通过DiscoveryClient接口)
云原生适配
在2025年的Spring Cloud 2023.x版本中,该注解已进化为:
支持多注册中心自动适配(Consul、Kubernetes Service等)
与Spring Cloud LoadBalancer深度集成
新建一个controller,模拟服务提供者
package com.badao.demo.controller;
import org.springframework.beans.factory.annotation.Value;
import org.springframework.web.bind.annotation.GetMapping;
import org.springframework.web.bind.annotation.PathVariable;
import org.springframework.web.bind.annotation.RequestMapping;
import org.springframework.web.bind.annotation.RestController;

@RestController
@RequestMapping("/orders")
public class OrderController {

    @Value("${server.port}")
    private String port;

    @GetMapping("/{id}")
    public String getOrder(@PathVariable Long id) {
        return "orderId:"+id+"port:"+port;
    }
}
此接口会获取yml中的端口以及传递的id参数。
打包成jar包,并使用不同的yml分别启动,模拟集群效果
java -jar order-service.jar --spring.profiles.active=node1

java -jar order-service.jar --spring.profiles.active=node2
启动之后到consul的ui页面中可以在service中看到。
Feign实现服务消费者并调用consul的服务
新建SpringBoot项目,pom中添加依赖
        <dependency>
            <groupId>org.springframework.boot</groupId>
            <artifactId>spring-boot-starter-web</artifactId>
        </dependency>
        <dependency>
            <groupId>org.springframework.cloud</groupId>
            <artifactId>spring-cloud-starter-consul-discovery</artifactId>
        </dependency>
        <dependency>
            <groupId>org.springframework.cloud</groupId>
            <artifactId>spring-cloud-starter-openfeign</artifactId>
        </dependency>
新建并修改yml文件
spring:
  application:
    name: service-consumer
  cloud:
    consul:
      host: 192.168.148.128 # Consul服务器IP
      port: 8500
      discovery:
        instance-id: ${spring.application.name}-${random.value}

server:
  port: 7001 # 避免与提供者端口冲突
启动类上添加注解,激活Feign
@EnableFeignClients新建Feign配置类(可选)
package com.badao.demo.config;

import feign.Retryer;
import org.springframework.context.annotation.Bean;
import org.springframework.context.annotation.Configuration;

@Configuration
public class FeignConfig {
    @Bean
    public Retryer feignRetryer() {
        return new Retryer.Default(1000, 3000, 3); // 间隔1s,最大3s,重试3次
    }
}
新建Feign客户端接口
import org.springframework.cloud.openfeign.FeignClient;
import org.springframework.web.bind.annotation.GetMapping;
import org.springframework.web.bind.annotation.PathVariable;

@FeignClient(name = "order-service") // 使用服务名调用
public interface OrderClient {
    @GetMapping("/orders/{id}")
    String getOrder(@PathVariable("id") Long id); // 返回简单字符串
}
新建调用示例Controller
import com.badao.demo.feign.OrderClient;
import org.springframework.beans.factory.annotation.Autowired;
import org.springframework.web.bind.annotation.GetMapping;
import org.springframework.web.bind.annotation.PathVariable;
import org.springframework.web.bind.annotation.RequestMapping;
import org.springframework.web.bind.annotation.RestController;
@RestController
@RequestMapping("/consumer")
public class ConsumerController {
@Autowired
private OrderClient orderClient;
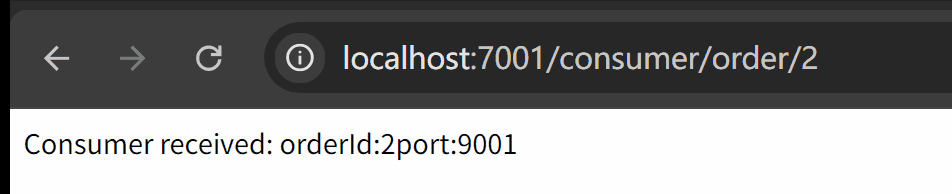
@GetMapping("/order/{id}")
public String getOrder(@PathVariable Long id) {
return "Consumer received: " + orderClient.getOrder(id);
}
}启动服务并测试验证

讨论HarmonyOS开发技术,专注于API与组件、DevEco Studio、测试、元服务和应用上架分发等。
更多推荐


 26
26 0
0- 0


 已为社区贡献7条内容

所有评论(0)