微服务端口号设置_通俗易懂,步骤清晰,SpringCloud搭建分布式服务架构
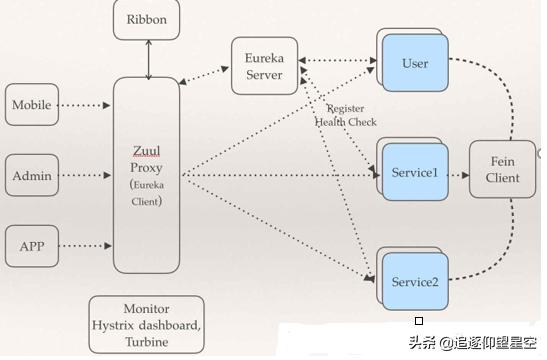
推荐学习肝了十天半月,献上纯手绘“Spring/Cloud/Boot/MVC”全家桶脑图 一箭双雕!Alibaba架构师,纯手打Cloud+Boot微服务架构笔记 问题引入:什么是SpringCloud?(在了解这个之前需要有微服务的概念)基于springBoot的一套实现微服务的框架,提供了微服务所需的配置管理,基于Http协议的restful风格(返回异步数据)SpringCould组件架构图
·
推荐学习
- 肝了十天半月,献上纯手绘“Spring/Cloud/Boot/MVC”全家桶脑图
- 一箭双雕!Alibaba架构师,纯手打Cloud+Boot微服务架构笔记
问题引入:什么是SpringCloud?(在了解这个之前需要有微服务的概念)
基于springBoot的一套实现微服务的框架,提供了微服务所需的配置管理,基于Http协议的restful风格(返回异步数据)
SpringCould组件架构图
由于在一台电脑上演示分布式项目,需要创建多个项目模块
步骤:
- 创建父类工程maven工程,修改pom文件,将打包方式改为pom
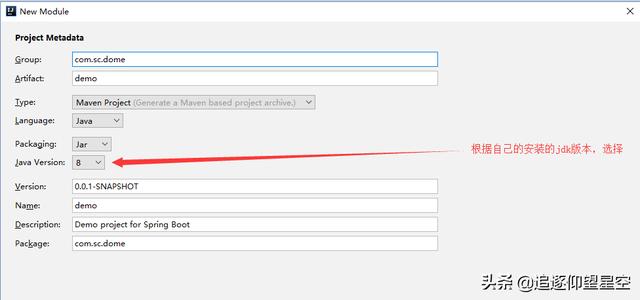
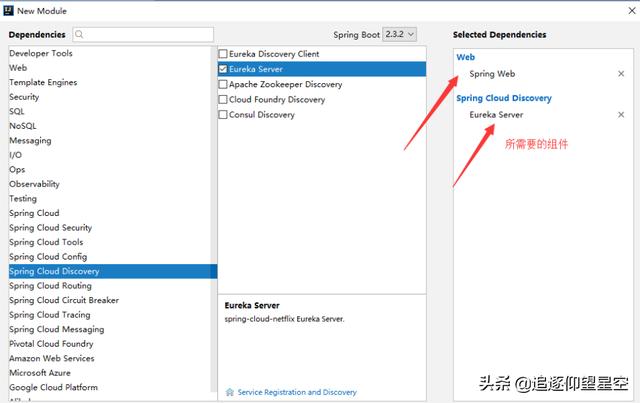
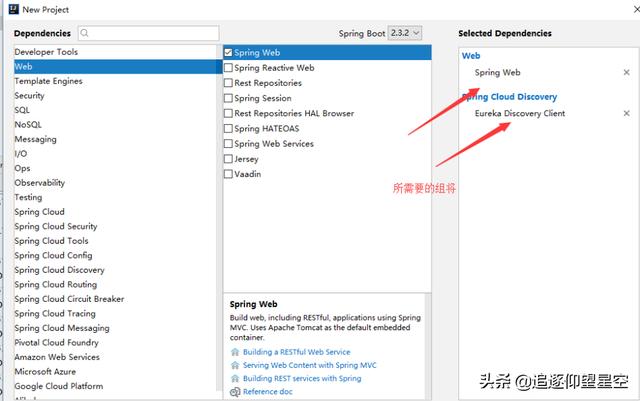
- 创建服务工程(注册中心)SpringBoot模块,选择需要导入的包,具体见下截图
- 在SpringBoot文件中添加eureka服务配置
#设置服务器端口server.port:9000#设置应用程序名称 名字不许用下划线,不支持服务调用spring.application.name=sc-demo-server#主机地址eureka.instance.hostname=localhost#表示不向注册中心注册eureka.client.register-with-eureka=false#表示不向注册中心调用服务eureka.client.fetch-registry=false#服务的地址eureka.client.service-url.defaultZone=http://${eureka.instance.hostname}:${server.port}/eureka- 在这个模块的启动类上添加eureka注解开启服务
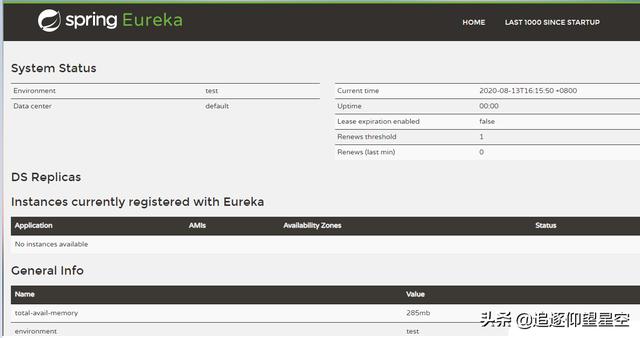
@SpringBootApplication@EnableEurekaServer //启动eureka,开启服务public class ScDemoServerApplication { public static void main(String[] args) {SpringApplication.run(ScDemoServerApplication.class, args); }}这时候运行你的启动类,在浏览器输入
http://localhost:自己设置的端口号/ 看到这个,说明eureka服务配置成功
接下来配置提供者与服务者
- 创建eureka的服务提供者 SpringBoot工程,具体见图(注意组件的区别)

- 这个模块的启动类上添加eureka注解开启服注意注解的使用
@SpringBootApplication@EnableEurekaClientpublic class ScDemoProviderApplication { public static void main(String[] args) { SpringApplication.run(ScDemoProviderApplication.class, args); }}- SpringBoot的配置文件中发布服务配置
#服务器端口server.port=9001#配置发布服务地址spring.application.name=sc-demo-providereureka.client.service-url.defaultZone=http://localhost:9000/eureka- 测试eureka服务者
在模块中创建一个包写一个实体类
public class Student { private Integer xh; private String name; private String sex; private Integer age; setter和getter 构造}编写控制器
@RestControllerpublic class TestController { //接收请求(服务) 返回json @RequestMapping("/getData") public Student getData(){ //返回一个学生 --调数据库 return new Student(101,"张三","人妖",21); }}在浏览器输入http://localhost:自己设置的服务提供者端口号/控制器请求名
页面会返回学生的json数据则成功
- 创建eureka的服务消费者 SpringBoot工程
创建流程与提供者相同
消费者的配置文件如下:
#服务器server.port=9002#服务的名称spring.application.name=eureka-consumer#指定注册中心:eureka服务器eureka.client.service-url.defaultZone=http://localhost:9000/eureka- 在启动类上开启eureka
package com.sc.dome;import org.springframework.boot.SpringApplication;import org.springframework.boot.autoconfigure.SpringBootApplication;import org.springframework.cloud.client.loadbalancer.LoadBalanced;import org.springframework.cloud.netflix.eureka.EnableEurekaClient;import org.springframework.context.annotation.Bean;import org.springframework.web.client.RestTemplate;@EnableEurekaClient@SpringBootApplicationpublic class ScConsumerApplication { public static void main(String[] args) { SpringApplication.run(ScConsumerApplication.class, args); } @Bean //交给spring容器管理 @LoadBalanced // 支持使用服务名称发现服务进行调用,且支持负载 public RestTemplate getRestTemplate() { return new RestTemplate(); }}- 开发控制器调用服务
package com.sc.dome.controller;import com.sc.dome.entity.Student;import org.springframework.beans.factory.annotation.Autowired;import org.springframework.web.bind.annotation.RequestMapping;import org.springframework.web.bind.annotation.RestController;import org.springframework.web.client.RestTemplate;/** * @Auther: Mr.zhou * @Date: 2020/8/13 13:44 */@RestControllerpublic class StudentController { @Autowired private RestTemplate restTemplate; // 从spring容器自动注入RestTemplate对象 @RequestMapping("showStudent") public Student showStudent(){ Student stu = restTemplate.getForObject("http://SC-PROVIDER/getStudent", Student.class); return stu; }}温馨提示:最后测试的时候需要开启三个启动类哦
作者:xybest.icu
原文链接:https://blog.csdn.net/qq_41530601/article/details/107983860

讨论HarmonyOS开发技术,专注于API与组件、DevEco Studio、测试、元服务和应用上架分发等。
更多推荐


 0
0 0
0- 0


 已为社区贡献1条内容

所有评论(0)