【HarmonyOS】管理应用窗口
目录
一、基本概念
窗口沉浸式能力:指对状态栏、导航栏等系统窗口进行控制,减少状态栏导航栏等系统界面的突兀感,从而使用户获得最佳体验的能力。沉浸式能力只在应用主窗口作为全屏窗口时生效。通常情况下,应用的辅助窗口(子窗、全局悬浮窗等)和处于自由窗口下的应用主窗口无法使用沉浸式能力。
全局悬浮窗:全局悬浮窗是一种特殊的应用辅助窗口,具备在应用主窗口和对应Ability退至后台后仍然可以在前台显示的能力。全局悬浮窗可以用于应用退至后台后,使用小窗继续显示UI,例如音乐应用用于显示桌面歌词等。应用在创建全局悬浮窗前,需要申请对应的权限。
二、场景介绍
在Stage模型下,管理应用窗口的典型场景有:
-
设置应用主窗口属性及目标页面
-
设置应用子窗口属性及目标页面
-
体验窗口沉浸式能力
-
设置全局悬浮窗
-
监听窗口不可交互与可交互事件
以下分别介绍具体开发方式。
三、接口说明
上述场景涉及的常用接口如下表所示。
| 实例名 | 接口名 | 描述 |
|---|---|---|
| WindowStage | getMainWindow(callback: AsyncCallback): void | 获取WindowStage实例下的主窗口。此接口仅可在Stage模型下使用。 |
| WindowStage | loadContent(path: string, callback: AsyncCallback): void | 为当前WindowStage的主窗口加载具体页面。其中path为要加载到窗口中的页面内容的路径,该路径需添加到工程的main_pages.json文件中。此接口仅可在Stage模型下使用。 |
| WindowStage | createSubWindow(name: string, callback: AsyncCallback): void | 创建子窗口。此接口仅可在Stage模型下使用。 |
| WindowStage | on(eventType: ‘windowStageEvent’, callback: Callback): void | 开启WindowStage生命周期变化的监听。此接口仅可在Stage模型下使用。 |
| window静态方法 | createWindow(config: Configuration, callback: AsyncCallback): void | 创建子窗口或者系统窗口。-config:创建窗口时的参数。 |
| Window | setUIContent(path: string, callback: AsyncCallback): void | 根据当前工程中某个页面的路径为窗口加载具体的页面内容。其中path为要加载到窗口中的页面内容的路径,在Stage模型下该路径需添加到工程的main_pages.json文件中。 |
| Window | setWindowBrightness(brightness: number, callback: AsyncCallback): void | 设置屏幕亮度值。 |
| Window | setWindowTouchable(isTouchable: boolean, callback: AsyncCallback): void | 设置窗口是否为可触状态。true表示可触;false表示不可触。 |
| Window | moveWindowTo(x: number, y: number, callback: AsyncCallback): void | 移动当前窗口位置。 |
| Window | resize(width: number, height: number, callback: AsyncCallback): void | 改变当前窗口大小。 |
| Window | setWindowLayoutFullScreen(isLayoutFullScreen: boolean): Promise | 设置主窗口或子窗口的布局是否为沉浸式布局。true表示沉浸式布局;false表示非沉浸式布局。 |
| Window | setWindowSystemBarEnable(names: Array<‘status’ | ‘navigation’>): Promise |
| Window | setWindowSystemBarProperties(systemBarProperties: SystemBarProperties): Promise | 设置窗口内导航栏、状态栏属性。systemBarProperties:导航栏、状态栏的属性集合。 |
| Window | showWindow(callback: AsyncCallback): void | 显示当前窗口。 |
| Window | on(type: ‘touchOutside’, callback: Callback): void | 开启本窗口区域外的点击事件的监听。 |
| Window | destroyWindow(callback: AsyncCallback): void | 销毁当前窗口。 |
四、设置应用主窗口
在Stage模型下,应用主窗口由UIAbility创建并维护生命周期。在UIAbility的onWindowStageCreate回调中,通过WindowStage获取应用主窗口,即可对其进行属性设置等操作。还可以在应用配置文件中设置应用主窗口的属性,如最大窗口宽度maxWindowWidth等。
开发步骤
-
获取应用主窗口。
通过getMainWindow接口获取应用主窗口。 -
设置主窗口属性。
可设置主窗口的背景色、亮度值、是否可触等多个属性,开发者可根据需要选择对应的接口。本示例以设置“是否可触”属性为例。 -
为主窗口加载对应的目标页面。
通过loadContent接口加载主窗口的目标页面。
import { UIAbility } from '@kit.AbilityKit';
import { window } from '@kit.ArkUI';
import { BusinessError } from '@kit.BasicServicesKit';

export default class EntryAbility extends UIAbility {
  onWindowStageCreate(windowStage: window.WindowStage) {
    // 1.获取应用主窗口。
    let windowClass: window.Window | null = null;
    windowStage.getMainWindow((err: BusinessError, data) => {
      let errCode: number = err.code;
      if (errCode) {
        console.error(`Failed to obtain the main window. Code:${err.code}, message:${err.message}`);
        return;
      }
      windowClass = data;
      console.info(`Succeeded in obtaining the main window. Result:${data}`);
      // 2.设置主窗口属性。以设置"是否可触"属性为例。
      let isTouchable: boolean = true;
      windowClass.setWindowTouchable(isTouchable, (err: BusinessError) => {
        let errCode: number = err.code;
        if (errCode) {
          console.error('Failed to set the window to be touchable. Cause:' + JSON.stringify(err));
          return;
        }
        console.info('Succeeded in setting the window to be touchable.');
      })
    })
    // 3.为主窗口加载对应的目标页面。
    windowStage.loadContent("pages/page2", (err: BusinessError) => {
      let errCode: number = err.code;
      if (errCode) {
        console.error('Failed to load the content. Cause:' + JSON.stringify(err));
        return;
      }
      console.info('Succeeded in loading the content.');
    });
  }
};
五、设置应用子窗口
开发者可以按需创建应用子窗口,如弹窗等,并对其进行属性设置等操作。
说明
以下几种场景不建议使用子窗口,建议优先考虑使用控件overlay能力实现。
移动设备(手机、在非自由模式下的平板设备)场景下子窗不能超出处于悬浮窗模式、分屏模式的应用主窗口范围,与控件一致。
分屏窗口与自由窗口模式下,主窗口位置大小发生改变时控件实时跟随变化能力优于子窗。
部分设备平台下根据实际的系统配置限制,子窗只有系统默认的动效和圆角阴影,应用无法设置,自由度低。
开发步骤
-
创建应用子窗口。
通过createSubWindow接口创建应用子窗口。
子窗口创建后默认是沉浸式布局。 -
设置子窗口属性。
子窗口创建成功后,可以改变其大小、位置等,还可以根据应用需要设置窗口背景色、亮度等属性。
在调用showWindow之前,建议设置子窗口的大小和位置。
如果没有设置子窗口的大小,调用showWindow后:- 自由窗口状态下,默认子窗口大小为当前物理屏幕的大小。其中,MateBook Fold折叠电脑半折叠态下,默认子窗口大小为竖向展开态的物理屏幕大小。
- 非自由窗口状态下,默认子窗口大小为主窗口大小。
-
加载显示子窗口的具体内容。
通过setUIContent和showWindow接口加载显示子窗口的具体内容。 -
销毁子窗口。
当不再需要某些子窗口时,可根据具体实现逻辑,使用destroyWindow接口销毁子窗口。
直接在onWindowStageCreate里面创建子窗口的整体示例代码如下:
import { UIAbility } from '@kit.AbilityKit';
import { window } from '@kit.ArkUI';
import { BusinessError } from '@kit.BasicServicesKit';

let windowStage_: window.WindowStage | null = null;
let sub_windowClass: window.Window | null = null;

export default class EntryAbility extends UIAbility {
  showSubWindow() {
    // 1.创建应用子窗口。
    if (windowStage_ == null) {
      console.error('Failed to create the subwindow. Cause: windowStage_ is null');
    }
    else {
      windowStage_.createSubWindow("mySubWindow", (err: BusinessError, data) => {
        let errCode: number = err.code;
        if (errCode) {
          console.error('Failed to create the subwindow. Cause: ' + JSON.stringify(err));
          return;
        }
        sub_windowClass = data;
        if (!sub_windowClass) {
          console.error('sub_windowClass is null');
          return;
        }
        console.info('Succeeded in creating the subwindow. Data: ' + JSON.stringify(data));
        // 2.子窗口创建成功后,设置子窗口的位置、大小及相关属性等。
        sub_windowClass.moveWindowTo(300, 300, (err: BusinessError) => {
          let errCode: number = err.code;
          if (errCode) {
            console.error('Failed to move the window. Cause:' + JSON.stringify(err));
            return;
          }
          console.info('Succeeded in moving the window.');
        });
        sub_windowClass.resize(500, 500, (err: BusinessError) => {
          let errCode: number = err.code;
          if (errCode) {
            console.error('Failed to change the window size. Cause:' + JSON.stringify(err));
            return;
          }
          console.info('Succeeded in changing the window size.');
        });
        // 3.为子窗口加载对应的目标页面。
        sub_windowClass.setUIContent("pages/page3", (err: BusinessError) => {
          let errCode: number = err.code;
          if (errCode) {
            console.error('Failed to load the content. Cause:' + JSON.stringify(err));
            return;
          }
          console.info('Succeeded in loading the content.');
          if (!sub_windowClass) {
            console.error('sub_windowClass is null');
            return;
          }
          // 3.显示子窗口。
          sub_windowClass.showWindow((err: BusinessError) => {
            let errCode: number = err.code;
            if (errCode) {
              console.error('Failed to show the window. Cause: ' + JSON.stringify(err));
              return;
            }
            console.info('Succeeded in showing the window.');
          });
        });
      })
    }
  }

  destroySubWindow() {
    if (!sub_windowClass) {
      console.error('sub_windowClass is null');
      return;
    }
    // 4.销毁子窗口。当不再需要子窗口时,可根据具体实现逻辑,使用destroy对其进行销毁。
    sub_windowClass.destroyWindow((err: BusinessError) => {
      let errCode: number = err.code;
      if (errCode) {
        console.error('Failed to destroy the window. Cause: ' + JSON.stringify(err));
        return;
      }
      console.info('Succeeded in destroying the window.');
    });
  }

  onWindowStageCreate(windowStage: window.WindowStage) {
    windowStage_ = windowStage;
    // 开发者可以在适当的时机,如主窗口上按钮点击事件等,创建子窗口。并不一定需要在onWindowStageCreate调用,这里仅作展示
    this.showSubWindow();
  }

  onWindowStageDestroy() {
    // 开发者可以在适当的时机,如子窗口上点击关闭按钮等,销毁子窗口。并不一定需要在onWindowStageDestroy调用,这里仅作展示
    this.destroySubWindow();
  }
};
另外,也可以在某个page页面通过点击按钮创建子窗口,整体示例代码如下:
// EntryAbility.ets
import { UIAbility } from '@kit.AbilityKit';
import { window } from '@kit.ArkUI';
export default class EntryAbility extends UIAbility {
  onWindowStageCreate(windowStage: window.WindowStage) {
    windowStage.loadContent('pages/Index', (err) => {
      if (err.code) {
        console.error('Failed to load the content. Cause:' + JSON.stringify(err));
        return;
      }
      console.info('Succeeded in loading the content.');
    })

    // 给Index页面传递windowStage
    AppStorage.setOrCreate('windowStage', windowStage);
  }
}
// Index.ets
import { window } from '@kit.ArkUI';
import { BusinessError } from '@kit.BasicServicesKit';

let windowStage_: window.WindowStage | undefined = undefined;
let sub_windowClass: window.Window | undefined = undefined;
@Entry
@Component
struct Index {
  @State message: string = 'Hello World';
  private createSubWindow(){
    // 获取windowStage
    windowStage_ = AppStorage.get('windowStage');
    // 1.创建应用子窗口。
    if (windowStage_ == null) {
      console.error('Failed to create the subwindow. Cause: windowStage_ is null');
    }
    else {
      windowStage_.createSubWindow("mySubWindow", (err: BusinessError, data) => {
        let errCode: number = err.code;
        if (errCode) {
          console.error('Failed to create the subwindow. Cause: ' + JSON.stringify(err));
          return;
        }
        sub_windowClass = data;
        if (!sub_windowClass) {
          console.error('sub_windowClass is null');
          return;
        }
        console.info('Succeeded in creating the subwindow. Data: ' + JSON.stringify(data));
        // 2.子窗口创建成功后,设置子窗口的位置、大小及相关属性等。
        sub_windowClass.moveWindowTo(300, 300, (err: BusinessError) => {
          let errCode: number = err.code;
          if (errCode) {
            console.error('Failed to move the window. Cause:' + JSON.stringify(err));
            return;
          }
          console.info('Succeeded in moving the window.');
        });
        sub_windowClass.resize(500, 500, (err: BusinessError) => {
          let errCode: number = err.code;
          if (errCode) {
            console.error('Failed to change the window size. Cause:' + JSON.stringify(err));
            return;
          }
          console.info('Succeeded in changing the window size.');
        });
        // 3.为子窗口加载对应的目标页面。
        sub_windowClass.setUIContent("pages/subWindow", (err: BusinessError) => {
          let errCode: number = err.code;
          if (errCode) {
            console.error('Failed to load the content. Cause:' + JSON.stringify(err));
            return;
          }
          console.info('Succeeded in loading the content.');
          if (!sub_windowClass) {
            console.error('sub_windowClass is null');
            return;
          }
          // 3.显示子窗口。
          sub_windowClass.showWindow((err: BusinessError) => {
            let errCode: number = err.code;
            if (errCode) {
              console.error('Failed to show the window. Cause: ' + JSON.stringify(err));
              return;
            }
            console.info('Succeeded in showing the window.');
          });
        });
      })
    }
  }
  private destroySubWindow(){
    if (!sub_windowClass) {
      console.error('sub_windowClass is null');
      return;
    }
    // 4.销毁子窗口。当不再需要子窗口时,可根据具体实现逻辑,使用destroy对其进行销毁。
    sub_windowClass.destroyWindow((err: BusinessError) => {
      let errCode: number = err.code;
      if (errCode) {
        console.error('Failed to destroy the window. Cause: ' + JSON.stringify(err));
        return;
      }
      console.info('Succeeded in destroying the window.');
    });
  }
  build() {
    Row() {
      Column() {
        Text(this.message)
          .fontSize(50)
          .fontWeight(FontWeight.Bold)
        Button(){
          Text('CreateSubWindow')
          .fontSize(24)
          .fontWeight(FontWeight.Normal)
        }.width(220).height(68)
        .margin({left:10, top:60})
        .onClick(() => {
          this.createSubWindow()
        })
        Button(){
          Text('destroySubWindow')
          .fontSize(24)
          .fontWeight(FontWeight.Normal)
        }.width(220).height(68)
        .margin({left:10, top:60})
        .onClick(() => {
          this.destroySubWindow()
        })
      }
      .width('100%')
    }
    .height('100%')
  }
}
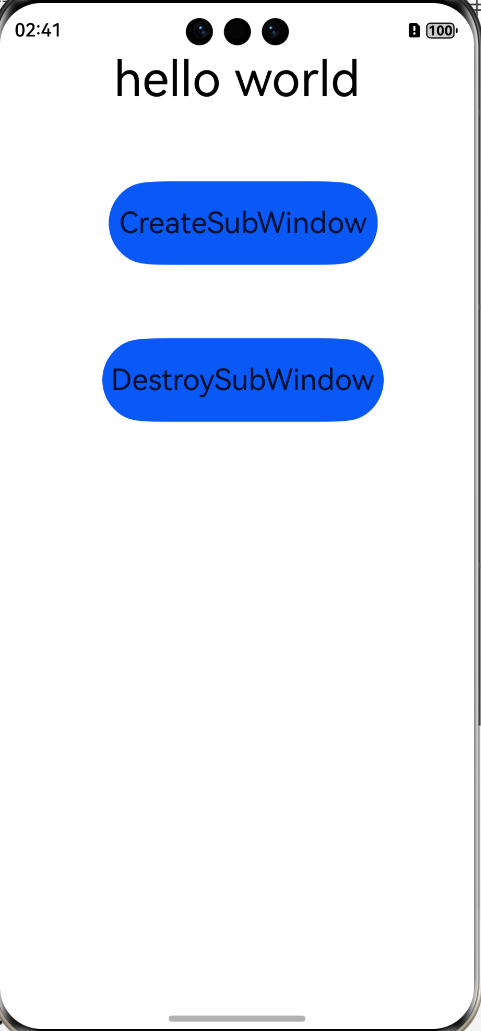
// subWindow.ets
@Entry
@Component
struct SubWindow {
  @State message: string = 'Hello subWindow';
  build() {
    Row() {
      Column() {
        Text(this.message)
          .fontSize(20)
          .fontWeight(FontWeight.Bold)
      }
      .width('100%')
    }
    .height('100%')
    .backgroundColor('#0D9FFB')
  }
}
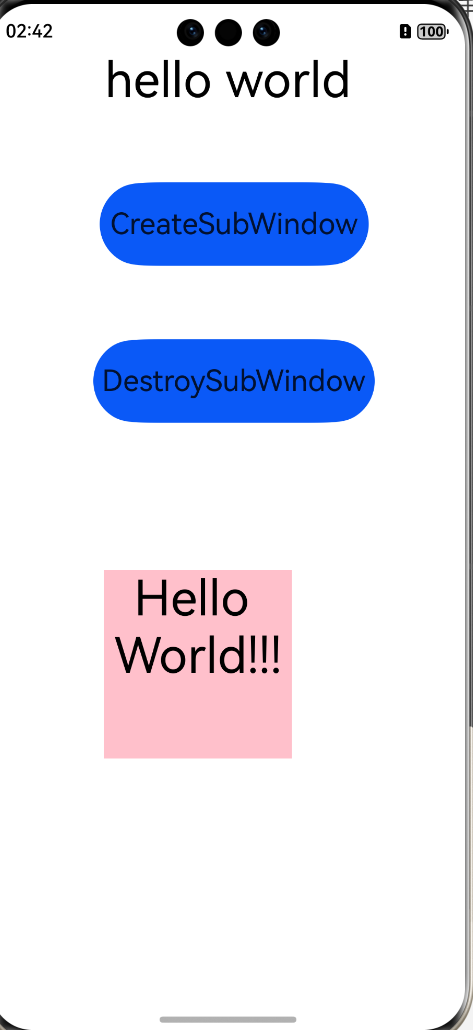
六、体验窗口沉浸式能力
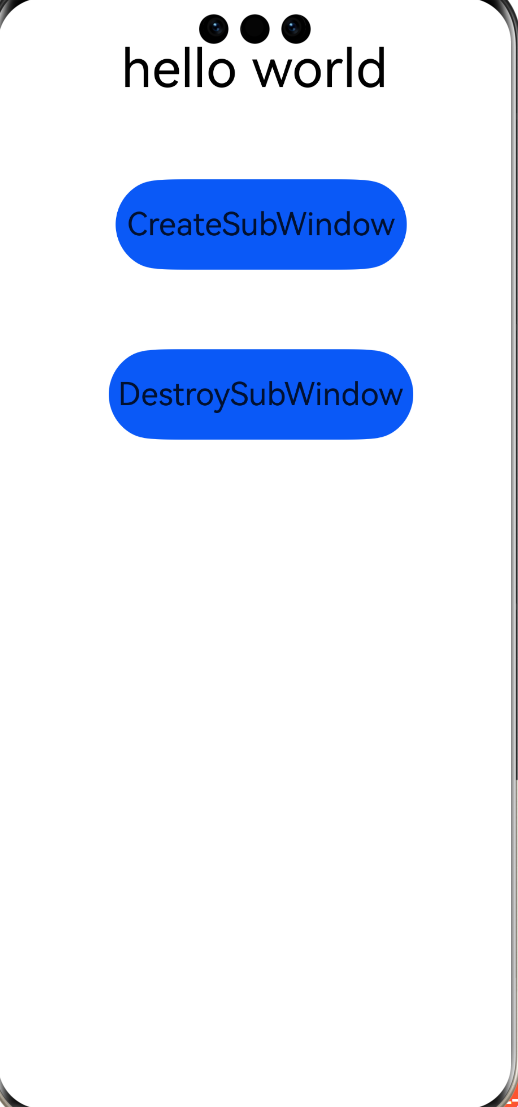
在看视频、玩游戏等场景下,用户往往希望隐藏状态栏、导航栏等不必要的系统窗口,从而获得更佳的沉浸式体验。此时可以借助窗口沉浸式能力(窗口沉浸式能力都是针对应用主窗口而言的),达到预期效果。从API version 10开始,沉浸式窗口默认配置为全屏大小并由组件模块控制布局,状态栏、导航栏背景颜色为透明,文字颜色为黑色;应用窗口调用setWindowLayoutFullScreen接口,设置为true表示由组件模块控制忽略状态栏、导航栏的沉浸式全屏布局,设置为false表示由组件模块控制避让状态栏、导航栏的非沉浸式全屏布局。
说明
当前沉浸式界面开发仅支持窗口级别的配置,暂不支持Page级别的配置。若有Page级别切换的需要,可以在页面生命周期开始,例如onPageShow中设置沉浸模式,然后在页面退出,例如onPageHide中恢复默认设置来实现。
开发步骤
-
获取应用主窗口。
通过getMainWindow接口获取应用主窗口。 -
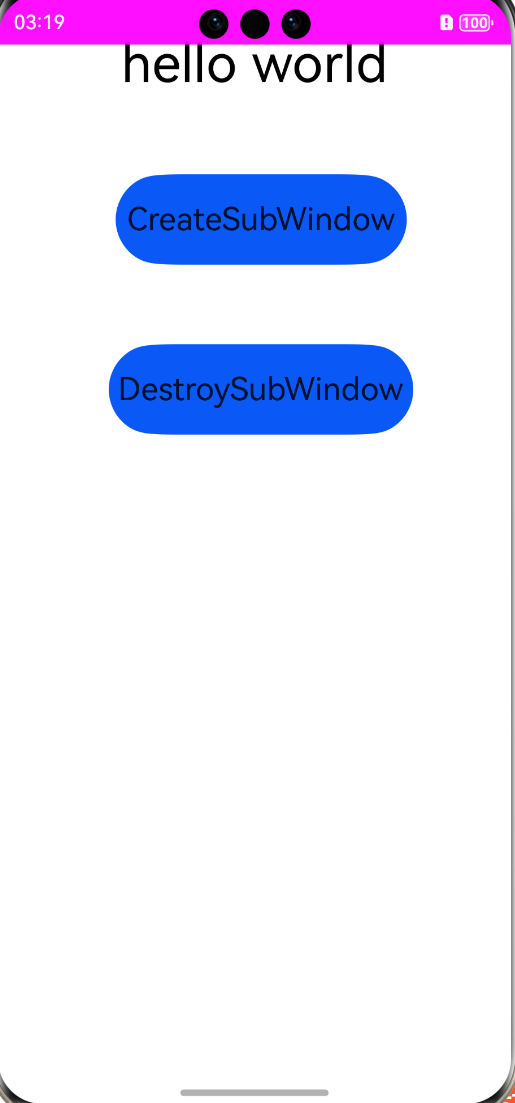
实现沉浸式效果。有以下两种方式:
- 方式一:应用主窗口为全屏窗口时,调用setWindowSystemBarEnable接口,设置导航栏、状态栏不显示,从而达到沉浸式效果。
- 方式二:调用setWindowLayoutFullScreen接口,设置应用主窗口为全屏布局;然后调用setWindowSystemBarProperties接口,设置导航栏、状态栏的透明度、背景/文字颜色以及高亮图标等属性,使之保持与主窗口显示协调一致,从而达到沉浸式效果。
-
加载显示沉浸式窗口的具体内容。
通过loadContent接口加载沉浸式窗口的具体内容。
import { UIAbility } from '@kit.AbilityKit';
import { window } from '@kit.ArkUI';
import { BusinessError } from '@kit.BasicServicesKit';

export default class EntryAbility extends UIAbility {
  onWindowStageCreate(windowStage: window.WindowStage) {
    // 1.获取应用主窗口。
    let windowClass: window.Window | null = null;
    windowStage.getMainWindow((err: BusinessError, data) => {
      let errCode: number = err.code;
      if (errCode) {
        console.error('Failed to obtain the main window. Cause: ' + JSON.stringify(err));
        return;
      }
      windowClass = data;
      console.info('Succeeded in obtaining the main window. Data: ' + JSON.stringify(data));

      // 2.实现沉浸式效果。方式一:设置导航栏、状态栏不显示。
      let names: Array<'status' | 'navigation'> = [];
      windowClass.setWindowSystemBarEnable(names)
        .then(() => {
          console.info('Succeeded in setting the system bar to be visible.');
        })
        .catch((err: BusinessError) => {
          console.error('Failed to set the system bar to be visible. Cause:' + JSON.stringify(err));
        });
      // 2.实现沉浸式效果。方式二:设置窗口为全屏布局,配合设置导航栏、状态栏的透明度、背景/文字颜色及高亮图标等属性,与主窗口显示保持协调一致。
      let isLayoutFullScreen = true;
      windowClass.setWindowLayoutFullScreen(isLayoutFullScreen)
        .then(() => {
          console.info('Succeeded in setting the window layout to full-screen mode.');
        })
        .catch((err: BusinessError) => {
          console.error('Failed to set the window layout to full-screen mode. Cause:' + JSON.stringify(err));
        });
      let sysBarProps: window.SystemBarProperties = {
        statusBarColor: '#ff00ff',
        navigationBarColor: '#00ff00',
        // 以下两个属性从API Version 8开始支持
        statusBarContentColor: '#ffffff',
        navigationBarContentColor: '#ffffff'
      };
      windowClass.setWindowSystemBarProperties(sysBarProps)
        .then(() => {
          console.info('Succeeded in setting the system bar properties.');
        })
        .catch((err: BusinessError) => {
          console.error('Failed to set the system bar properties. Cause: ' + JSON.stringify(err));
        });
    })
    // 3.为沉浸式窗口加载对应的目标页面。
    windowStage.loadContent("pages/page2", (err: BusinessError) => {
      let errCode: number = err.code;
      if (errCode) {
        console.error('Failed to load the content. Cause:' + JSON.stringify(err));
        return;
      }
      console.info('Succeeded in loading the content.');
    });
  }
};
七、设置全局悬浮窗(受限开放)
全局悬浮窗可以在已有的任务基础上,创建一个始终在前台显示的窗口。即使创建全局悬浮窗的任务退至后台,全局悬浮窗仍然可以在前台显示。通常全局悬浮窗位于所有应用窗口之上,开发者可以创建全局悬浮窗,并对全局悬浮窗进行属性设置等操作。
开发步骤
前提条件: 创建WindowType.TYPE_FLOAT即全局悬浮窗类型的窗口,需要申请ohos.permission.SYSTEM_FLOAT_WINDOW权限,该权限为受控开放权限,仅符合指定场景的在2in1设备上的应用可申请该权限。申请方式请参考:申请使用受限权限。
-
创建全局悬浮窗。
通过window.createWindow接口创建全局悬浮窗类型的窗口。 -
对全局悬浮窗进行属性设置等操作。
全局悬浮窗窗口创建成功后,可以改变其大小、位置等,还可以根据应用需要设置全局悬浮窗背景色、亮度等属性。 -
加载显示全局悬浮窗的具体内容。
通过setUIContent和showWindow接口加载显示全局悬浮窗的具体内容。 -
销毁全局悬浮窗。
当不再需要全局悬浮窗时,可根据具体实现逻辑,使用destroyWindow接口销毁全局悬浮窗。
import { UIAbility } from '@kit.AbilityKit';
import { window } from '@kit.ArkUI';
import { BusinessError } from '@kit.BasicServicesKit';

export default class EntryAbility extends UIAbility {
  onWindowStageCreate(windowStage: window.WindowStage) {
    // 1.创建全局悬浮窗。
    let windowClass: window.Window | null = null;
    let config: window.Configuration = {
      name: "floatWindow", windowType: window.WindowType.TYPE_FLOAT, ctx: this.context
    };
    window.createWindow(config, (err: BusinessError, data) => {
      let errCode: number = err.code;
      if (errCode) {
        console.error('Failed to create the floatWindow. Cause: ' + JSON.stringify(err));
        return;
      }
      console.info('Succeeded in creating the floatWindow. Data: ' + JSON.stringify(data));
      windowClass = data;
      // 2.全局悬浮窗窗口创建成功后,设置全局悬浮窗的位置、大小及相关属性等。
      windowClass.moveWindowTo(300, 300, (err: BusinessError) => {
        let errCode: number = err.code;
        if (errCode) {
          console.error('Failed to move the window. Cause:' + JSON.stringify(err));
          return;
        }
        console.info('Succeeded in moving the window.');
      });
      windowClass.resize(500, 500, (err: BusinessError) => {
        let errCode: number = err.code;
        if (errCode) {
          console.error('Failed to change the window size. Cause:' + JSON.stringify(err));
          return;
        }
        console.info('Succeeded in changing the window size.');
      });
      // 3.为全局悬浮窗加载对应的目标页面。
      windowClass.setUIContent("pages/page4", (err: BusinessError) => {
        let errCode: number = err.code;
        if (errCode) {
          console.error('Failed to load the content. Cause:' + JSON.stringify(err));
          return;
        }
        console.info('Succeeded in loading the content.');
        // 3.显示全局悬浮窗。
        (windowClass as window.Window).showWindow((err: BusinessError) => {
          let errCode: number = err.code;
          if (errCode) {
            console.error('Failed to show the window. Cause: ' + JSON.stringify(err));
            return;
          }
          console.info('Succeeded in showing the window.');
        });
      });
      // 4.销毁全局悬浮窗。当不再需要全局悬浮窗时,可根据具体实现逻辑,使用destroy对其进行销毁。
      windowClass.destroyWindow((err: BusinessError) => {
        let errCode: number = err.code;
        if (errCode) {
          console.error('Failed to destroy the window. Cause: ' + JSON.stringify(err));
          return;
        }
        console.info('Succeeded in destroying the window.');
      });
    });
  }
};
八、监听窗口不可交互与可交互事件
应用在前台显示过程中可能会进入某些不可交互的场景,比较典型的是进入多任务界面。此时,对于一些应用可能需要选择暂停某个与用户正在交互的业务,如视频类应用暂停正在播放的视频或者相机暂停预览流等。而当该应用从多任务又切回前台时,又变成了可交互的状态,此时需要恢复被暂停中断的业务,如恢复视频播放或相机预览流等。
开发步骤
在创建WindowStage对象后可通过监听’windowStageEvent’事件类型,监听到窗口进入前台、后台、前台可交互、前台不可交互等事件,应用可根据这些上报的事件状态进行相应的业务处理。
import { UIAbility } from '@kit.AbilityKit';
import { window } from '@kit.ArkUI';

export default class EntryAbility extends UIAbility {
  onWindowStageCreate(windowStage: window.WindowStage) {
    try {
      windowStage.on('windowStageEvent', (data) => {
        console.info('Succeeded in enabling the listener for window stage event changes. Data: ' +
          JSON.stringify(data));

        // 根据事件状态类型选择进行相应的处理
        if (data === window.WindowStageEventType.SHOWN) {
          console.info('current window stage event is SHOWN');
          // 应用进入前台,默认为可交互状态
          // ...
        } else if (data === window.WindowStageEventType.HIDDEN) {
          console.info('current window stage event is HIDDEN');
          // 应用进入后台,默认为不可交互状态
          // ...
        } else if (data === window.WindowStageEventType.PAUSED) {
          console.info('current window stage event is PAUSED');
          // 前台应用进入多任务,转为不可交互状态
          // ...
        } else if (data === window.WindowStageEventType.RESUMED) {
          console.info('current window stage event is RESUMED');
          // 进入多任务后又继续返回前台时,恢复可交互状态
          // ...
        }

        // ...
      });
    } catch (exception) {
      console.error('Failed to enable the listener for window stage event changes. Cause:' +
        JSON.stringify(exception));
    }
  }
}

讨论HarmonyOS开发技术,专注于API与组件、DevEco Studio、测试、元服务和应用上架分发等。
更多推荐


 21
21 0
0- 0


 已为社区贡献9条内容

所有评论(0)