鸿蒙5.0开发实战案例:同层渲染实战指南
📑往期推文全新看点(文中附带最新·鸿蒙全栈学习笔记)
✒️ 鸿蒙应用开发与鸿蒙系统开发哪个更有前景?
✒️ 嵌入式开发适不适合做鸿蒙南向开发?看完这篇你就了解了~
✒️ 对于大前端开发来说,转鸿蒙开发究竟是福还是祸?
✒️ 鸿蒙岗位需求突增!移动端、PC端、IoT到底该怎么选?
✒️ 记录一场鸿蒙开发岗位面试经历~
✒️ 持续更新中……
同层渲染是ArkWeb组件为应用提供原生组件和Web元素渲染在同一层级的能力。支持的组件范围请参考 NodeRenderType 说明。
- 使用前请在module.json5中添加网络权限,添加方法请参考 在配置文件中声明权限 。
"requestPermissions":[
    {
      "name" : "ohos.permission.INTERNET"
    }
  ]
约束限制
使用同层渲染的功能时会有如下限制。
-
不支持W3C规格标准标签定义为同层标签。
-
不支持同时配置Object标签和Embed标签作为同层渲染标签。
-
一个页面内同层标签的个数建议不超过五个,超过这个范围性能体验可能得不到保障。
-
同层标签最大高度不超过8192px,最大纹理大小为8192px。
-
Web组件嵌套Web只支持一层嵌套,不支持多层嵌套。如果多层嵌套,会显示 “该插件不受支持”。
-
同层渲染区域支持的触屏事件包括:滑动、点击、缩放、长按,不支持拖拽。
-
同层渲染区域不支持鼠标、键盘、触摸板事件
-
开启同层渲染后,Web组件打开的所有Web页面将不支持统一渲染模式 RenderMode 。
绘制XComponent+AVPlayer和Button组件
使能同层渲染模式
开发者可通过 enableNativeEmbedMode() 控制同层渲染开关。Html文件中需要显式使用embed标签,并且embed标签内type必须以“native/”开头。同层标签对应的元素区域的背景为透明。
- 应用侧代码组件使用示例。
// HAP's src/main/ets/pages/Index.ets
// 创建NodeController
import { webview } from '@kit.ArkWeb';
import { UIContext, NodeController, BuilderNode, NodeRenderType, FrameNode } from "@kit.ArkUI";
import { AVPlayerDemo } from './PlayerDemo';

@Observed
declare class Params {
  textOne : string
  textTwo : string
  width : number
  height : number
}

declare class nodeControllerParams {
  surfaceId : string
  type : string
  renderType : NodeRenderType
  embedId : string
  width : number
  height : number
}

// 用于控制和反馈对应的NodeContainer上的节点的行为,需要与NodeContainer一起使用。
class MyNodeController extends NodeController {
  private rootNode: BuilderNode<[Params]> | undefined | null;
  private embedId_ : string = "";
  private surfaceId_ : string = "";
  private renderType_ :NodeRenderType = NodeRenderType.RENDER_TYPE_DISPLAY;
  private width_ : number = 0;
  private height_ : number = 0;
  private type_ : string = "";
  private isDestroy_ : boolean = false;

  setRenderOption(params : nodeControllerParams) {
    this.surfaceId_ = params.surfaceId;
    this.renderType_ = params.renderType;
    this.embedId_ = params.embedId;
    this.width_ = params.width;
    this.height_ = params.height;
    this.type_ = params.type;
  }
  // 必须要重写的方法,用于构建节点数、返回节点数挂载在对应NodeContainer中。
  // 在对应NodeContainer创建的时候调用、或者通过rebuild方法调用刷新。
  makeNode(uiContext: UIContext): FrameNode | null{
    if (this.isDestroy_) { // rootNode为null
      return null;
    }
    if (!this.rootNode) { // rootNode 为undefined时
      this.rootNode = new BuilderNode(uiContext, { surfaceId: this.surfaceId_, type: this.renderType_});
      if (this.type_ === 'native/video') {
        this.rootNode.build(wrapBuilder(VideoBuilder), {textOne: "myButton", width : this.width_, height : this.height_});
      } else {
        // other
      }
    }
    // 返回FrameNode节点。
    return this.rootNode.getFrameNode();
  }

  setBuilderNode(rootNode: BuilderNode<Params[]> | null): void{
    this.rootNode = rootNode;
  }

  getBuilderNode(): BuilderNode<[Params]> | undefined | null{
    return this.rootNode;
  }

  updateNode(arg: Object): void {
    this.rootNode?.update(arg);
  }
  getEmbedId() : string {
    return this.embedId_;
  }

  setDestroy(isDestroy : boolean) : void {
    this.isDestroy_ = isDestroy;
    if (this.isDestroy_) {
      this.rootNode = null;
    }
  }

  postEvent(event: TouchEvent | undefined) : boolean {
    return this.rootNode?.postTouchEvent(event) as boolean
  }
}

@Component
struct VideoComponent {
  @ObjectLink params: Params
  @State bkColor: Color = Color.Red
  mXComponentController: XComponentController = new XComponentController();
  @State player_changed: boolean = false;
  player?: AVPlayerDemo;

  build() {
    Column() {
      Button(this.params.textOne)

      XComponent({ id: 'video_player_id', type: XComponentType.SURFACE, controller: this.mXComponentController})
        .border({width: 1, color: Color.Red})
        .onLoad(() => {
          this.player = new AVPlayerDemo();
          this.player.setSurfaceID(this.mXComponentController.getXComponentSurfaceId());
          this.player_changed = !this.player_changed;
          this.player.avPlayerLiveDemo()
        })
        .width(300)
        .height(200)
    }
    //自定义组件中的最外层容器组件宽高应该为同层标签的宽高
    .width(this.params.width)
    .height(this.params.height)
  }
}
// @Builder中为动态组件的具体组件内容。
@Builder
function VideoBuilder(params: Params) {
  VideoComponent({ params: params })
    .backgroundColor(Color.Gray)
}

@Entry
@Component
struct WebIndex {
  browserTabController: WebviewController = new webview.WebviewController()
  private nodeControllerMap: Map<string, MyNodeController> = new Map();
  @State componentIdArr: Array<string> = [];

  aboutToAppear() {
    // 配置web开启调试模式。
    webview.WebviewController.setWebDebuggingAccess(true);
  }

  build(){
    Row() {
      Column() {
        Stack() {
          ForEach(this.componentIdArr, (componentId: string) => {
            NodeContainer(this.nodeControllerMap.get(componentId))
          }, (embedId: string) => embedId)
          // Web组件加载本地test.html页面。
          Web({ src: $rawfile("test.html"), controller: this.browserTabController })
              // 配置同层渲染开关开启。
            .enableNativeEmbedMode(true)
              // 获取embed标签的生命周期变化数据。
            .onNativeEmbedLifecycleChange((embed) => {
              console.log("NativeEmbed surfaceId" + embed.surfaceId);
              // 1. 如果使用embed.info.id作为映射nodeController的key,请在h5页面显式指定id
              const componentId = embed.info?.id?.toString() as string
              if (embed.status == NativeEmbedStatus.CREATE) {
                console.log("NativeEmbed create" + JSON.stringify(embed.info))
                // 创建节点控制器,设置参数并rebuild。
                let nodeController = new MyNodeController()
                // 1. embed.info.width和embed.info.height单位是px格式,需要转换成ets侧的默认单位vp
                nodeController.setRenderOption({surfaceId : embed.surfaceId as string, type : embed.info?.type as string,
                  renderType : NodeRenderType.RENDER_TYPE_TEXTURE, embedId : embed.embedId as string,
                  width : px2vp(embed.info?.width), height : px2vp(embed.info?.height)})
                nodeController.setDestroy(false);
                // 根据web传入的embed的id属性作为key,将nodeController存入map。
                this.nodeControllerMap.set(componentId, nodeController)
                // 将web传入的embed的id属性存入@State状态数组变量中,用于动态创建nodeContainer节点容器,需要将push动作放在set之后。
                this.componentIdArr.push(componentId)
              } else if (embed.status == NativeEmbedStatus.UPDATE) {
                let nodeController = this.nodeControllerMap.get(componentId)
                nodeController?.updateNode({textOne: 'update', width: px2vp(embed.info?.width), height: px2vp(embed.info?.height)} as ESObject)
              } else {
                let nodeController = this.nodeControllerMap.get(componentId);
                nodeController?.setDestroy(true)
                this.nodeControllerMap.clear();
                this.componentIdArr.length = 0;
              }
            })// 获取同层渲染组件触摸事件信息。
            .onNativeEmbedGestureEvent((touch) => {
              console.log("NativeEmbed onNativeEmbedGestureEvent" + JSON.stringify(touch.touchEvent));
              this.componentIdArr.forEach((componentId: string) => {
                let nodeController = this.nodeControllerMap.get(componentId)
                // 将获取到的同层区域的事件发送到该区域embedId对应的nodeController上
                if (nodeController?.getEmbedId() === touch.embedId) {
                  let ret = nodeController?.postEvent(touch.touchEvent)
                  if (ret) {
                    console.log("onNativeEmbedGestureEvent success " + componentId)
                  } else {
                    console.log("onNativeEmbedGestureEvent fail " + componentId)
                  }
                  if (touch.result) {
                    // 通知Web组件手势事件消费结果
                    touch.result.setGestureEventResult(ret);
                  }
                }
              })
            })
        }
      }
    }
  }
}
- 应用侧代码,视频播放示例。
// HAP's src/main/ets/pages/PlayerDemo.ets
import { media } from '@kit.MediaKit';
import { BusinessError } from '@ohos.base';

export class AVPlayerDemo {
  private count: number = 0;
  private surfaceID: string = ''; // surfaceID用于播放画面显示,具体的值需要通过Xcomponent接口获取,相关文档链接见上面Xcomponent创建方法。
  private isSeek: boolean = true; // 用于区分模式是否支持seek操作。

  setSurfaceID(surface_id: string){
    console.log('setSurfaceID : ' + surface_id);
    this.surfaceID = surface_id;
  }
  // 注册avplayer回调函数。
  setAVPlayerCallback(avPlayer: media.AVPlayer) {
    // seek操作结果回调函数。
    avPlayer.on('seekDone', (seekDoneTime: number) => {
      console.info(`AVPlayer seek succeeded, seek time is ${seekDoneTime}`);
    })
    // error回调监听函数,当avplayer在操作过程中出现错误时,调用reset接口触发重置流程。
    avPlayer.on('error', (err: BusinessError) => {
      console.error(`Invoke avPlayer failed, code is ${err.code}, message is ${err.message}`);
      avPlayer.reset();
    })
    // 状态机变化回调函数。
    avPlayer.on('stateChange', async (state: string, reason: media.StateChangeReason) => {
      switch (state) {
        case 'idle': // 成功调用reset接口后触发该状态机上报。
          console.info('AVPlayer state idle called.');
          avPlayer.release(); // 调用release接口销毁实例对象。
          break;
        case 'initialized': // avplayer 设置播放源后触发该状态上报。
          console.info('AVPlayer state initialized called.');
          avPlayer.surfaceId = this.surfaceID; // 设置显示画面,当播放的资源为纯音频时无需设置。
          avPlayer.prepare();
          break;
        case 'prepared': // prepared调用成功后上报该状态机。
          console.info('AVPlayer state prepared called.');
          avPlayer.play(); // 调用播放接口开始播放。
          break;
        case 'playing': // play成功调用后触发该状态机上报。
          console.info('AVPlayer state prepared called.');
          if(this.count !== 0) {
            if (this.isSeek) {
              console.info('AVPlayer start to seek.');
              avPlayer.seek(avPlayer.duration); // seek到视频末尾。
            } else {
              // 当播放模式不支持seek操作时继续播放到结尾。
              console.info('AVPlayer wait to play end.');
            }
          } else {
            avPlayer.pause(); // 调用暂停接口暂停播放。
          }
          this.count++;
          break;
        case 'paused': // pause成功调用后触发该状态机上报。
          console.info('AVPlayer state paused called.');
          avPlayer.play(); // 再次播放接口开始播放。
          break;
        case 'completed': //播放接口后触发该状态机上报。
          console.info('AVPlayer state paused called.');
          avPlayer.stop(); // 调用播放接口接口。
          break;
        case 'stopped': // stop接口后触发该状态机上报。
          console.info('AVPlayer state stopped called.');
          avPlayer.reset(); // 调用reset接口初始化avplayer状态。
          break;
        case 'released': //播放接口后触发该状态机上报。
          console.info('AVPlayer state released called.');
          break;
        default:
          break;
      }
    })
  }

  // 通过url设置网络地址来实现播放直播码流。
  async avPlayerLiveDemo(){
    // 创建avPlayer实例对象
    let avPlayer: media.AVPlayer = await media.createAVPlayer();
    // 创建状态机变化回调函数。
    this.setAVPlayerCallback(avPlayer);
    this.isSeek = false; // 不支持seek操作。
    // 使用时需要自行替换视频链接
    avPlayer.url = 'https://xxx.xxx/demo.mp4';
  }
}
- 前端页面示例。
<!--HAP's src/main/resources/rawfile/test.html-->
<!DOCTYPE html>
<html>
<head>
    <title>同层渲染测试html</title>
    <meta name="viewport">
</head>
<body>
<div>
    <div id="bodyId">
        <embed id="nativeVideo" type = "native/video" width="1000" height="1500" src="test" style = "background-color:red"/>
    </div>
</div>
</body>
</html>
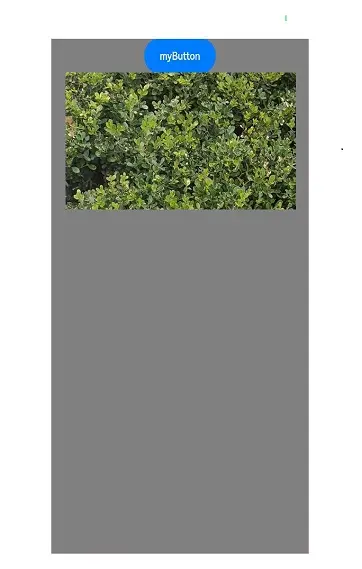
使能同层渲染模式并指定标签名和自定义类型
开发者也可通过 registerNativeEmbedRule(tag: string, type: string) 指定tag标签和自定义类型。
当前tag仅支持"embed"和"object",type类型则可任意指定,两个字符串参数均不区分大小写,ArkWeb内核侧将会统一转成小写,其中tag字串使用全字符串匹配,type使用字符串前缀匹配。
若开发者不使用该接口或该接口接收的为非法字符串(如:空字符串)时,内核将使用默认设置即"embed" + "native/"前缀模式,若指定类型与w3c定义的object或embed标准类型重合如registerNativeEmbedRule(“object”, “application/pdf”),
ArkWeb将遵循w3c标准行为,不会将其识别为同层标签。
- 应用侧代码使用registerNativeEmbedRule示例。
class MyNodeController extends NodeController {
  ...
  makeNode(uiContext: UIContext): FrameNode | null{

    if (this.type_ === 'test') {
      ...
    } else if (this.type_ === 'test/video') {
      ...
    } else {
      // other
    }
    ...
  }
  ...
}
...

  build(){
      ...
        Stack() {
          ...
          Web({ src: $rawfile("test.html"), controller: this.browserTabController })
             // 配置同层渲染开关开启。
            .enableNativeEmbedMode(true)
             // 注册同层标签为"object",类型为"test"前缀。
            .registerNativeEmbedRule("object", "test")
            ...
        }
      ...
  }
- 与registerNativeEmbedRule相对应的前端页面代码,类型可使用"test"及以"test"为前缀的字串。
<!DOCTYPE html>
<html>
<head>
    <title>同层渲染测试html</title>
    <meta name="viewport">
</head>
<body>
<div>
    <div>
        <object id="nativeButton" type="test" width="800" height="800" data="test?params1=xxx?" style = "background-color:red"/>
          <param name="id" value="playerId" />
          <param name="data" value='{}' />
        </object>
    </div>
    <div>
        <object id="nativeVideo" type="test/video" width="500" height="500" data="test" style = "background-color:red"/><object>
    </div>
</div>
<div id="button" width="500" height="200">
    <p>bottom</p>
</div>

</body>
</html>
绘制TextInput组件并将同层元素更新时上报的位置信息更新到组件侧
触发同层元素更新的行为包括滚动、缩放、元素发生改变导致的重排等。由于同层元素的位置基于Web组件坐标系,对于网页缩放这种并未真正改变元素的size的行为,只会有position的改变,宽高仍保持初始值。
需要位置信息的组件如TextInput、TextArea等需将同层元素更新上报来的位置信息实时更新到组件侧。
- 应用侧完整示例。
...
class MyNodeController extends NodeController {
  ...
  makeNode(uiContext: UIContext): FrameNode | null{

    if (this.type_ === 'application/view') {
      this.rootNode.build(wrapBuilder(TextInputBuilder), {
        textOne: "myInput",
        width: this.width_,
        height: this.height_
      });
    } else {
      // other
    }
    ...
  }
  ...
}


@Component
struct TextInputComponent {
  @Prop params: Params
  @State bkColor: Color = Color.Red
  mXComponentController: XComponentController = new XComponentController();

  build() {
    Column() {
      TextInput({ text: `${this.params.textOne}` })
        .height(50)
        .width(200)
        .backgroundColor(Color.Green)
        .onTouch((event) => {
          console.log('input1 event ' + JSON.stringify(event));
        }).margin({ top: 30})

      TextInput({ text: `${this.params.textOne}` })
        .height(50)
        .width(200)
        .backgroundColor(Color.Green)
        .onTouch((event) => {
          console.log('input2 event ' + JSON.stringify(event));
        }).margin({ top: 30})

      TextInput({ text: `${this.params.textOne}` })
        .height(50)
        .width(200)
        .backgroundColor(Color.Green)
        .onTouch((event) => {
          console.log('input2 event ' + JSON.stringify(event));
        }).margin({ top: 30})
    }
    .width(this.params.width)
    .height(this.params.height)
  }
}

@Builder
function TextInputBuilder(params: Params) {
  TextInputComponent({ params: params })
    .height(params.height)
    .width(params.width)
    .backgroundColor(Color.Red)
}

@Entry
@Component
struct Page {
  browserTabController: WebviewController = new webview.WebviewController()
  private nodeControllerMap: Map<string, MyNodeController> = new Map();
  @State componentIdArr: Array<string> = [];
  @State edges: Edges = {};

  build() {
    Row() {
      Column() {
        Stack(){
          ForEach(this.componentIdArr, (componentId: string) => {
            NodeContainer(this.nodeControllerMap.get(componentId)).position(this.edges)
          }, (embedId: string) => embedId)

          Web({ src: $rawfile('test.html'), controller: this.browserTabController})
            .enableNativeEmbedMode(true)
            .registerNativeEmbedRule("object", "APPlication/view")
            .onNativeEmbedLifecycleChange((embed) => {
              const componentId = embed.info?.id?.toString() as string;
              if (embed.status == NativeEmbedStatus.CREATE) {
                // 建议用edges的方式使用position,避免px和vp的转换出现浮点数运算带来额外的精度损失
                this.edges = {left: `${embed.info?.position?.x as number}px`, top: `${embed.info?.position?.y as number}px`}
                let nodeController = new MyNodeController()
                nodeController.setRenderOption({surfaceId : embed.surfaceId as string,
                  type : embed.info?.type as string,
                  renderType : NodeRenderType.RENDER_TYPE_TEXTURE,
                  embedId : embed.embedId as string,
                  width : px2vp(embed.info?.width),
                  height :px2vp(embed.info?.height)})
                nodeController.rebuild()

                this.nodeControllerMap.set(componentId, nodeController)
                this.componentIdArr.push(componentId)
              } else if (embed.status == NativeEmbedStatus.UPDATE) {
                console.log("NativeEmbed update" + JSON.stringify(embed.info))

                this.edges = {left: `${embed.info?.position?.x as number}px`, top: `${embed.info?.position?.y as number}px`}
                let nodeController = this.nodeControllerMap.get(componentId)

                nodeController?.updateNode({text: 'update',   width : px2vp(embed.info?.width),
                  height :px2vp(embed.info?.height)} as ESObject)
                nodeController?.rebuild()
              } else {
                let nodeController = this.nodeControllerMap.get(componentId)
                nodeController?.setBuilderNode(null)
                nodeController?.rebuild()
              }
            })
            .onNativeEmbedGestureEvent((touch) => {
              this.componentIdArr.forEach((componentId: string) => {
                let nodeController = this.nodeControllerMap.get(componentId)
                if (nodeController?.getEmbedId() === touch.embedId) {
                  let ret = nodeController?.postEvent(touch.touchEvent)
                  if (ret) {
                    console.log("onNativeEmbedGestureEvent success " + componentId)
                  } else {
                    console.log("onNativeEmbedGestureEvent fail " + componentId)
                  }
                }
              })
            })
        }
      }
      .width('100%')
    }
    .height('100%')
  }
}
- 前述应用侧相对应的前端示例。
<!DOCTYPE html>
<html>
<head>
    <title>同层渲染测试html</title>
    <meta charset="UTF-8">
    <style>
    html {
        background-color: blue;
    }
    </style>
</head>
<body>

<div id="bodyId" style="width:800px; height:1000px; margin-top:1000px;">
    <object id="cameraTest" type="application/view" width="100%" height="100%" ></object>
</div>
<div style="height:1000px;">
</div>

</body>
</html>


讨论HarmonyOS开发技术,专注于API与组件、DevEco Studio、测试、元服务和应用上架分发等。
更多推荐



 35
35 0
0- 0


 已为社区贡献429条内容

所有评论(0)