OpenHarmony南向设备开发:基于命令行开发-小型系统(基于Hi3516开发板)
下方将展示如何在单板上运行第一个应用程序.........
往期鸿蒙全套实战精彩文章必看内容:
编写“Hello World”程序
下方将展示如何在单板上运行第一个应用程序,其中包括新建应用程序、编译、烧写、运行等步骤,最终输出“Hello World!”。
示例目录
示例完整目录如下:
applications/sample/hello
│── BUILD.gn
└── src
    └── helloworld.c
开发步骤
请在源码目录中通过以下步骤创建“Hello World”应用程序。
-
新建目录及源码。
新建applications/sample/hello/src/helloworld.c目录及文件,代码如下所示,用户可以自定义修改打印内容(例如:修改OHOS为World)。当前应用程序可支持标准C及C++的代码开发。
#include <stdio.h> int main(int argc, char **argv) { printf("\n\n"); printf("\n\t\tHello OHOS!\n"); printf("\n\n\n"); return 0; } -
新建编译组织文件。
新建applications/sample/hello/BUILD.gn文件,内容如下所示:
import("//build/lite/config/component/lite_component.gni") lite_component("hello-OHOS") { features = [ ":helloworld" ] } executable("helloworld") { output_name = "helloworld" sources = [ "src/helloworld.c" ] } -
添加新组件。
修改文件build/lite/components/communication.json,添加组件hello_world_app的配置,如下所示为communication.json文件片段,"##start##“和”##end##“之间为新增配置(”##start##“和”##end##"仅用来标识位置,添加完配置后删除这两行):
{ "components": [ { "component": "camera_sample_communication", "description": "Communication related samples.", "optional": "true", "dirs": [ "applications/sample/camera/communication" ], "targets": [ "//applications/sample/camera/communication:sample" ], "rom": "", "ram": "", "output": [], "adapted_kernel": [ "liteos_a" ], "features": [], "deps": { "components": [], "third_party": [] } }, ##start## { "component": "hello_world_app", "description": "hello world samples.", "optional": "true", "dirs": [ "applications/sample/hello" ], "targets": [ "//applications/sample/hello:hello-OHOS" ], "rom": "", "ram": "", "output": [], "adapted_kernel": [ "liteos_a" ], "features": [], "deps": { "components": [], "third_party": [] } }, ##end## { "component": "camera_sample_app", "description": "Camera related samples.", "optional": "true", "dirs": [ "applications/sample/camera/launcher", "applications/sample/camera/cameraApp", "applications/sample/camera/setting", "applications/sample/camera/gallery", "applications/sample/camera/media" ], -
修改单板配置文件。
修改文件vendor/hisilicon/hispark_taurus/config.json,新增hello_world_app组件的条目,如下所示代码片段为applications子系统配置,"##start##“和”##end##“之间为新增条目(”##start##“和”##end##"仅用来标识位置,添加完配置后删除这两行):
      {
        "subsystem": "applications",
        "components": [
          { "component": "camera_sample_app", "features":[] },
          { "component": "camera_sample_ai", "features":[] },
##start##
          { "component": "hello_world_app", "features":[] },
##end##
          { "component": "camera_screensaver_app", "features":[] }
        ]
      }
编译
OpenHarmony支持hb和build.sh两种编译方式。
前提条件
操作步骤
请进入源码根目录,执行如下命令进行编译:
-
设置编译路径。
hb set -
选择当前路径。
. -
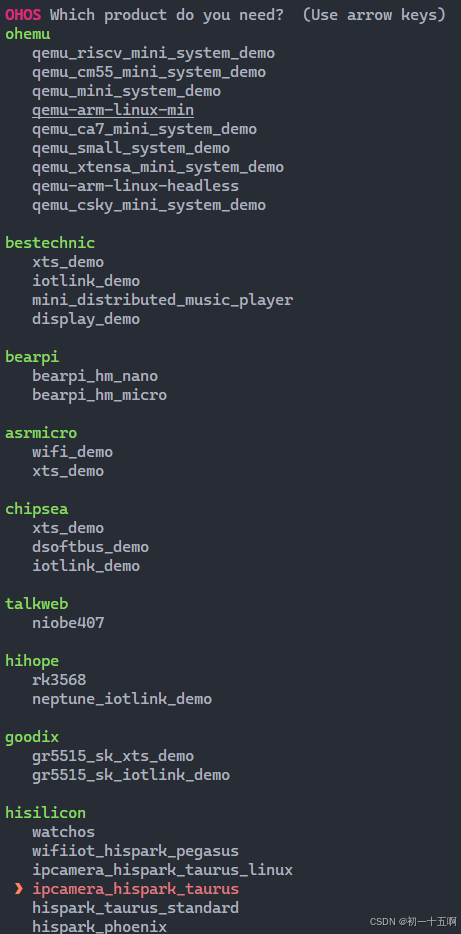
在hisilicon下选择ipcamera_hispark_taurus并回车。
说明:
同样的开发板在适配不同的场景时,要采用的编译形态不同(即此处要选择的product不同)。
图1 Hi3516编译设置图例
-
执行编译。
说明:
-
单独编译一个部件(例如hello),可使用“hb build -T 目标名称”进行编译。
-
增量编译整个产品,可使用“hb build”进行编译。
-
完整编译整个产品,可使用“hb build -f”进行编译。
此处以完整编译整个产品为例进行说明。
hb build -f -
-
编译结束后,出现“build success”字样,则证明构建成功。
须知: 烧录相关文件获取路径:
-
编译结果文件及日志文件:out/hispark_taurus/ipcamera_hispark_taurus。
-
U-boot文件:device/board/hisilicon/hispark_taurus/uboot/out/boot/u-boot-hi3516dv300.bin。
-
烧录
针对Hi3516DV300开发板,除了DevEco Device Tool外,还可以使用HiTool进行烧录。
前提条件
-
开发板相关源码已编译完成,已形成烧录文件。
-
客户端(操作平台,例如Windows系统)已下载并安装HiTool工具。
-
客户端(操作平台,例如Windows系统)已安装USB驱动。
-
客户端已安装串口终端工具(例如IPOP)。
-
使用USB线缆、串口线缆连接客户端与开发板。
操作步骤
-
准备烧录相关文件。
-
在客户端新建用于保存烧录文件的文件夹,例如“D:\liteos”或“D:\linux”。
-
将烧录所需烧写配置文件和启动引导文件保存到新建的文件夹中。
-
Hi3516DV300对应的LiteOS内核小型系统的启动引导文件为“u-boot-hi3516dv300.bin”,烧写配置文件需要开发者自行准备(可自行命名,例如LS_3516_liteos.xml),模板如下:
<?xml version="1.0" encoding="GB2312" ?> <Partition_Info ProgrammerFile=""> <Part Sel="1" PartitionName="fastboot" FlashType="emmc" FileSystem="none" Start="0" Length="1M" SelectFile="D:\liteos\u-boot-hi3516dv300.bin"/> <Part Sel="1" PartitionName="" FlashType="emmc" FileSystem="none" Start="1M" Length="9M" SelectFile="D:\liteos\OHOS_Image.bin"/> <Part Sel="1" PartitionName="" FlashType="emmc" FileSystem="none" Start="10M" Length="50M" SelectFile="D:\liteos\rootfs_vfat.img"/> <Part Sel="1" PartitionName="" FlashType="emmc" FileSystem="none" Start="60M" Length="50M" SelectFile="D:\liteos\userfs_vfat.img"/> </Partition_Info> -
Hi3516DV300对应的Linux内核小型系统的启动引导文件为“u-boot-hi3516dv300.bin”,烧写配置文件需要开发者自行准备(可自行命名,例如LS_3516_linux.xml),模板如下
<?xml version="1.0" encoding="GB2312" ?>
<Partition_Info ProgrammerFile="">
<Part Sel="1" PartitionName="fastboot" FlashType="emmc" FileSystem="none" Start="0" Length="1M" SelectFile="D:\linux\u-boot-hi3516dv300.bin"/>
<Part Sel="1" PartitionName="ohos_image" FlashType="emmc" FileSystem="none" Start="1M" Length="9M" SelectFile="D:\linux\uImage_hi3516dv300_smp"/>
<Part Sel="1" PartitionName="rootfs" FlashType="emmc" FileSystem="ext3/4" Start="10M" Length="50M" SelectFile="D:\linux\rootfs_ext4.img"/>
<Part Sel="1" PartitionName="userfs" FlashType="emmc" FileSystem="ext3/4" Start="60M" Length="50M" SelectFile="D:\linux\userfs_ext4.img"/>
<Part Sel="1" PartitionName="userdata" FlashType="emmc" FileSystem="ext3/4" Start="110M" Length="1024M" SelectFile="D:\linux\userdata_ext4.img"/>
</Partition_Info>
-
-
将编译完成的源码包下载至客户端并解压,将烧录相关文件拷贝至步骤1中新建的文件夹。
针对Hi3516DV300开发板(系统使用LiteOS内核或Linux内核根据业务实际需要选择):
- LiteOS内核小型系统对应的烧写所需文件为:OHOS_Image.bin、rootfs_vfat.img、userfs_vfat.img
- Linux内核小型系统对应的烧写所需文件为:uImage_hi3516dv300_smp、rootfs_ext4.img、userfs_ext4.img、userdata_ext4.img
-
-
使用HiTool烧录。
-
打开HiTool。
-
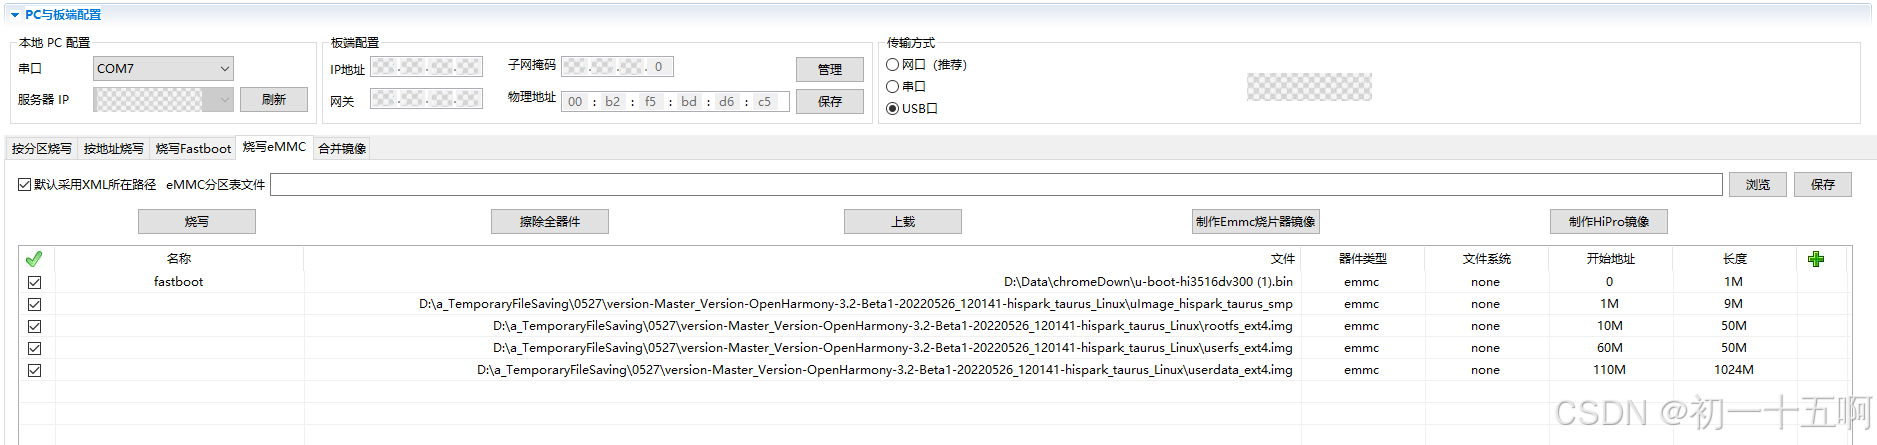
设置HiTool参数。
传输方式选择USB口,烧写方式选择烧写eMMC(单板的存储介质为eMMC)。
-
单击浏览在步骤1创建的文件夹中选择烧写配置文件(例如LS_3516_linux.xml)。
-
单击烧写后,按住开发板上串口旁的按钮(Update键),并拔插USB线(上下电)。
烧录开始后,可以在HiTool工具下方的控制台区域观察到烧录过程中的打印信息。
烧录完成后,HiTool弹出提示框显示烧写成功。
-
单击确定。
-
-
导入启动参数。
-
使用终端工具打开串口。
-
拔插开发板电源使其重启,3s内在串口终端输入回车。
终端界面中出现“hisilicon #”表示已连接开发板串口。
-
在串口终端拷贝如下启动参数后,按回车完成配置。
-
LiteOS内核小型系统对应的启动参数为:
setenv bootcmd "mmc read 0x0 0x80000000 0x800 0x4800;go 0x80000000"; setenv bootargs "console=ttyAMA0,115200n8 root=emmc fstype=vfat rootaddr=10M rootsize=50M rw"; saveenv sa;reset -
Linux内核小型系统对应的启动参数为:
setenv bootargs "mem=128M console=ttyAMA0,115200 root=/dev/mmcblk0p3 rw rootfstype=ext4 rootwait blkdevparts=mmcblk0:1M(boot),9M(kernel),50M(rootfs),50M(userfs),1024M(userdata)"
setenv bootcmd "mmc read 0x0 0x82000000 0x800 0x4800; mw 0x10FF0044 0x0600;mw 0x120D2010 0x00000000;mw 0x120D2400 0x000000ff;mw 0x120D2010 0x00000000; bootm 0x82000000"
saveenv;
reset
-
-
运行
系统启动成功后,取源码out目录下的helloworld可执行文件放入系统的bin目录,通过以下步骤运行“Hello World”。
操作步骤
-
在启动界面进入bin目录。
cd bin -
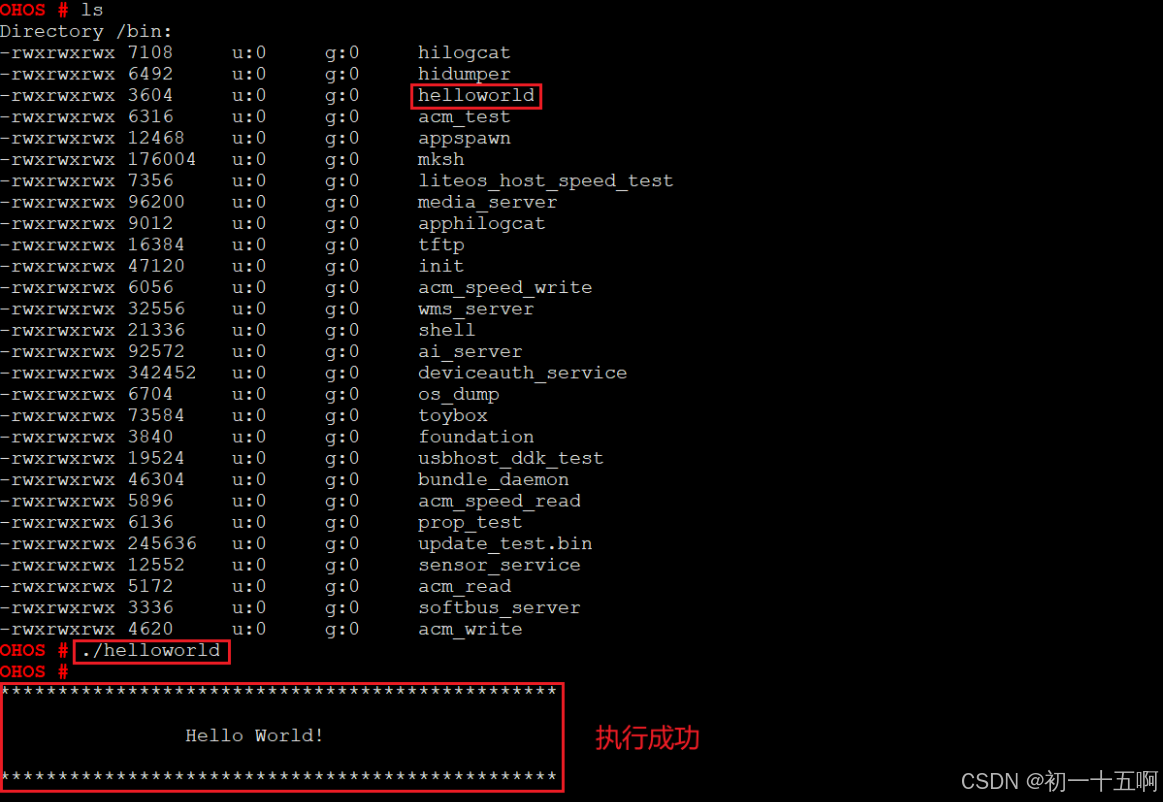
进入bin目录后可以看到helloworld文件,通过以下命令运行helloworld程序。
./helloworld界面打印“Hello World!”,程序运行成功。


讨论HarmonyOS开发技术,专注于API与组件、DevEco Studio、测试、元服务和应用上架分发等。
更多推荐


 16
16 0
0- 0


 已为社区贡献15条内容

所有评论(0)