Electron 与鸿蒙 DevEco Studio 的融合实战:从 WebView 到安全 IPC 架构迁移指南
虽然鸿蒙原生推荐使用 ArkTS + ArkUI 开发,但对已有 Electron 项目或偏好 Web 技术的团队而言,“Electron for HarmonyOS”成为一种极具吸引力的过渡方案。本文将以一个完整的 Electron 示例为基础,逐行解析其架构,并探讨如何无缝迁移至鸿蒙 DevEco Studio 开发环境。

-
个人首页: VON
-
鸿蒙系列专栏: 鸿蒙开发小型案例总结
-
综合案例 :鸿蒙综合案例开发
-
鸿蒙6.0:从0开始的开源鸿蒙6.0.0
-
鸿蒙5.0:鸿蒙5.0零基础入门到项目实战
-
本文章所属专栏:Electron for HarmonyOS
从 WebView 到安全 IPC 架构迁移指南

引言:为什么关注 Electron 与鸿蒙的结合?
随着华为鸿蒙生态向 PC 端扩展,越来越多开发者开始思考:能否在鸿蒙系统上复用熟悉的 Web 技术栈(HTML/CSS/JS + Node.js)?
虽然鸿蒙原生推荐使用 ArkTS + ArkUI 开发,但对已有 Electron 项目或偏好 Web 技术的团队而言,“Electron for HarmonyOS”成为一种极具吸引力的过渡方案。本文将以一个完整的 Electron 示例为基础,逐行解析其架构,并探讨如何无缝迁移至鸿蒙 DevEco Studio 开发环境。
参考文档:
一、原始 Electron 项目结构与代码详解
1. main.js —— 主进程:应用的“大脑”
const { app, BrowserWindow, ipcMain, webContents } = require('electron');
const path = require('path');
- 引入 Electron 核心模块:
app:控制应用生命周期;BrowserWindow:创建和管理窗口;ipcMain:主进程接收来自渲染进程的消息;webContents:可选,用于操作网页内容(本例未直接使用)。
ipcMain.handle('read-file', async (event, filePath) => {
  const fs = require('fs').promises;
  try {
    const data = await fs.readFile(filePath, 'utf8');
    return data;
  } catch (err) {
    throw new Error(`无法读取文件: ${err.message}`);
  }
});
- 作用:注册一个名为
'read-file'的 IPC 处理函数。 - 安全设计:
- 使用
ipcMain.handle(而非on)支持异步返回值; - 在主进程中调用
fs,避免渲染进程直接访问文件系统; - 错误通过
throw抛出,可在渲染端catch。
- 使用
ipcMain.handle('get-app-version', () => {
  return app.getVersion();
});
- 获取应用版本号,数据来源于
package.json中的version字段。
function createWindow() {
  const win = new BrowserWindow({
    width: 900,
    height: 600,
    webPreferences: {
      preload: path.join(__dirname, 'preload.js'), // ← 关键
      contextIsolation: true,   // ← 必须开启
      nodeIntegration: false,   // ← 禁用 Node
      webviewTag: true,         // ← 允许使用 <webview>
    },
  });
  win.loadFile('index.html');
}
- 关键配置说明:
preload: 'preload.js':在渲染上下文初始化前注入脚本,是唯一能同时访问 Node 和 DOM 的地方;contextIsolation: true:隔离预加载脚本与页面脚本的上下文,防止 XSS 攻击;nodeIntegration: false:禁止渲染进程直接使用require或process;webviewTag: true:启用<webview>标签(默认已弃用,需显式开启)。
✅ 这是 Electron 官方推荐的安全三件套:
preload + contextIsolation + nodeIntegration=false。
2. preload.js —— 预加载脚本:安全的“桥梁”
const { contextBridge, ipcRenderer } = require('electron');

contextBridge.exposeInMainWorld('myAPI', {
  readFile: (filePath) => ipcRenderer.invoke('read-file', filePath),
  getVersion: () => ipcRenderer.invoke('get-app-version'),
});
- 作用:在渲染进程的
window对象上安全暴露自定义 API。 - 原理:
contextBridge可在隔离上下文中将对象“透传”到页面全局作用域;ipcRenderer.invoke()是现代 Electron 推荐的异步 IPC 调用方式(返回 Promise);- 渲染进程看不到
ipcRenderer本身,只能调用封装好的方法,避免滥用。
🔒 安全意义:即使恶意网页被嵌入,也无法直接调用
ipcRenderer.send发送任意指令。
3. guest-preload.js —— WebView 内部预加载:极致隔离
// guest-preload.js
console.log('Guest page loaded in <webview>');
// 不建议在此启用 Node.js 或暴露敏感接口
- 此脚本仅用于调试,通常为空或只包含日志。
- 重要原则:WebView 加载的是第三方网站(如 CSDN),绝不能赋予其本地能力。
- 若需与主应用通信,应通过
postMessage+ 主窗口监听实现,而非暴露 Node。
4. index.html —— 主页面:嵌入外部内容
<webview
  src="https://blog.csdn.net/2302_80329073?spm=1011.2415.3001.5343"
  style="width:100%; height:400px; border:1px solid #ccc;">
</webview>
- 使用
<webview>标签嵌入外部网页,类似<iframe>,但运行在独立进程,更安全。 - 注意:
<webview>已被 Electron 官方标记为“实验性”,未来可能被BrowserView替代,但在桌面端仍广泛使用。
5. renderer.js —— 渲染进程逻辑:调用安全 API
document.getElementById('btn').addEventListener('click', async () => {
  try {
    const version = await window.myAPI.getVersion();
    document.getElementById('version').textContent = version;
  } catch (err) {
    console.error('获取版本失败:', err);
  }
});
- 通过
window.myAPI调用预加载脚本暴露的方法; - 使用
async/await处理异步结果; - 错误被捕获并记录,避免页面崩溃。
💡 实际项目中,按钮和显示区域需在 HTML 中定义(示例中省略)。
这是原生Electron中运行的项目

二、鸿蒙 DevEco Studio 中的等效实现思路
方案 A:使用鸿蒙内置 Web 组件(推荐)
鸿蒙版 MainUI.ets 详解:
import web_webview from '@ohos:web.web';
import bundleManager from '@ohos.bundle.bundleManager';

@Entry
@Component
struct MainUI {
  controller: web_webview.WebController = new web_webview.WebController();

  build() {
    Column() {
      Text('WebView 测试').fontSize(20)
      Web({
        src: 'https://blog.csdn.net/2302_80329073',
        controller: this.controller
      })
        .width('100%')
        .height(400)
        .borderWidth(1)
        .borderColor('#ccc')
        .onPageEnd(() => {
          // 页面加载完成后注入 JS Bridge
          this.controller.runJavaScript(`
            window.myAPI = {
              getVersion: function() {
                return new Promise((resolve) => {
                  // 实际应通过 postMessage 通知 Native,
                  // Native 再调用 bundleManager 返回版本
                  resolve('1.0.0'); // 演示用
                });
              }
            };
          `);
        })
    }
    .padding(20)
  }
}
Web组件:鸿蒙提供的网页容器,功能类似<webview>;WebController:用于控制 Web 行为,如执行 JS、前进后退等;onPageEnd:页面加载完成回调,此时可安全注入脚本;runJavaScript:在网页上下文中执行任意 JavaScript,用于模拟preload.js的桥接功能。
⚠️ 鸿蒙 Web 组件不支持 Node.js,所有本地能力必须通过 Ability 调用,并通过
postMessage/onMessage通信。
方案 B:直接无脑迁移
在之前的环境搭建中,我们已经将所有基础配置项在dev中进行了配置,所以这里直接无脑迁移即可
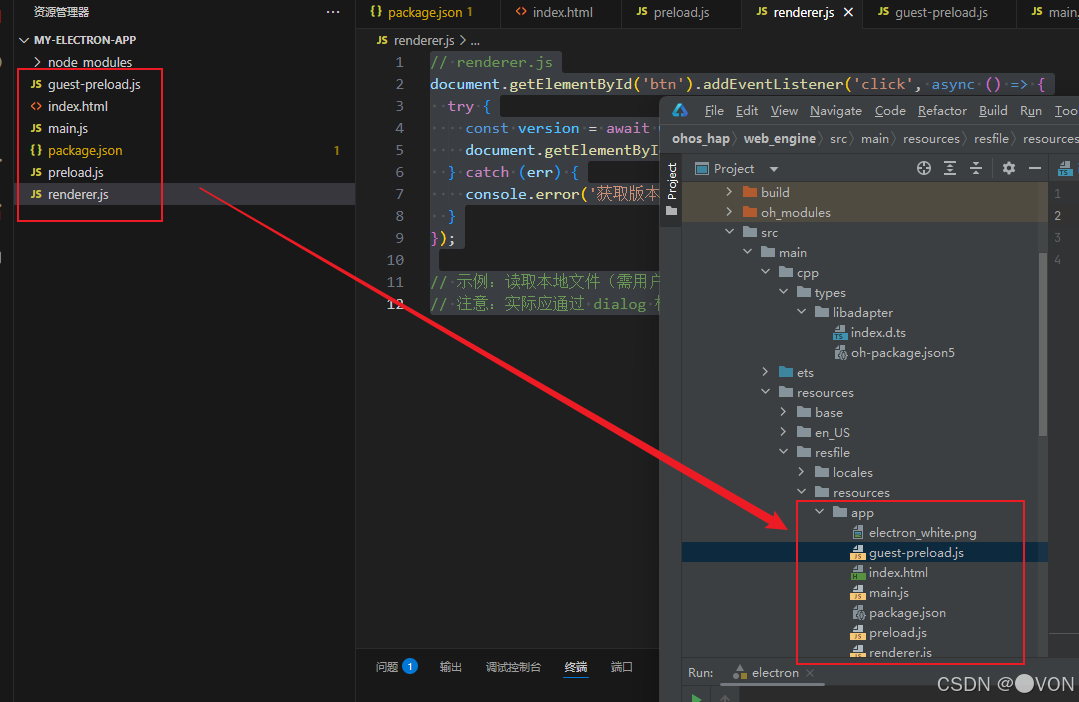
可以看到在真机中同样运行成功了

三、迁移对照表(含代码映射)
| 功能 | Electron 实现 | 鸿蒙替代方案 |
|---|---|---|
| 创建窗口 | new BrowserWindow() |
@Component struct MainUI + build() |
| 嵌入网页 | <webview src="..."> |
Web({ src: '...' }) |
| 安全 API 暴露 | contextBridge.exposeInMainWorld |
controller.runJavaScript("window.myAPI = {...}") |
| 调用本地能力 | ipcRenderer.invoke('xxx') |
postMessage → Ability → callMethod → 回传 |
| 读取文件 | fs.promises.readFile |
@ohos.file.fs.readFile(需权限) |
| 获取版本 | app.getVersion() |
bundleManager.getBundleInfo().versionName |
四、结语:安全与兼容并重
本文不仅展示了如何逐行理解 Electron 安全架构,还提供了向鸿蒙迁移的可行路径。核心思想是:
- 保持能力隔离:无论是 Electron 的
contextIsolation,还是鸿蒙的 Web 沙箱,都强调“最小权限”; - 桥接而非开放:永远不要直接暴露底层 API,而是封装成受控接口;
- 渐进式迁移:对于复杂应用,可先在鸿蒙 PC 上运行 Electron(方案 B),再逐步重构为原生 Web 组件(方案 A)。
🌟 最终目标:不是“把 Electron 搬到鸿蒙”,而是“用鸿蒙的方式实现同样的用户体验”。

讨论HarmonyOS开发技术,专注于API与组件、DevEco Studio、测试、元服务和应用上架分发等。
更多推荐


 37
37 0
0- 0


 已为社区贡献29条内容

所有评论(0)