二十二、【鸿蒙 NEXT】扫码功能
本文介绍了如何实现一个扫码功能,主要包含相机实时扫码和相册图片识别两种方式。关键组件包括XComponent用于相机预览、ScanKit的customScan工具类实现相机扫码、detectBarcode工具类解析相册图片。实现步骤包括:1)构建包含标题、扫描动画和操作按钮的界面;2)申请相机权限;3)初始化customScan并启动扫描,需依赖XComponent的宽高参数;4)处理扫码结果展示
【前言】
在开发过程中,经常有扫一扫功能,可以通过相机直接扫码,或者打开相册,识别相册中的二维码,下面介绍下如何实现一个扫码功能
一、首先看下实现效果如下
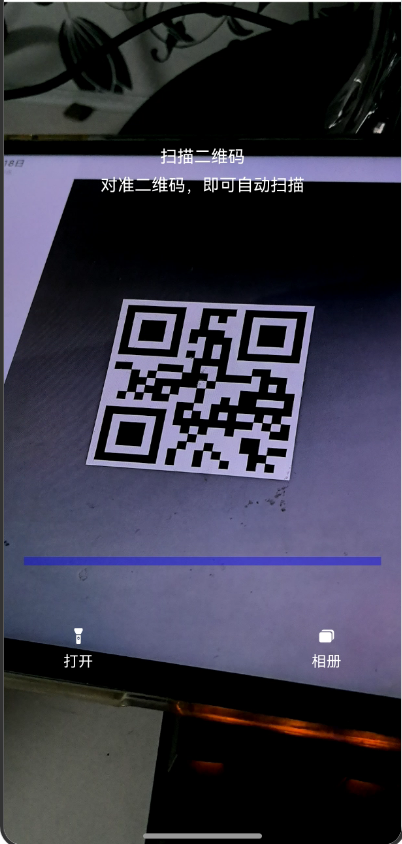
从布局上,最上边是一个标题,中间是不断上下扫描的动画,最下边是两个按钮,一个是打开闪光灯,一个是打开相册,这个布局可以自定义
二、扫码的关键组件
1、XComponent组件,用来实时预览相机拍摄的图片
2、ScanKit中的customScan系统工具类,用来打开相机,并实时识别相机中的二维码,并将图片内容展示在XComponent组件中,一旦捕获到二维码就会解析,并将结果返回给我们
3、ScanKit中的detectBarcode系统工具类,可以识别解析相册返回的图片流,并返回二维码信息
三、代码实现
代码实现步骤如下:
1、首先是布局,总共两部分,一个是XComponet用来实时展示相机拍摄的图片,另一部分就是自定义标题,扫描动画,底部操作按钮
2、要申请相机权限,否则ScanKit没法正常打开相机,权限申请可以参考我之前的文章
3、customScan初始化,并开启扫描,由于customScan需要将相机的图片实时展示在XComponent组件中,因此customScan初始化依赖XComponent组件的宽和高。特别是一些折叠屏,需要开发者实时计算宽和高,并重新初始化
页面代码实现:
import { customScan, scanBarcode, scanCore } from '@kit.ScanKit';
import hilog from '@ohos.hilog';
import { display } from '@kit.ArkUI';
import { PermissionUtils } from '../util/PermissionUtils';
import { AlbumUtil } from './AlbumUtil';

const TAG: string = '[customScanPage]';

@Entry
@Component
struct CustomScanPage {
  @State translateY: number = 0;
  @State surfaceId: string = '' // XComponent组件生成id
  @State cameraHeight: number = 640 // 设置预览流高度,默认单位:vp
  @State cameraWidth: number = 360 // 设置预览流宽度,默认单位:vp
  @State userGrant: boolean = false
  // 打开闪光灯
  @State flashlightState: boolean = false
  private mXComponentController: XComponentController = new XComponentController()

  async onPageShow() {
    // 自定义启动第一步,用户申请权限
    PermissionUtils.requestPermission('ohos.permission.CAMERA').then(grant => {
      this.userGrant = grant ?? false
    })
    // 自定义启动第二步:设置预览流布局尺寸
    this.setDisplay();
  }

  async onPageHide() {
    // 页面消失或隐藏时,停止并释放相机流
    this.releaseCamera();
  }

  // 释放相机流
  private async releaseCamera() {
    try {
      await customScan.stop();
      await customScan.release();
    } catch (error) {
      hilog.error(0x0001, TAG, `Failed to release customScan. Code: ${error.code}, message: ${error.message}`);
    }
  }

  // 竖屏时获取屏幕尺寸,设置预览流全屏示例
  setDisplay() {
    try {
      // 默认竖屏
      let displayClass = display.getDefaultDisplaySync();
      let displayHeight = this.getUIContext().px2vp(displayClass.height);
      let displayWidth = this.getUIContext().px2vp(displayClass.width);
      let maxLen: number = Math.max(displayWidth, displayHeight);
      let minLen: number = Math.min(displayWidth, displayHeight);
      const RATIO: number = 16 / 9;
      this.cameraHeight = maxLen;
      this.cameraWidth = maxLen / RATIO;
    } catch (error) {
      hilog.error(0x0001, TAG, `Failed to getDefaultDisplaySync. Code: ${error.code}, message: ${error.message}`);
    }
  }

  // toast显示扫码结果
  async showScanResult(result: scanBarcode.ScanResult) {
    this.initAndStartCamera();
    // 使用toast显示出扫码结果
    this.getUIContext().getPromptAction().showToast({
      message: `解析到的url为${result.originalValue}`,
      duration: 5000
    });
  }

  async initAndStartCamera() {
    this.releaseCamera()
    let viewControl: customScan.ViewControl = {
      // xComponent的宽和高
      width: this.cameraWidth,
      height: this.cameraHeight,
      surfaceId: this.surfaceId
    };
    // 多码扫码识别,enableMultiMode: true 单码扫码识别enableMultiMode: false
    let options: scanBarcode.ScanOptions = {
      scanTypes: [scanCore.ScanType.ALL],
      enableMultiMode: true,
      enableAlbum: true
    }
    try {
      // 自定义启动第三步,初始化接口
      customScan.init(options);
      // 自定义启动第四步,请求扫码接口,通过Promise方式回调
      let result: scanBarcode.ScanResult[] = await customScan.start(viewControl)
      this.showScanResult(result[0])
    } catch (error) {
      hilog.error(0x0001, TAG, `Failed to start customScan. Code: ${error.code}, message: ${error.message}`);
    }
  }

  build() {
    Stack() {
      if (this.userGrant) {
        Column() {
          XComponent({
            id: 'componentId',
            type: XComponentType.SURFACE,
            controller: this.mXComponentController
          })
            .onLoad(async () => {
              // 获取XComponent组件的surfaceId
              this.surfaceId = this.mXComponentController.getXComponentSurfaceId();
              this.initAndStartCamera();
            })
            .width(this.cameraWidth)
            .height(this.cameraHeight)
        }
        .height('100%')
        .width('100%')
      }


      Column() {
        this.TopTips()
        this.buildScanAnimator()
        this.buildBottom()
      }
    }
    .width('100%')
    .height('100%')
  }

  // 自定义扫码界面的顶部返回按钮和扫码提示
  @Builder
  TopTips() {
    Column({ space: 8 }) {
      Text('扫描二维码')
        .fontColor(Color.White)
      Text('对准二维码,即可自动扫描')
        .fontColor(Color.White)
    }
    .height(146)
    .width('100%')
  }

  // 扫描动画
  @Builder
  buildScanAnimator() {
    Column() {
      Row()
        .width('90%')
        .height(8)
        .backgroundColor(Color.Blue)
        .translate({ y: this.translateY })
        .opacity(0.4)
        .animation({
          duration: 2500,
          curve: Curve.EaseInOut,
          iterations: -1,
          playMode: PlayMode.Alternate
        })
    }.onAppear(() => {
      this.translateY = 240
    }).height('40%')
    .width('100%')
  }

  // 构建底部按钮(打开关闭闪光灯、打开相册)
  @Builder
  buildBottom() {
    Row() {
      Column({ space: 8 }) {
        if (this.flashlightState) {
          SymbolGlyph($r('sys.symbol.flashlight_on_fill'))
            .fontColor([Color.White])
            .onClick(() => {
              customScan.closeFlashLight()
              this.flashlightState = !this.flashlightState
            })
          Text('关闭')
            .fontSize(14)
            .fontColor(Color.White)
        } else {
          SymbolGlyph($r('sys.symbol.flashlight_off_fill'))
            .fontColor([Color.White])
            .onClick(() => {
              customScan.openFlashLight()
              this.flashlightState = !this.flashlightState
            })
          Text('打开')
            .fontSize(14)
            .fontColor(Color.White)
        }
      }

      Column({ space: 8 }) {
        SymbolGlyph($r('sys.symbol.rectangle_on_rectangle_fill'))
          .fontColor([Color.White])
          .onClick(() => {
            AlbumUtil.openAlbum().then(result => {
              if (result.length > 0) {
                this.showScanResult(result[0])
              }
            })
          })
        Text('相册')
          .fontSize(14)
          .fontColor(Color.White)
      }
    }.justifyContent(FlexAlign.SpaceBetween)
    .padding({left:56,right:56})
    .width('100%')
  }
}
打开相册,并识别相册图片二维码的工具类
import { detectBarcode, scanBarcode, scanCore } from "@kit.ScanKit";
import { photoAccessHelper } from "@kit.MediaLibraryKit";

export class AlbumUtil {

  static async openAlbum(): Promise<scanBarcode.ScanResult[]> {
    const photoSelectOptions: photoAccessHelper.PhotoSelectOptions = {
      MIMEType: photoAccessHelper.PhotoViewMIMETypes.IMAGE_TYPE,
      maxSelectNumber: 1,
      isPhotoTakingSupported: false,
      isEditSupported: false
    };
    const photoPicker: photoAccessHelper.PhotoViewPicker = new photoAccessHelper.PhotoViewPicker();
    try {
      const photoSelectResult: photoAccessHelper.PhotoSelectResult = await photoPicker.select(photoSelectOptions);
      if (photoSelectResult && photoSelectResult.photoUris && photoSelectResult.photoUris.length > 0) {
        return AlbumUtil.decodeAlbum(photoSelectResult.photoUris[0]);
      }
    } catch (error) {
    }
    return []
  }

  static async decodeAlbum(uri: string): Promise<scanBarcode.ScanResult[]> {
    const inputImage: detectBarcode.InputImage = { uri };
    try {
      const scanResults: Array<scanBarcode.ScanResult> = await detectBarcode.decode(inputImage, {
        scanTypes: [scanCore.ScanType.ALL],
        enableMultiMode: false,
        enableAlbum: true
      });
      if (scanResults && scanResults.length > 0) {
        return [scanResults[0]]
      } else {
        return []
      }
    } catch (error) {
      return []
    }
  }


}
讨论HarmonyOS开发技术,专注于API与组件、DevEco Studio、测试、元服务和应用上架分发等。
更多推荐

 5
5 0
0- 0


 已为社区贡献21条内容

所有评论(0)