[江鸟中原]晴雨先知
本文介绍了基于鸿蒙ArkUI框架开发的晴雨先知天气应用。项目通过定义cast、forecasts、weather三级嵌套数据结构,对接高德天气API获取JSON数据。使用getWeatherUtil工具类实现异步网络请求,支持单城市和多城市天气查询。应用包含城市选择、实时温度显示、生活指数、24小时预报和4天预报等功能模块,采用ArkUI声明式组件构建UI界面,并通过路由实现页面跳转和参数传递。目
一.前言
这是本学期鸿蒙移动应用开发课程的期末大作业--晴雨先知,它是我在学习这一学期的课程之后利用ArkUI开发框架所做的一些成果。通过编写项目,我学到了很多关于ArkUI开发框架的知识,这对我今后会有很大的帮助。我的代码仍有许多不足之处,多多指教。希望通过这篇文章,我们能够对鸿蒙有更深一步的了解与应用。
二.开发过程
首先我们要定义相应的数据类型,创建一个cast数据类型,存储每天的天信息。再创建一个foercasts数据类型,存储的城市信息以及城市对应的天气信息数组;在forecasts的外面还有一层数据类型,我们可以命名为weather(命名可以任意),通过嵌套来读取天气数据。
下面是定义的数据类及构造器。
2.1数据类
1.cast
export interface cast {
  date: string
  dayWeather: string
  nightWeather: string
  dayTemp: number
  nightTemp: number
  dayWind: string
  nightwind: string//晚上风向
  nightpower: string//晚上风级
  dayPower: string
  dayTemp_float: number
  nightTemp_float: number
}

//天气信息
export class casts {
  date: string//日期
  dayweather: string//白天天气
  nightweather: string//晚上天气
  daytemp: number//白天温度
  nighttemp: number//晚上温度
  daywind: string//白天风向
  nightwind: string//晚上风向
  nightpower: string//晚上风级
  daypower: string//白天风级
  daytemp_float: number//白天温度小数
  nighttemp_float: number//晚上温度小数

  constructor(item: cast) {
    this.date = item.date
    this.dayweather = item.dayWeather
    this.nightweather = item.nightWeather
    this.daytemp = item.dayTemp
    this.nighttemp = item.nightTemp
    this.daywind = item.dayWind
    this.nightwind = item.nightwind
    this.daypower = item.dayPower
    this.nightpower = item.nightpower
    this.daytemp_float = item.dayTemp_float
    this.nighttemp_float = item.nightTemp_float
  }
}
2.forecasts
export interface forecast {
  city: string//城市名
  adcode: number//城市代码
  province: string//城市
  reporttime: string//发布时间
  casts: Array<casts>//城市天气信息
}
export class forecasts {
  city: string
  adcode: number
  province: string//城市
  reporttime: string//发布时间
  casts: Array<casts>

  constructor(item: forecast) {
    this.city = item.city
    this.adcode = item.adcode
    this.province = item.province
    this.reporttime = item.reporttime
    this.casts = item.casts
  }
3.weather
export interface weather{
  status: number
  count: number
  infoCode: number
  forecasts: Array<forecasts>
}

export class Weather {
  status: number
  count: number
  infoCode: number
  forecasts: Array<forecasts> = []

  constructor(item: weather) {
    this.status = item.status
    this.count = item.count
    this.infoCode = item.infoCode
    this.forecasts = item.forecasts
  }
2.2获取数据
建立完数据类型之后,我们需要思考如何获取数据。
该项目通过高德地图提供的天气预报文件获取天气数据,以下是高德地图提供天气预报的网址。
url: https://lbs.amap.com/api/webservice/guide/api/weatherinfo
通过上述网址可以获得申请个人开发者的权限 得到相对应的key值,再通过key值获取天气预报的JSON文件
url:https://restapi.amap.com/v3/weather/weatherInfo?city=<城市天气代码>&key=<个人开发者获取的key值>&extensions=all
通过高德地图个人开发者key值可以获取某个城市从今天开始连续四天的天气信息,会得到一个JSON文件。
2.3读取数据
获取数据之后,我们还需要读取数据。我们可以建立一个getWeatherUtil类,它是一个工具类。可以利用异步函数来获取网络数据。
class getWeatherUtil {

  // 发送一个URL请求,返回对应的数据
  // 传入一个城市代码,传入城市代码返回对应城市的天气情况
  getWeather(cityCode: number) {
    // 由于是网络请求 所以可以使用Promise异步获取
    return new Promise<WeatherModel>((resolve, reject) => {
      // 创建一个获取数据的对象
      let request = http.createHttp()
      // 需要发送的url数据
      let url = `https://restapi.amap.com/v3/weather/weatherInfo?city=${cityCode}&key=ac74cfe426c4d43a1c31770c62a161b6&extensions=all`

      //将url传入request中,从而得到该url中的数据
      let result = request.request(url)
      // 由于使用的是异步获取,所以真正的数据还需要以下操作 res才是最终的数据
      result.then((res) => {
        // 如果 res 的响应码是200,那么说明这个数据返回成功
        if(res.responseCode === 200) {
          console.log(res.result.toString());
          // 将获取的 数据 返回至 return 再由 return 返回出函数

          // 由于读取的是JSON文件,所以通过JSON.parse返回数据
          resolve(JSON.parse(res.result.toString()))
        }
      })
        // 如果失败的话,则报异常
        .catch((err: Error) => {
          console.log(err + '')
        })

    })
  }

  // 直接发送多个URL,然后结果一并返回
  // 传入城市编码数组
  // 联网获取,所以使用异步获取
  async getWeathers(cityCodes: Array<number>) {

    // 首先定义一个Promise数组,使用 Promise.all 方法 发送多个URL
    let promises: Array<Promise<WeatherModel>> = []
    // 定义一个WeatherModel数组,将获取的数据全部一并返回
    let weatherModels: Array<WeatherModel> = []
    // 将传入的参数传入到promises里面
    for (let i = 0; i < cityCodes.length; i++) {
      promises.push(this.getWeather(cityCodes[i]))
    }
    // 使用 all 方法
    // 这里 result 获取的就是 WeatherModel 集合
    await Promise.all(promises)
      .then((result) => {
      //遍历的每一个 element 元素 都是 WeatherModel 类型
      for (const element of result) {
        console.log(element.forecasts[0].city);
        console.log(element.forecasts[0].casts[0].dayweather)
        console.log(element.forecasts[0].casts[0].daytemp + '|' + element.forecasts[0].casts[0].nighttemp);
      }
      // 让获取的数据传给weatherModels进行返回
      weatherModels = result
    })

    // 返回获取的数据数组
    return weather
  }
获取到数据之后,我们需要让这些数据在页面展示出来让使用者看见。
2.3初始化数据
数据会在主页面中被调用然后展示。
@State cityCodeList : number[] = [410100]
  // 城市名字集合
  @State cityNameList: string[] = []
  // 城市信息集合
  @State cityWeatherList: Array<WeatherModel> = []
  // 城市信息的索引
  @State cityIndex: number = 0

  // 控制生活指数页面是否显示
  @State isDisplay: boolean = true
  // 控制选择的城市
  @State selectedCity: string = ''

  // 加载数据
  aboutToAppear(): void {
    this.initDate()
  }

  //当页面再次显示的时候获取数据
  onPageShow(): void {
    console.log('JSON.stringify:' + JSON.stringify(router.getParams()));
    if (router.getParams() !== undefined && router.getParams() !== null) {
      let params = router.getParams() as string
      if (params !== undefined && params !== null) {
        // 获取上一个页面传递的数据
        this.isDisplay = params['isDisplay']
        this.selectedCity = params['city']
        // 修改为所选城市的城市代码
        this.cityCodeList[0] = getCityCodeByCityName(this.selectedCity)

        // 因为更改了城市,所以需要重新获取天气信息
        // 首先需要清除原本集合中的数据
        this.cityNameList = []
        this.cityWeatherList = []
        // 数据刷新
        this.initDate()
        console.log('接收到InterposeShow页面的数据:' + JSON.stringify(params))
      }else {
        console.log('params赋值失败');
      }
    }else {
      console.log('接受数据失败');
    }
  }


  // 初始化方法
  // 由于是获取异步函数的数据,所以这里定义为异步函数
  async initDate() {
    // 由于调用的是异步方法,所以使用 await 接收
    let result:Array<WeatherModel> = await get.getWeathers(this.cityCodeList)

    // 对得到的返回结果进行遍历
    for (let i = 0; i < result.length; i++) {
      // 首先创建一个单独的城市信息和城市名字
      let ACityWeather: WeatherModel = result[i]
      let ACityName: string = result[i].forecasts[0].city
      this.cityNameList.push(ACityName)
      // 获取城市信息和城市名字
      // 添加到城市信息集合里面
      this.cityWeatherList.push(ACityWeather)

    }
  }
2.4界面展示
上面所描述的是本应用的核心逻辑。接下来展示的是UI界面的代码及图片,供大家参考。
2.4.1选择城市
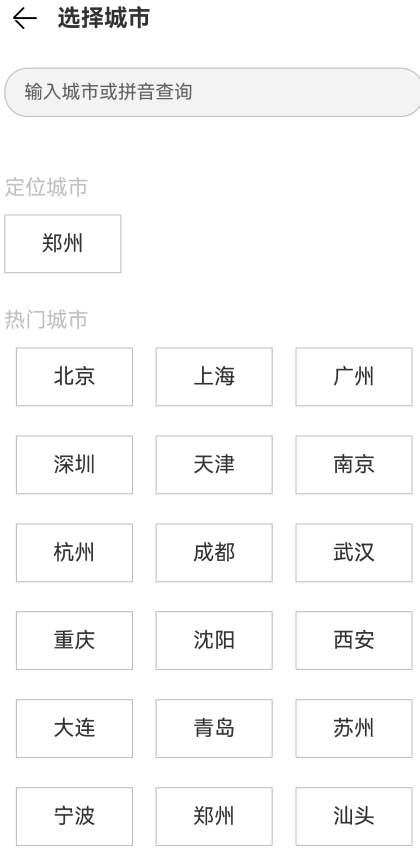
struct SelectCityShow {
@State cityName: string = ''
// private name: string = this.cityName
aboutToAppear(): void {
// 接收页面路由传递过来的数据
console.log('JSON.stringify:' + JSON.stringify(router.getParams()));
if (router.getParams() !== undefined && router.getParams() !== null) {
let params = router.getParams() as string
if (params !== undefined && params !== null) {
this.cityName = params['city']
console.log('接收到InterposeShow页面的数据:' + JSON.stringify(params))
}else {
console.log('params赋值失败');
}
}else {
console.log('接受数据失败');
}
}
build() {
Scroll() {
Column() {
// 标题
Row({
space: 15
}) {
Image($r('app.media.ic_public_back'))
.width(25)
.onClick(() => {
router.back({
url: 'pages/Weather/InterposeShow/InterposeShow',
params: {
info: this.cityName
}
})
})
Text('选择城市')
.fontSize(20)
.fontWeight(FontWeight.Bold)
}
.width('100%')
.margin({
bottom: 30
})
.padding({
left: 20
})
// 输入框
TextInput({
placeholder: '输入城市或拼音查询'
})
.type(InputType.Normal)
.margin({
left: 15,
right: 15
})
.border({
width: 1,
color: '#C0C0C0',
style: BorderStyle.Solid
})
// 定位城市
Column({
space: 12
}) {
// 标题
Text('定位城市')
.fontSize(18)
.fontColor('#C0C0C0')
// 城市
// CityGripItemComponent({
// city: '郑州'
// })
Text(this.cityName)
.textAlign(TextAlign.Center)
.fontSize(18)
.width(100)
.height(50)
.border({
width: 1,
color: '#C0C0C0',
style: BorderStyle.Solid
})
}
.alignItems(HorizontalAlign.Start)
.width('100%')
.margin({
top: 50
})
.padding({
left: 15
})
// 热门城市
Column() {
// 标题
Text('热门城市')
.fontSize(18)
.fontColor('#C0C0C0')
// 热门城市组件
Grid() {
ForEach(Cities,(item: cityData) => {
GridItem() {
CityGripItemComponent({
city: item.name,
cityName: this.cityName
})
}
})
}
.columnsTemplate('1fr 1fr 1fr')
.rowsTemplate('1fr 1fr 1fr 1fr 1fr 1fr')
.columnsGap(0)
.rowsGap(0)
.width('100%')
.height(450)
}
.alignItems(HorizontalAlign.Start)
.width('100%')
.margin({
top: 30,
bottom: 150
})
.padding({
left: 15,
right: 15
})
}
}
}
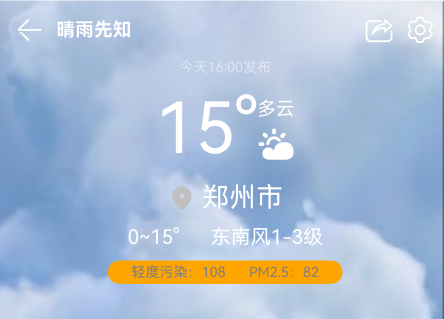
}2.4.2城市温度
build() {
Column() {
// 顶部
Row(){
// 顶部左侧
Row({
space : 10
}){
Image($r('app.media.ic_public_back'))
.width(25)
.fillColor(Color.White)
Text('晴雨先知')
.fontColor(Color.White)
.fontWeight(FontWeight.Bold)
}
Blank()
// 顶部右侧
Row({
space : 10
}) {
Image($r('app.media.ic_message_forwarding'))
.width(25)
.fillColor(Color.White)
Image($r('app.media.cm_settings'))
.width(25)
.fillColor(Color.White)
.onClick(() => {
router.pushUrl({
url: 'pages/Weather/InterposeShow/InterposeShow',
params: {
// data: new backData(this.isDisplay, this.forecast.city)
isDisplay: this.isDisplay,
city: this.forecast.city
}
},
router.RouterMode.Single
)
})
}
}
.width('100%')
.height(50)
.padding({
left : 15,
right : 15
})
// .backgroundColor(Color.Blue)
// 中间的大图标
Column({
space : 10
}) {
//时间
Text(`今天${this.forecast.reporttime.substring(11,16)}发布`)
.fontSize(12)
.fontColor(Color.White)
.opacity(0.5)
//中间的大图标
Row() {
//温度
Text(this.forecast.casts[0].daytemp + '°')
.fontSize(60)
.fontColor(Color.White)
//温度右边的图标
Column({
space : 7
}) {
// 天气
Text(this.forecast.casts[0].dayweather)
.fontColor(Color.White)
//图标
Image(getImageByCast(this.forecast.casts[0].dayweather))
.width(30)
.fillColor(Color.White)
}
}
//坐标
Row({
space : 5
}) {
Image($r('app.media.cm_gps'))
.width(25)
.fillColor('#C0C0C0')
Text(this.forecast.city)
.fontSize(23)
.fontColor(Color.White)
}
//温度和风级
Row({
space : 27
}) {
Text(`${this.forecast.casts[0].nighttemp}~${this.forecast.casts[0].daytemp}°`)
.fontSize(17)
.fontColor(Color.White)
Text(`${this.forecast.casts[0].daywind}风${this.forecast.casts[0].daypower}级`)
.fontSize(17)
.fontColor(Color.White)
}
//污染以及PM值
Row({
space :20
}){
Text('轻度污染:108')
.fontSize(12)
.fontColor(Color.Gray)
Text('PM2.5:82')
.fontSize(12)
.fontColor(Color.Gray)
}
.padding({
left : 20,
right : 20
})
.height(20)
.backgroundColor(Color.Orange)
.borderRadius(10)
}
}
// .backgroundColor(Color.Blue)
.backgroundImage(changeBackgroundByCast(this.forecast.casts[0].dayweather))
.backgroundImageSize(ImageSize.Cover)
.padding({
bottom : 30
})
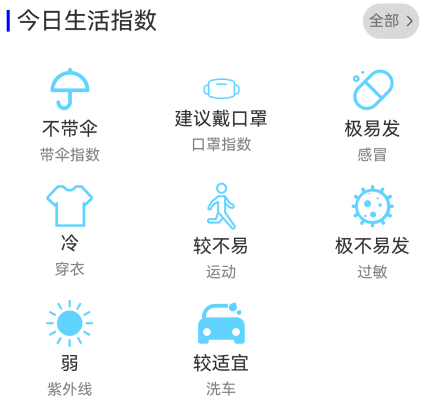
}2.4.3今日生活指数
export struct LifeNumberComponent {
// 接收天气信息
// @Prop forecast: string = ''
build() {
Column() {
//生活指数标题
Row() {
Row({
space : 5
}) {
Text('|')
.fontColor(Color.Blue)
.fontWeight(FontWeight.Bold)
.fontSize(20)
Text('今日生活指数')
.fontSize(20)
}
Blank()
Row({
space : -10
}) {
Text('全部')
.fontSize(13)
.onClick(() => {
router.pushUrl({
url: 'pages/Weather/LifeNumberShow/LifeNumberShow'
},
router.RouterMode.Single
)
})
Image($r('app.media.cm_crrow_right'))
.width(17)
}
.height(30)
.backgroundColor('#C0C0C0')
.opacity(0.6)
.borderRadius(15)
.margin({
right: 15
})
.padding({
left : 5,
// right : 5
})
}
.width('100%')
.padding({
left : 10,
right : 10
})
//生活指标模块
Grid() {
ForEach(LifeNumberData,(item: LifeNumber, index: number) => {
GridItem() {
GripItemComponent({
ItemComponent : item
})
}
})
}
.columnsTemplate('1fr 1fr 1fr')
.rowsTemplate('1fr 1fr 1fr')
.columnsGap(0)
.rowsGap(0)
.width('100%')
.height(300)
.margin({
top : 15
})
}
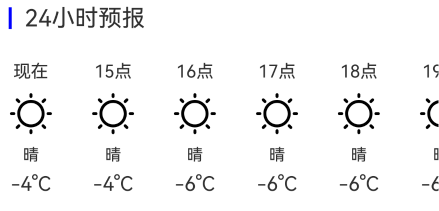
}2.4.4 24小时预报
export struct TwentyFourHourForecastComponent {
  build() {
    Column() {
      // 标题
      Row({
        space : 10
      }) {
        Text('|')
          .fontColor(Color.Blue)
          .fontWeight(FontWeight.Bold)
          .fontSize(20)
        Text('24小时预报')
          .fontSize(20)
      }
      .width('100%')
      .justifyContent(FlexAlign.Start)
      .margin({
        bottom : 25
      })

      // 小时预报
      Scroll() {
        Row({
          space : 30
        }) {
          ForEach(Hours, (item: HourForecast, index: number) => {
            TwentyFourForecastScrollComponent({
              HourStateItem : item
            })
          })
        }
      }
      .scrollable(ScrollDirection.Horizontal)
    }
    .padding({
      left : 10,
      right : 10
    })
  }
}
2.4.5连续4天预报

export struct DayForecastComponent {
  Casts: Array<casts> = []

  build() {
    Column() {
      // 标题
      Row({
        space : 10
      }) {
        Text('|')
          .fontColor(Color.Blue)
          .fontWeight(FontWeight.Bold)
          .fontSize(20)
        Text('连续4天预报')
          .fontSize(20)
      }
      .width('100%')
      .justifyContent(FlexAlign.Start)
      .margin({
        bottom : 25
      })
      .padding({
        left: 10,
        right: 10
      })

      // 连续4天预报
      Column({
        space : 10
      }) {
        ForEach(this.Casts, (item: casts) => {
          DayForecastItem({
            // DayItem: item
            cast: item
          })
        })
      }
    }
  }
}
三.总结
“晴雨先知” 是基于 ArkUI 框架完成的鸿蒙移动应用开发期末作业,实现了完整的城市天气查询功能。项目先构建cast、forecasts、weather三级嵌套数据结构,精准适配高德天气 API 的 JSON 数据格式;再封装getWeatherUtil工具类,通过 Promise 与 async/await 实现单城市及多城市的异步网络数据请求。同时,依托 ArkUI 声明式组件完成城市选择、实时温度、生活指数、24 小时及 4 天预报等多模块界面开发,借助路由实现页面间参数传递与状态联动。不过项目存在错误反馈缺失、无本地缓存、UI 交互细节不足等问题,未来将优化这些短板,进一步提升应用的稳定性与用户体验。

讨论HarmonyOS开发技术,专注于API与组件、DevEco Studio、测试、元服务和应用上架分发等。
更多推荐

 24
24 0
0- 0


 已为社区贡献1条内容

所有评论(0)