Driver Development Kit(驱动开发服务)
Driver Development Kit(驱动开发套件)为外设驱动开发者提供高效、安全、丰富的外设扩展驱动开发解决方案C-API,支持外设驱动开发者为消费者带来外设即插即用的极致体验。支持开发者开发外设配件的高阶功能,满足消费者高阶使用场景诉求。扩展驱动框架支持外设扩展驱动生命周期管理,面向扩展设备应用提供扩展外设查询绑定能力接口。使用场景支持开发者高效、安全开发专业外设或外设扩展增强能力:面


一、Driver Development Kit 简介
Driver Development Kit(驱动开发套件)为外设驱动开发者提供高效、安全、丰富的外设扩展驱动开发解决方案C-API,支持外设驱动开发者为消费者带来外设即插即用的极致体验。
-
支持开发者开发外设配件的高阶功能,满足消费者高阶使用场景诉求。
-
扩展驱动框架支持外设扩展驱动生命周期管理,面向扩展设备应用提供扩展外设查询绑定能力接口。
使用场景
支持开发者高效、安全开发专业外设或外设扩展增强能力:
-
面向专业专用办公外设驱动开发场景。
例如:银行柜台、企业办公、医疗检测等领域专业专用外设,如:高拍仪、身份证扫描仪、指纹识别仪、血氧血糖监测设备。 -
面向非标外设扩展增强能力开放场景。
例如:厂商私有非标HID外设增强能力开放场景,如:手写板快捷键定制、压感/绘图区域设置、扩展增强能力设置、鼠标灯光效果设置、鼠标扩展按键定制、DPI及X/Y轴等高阶能力设置。
框架原理
HDF扩展驱动框架为外设扩展驱动开发,提供稳定统一的外设驱动开发接口,支撑用户态外设扩展驱动开发者基于DDK能力开发用户态外设扩展驱动。
扩展外设管理服务作为用户态扩展外设管理的核心服务,实现对扩展外设和外设扩展驱动的生命周期管理,同时面向扩展设备应用开发提供标准ArkTS API接口,支持扩展外设查询、绑定及解绑能力接口。
图1 扩展外设驱动原理图

模块功能
● 扩展外设应用:查询驱动并绑定驱动,自定义驱动与设备之间的通信方式以及数据处理方式等,即外设扩展驱动客户端。
● 外设扩展驱动(应用):基于DDK能力开发的专业专用外设扩展驱动或外设扩展增强驱动,即外设扩展驱动。
● 扩展外设管理服务(Driver Extension SA):扩展设备管理,驱动包全生命周期管理等。
● AMS :用于拉起和关闭扩展驱动能力DriverExtensionAbility。
流程说明
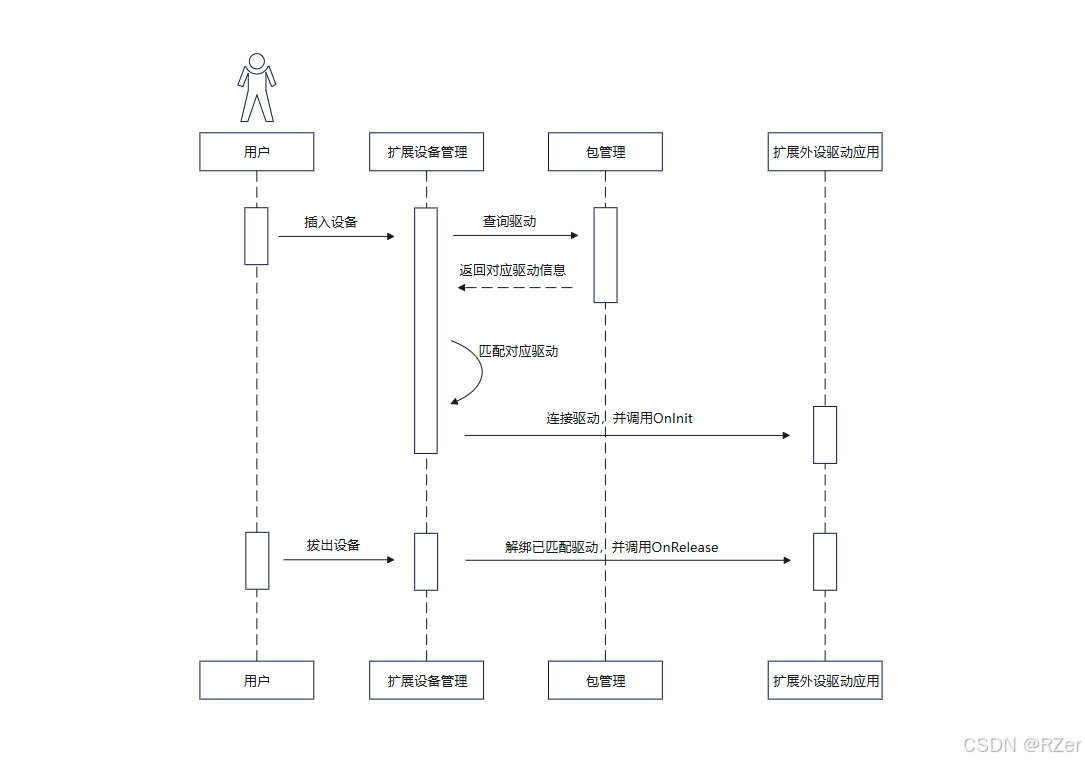
用户插入外设时,外设与驱动的匹配流程如图2所示。
图2 扩展外设及外设扩展驱动匹配时序图
用户使用扩展外设应用时,扩展外设驱动客户端与外设扩展驱动的绑定流程如图3所示。
图3 外设扩展驱动客户端与外设扩展驱动绑定时序图
二、外设扩展驱动客户端开发指导
场景介绍
扩展外设主要是指通过物理接口连入主设备的配件设备,如手写板、打印机和扫描仪等。应用通过扩展外设管理能力可以查询绑定扩展外设,从而使用扩展外设驱动提供的定制能力来使用扩展外设,如打印机的配套软件。
扩展外设管理能力支持所有可移植HarmonyOS系统的设备使用。
环境搭建
开发工具及配置
DevEco Studio是驱动开发工具,进行驱动开发必备条件之一,我们可以使用该工具进行开发、调试、打包等操作。
请下载安装该工具,并参考DevEco Studio使用指南中的创建工程及运行进行基本的操作验证,保证DevEco Studio可正常运行。
SDK版本配置
扩展外设管理提供的ArkTs接口,所需SDK版本为API10及以上版本才可使用。
HDC配置
HDC(HarmonyOS Device Connector)是为开发人员提供的用于调试的命令行工具,通过该工具可以在Windows/Linux/Mac系统上与真实设备或者模拟器进行交互,详细参考HDC配置。
注意: “配置环境变量hdc_server_port”和“全局环境变量”为必须操作。
开发设备
当前开发调试及验证,以RK3568作为开发设备进行说明。关于RK3568的编译、烧录操作等方法,可参考快速入门。
开发客户端和驱动时,需要一个外接USB设备进行调试,当前仅支持USB总线的外接设备。
需要知道外接USB设备的ProductId和VendorId,用于定义驱动以及IPC通信。
接口说明
扩展外设管理基本能力如下,更多详情请查阅API参考文档。
表1 扩展外设管理基本能力接口
| 接口名 | 描述 |
|---|---|
| queryDevices(busType?: number): Array<Readonly> | 查询扩展外设列表。 |
| bindDevice(deviceId: number, onDisconnect: AsyncCallback, callback: AsyncCallback<{deviceId: number; remote: rpc.IRemoteObject;}>): void | 绑定设备,绑定成功后返回设备驱动的IRemoteObject通信对象,通过该对象与设备驱动进行交互。 |
| bindDevice(deviceId: number, onDisconnect: AsyncCallback): Promise<{deviceId: number; remote: rpc.IRemoteObject;}> | 绑定设备的Promise形式。 |
| bindDeviceDriver(deviceId: number, onDisconnect: AsyncCallback, callback: AsyncCallback>RemoteDeviceDriver>): void; | 绑定设备,API11开始支持。 |
| bindDeviceDriver(deviceId: number, onDisconnect: AsyncCallback): Promise; | 绑定设备的Promise形式,API11开始支持。 |
| unbindDevice(deviceId: number, callback: AsyncCallback): void | 解绑设备。 |
| unbindDevice(deviceId: number): Promise | 解绑设备的Promise形式。 |
开发步骤
应用可通过查询绑定扩展外设,从而使用扩展外设的定制驱动能力。
开发示例如下(仅供参考):为开发者提供的示例代码为同时开发客户端和服务端的Demo,并实现IPC通信。
-
创建新工程,请参考创建一个新的工程,创建一个HarmonyOS工程。
注意:
开发驱动客户端,请选择Empty Ability模板。
开发驱动服务端,请选择Native C++模板。
同时开发驱动客户端和服务端,请选择Native C++模板。 -
在文件中导入相关Kit,并声明想要绑定的USB设备的productId、vendorId以及与驱动通信的Code。
说明:
以下示例代码均写在entry/src/main/ets/pages/Index.ets文件中。
import { hilog } from '@kit.PerformanceAnalysisKit';
import { deviceManager } from '@kit.DriverDevelopmentKit';
import { BusinessError } from '@kit.BasicServicesKit';
import { rpc } from '@kit.IPCKit';

const REQUEST_CODE: number = 99; // 自定义通信Code,此处仅供参考
const productId: number = 4258;  // 请声明连接的USB设备的productId
const vendorId: number = 4817;   // 请声明连接的USB设备的vendorId
- 定义message变量和远程对象变量,后续与驱动通信使用。
说明:
第3步开始,以下接口均在struct Index{}中定义。
@State message: string = 'Hello';
private remote: rpc.IRemoteObject | null = null;
- 定义查询设备接口,通过queryDevices获取目标设备ID。
private async queryTargetDeviceId(): Promise<number> {
try {
  const devices: Array<deviceManager.Device> = deviceManager.queryDevices(deviceManager.BusType.USB);
  const index = devices.findIndex((item: deviceManager.Device) => {
    let usbDevice = item as deviceManager.USBDevice;
    // 如果不知道设备productId和vendorId,可以通过该日志查看连接的usb设备的相关信息
    hilog.info(0, 'testTag', `usbDevice.productId = ${usbDevice.productId}, usbDevice.vendorId = ${usbDevice.vendorId}`);
    return usbDevice.productId === productId && usbDevice.vendorId === vendorId;
  });
  if (index < 0) {
    hilog.error(0, 'testTag', 'can not find device');
    return -1;
  }
  return devices[index].deviceId;
} catch (error) {
  hilog.error(0, 'testTag', `queryDevice failed, err: ${JSON.stringify(error)}`);
}
return -1;
}
- 定义获取对应驱动远程对象的接口,通过bindDeviceDriver获取远程对象。
private async getDriverRemote(deviceId: number): Promise<rpc.IRemoteObject | null> {
try {
  let remoteDeviceDriver: deviceManager.RemoteDeviceDriver = await deviceManager.bindDeviceDriver(deviceId,
    (err: BusinessError, id: number) => {
    hilog.info(0, 'testTag', `device[${id}] id disconnect, err: ${JSON.stringify(err)}}`);
  });
  return remoteDeviceDriver.remote;
} catch (error) {
  hilog.error(0, 'testTag', `bindDeviceDriver failed, err: ${JSON.stringify(error)}`);
}
  return null;
}
- 定义与远程对象通信接口,通过sendMessageRequest与远程对象进行IPC通信。
private async communicateWithRemote(): Promise<void> {
  const deviceId: number = await this.queryTargetDeviceId();
  if (deviceId < 0) {
    hilog.error(0, 'testTag', 'can not find target device');
    return;
  }
  this.remote = await this.getDriverRemote(deviceId);
  if (this.remote === null) {
    hilog.error(0, 'testTag', `getDriverRemote failed`);
    return;
  }

  let option = new rpc.MessageOption();
  let data = new rpc.MessageSequence();
  let reply = new rpc.MessageSequence();

  // 向驱动发送信息"Hello"
  data.writeString(this.message);

  try {
    await this.remote.sendMessageRequest(REQUEST_CODE, data, reply, option);
    // 获取驱动返回信息"Hello world"
    this.message = reply.readString();
    hilog.info(0, 'testTag', `sendMessageRequest, message: ${this.message}}`);
  } catch (error) {
    hilog.error(0, 'testTag', `sendMessageRequest failed, err: ${JSON.stringify(error)}`);
  }
}
- 渲染UI界面,更多UI界面开发请参考UI开发。
build() {
  Row() {
    Column() {
      Text(this.message) // 显示"Hello"
        .fontSize(60)
        .fontWeight(FontWeight.Bold)
        .onClick(() => { // 点击"Hello",与远程对象通信,显示"Hello World"
          this.communicateWithRemote();
        })
    }
    .width('100%')
  }
  .height('100%')
}
- 接下来请参考外设扩展驱动开发指导,进行对应驱动的示例代码开发。
应用签名
注意: 先配置权限,再自动签名。
应用需要配置签名文件才能在设备上运行,并且扩展外设管理客户端开发,需要配置扩展外设的权限:ohos.permission.ACCESS_EXTENSIONAL_DEVICE_DRIVER。
自动签名方法: 请参考自动签名。
权限配置方法: 请参考使用ACL的签名配置指导。


讨论HarmonyOS开发技术,专注于API与组件、DevEco Studio、测试、元服务和应用上架分发等。
更多推荐


 16
16 0
0- 0


 已为社区贡献28条内容

所有评论(0)