鸿蒙自定义弹窗开发指南
通过以上实现方式,开发者可以快速创建具有自定义布局、交互逻辑和动画效果的高复用性弹窗组件。重点在于通过 `CustomDialogController` 实现弹窗生命周期控制,结合 `@Prop` 和回调函数完成数据双向传递。使用 @CustomDialog 装饰器声明弹窗组件,并通过 CustomDialogController 控制弹窗行为,以下是一个忘记密码的界面弹窗。在鸿蒙(Harmony
·
在鸿蒙(HarmonyOS)应用开发中,通过 @CustomDialog 装饰器实现自定义弹窗组件是常见且高效的方式。以下是具体实现步骤与调用方法:
一、自定义弹窗组件实现
1. 组件定义
使用 @CustomDialog 装饰器声明弹窗组件,并通过 CustomDialogController 控制弹窗行为,以下是一个忘记密码的界面弹窗
@CustomDialog
export struct PhoneVerify{
  controller?: CustomDialogController
  @State phone: string = ''
  @State code: string = ''

  phoneVerifyHandle(){
    //
  }
  build() {
    Column() {
      Column({ space: 10 }) {
        Text() {
          SymbolSpan($r('sys.symbol.xmark'))
            .fontSize(20)
            .fontWeight(FontWeight.Bold)
            .fontColor([$r('app.color.gray_5')])
        }
        .textAlign(TextAlign.End)
        .width('100%')
        .onClick(()=>{
          this.controller?.close()
        })

        TextInput({ text: this.phone, placeholder: '请输入手机号' })
          .onChange((value) => this.phone = value)
        Row(){
          TextInput({ text: this.code, placeholder: '请输入验证码' })
            .onChange((value) => this.code = value)
          Text('获取验证码')
            .backgroundColor($r('app.color.primary'))
            .borderRadius(6)
            .fontColor($r('app.color.white'))
            .fontSize(13)
            .padding(5)
            .margin({
              left:'-33%'
            })
        }
        .width('100%')
        Text('需要先通过手机号校验,才能重置您的密码哦~')
          .fontSize(12)
          .fontColor($r('app.color.text_secondary'))
      }
      .padding(15)
      Divider()  // 顶部添加分隔线
        .color($r('app.color.gray_5'))
        .strokeWidth(0.5)
        .vertical(false)
      Row() {
        Button('取消')
          .type(ButtonType.Normal)
          .width('50%')
          .backgroundColor(Color.Transparent)
          .fontColor($r('app.color.text_secondary'))
          .fontSize(18)
          .onClick(() => this.controller?.close())
        Divider()  // 顶部添加分隔线
          .color($r('app.color.gray_5'))
          .strokeWidth(0.5)
          .vertical(true)
        Button('确认')
          .type(ButtonType.Normal)
          .width('50%')
          .backgroundColor(Color.Transparent)
          .fontColor($r('app.color.primary'))
          .fontSize(18)
          .onClick(() => {
            this.phoneVerifyHandle()
            this.controller?.close()
          })
      }
      .height(40)
    }
    .backgroundColor($r('app.color.white'))
    .borderRadius(10)
    .width('80%')
  }
}
二、弹窗调用与交互
import { PhoneVerify} from '../../components/CustomDialog/PhoneVerify'

@Entry
@Component
struct Login {
  controller?: CustomDialogController;

  build() {
    Column() {
        Text('忘记密码?')
            .fontColor($r('app.color.text_secondary'))
            .fontSize(12)
            .onClick(() => {
              //弹窗
              this.controller = new CustomDialogController({
                builder: PhoneVerify(),//内容构造器
                customStyle: true,//弹窗容器样式是否自定义
                autoCancel: false,//是否允许点击遮障层退出
                alignment: DialogAlignment.Center,//弹窗在竖直方向上的对齐方式。
              })
              this.controller.open()
            })
    }
  }
}
三、运行效果图如下
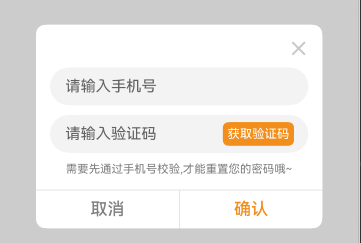
通过以上实现方式,开发者可以快速创建具有自定义布局、交互逻辑和动画效果的高复用性弹窗组件。重点在于通过 `CustomDialogController` 实现弹窗生命周期控制,结合 `@Prop` 和回调函数完成数据双向传递。

讨论HarmonyOS开发技术,专注于API与组件、DevEco Studio、测试、元服务和应用上架分发等。
更多推荐

 17
17 0
0- 0


 已为社区贡献11条内容

所有评论(0)