DevEco Studio 模块使用全指南
模块类型功能适用场景文件结构应用模块包含UI和业务逻辑主功能开发库模块封装可复用代码共享工具类卡片模块服务卡片功能桌面小部件服务模块后台服务能力无界面功能。
·
一、模块类型概述
| 模块类型 | 功能 | 适用场景 | 文件结构 |
|---|---|---|---|
| 应用模块 | 包含UI和业务逻辑 | 主功能开发 | entry/src/main/ets/ |
| 库模块 | 封装可复用代码 | 共享工具类 | library/src/main/ets/ |
| 卡片模块 | 服务卡片功能 | 桌面小部件 | widget/src/main/ets/ |
| 服务模块 | 后台服务能力 | 无界面功能 | service/src/main/ets/ |
二、添加新模块(Add New Module)
- 入口路径:
- 右键工程根目录 > New > Module
- 菜单 File > New > Module
- 操作步骤:
- 选择模板(如 Empty Ability 或 Shared Library)。
- 配置模块信息:
- Module name:不能与工程名重复(如
feature_payment)。 - Module type:选择
Entry或Feature(默认Feature)。 - Device type:勾选支持的设备(如 Phone、Tablet)。
- Module name:不能与工程名重复(如
- 完成创建后,模块会生成独立的
src、resources和module.json5。
三、模块功能扩展:添加 Ability 与 Page
1. 添加 Ability(核心组件)
- Stage 模型(主推):
- UIAbility:带界面的组件(如页面、弹窗)。
- 右键模块
ets目录 > New > Ability > UIAbility,设置名称并勾选 Launcher ability(桌面图标)。
- 右键模块
- ExtensionAbility:无界面的扩展功能(如后台服务、数据备份)。
- 右键模块 > New > Extension Ability,选择类型(如 BackupAbility)。
- UIAbility:带界面的组件(如页面、弹窗)。
- FA 模型(兼容旧项目):
- 右键模块
js目录 > New > Ability,选择 Page Ability 或 Service Ability。
- 右键模块
2. 添加 Page(页面)
- 适用场景:ArkTS Stage 模型工程,用于构建多页面应用。
- 操作步骤:
- 右键模块
src/main/ets/pages> New > Page。 - 选择模板(如 Empty Page 或 Map Page),输入名称(如
OrderPage)。 - 生成文件
OrderPage.ets,通过路由跳转:
- 右键模块
import router from '@ohos.router';
router.pushUrl({ url: 'pages/OrderPage' }); // 跳转至新页面四、添加服务卡片(Service Widget)
1. 创建流程
-
右键模块 > New > Service Widget
-
选择卡片模板:
-
2x2
-
2x4
-
4x4
-
-
配置参数(可默认):
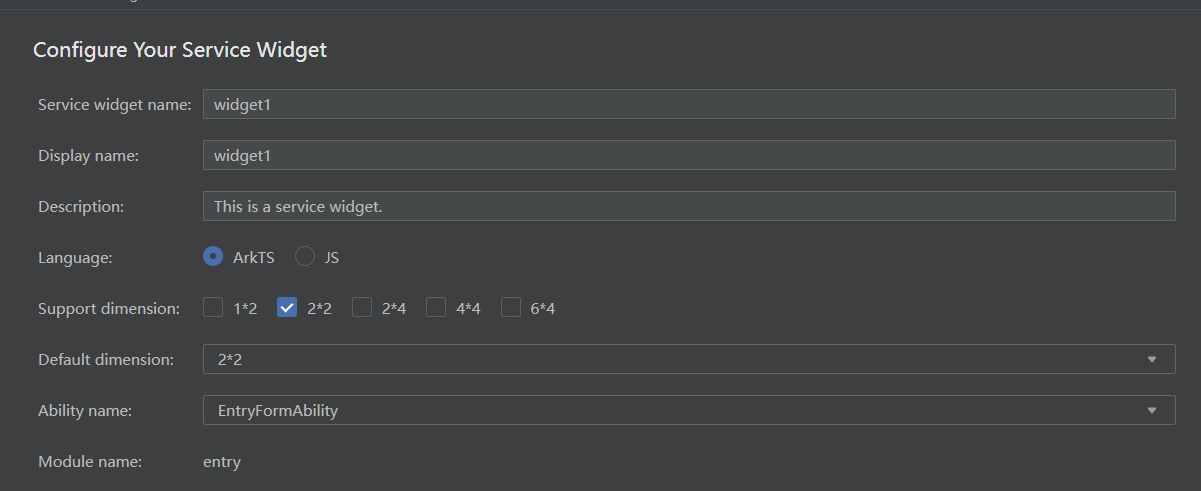
-
生成文件:
resources/base/profile/
  └── weather_widget.json  // 卡片配置文件
ets/widget/
  └── WeatherWidget.ets   // 卡片逻辑
2. 卡片配置文件示例
{
  "forms": [
    {
      "name": "widget",
      "displayName": "$string:widget_display_name",
      "description": "$string:widget_desc",
      "src": "./ets/widget/pages/WidgetCard.ets",
      "uiSyntax": "arkts",
      "window": {
        "designWidth": 720,
        "autoDesignWidth": true
      },
      "colorMode": "auto",
      "isDynamic": true,
      "isDefault": true,
      "updateEnabled": false,
      "scheduledUpdateTime": "10:30",
      "updateDuration": 1,
      "defaultDimension": "1*2",
      "supportDimensions": [
        "1*2",
        "2*2"
      ]
    }
  ]
}
五、导入示例工程(Import Sample)
1. 导入 Sample 工程(快速学习)
- 操作步骤:
- 确保已安装 Git(菜单 File > Settings > Version Control > Git,测试连接)。
- 欢迎页点击 More Actions > Import Sample,选择官方示例(如
Preferences配置模块)。 - 等待同步完成,查看模块结构(如
entry主模块 +feature_settings特性模块)。
- 注意:
- 网络受限需配置 Git 代理(
git config --global http.proxy http://proxy:port)。
- 网络受限需配置 Git 代理(
2. 删除模块
- 操作步骤:
- 右键模块目录 > Delete,确认删除文件。
- 手动清理工程级配置:
build-profile.json5中移除模块相关配置。app.json5(Stage)或config.json(FA)中删除模块引用。
六、模块开发最佳实践
1. 模块化设计原则
- 职责分离:
entry模块:仅包含启动逻辑和全局配置。feature模块:独立功能(如feature_login、feature_share),通过接口与主模块通信。
- 资源复用:
- 公共资源(如字体、颜色)放在
AppScope/resources目录,供所有模块共享。 - 私有资源存放在模块
resources目录,避免命名冲突。
- 公共资源(如字体、颜色)放在
2. 跨模块通信
- EventBus:通过全局事件总线传递数据(如
@AppStorage或三方库EventCenter)。 - 接口暴露:在
Library模块中定义接口,Entry/Feature模块实现: -
// Library模块
export interface PaymentService {
  pay(amount: number): boolean;
}
// Feature模块实现
export class AlipayService implements PaymentService { ... }
3. 构建与调试
- 单独构建模块:右键模块 > Build Module,生成独立
.hap包(用于动态加载)。 - 调试特定模块:在工具栏选择模块名称,点击 Run 或 Debug(如
entry或feature_payment)。
##鸿蒙开发工具##DevEco Studio##商务#

讨论HarmonyOS开发技术,专注于API与组件、DevEco Studio、测试、元服务和应用上架分发等。
更多推荐
 13
13 0
0- 0


 已为社区贡献11条内容

所有评论(0)