鸿蒙极客教大家如何开发鸿蒙APP-- 实况窗进阶开发
本文详细讲解了实况窗的 5 种核心模板实战、进阶功能配置及远程更新方案,覆盖了从本地开发到跨进程同步的全流程。开发者可根据自身业务场景选择合适的模板,通过 Push Kit 实现全天候状态同步,让用户在任何场景下都能实时掌握服务进度。后续开发中,可结合《实况窗设计规范》优化 UI 交互,或通过 “白名单测试→正式权限申请” 的流程完成上线。如需更多细节,可参考华为开发者联盟官方文档。
大家好,我是陈杨,8 年前端老兵转型鸿蒙开发,也是一名鸿蒙极客。
从前端到鸿蒙,我靠的是 “三天上手 ArkTS” 的技术嗅觉,以及 “居安思危” 的转型魄力。这三年,我不玩虚的,封装了开源组件库「莓创图表」,拿过创新赛大奖,更带着团队上架了 11 款自研 APP,涵盖工具、效率、创意等多个领域。
想体验我的作品?欢迎搜索体验:指令魔方、JLPT、REFLEX PRO、国潮纸刻、Wss 直连、ZenithDocs Pro、圣诞相册、CSS 特效。
今天,咱们继续聊点硬核的 ——[实况窗进阶开发:模板实战与远程更新全攻略]。
在上一篇文章中,我们已经掌握了实况窗服务的基础接入流程与核心功能实现。而在实际开发中,不同场景对实况窗的展示样式、交互逻辑有着差异化需求,同时应用进程退出后的状态同步也是关键痛点。本文将聚焦本地实况窗的模板化开发、实况胶囊与计时器配置,以及基于 Push Kit 的远程更新方案,结合完整代码示例与场景拆解,助力开发者实现更灵活、稳定的实况窗功能。
一、本地实况窗核心模板实战
实况窗提供 5 种预设样式模板,覆盖绝大多数高频场景。开发者无需从零设计 UI,只需根据业务场景选择对应模板并配置参数,即可快速实现标准化展示。以下是各模板的详细实战指南:
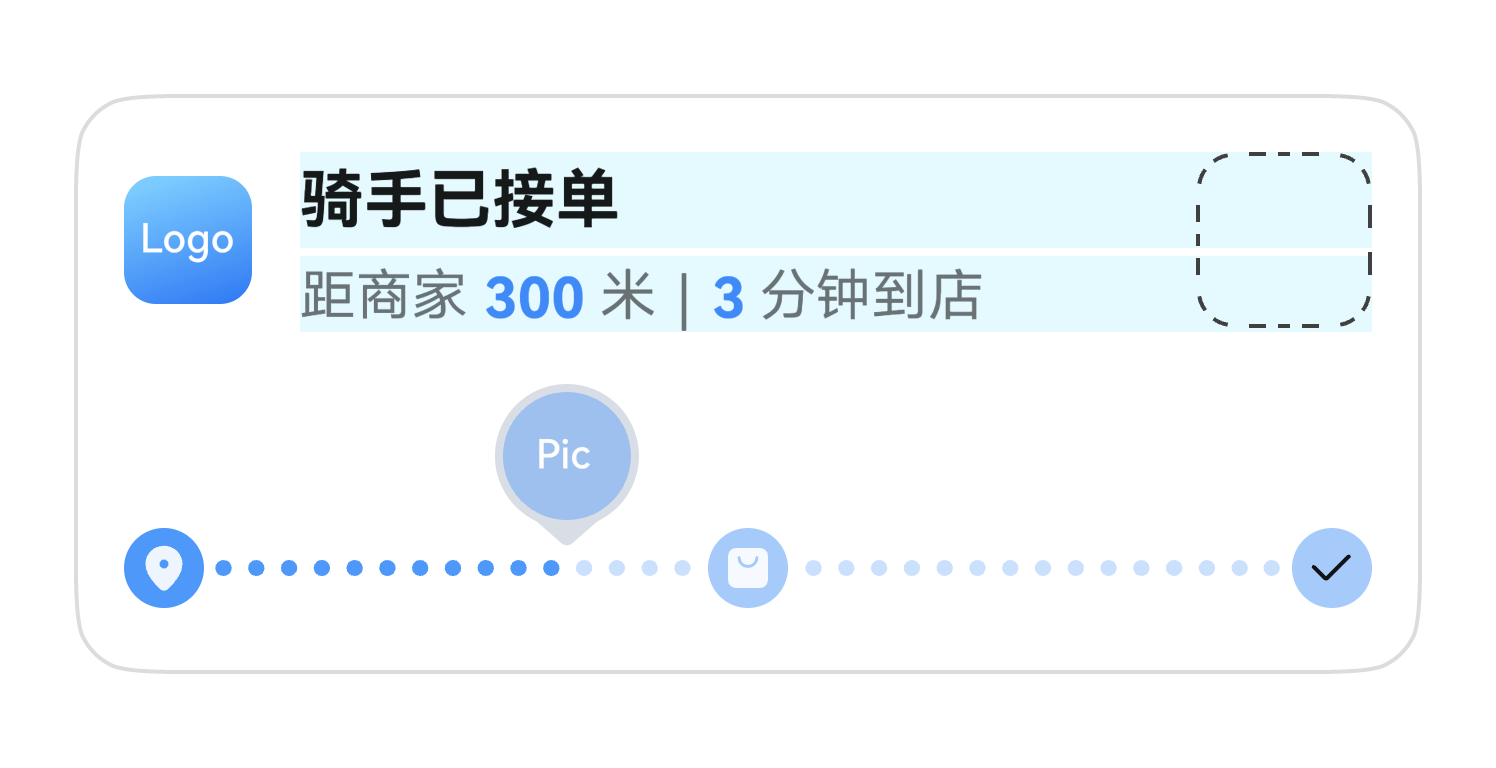
1. 进度可视化模板(打车 / 外卖场景首选)
适用于需要展示服务进度的场景(如外卖配送、打车接驾),核心亮点是进度条 + 节点图标,直观呈现服务所处阶段。
(1)核心配置参数
| 参数 | 说明 | 取值示例 |
|---|---|---|
| layoutType | 模板类型 | LAYOUT_TYPE_PROGRESS |
| progress | 进度值(0-100) | 40 |
| color | 进度条颜色 | #FF317AF7 |
| nodeIcons | 进度节点图标 | [“icon_store.png”, “icon_rider.png”, “icon_user.png”] |
| indicatorType | 进度指示器类型 | INDICATOR_TYPE_UP(向上指示) |
(2)完整代码实现
import { liveViewManager, LayoutType, IndicatorType, LineType } from '@kit.LiveViewKit';
import { Want, wantAgent } from '@kit.AbilityKit';

export class DeliveryLiveViewController {
  // 校验实况窗开关状态
  private static async checkLiveViewEnabled(): Promise<boolean> {
    const isEnabled = await liveViewManager.isLiveViewEnabled();
    if (!isEnabled) console.warn("用户未开启实况窗权限");
    return isEnabled;
  }

  // 构建点击跳转能力
  private static async buildClickAction(): Promise<Want> {
    const wantAgentInfo: wantAgent.WantAgentInfo = {
      wants: [{
        bundleName: 'com.example.deliveryapp', // 替换为实际包名
        abilityName: 'DeliveryDetailAbility' // 跳转目标Ability
      } as Want],
      actionType: wantAgent.OperationType.START_ABILITIES,
      requestCode: 1001,
      actionFlags: [wantAgent.WantAgentFlags.UPDATE_PRESENT_FLAG]
    };
    return await wantAgent.getWantAgent(wantAgentInfo);
  }

  // 创建外卖配送实况窗(进度可视化模板)
  public async createDeliveryLiveView(orderId: string): Promise<liveViewManager.LiveViewResult> {
    if (!await DeliveryLiveViewController.checkLiveViewEnabled()) {
      throw new Error("实况窗功能未开启");
    }

    const liveViewConfig: liveViewManager.LiveView = {
      id: Number(orderId), // 用订单号作为实况窗唯一ID
      event: "DELIVERY", // 场景标识:即时配送
      liveViewData: {
        primary: {
          title: "骑手已接单,前往商家",
          content: [
            { text: "距商家 " },
            { text: "300 ", textColor: "#FF0A59F7" },
            { text: "米 | " },
            { text: "3 ", textColor: "#FF0A59F7" },
            { text: "分钟到店" }
          ],
          keepTime: 15, // 持续展示15秒(无操作自动收起)
          clickAction: await DeliveryLiveViewController.buildClickAction(),
          layoutData: {
            layoutType: LayoutType.LAYOUT_TYPE_PROGRESS,
            progress: 25, // 当前进度25%(接单→到店阶段)
            color: "#FF317AF7",
            backgroundColor: "#f7f0f8e0",
            indicatorType: IndicatorType.INDICATOR_TYPE_UP,
            indicatorIcon: "indicator.png", // 资源文件需放在/resources/rawfile
            lineType: LineType.LINE_TYPE_DOTTED_LINE, // 虚线进度条
            nodeIcons: ["icon_store.png", "icon_rider.png", "icon_user.png"] // 三个阶段节点
          }
        }
      }
    };

    return await liveViewManager.startLiveView(liveViewConfig);
  }
}
(3)效果预览
2. 强调文本模板(取餐 / 排队场景)
适用于需要突出关键信息的场景(如取餐码、排队号),核心是大字体展示核心内容,辅助信息补充说明。
核心代码片段
// 取餐场景实况窗创建
private static async buildPickupLiveView(orderId: string): Promise<liveViewManager.LiveView> {
  return {
    id: Number(orderId),
    event: "PICK_UP", // 场景标识:取餐
    liveViewData: {
      primary: {
        title: "餐品已备好,速来取餐",
        content: [
          { text: "请前往" },
          { text: " 星巴克(南京东路店) ", textColor: "#FF0A59F7" },
          { text: "取餐" }
        ],
        keepTime: 20,
        clickAction: await DeliveryLiveViewController.buildClickAction(),
        layoutData: {
          layoutType: LayoutType.LAYOUT_TYPE_PICKUP,
          title: "取餐码",
          content: "7298", // 突出展示取餐码
          underlineColor: "#FF0A59F7", // 下划线颜色
          descPic: "coffee.png" // 右侧展示商品图片
        }
      }
    }
  };
}
3. 左右文本模板(航班 / 高铁场景)
适用于展示起止信息的场景(如航班起降、高铁行程),核心是左右分栏展示出发 / 到达信息,中间用图标连接。
核心代码片段
// 高铁场景实况窗创建
private static async buildTrainLiveView(trainNo: string): Promise<liveViewManager.LiveView> {
  return {
    id: trainNo.hashCode(), // 用列车号生成唯一ID
    event: "TRAIN", // 场景标识:高铁
    liveViewData: {
      primary: {
        title: "列车即将检票",
        content: [
          { text: "检票口 " },
          { text: "6B ", textColor: "#FF0A59F7" },
          { text: "| 座位 " },
          { text: "03车 12F", textColor: "#FF0A59F7" }
        ],
        keepTime: 30,
        clickAction: await DeliveryLiveViewController.buildClickAction(),
        layoutData: {
          layoutType: LayoutType.LAYOUT_TYPE_FLIGHT,
          firstTitle: "09:00", // 出发时间
          firstContent: "上海虹桥", // 出发地
          lastTitle: "14:20", // 到达时间
          lastContent: "汉口", // 到达地
          spaceIcon: "train_icon.png", // 中间列车图标
          isHorizontalLineDisplayed: true, // 显示水平连接线
          additionalText: "请提前15分钟到达检票口" // 底部提示文本
        }
      }
    }
  };
}
4. 赛事比分模板(体育 / 游戏赛事场景)
专为实时比分展示设计,支持主队 / 客队名称、图标、比分及比赛时长展示,核心是动态更新比分数据。
核心代码片段
// 赛事比分实况窗创建
private static async buildScoreLiveView(matchId: string): Promise<liveViewManager.LiveView> {
  return {
    id: Number(matchId),
    event: "SCORE", // 场景标识:赛事比分
    liveViewData: {
      primary: {
        title: "第四节比赛中",
        content: [
          { text: "湖人 ", textColor: "#FF0A59F7" },
          { text: " VS " },
          { text: "勇士 ", textColor: "#FF0A59F7" },
          { text: " | 常规赛" }
        ],
        keepTime: 1, // 赛事场景1秒刷新一次
        clickAction: await DeliveryLiveViewController.buildClickAction(),
        layoutData: {
          layoutType: LayoutType.LAYOUT_TYPE_SCORE,
          hostName: "湖人",
          hostIcon: "lakers.png", // 主队图标
          hostScore: "110", // 主队比分
          guestName: "勇士",
          guestIcon: "warriors.png", // 客队图标
          guestScore: "102", // 客队比分
          competitionDesc: [{ text: "●", textColor: "#FFFF0000" }, { text: "Q4" }], // 第四节标识
          competitionTime: "02:16", // 剩余时间
          isHorizontalLineDisplayed: true
        }
      }
    }
  };
}
5. 导航模板(出行导航场景)
适用于步行、骑行、驾车导航场景,核心是展示当前导航指令与后续路线规划,支持方向图标序列。
核心代码片段
// 导航场景实况窗创建
private static async buildNavigationLiveView(routeId: string): Promise<liveViewManager.LiveView> {
  return {
    id: Number(routeId),
    event: "NAVIGATION", // 场景标识:导航
    liveViewData: {
      primary: {
        title: "178米后左转",
        content: [{ text: "去往" }, { text: " 南京东路", textColor: "#FF0A59F7" }],
        keepTime: 15,
        clickAction: await DeliveryLiveViewController.buildClickAction(),
        layoutData: {
          layoutType: LayoutType.LAYOUT_TYPE_NAVIGATION,
          currentNavigationIcon: "turn_left.png", // 当前转向图标
          navigationIcons: ["left.png", "straight.png", "straight.png", "right.png"] // 后续路线图标序列
        }
      }
    }
  };
}
二、进阶功能:实况胶囊与计时器配置
除了核心模板,实况窗还支持实况胶囊(状态栏展示)与计时器(倒计时 / 正计时)功能,进一步提升用户体验。
1. 实况胶囊配置
实况胶囊是状态栏的小型展示组件,支持文本、进度、计时器三种类型,即使应用在后台也能让用户快速感知状态。
文本胶囊(打车场景示例)
// 在liveViewData中添加capsule配置
capsule: {
  type: liveViewManager.CapsuleType.CAPSULE_TYPE_TEXT, // 文本类型胶囊
  status: 1, // 正常状态
  icon: "capsule_taxi.png", // 胶囊图标
  backgroundColor: "#ff0959F8", // 胶囊背景色
  title: "5分钟到达" // 胶囊文本
}
进度胶囊(外卖配送场景示例)
capsule: {
  type: liveViewManager.CapsuleType.CAPSULE_TYPE_PROGRESS, // 进度类型胶囊
  status: 1,
  icon: "capsule_delivery.png",
  backgroundColor: "#FF317AF7",
  progress: 60, // 胶囊进度值
  title: "配送中"
}
2. 实况窗计时器配置
适用于排队等待、抢票倒计时等场景,支持正计时 / 倒计时,通过占位符${placeholder.timer}嵌入文本内容。
排队场景计时器示例
// 排队场景实况窗配置
public async createQueueLiveView(queueId: string): Promise<liveViewManager.LiveViewResult> {
  if (!await DeliveryLiveViewController.checkLiveViewEnabled()) {
    throw new Error("实况窗功能未开启");
  }

  const liveViewConfig: liveViewManager.LiveView = {
    id: Number(queueId),
    event: "QUEUE", // 场景标识:排队
    timer: {
      time: 620000, // 初始时间(毫秒)
      isCountdown: false, // true=倒计时,false=正计时
      isPaused: false // 是否暂停
    },
    liveViewData: {
      primary: {
        title: "大桌4人等位  32桌",
        content: [
          { text: "已等待 " },
          { text: "${placeholder.timer}", textColor: "#ff10c1f7" }, // 计时器占位符
          { text: " | 预计还需>30分钟" }
        ],
        keepTime: 15,
        clickAction: await DeliveryLiveViewController.buildClickAction(),
        layoutData: {
          layoutType: LayoutType.LAYOUT_TYPE_PROGRESS,
          progress: 20,
          color: "#FFFF0000",
          backgroundColor: "#FFf5f5f5",
          indicatorType: IndicatorType.INDICATOR_TYPE_OVERLAY,
          lineType: LineType.LINE_TYPE_DOTTED_LINE,
          nodeIcons: ["icon_queue.png", "icon_finish.png"]
        }
      }
    }
  };

  return await liveViewManager.startLiveView(liveViewConfig);
}
三、本地实况窗的更新与结束
当服务状态发生变化(如外卖送达、列车检票)时,需要及时更新或结束实况窗,确保信息准确性。
1. 本地更新实况窗
// 更新外卖配送状态(骑手已取餐,前往用户)
public async updateDeliveryStatus(orderId: string): Promise<liveViewManager.LiveViewResult> {
  if (!await DeliveryLiveViewController.checkLiveViewEnabled()) {
    throw new Error("实况窗功能未开启");
  }

  // 构建更新后的配置(复用创建时的结构,修改关键参数)
  const updatedLiveView = await this.buildDeliveryLiveView(orderId);
  updatedLiveView.liveViewData.primary.title = "骑手已取餐,前往您的位置";
  updatedLiveView.liveViewData.primary.content = [
    { text: "距您 " },
    { text: "1.2 ", textColor: "#FF0A59F7" },
    { text: "公里 | " },
    { text: "8 ", textColor: "#FF0A59F7" },
    { text: "分钟送达" }
  ];
  updatedLiveView.liveViewData.primary.layoutData.progress = 75; // 进度更新为75%
  updatedLiveView.liveViewData.capsule.title = "8分钟送达"; // 胶囊文本更新

  return await liveViewManager.updateLiveView(updatedLiveView);
}
2. 结束实况窗
// 外卖送达,结束实况窗
public async finishDeliveryLiveView(orderId: string): Promise<liveViewManager.LiveViewResult> {
  if (!await DeliveryLiveViewController.checkLiveViewEnabled()) {
    throw new Error("实况窗功能未开启");
  }

  const finishedLiveView = await this.buildDeliveryLiveView(orderId);
  finishedLiveView.liveViewData.primary.title = "商品已送达";
  finishedLiveView.liveViewData.primary.content = [
    { text: "感谢您的使用," },
    { text: "记得给骑手好评哦~", textColor: "#FF0A59F7" }
  ];
  finishedLiveView.liveViewData.primary.layoutData.progress = 100; // 进度100%
  finishedLiveView.liveViewData.capsule.title = "已送达";

  return await liveViewManager.stopLiveView(finishedLiveView);
}
四、远程更新:基于 Push Kit 的实况窗同步方案
本地实况窗的更新依赖应用进程存活,当应用被关闭或退到后台时,无法主动更新状态。通过 Push Kit 实现远程更新,可确保实况窗在整个生命周期内实时同步,这也是官方推荐的最佳实践。
1. 远程更新核心流程
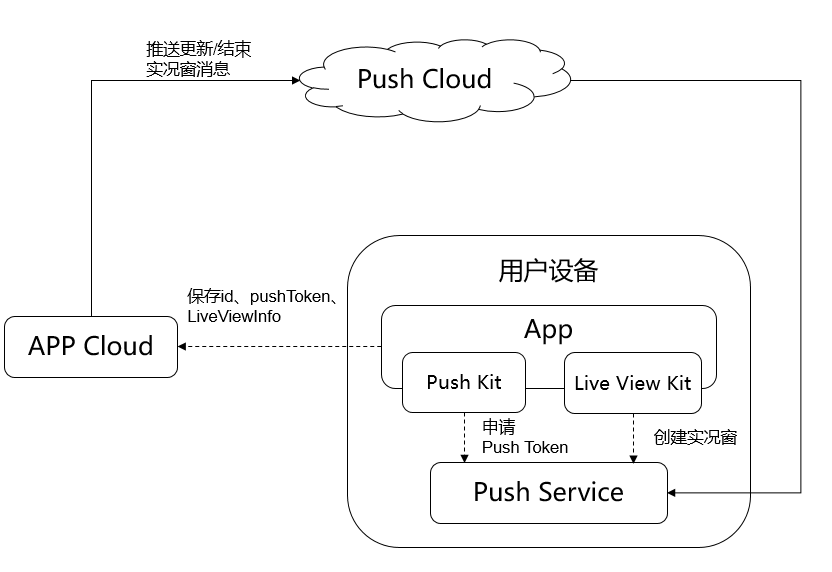
- 应用创建本地实况窗成功后,将
实况窗ID、Push Token、场景event存储到业务服务器; - 当服务状态变化(如外卖送达、航班延误),业务服务器通过 Push Kit 推送更新消息;
- 设备接收 Push 消息后,通过 Live View Kit API 更新或结束实况窗。
2. 服务端推送实现(Java Spring Boot)
(1)依赖配置
<!-- 华为Push Kit依赖 -->
<dependency>
  <groupId>com.huawei.hms</groupId>
  <artifactId>push-server-sdk</artifactId>
  <version>5.3.0.300</version>
</dependency>
(2)推送工具类
import com.huawei.push.message.AndroidConfig;
import com.huawei.push.message.AndroidNotification;
import com.huawei.push.message.Message;
import com.huawei.push.reponse.SendResponse;
import com.huawei.push.service.HmsPushService;
import com.huawei.push.service.HmsPushServiceFactory;
import com.huawei.push.util.ValidatorUtils;

import java.util.HashMap;
import java.util.Map;

public class LiveViewPushUtil {
  // 华为开发者联盟配置
  private static final String APP_ID = "your_app_id";
  private static final String APP_SECRET = "your_app_secret";
  private static final HmsPushService hmsPushService = HmsPushServiceFactory.createHmsPushService(APP_ID, APP_SECRET);

  /**
   * 推送实况窗更新消息
   * @param pushToken 设备Push Token
   * @param liveViewId 实况窗ID
   * @param event 场景标识(如DELIVERY、TAXI)
   * @param progress 最新进度
   * @return 推送结果
   */
  public static SendResponse pushLiveViewUpdate(String pushToken, String liveViewId, String event, int progress) {
    // 1. 构建实况窗更新数据
    Map<String, String> data = new HashMap<>();
    data.put("liveViewId", liveViewId);
    data.put("event", event);
    data.put("progress", String.valueOf(progress));
    data.put("title", "外卖配送进度更新");
    data.put("content", "骑手正在加速配送中,预计5分钟后到达");
    data.put("capsuleTitle", "5分钟送达");

    // 2. 构建Android推送配置
    AndroidNotification notification = new AndroidNotification.Builder()
      .setTitle("实况窗更新")
      .setBody("您的外卖配送进度有更新")
      .build();

    AndroidConfig androidConfig = new AndroidConfig.Builder()
      .setNotification(notification)
      .setData(data)
      .build();

    // 3. 构建推送消息
    Message message = new Message.Builder()
      .setToken(new String[]{pushToken})
      .setAndroidConfig(androidConfig)
      .build();

    // 4. 发送推送
    try {
      ValidatorUtils.validate(message);
      return hmsPushService.send(message);
    } catch (Exception e) {
      e.printStackTrace();
      return null;
    }
  }

  /**
   * 推送实况窗结束消息
   */
  public static SendResponse pushLiveViewFinish(String pushToken, String liveViewId) {
    Map<String, String> data = new HashMap<>();
    data.put("liveViewId", liveViewId);
    data.put("action", "finish");

    AndroidNotification notification = new AndroidNotification.Builder()
      .setTitle("服务完成")
      .setBody("您的外卖已送达,感谢使用")
      .build();

    AndroidConfig androidConfig = new AndroidConfig.Builder()
      .setNotification(notification)
      .setData(data)
      .build();

    Message message = new Message.Builder()
      .setToken(new String[]{pushToken})
      .setAndroidConfig(androidConfig)
      .build();

    try {
      ValidatorUtils.validate(message);
      return hmsPushService.send(message);
    } catch (Exception e) {
      e.printStackTrace();
      return null;
    }
  }
}
3. 客户端接收与处理
(1)配置 Push 接收服务
在config.json中注册 Push 接收 Ability:
{
  "module": {
    "abilities": [
      {
        "name": ".PushReceiverAbility",
        "type": "service",
        "visible": true,
        "skills": [
          {
            "actions": ["com.huawei.push.action.MESSAGING_EVENT"]
          }
        ]
      }
    ]
  }
}
(2)接收 Push 消息并更新实况窗
import { Ability, Want } from '@kit.AbilityKit';
import { liveViewManager } from '@kit.LiveViewKit';

export default class PushReceiverAbility extends Ability {
  onStart(want: Want) {
    super.onStart(want);
    // 监听Push消息
    this.subscribePushMessage();
  }

  private subscribePushMessage() {
    // 华为Push消息接收回调
    const pushReceiver = {
      onMessageReceived: (message: any) => {
        const data = message.data;
        if (!data) return;

        // 处理实况窗更新消息
        if (data.action === "finish") {
          // 结束实况窗
          this.finishLiveView(Number(data.liveViewId));
        } else {
          // 更新实况窗
          this.updateLiveView(
            Number(data.liveViewId),
            data.event,
            Number(data.progress),
            data.title,
            data.content,
            data.capsuleTitle
          );
        }
      }
    };

    // 注册Push接收器(需导入华为Push SDK)
    // pushManager.subscribe(pushReceiver);
  }

  // 更新实况窗
  private async updateLiveView(
    liveViewId: number,
    event: string,
    progress: number,
    title: string,
    content: string,
    capsuleTitle: string
  ) {
    if (!await liveViewManager.isLiveViewEnabled()) return;

    const liveViewConfig: liveViewManager.LiveView = {
      id: liveViewId,
      event: event,
      liveViewData: {
        primary: {
          title: title,
          content: [{ text: content }],
          keepTime: 15,
          clickAction: await this.buildClickAction(),
          layoutData: {
            layoutType: liveViewManager.LayoutType.LAYOUT_TYPE_PROGRESS,
            progress: progress,
            color: "#FF317AF7",
            backgroundColor: "#f7f0f8e0",
            lineType: liveViewManager.LineType.LINE_TYPE_DOTTED_LINE
          }
        },
        capsule: {
          type: liveViewManager.CapsuleType.CAPSULE_TYPE_TEXT,
          status: 1,
          icon: "capsule_delivery.png",
          backgroundColor: "#FF317AF7",
          title: capsuleTitle
        }
      }
    };

    await liveViewManager.updateLiveView(liveViewConfig);
  }

  // 结束实况窗
  private async finishLiveView(liveViewId: number) {
    if (!await liveViewManager.isLiveViewEnabled()) return;

    const liveViewConfig: liveViewManager.LiveView = {
      id: liveViewId,
      event: "DELIVERY",
      liveViewData: {
        primary: {
          title: "商品已送达",
          content: [{ text: "感谢您的使用,记得给骑手好评哦~" }],
          keepTime: 15,
          clickAction: await this.buildClickAction(),
          layoutData: {
            layoutType: liveViewManager.LayoutType.LAYOUT_TYPE_PROGRESS,
            progress: 100,
            color: "#FF317AF7"
          }
        }
      }
    };

    await liveViewManager.stopLiveView(liveViewConfig);
  }

  // 构建点击动作
  private async buildClickAction(): Promise<Want> {
    const wantAgentInfo: wantAgent.WantAgentInfo = {
      wants: [{
        bundleName: 'com.example.deliveryapp',
        abilityName: 'DeliveryDetailAbility'
      } as Want],
      actionType: wantAgent.OperationType.START_ABILITIES,
      requestCode: 1001,
      actionFlags: [wantAgent.WantAgentFlags.UPDATE_PRESENT_FLAG]
    };
    return await wantAgent.getWantAgent(wantAgentInfo);
  }
}
五、开发注意事项与避坑指南
- 资源文件路径:所有图标(如 indicator.png、capsule_delivery.png)需放在
/resources/rawfile目录下,否则会导致加载失败; - 实况窗开关校验:每次创建 / 更新前必须调用
isLiveViewEnabled()校验用户是否开启权限,避免功能失效; - 唯一 ID 设计:实况窗 ID 需与业务实体(如订单号、列车号)绑定,确保更新 / 结束时能精准定位;
- 推送频率控制:遵循实况窗更新频次限制(如配送场景每 5 分钟最多 10 次),避免消息被系统丢弃;
- 兼容性处理:仅支持 HarmonyOS 5.0 + 设备,需在应用启动时检查系统版本,低版本设备提供替代方案。
六、总结
本文详细讲解了实况窗的 5 种核心模板实战、进阶功能配置及远程更新方案,覆盖了从本地开发到跨进程同步的全流程。开发者可根据自身业务场景选择合适的模板,通过 Push Kit 实现全天候状态同步,让用户在任何场景下都能实时掌握服务进度。
后续开发中,可结合《实况窗设计规范》优化 UI 交互,或通过 “白名单测试→正式权限申请” 的流程完成上线。如需更多细节,可参考华为开发者联盟官方文档。

讨论HarmonyOS开发技术,专注于API与组件、DevEco Studio、测试、元服务和应用上架分发等。
更多推荐
 22
22 0
0- 0


 已为社区贡献42条内容

所有评论(0)