Flutter框架跨平台鸿蒙开发——移动端绘画板APP开发流程
本文介绍了基于Flutter框架开发跨平台移动端绘画板APP的全流程,支持Android、iOS和鸿蒙OS。应用采用MVC架构,具备自由绘制、颜色选择、线条调整、撤销和清空等功能。开发环境配置了Flutter 3.10.0和Dart 3.0.0,通过核心代码实现路径模型、状态管理和画布绘制功能。应用特点包括跨平台兼容性、流畅绘制体验和响应式设计,最终完成从架构设计到发布上线的完整开发周期。
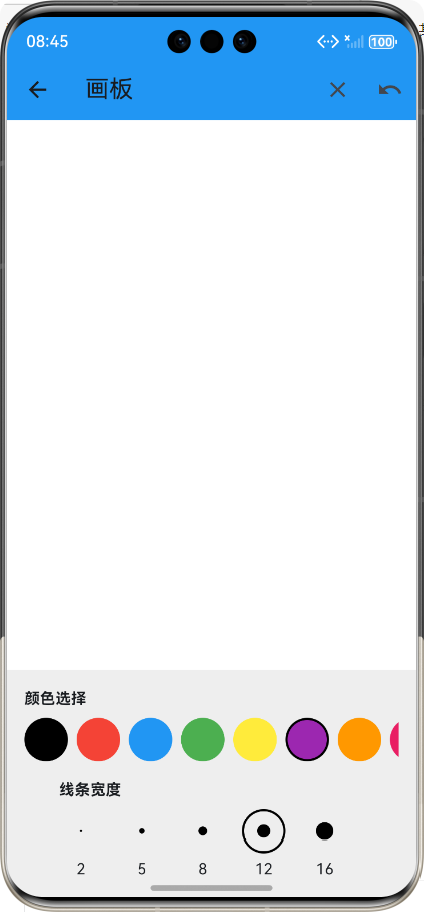
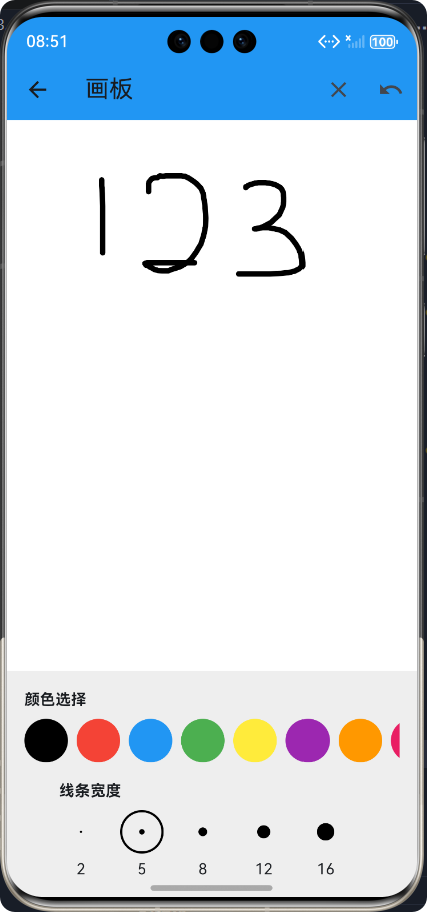
🚀运行效果展示
Flutter框架跨平台鸿蒙开发——移动端绘画板APP开发流程
📝 前言
随着移动应用开发的发展,跨平台开发框架越来越受到开发者的青睐。Flutter作为Google推出的开源UI框架,以其"一次编写,到处运行"的特性,成为跨平台开发的热门选择。而鸿蒙OS作为华为推出的全场景分布式操作系统,也在快速发展。本文将详细介绍如何使用Flutter框架开发一款跨平台的移动端绘画板APP,并适配鸿蒙OS,包括开发流程、核心功能实现、技术难点及解决方案。
🎨 应用介绍
应用概述
本项目是一款基于Flutter框架开发的跨平台移动端绘画板APP,支持在Android、iOS和鸿蒙OS上运行。应用提供了丰富的绘画功能,包括自由绘制、颜色选择、线条宽度调整、清空画布和撤销操作等。
应用特点
- 跨平台兼容:基于Flutter框架开发,支持Android、iOS和鸿蒙OS
- 流畅的绘制体验:实时绘制,无明显延迟
- 丰富的绘画工具:支持多种颜色和线条宽度选择
- 简洁易用的界面:直观的用户界面,易于操作
- 响应式设计:适配不同屏幕尺寸
应用架构
应用采用MVC架构,分离模型、视图和控制器:
- 模型层:负责数据管理,包括绘制路径、颜色和线条宽度等
- 视图层:负责UI渲染,包括画布、颜色选择器和线条宽度选择器等
- 控制层:负责处理用户交互,包括触摸事件、颜色选择和线条宽度调整等
🔧 开发环境搭建
开发工具
- Flutter SDK:3.10.0
- Dart SDK:3.0.0
- Android Studio:2022.3.1
- HarmonyOS DevEco Studio:3.1.0
环境配置
- 安装Flutter SDK和Dart SDK
- 配置Flutter环境变量
- 安装Android Studio和HarmonyOS DevEco Studio
- 配置Flutter插件和HarmonyOS插件
- 创建Flutter项目
📊 开发流程
开发流程总览
详细开发流程
- 项目初始化:创建Flutter项目,配置依赖
- 架构设计:设计应用架构,包括目录结构和组件划分
- 模型层开发:实现绘制路径、颜色和线条宽度等数据模型
- 视图层开发:实现画布、颜色选择器和线条宽度选择器等UI组件
- 控制层开发:实现触摸事件处理、颜色选择和线条宽度调整等逻辑
- 功能测试:测试应用功能,确保正常运行
- 鸿蒙适配:适配鸿蒙OS,确保在鸿蒙设备上正常运行
- 性能优化:优化应用性能,提高绘制流畅度
- 发布上线:打包发布应用
🚀 核心功能实现
1. 绘制路径模型
/// 绘制路径模型类
/// 用于存储单条绘制路径的所有信息
class DrawingPath {
  /// 构造函数
  DrawingPath({
    required this.points,
    required this.color,
    required this.strokeWidth,
  });

  /// 路径上的点列表
  final List<Offset> points;

  /// 绘制颜色
  final Color color;

  /// 线条宽度
  final double strokeWidth;
}
2. 画板状态管理
/// 画板状态模型类
/// 用于管理整个画板的状态
class DrawingBoardState {
  /// 构造函数
  DrawingBoardState() {
    paths = [];
    currentColor = Colors.black;
    currentStrokeWidth = 5.0;
  }

  /// 所有绘制路径
  late List<DrawingPath> paths;

  /// 当前绘制颜色
  late Color currentColor;

  /// 当前线条宽度
  late double currentStrokeWidth;

  /// 当前正在绘制的路径
  DrawingPath? currentPath;
}
3. 画板绘制器
/// 画板绘制器
/// 负责将绘制路径渲染到画布上
class DrawingPainter extends CustomPainter {
/// 构造函数
DrawingPainter(this.paths, this.currentPath);
/// 要绘制的路径列表
final List<DrawingPath> paths;
/// 当前正在绘制的路径
final DrawingPath? currentPath;
void paint(Canvas canvas, Size size) {
// 遍历所有已完成的路径并绘制
for (final path in paths) {
_drawPath(canvas, path);
}
// 绘制当前正在绘制的路径
if (currentPath != null) {
_drawPath(canvas, currentPath!);
}
}
/// 绘制单条路径
void _drawPath(Canvas canvas, DrawingPath path) {
// 创建绘制笔刷
final paint = Paint()
..color = path.color
..strokeWidth = path.strokeWidth
..strokeCap = StrokeCap.round
..strokeJoin = StrokeJoin.round
..style = PaintingStyle.stroke;
// 如果只有一个点,绘制一个圆形
if (path.points.length == 1) {
final point = path.points[0];
canvas.drawCircle(point, path.strokeWidth / 2, paint);
return;
}
// 创建路径对象
final drawPath = Path();
// 移动到路径起点
drawPath.moveTo(path.points[0].dx, path.points[0].dy);
// 连接所有点形成路径
for (int i = 1; i < path.points.length; i++) {
drawPath.lineTo(path.points[i].dx, path.points[i].dy);
}
// 绘制路径
canvas.drawPath(drawPath, paint);
}
bool shouldRepaint(covariant DrawingPainter oldDelegate) {
// 当路径列表或当前路径发生变化时,需要重新绘制
return oldDelegate.paths != paths || oldDelegate.currentPath != currentPath;
}
}
4. 画板主屏幕
/// 画板主屏幕
/// 提供完整的画板功能,包括绘制、颜色选择、线条宽度调整等
class DrawingBoardScreen extends StatefulWidget {
/// 构造函数
const DrawingBoardScreen({super.key});
State<DrawingBoardScreen> createState() => _DrawingBoardScreenState();
}
class _DrawingBoardScreenState extends State<DrawingBoardScreen> {
/// 画板状态
late DrawingBoardState _boardState;
void initState() {
super.initState();
_boardState = DrawingBoardState();
}
Widget build(BuildContext context) {
return Scaffold(
appBar: AppBar(
title: const Text('画板'),
backgroundColor: Colors.blue,
actions: [
// 清空按钮
IconButton(
icon: const Icon(Icons.clear),
onPressed: _clearBoard,
tooltip: '清空画板',
),
// 撤销按钮
IconButton(
icon: const Icon(Icons.undo),
onPressed: _undo,
tooltip: '撤销',
),
],
),
body: Column(
children: [
// 绘制区域
Expanded(
child: _buildDrawingCanvas(),
),
// 工具栏
_buildToolbar(),
],
),
);
}
/// 构建绘制画布
Widget _buildDrawingCanvas() {
return GestureDetector(
// 移除key,简化触摸事件处理
onPanStart: (details) => _onPanStart(details),
onPanUpdate: (details) => _onPanUpdate(details),
onPanEnd: (details) => _onPanEnd(details),
// 添加behavior属性,确保能够捕捉到透明区域的触摸事件
behavior: HitTestBehavior.opaque,
child: Container(
color: Colors.white,
width: double.infinity,
height: double.infinity,
child: CustomPaint(
painter: DrawingPainter(_boardState.paths, _boardState.currentPath),
),
),
);
}
// 其他方法...
}
5. 触摸事件处理
/// 处理触摸开始事件
void _onPanStart(DragStartDetails details) {
  // 直接使用GestureDetector提供的localPosition
  final Offset localPosition = details.localPosition;

  setState(() {
    _boardState.currentPath = DrawingPath(
      points: [localPosition],
      color: _boardState.currentColor,
      strokeWidth: _boardState.currentStrokeWidth,
    );
  });
}

/// 处理触摸移动事件
void _onPanUpdate(DragUpdateDetails details) {
  if (_boardState.currentPath == null) return;

  // 直接使用GestureDetector提供的localPosition
  final Offset localPosition = details.localPosition;

  setState(() {
    _boardState.currentPath!.points.add(localPosition);
  });
}

/// 处理触摸结束事件
void _onPanEnd(DragEndDetails details) {
  if (_boardState.currentPath != null) {
    setState(() {
      _boardState.paths.add(_boardState.currentPath!);
      _boardState.currentPath = null;
    });
  }
}
6. 颜色和线条宽度选择器
/// 颜色选择器工具类
/// 提供常用的颜色选项
class ColorPalette {
  /// 常用颜色列表
  static const List<Color> colors = [
    Colors.black,
    Colors.red,
    Colors.blue,
    Colors.green,
    Colors.yellow,
    Colors.purple,
    Colors.orange,
    Colors.pink,
    Colors.cyan,
    Colors.brown,
  ];
}

/// 线条宽度选择器工具类
/// 提供常用的线条宽度选项
class StrokeWidthPalette {
  /// 常用线条宽度列表
  static const List<double> strokeWidths = [
    2.0,
    5.0,
    8.0,
    12.0,
    16.0,
  ];
}
🔧 鸿蒙适配
适配流程
- 安装鸿蒙OS模拟器:在DevEco Studio中安装鸿蒙OS模拟器
- 配置Flutter鸿蒙适配插件:安装并配置Flutter鸿蒙适配插件
- 修改项目配置:修改项目配置,支持鸿蒙OS
- 构建鸿蒙OS安装包:使用Flutter命令构建鸿蒙OS安装包
- 测试鸿蒙OS适配:在鸿蒙OS模拟器上测试应用
适配注意事项
- 权限配置:根据鸿蒙OS的权限要求,配置相应的权限
- 屏幕适配:适配鸿蒙OS设备的屏幕尺寸
- 性能优化:针对鸿蒙OS进行性能优化
- API兼容:确保使用的API在鸿蒙OS上兼容
🎯 技术难点及解决方案
1. 实时绘制性能优化
问题:在绘制过程中,实时更新UI可能导致性能问题,出现卡顿。
解决方案:
- 使用CustomPainter进行绘制,避免使用大量的Widget
- 合理使用setState,只在必要时更新UI
- 优化绘制逻辑,减少不必要的计算
2. 触摸事件处理
问题:不同平台的触摸事件处理可能存在差异,导致绘制位置不准确。
解决方案:
- 直接使用GestureDetector提供的localPosition,避免坐标转换错误
- 添加HitTestBehavior.opaque属性,确保能够捕捉到触摸事件
- 测试不同平台的触摸事件处理,确保兼容性
3. 鸿蒙OS适配
问题:Flutter应用在鸿蒙OS上运行可能存在兼容性问题。
解决方案:
- 使用最新版本的Flutter和鸿蒙OS适配插件
- 测试应用在鸿蒙OS上的运行情况,及时修复问题
- 遵循鸿蒙OS的设计规范,确保应用在鸿蒙OS上有良好的用户体验
📈 性能优化
1. 绘制优化
- 使用CustomPainter进行绘制,避免使用大量的Widget
- 优化绘制逻辑,减少不必要的计算
- 合理使用shouldRepaint方法,避免不必要的重绘
2. 内存优化
- 及时释放不再使用的资源
- 避免内存泄漏
- 优化数据结构,减少内存占用
3. 响应式设计
- 使用MediaQuery获取屏幕尺寸,适配不同屏幕
- 使用Flex布局,确保UI在不同屏幕尺寸下都能正常显示
- 测试不同屏幕尺寸下的显示效果,确保兼容性
📋 总结
本文详细介绍了如何使用Flutter框架开发一款跨平台的移动端绘画板APP,并适配鸿蒙OS。主要内容包括:
- 应用介绍:介绍了应用的概述、特点和架构
- 开发环境搭建:介绍了开发工具和环境配置
- 开发流程:详细介绍了开发流程,包括项目初始化、架构设计、模型层开发、视图层开发、控制层开发、功能测试、鸿蒙适配和性能优化
- 核心功能实现:详细介绍了绘制路径模型、画板状态管理、画板绘制器、画板主屏幕、触摸事件处理和颜色线条宽度选择器的实现
- 鸿蒙适配:介绍了鸿蒙OS的适配流程和注意事项
- 技术难点及解决方案:介绍了实时绘制性能优化、触摸事件处理和鸿蒙OS适配等技术难点及解决方案
- 性能优化:介绍了绘制优化、内存优化和响应式设计等性能优化方法
- 应用效果:展示了应用的界面和功能演示
📚 参考资料
欢迎加入开源鸿蒙跨平台社区:https://openharmonycrossplatform.csdn.net

讨论HarmonyOS开发技术,专注于API与组件、DevEco Studio、测试、元服务和应用上架分发等。
更多推荐
 16
16 0
0- 0


 已为社区贡献12条内容

所有评论(0)