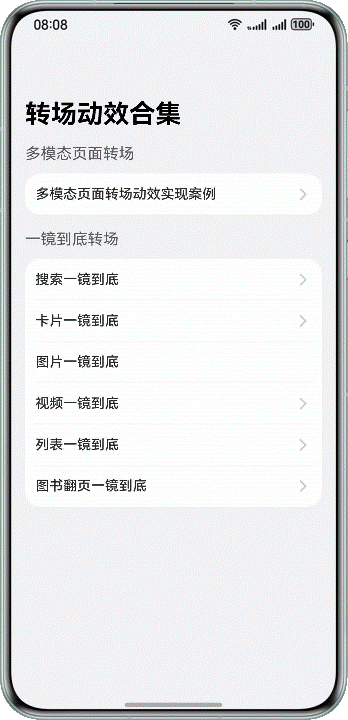
HarmonyOS 一镜到底转场动效实战指南
文章摘要 "一镜到底"转场动画是一种提升用户体验的界面过渡技术,通过元素匹配实现平滑切换效果。文章介绍了两种核心实现方式:共享元素转场(保持焦点元素连续性)和共享容器转场(通过边界属性过渡)。具体提供了三种技术方案:1)NodeController节点迁移法,适合资源密集型组件;2)geometryTransition接口法,系统自动处理简单场景;3)Navigation自定义
一、开场白:啥是"一镜到底"
先说清楚,这玩意儿不是拍电影那种一镜到底,是页面切换时的一种过渡动画效果。
说白了就是:页面 A 有个元素,页面 B 也有个元素(内容相同或相似),切换的时候这俩元素做个位置、大小、形状的匹配过渡,看起来就像元素从一个位置"流动"到另一个位置,而不是突然消失又突然出现。
举个例子,你点击一张小图,大图页面打开。没有一镜到底的话,小图直接消失,大图直接出现,观感很生硬。有一镜到底的话,小图和大图之间做个平滑过渡,感觉像小图慢慢放大变成了大图,整个切换过程就丝滑了。


左边是没加动效,右边是加了动效,你一看就明白哪个体验更好。
这玩意儿有啥好处?
- 提升用户操作任务的效率(切换过程有视觉引导)
- 增强视觉流畅感(过渡丝滑不生硬)
- 提升动效品质感(看起来高级)
所以华为说这是转场设计中重点推荐的技法,不是吹的,确实好用。
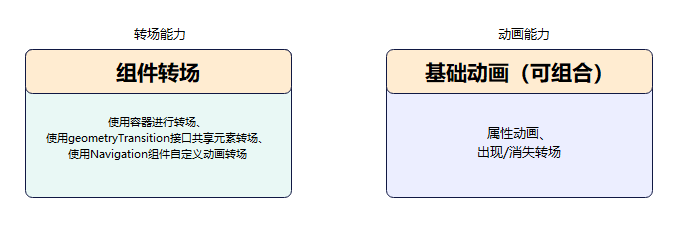
二、两种核心玩法
一镜到底分两大类:共享元素转场和共享容器转场。
共享元素转场
共享元素是啥?就是转场前后持续存在的界面元素。比如搜索框,首页有个搜索框,详情页也有个搜索框,这俩就是共享元素。
上面这个 GIF,搜索框就是共享元素,转场过程中它持续存在,你一眼就能看出这是同个搜索框在动。
共享元素的特点:转场发生后希望用户关注到的焦点元素,增强转场的连续感。
共享容器转场
共享容器是啥?当一组元素在过渡时有明确的边界,就用容器让转换过程有连续感。容器通过大小、位置、圆角等属性做补间过渡,容器内的元素通过淡入淡出或共享元素手法过渡。
三、三大实现方式
一镜到底的实现需要转场能力和动画能力组合使用。华为提供了三种实现方式,各有优劣,看你场景选哪个。
方式一:用容器做节点迁移(NodeController)
NodeContainer 是个占位容器组件,用于自定义节点和节点树的显示复用。NodeController 提供一系列生命周期回调,通过 makeNode() 回调返回 FrameNode 节点树的根节点,把 FrameNode 节点树挂载到对应的 NodeContainer 下。
举个例子,卡片分折叠态和展开态。你把折叠态和展开态分成两个 NodeContainer 来控制。NodeController 触发 onRemove() 让 NodeContainer1 下树,调用 update() 更新卡片展开状态,节点迁移到 NodeContainer2,同时触发动画。
Sign%3DFA56A4D5FEDFBEA9AB01F4D47198A31D32E37382C6D517B5C13C85AF51CBEB5B&pos_id=img-Ily5X10P-1776220172625)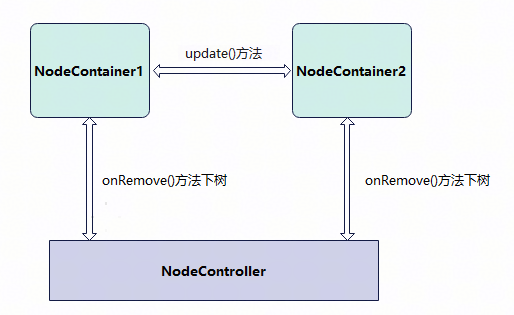
这方式的特点:
- 适合新建对象开销大的场景(比如视频直播组件点击转全屏)
- 开始迁移时要根据前后布局位置大小对组件添加位移缩放,确保迁移开始时组件能对齐初始布局
- 之后添加动画把位移缩放复位,实现一镜到底过渡
坑点:迁移开始时要算好位置,不然视觉上会有跳变。
方式二:用 geometryTransition() 共享元素转场
geometryTransition() 接口用于组件内隐式共享元素转场,在视图状态切换过程中提供丝滑的上下文继承过渡体验。
使用方式:对需要添加一镜到底动效的两个组件用 geometryTransition() 绑定同一个 id。其中一个组件消失、另一个组件创建出现时,系统会自动为二者添加一镜到底动效。
这方式的特点:
- 适合创建新节点开销小的场景
- 系统侧自动处理,省心
- 最适合两个不同对象之间完成一镜到底
坑点:别把 id 搞混了,id 不一致就没效果。
方式三:用 Navigation 自定义动画转场
Navigation 通过 customNavContentTransition() 事件提供自定义转场动画能力。三步走:
- 构建一个自定义转场动画工具类 CustomNavigationUtils,用 Map 管理各个页面的自定义动画对象 CustomTransition,页面创建时注册,销毁时解注册。
- 实现一个转场协议对象 NavigationAnimatedTransition:
- timeout 属性表示转场结束超时时间(默认 1000ms)
- transition 属性为自定义转场动画方法,系统会在转场开始时调用
- onTransitionEnd 为转场结束时的回调
- 调用 customNavContentTransition() 方法,返回实现的转场协议对象。返回 undefined 就用系统默认转场。
这方式的特点:
- 适合页面切换转场(如标题页和详情页之间)
- 可控性强,想怎么搞怎么搞
- 需要自己写动画逻辑
坑点:动画逻辑写错了容易出问题,要仔细。
四、实战案例:元素转场
图片双指放大转场
场景:图片用双指放大转场显示图片详情页。

实现方式:属性动画 + 节点迁移,通过手势捏合控制节点上下树。
关键代码:
// 小图模式和大图模式分别为两个页面,通过监听 expand 值来切换
@StorageProp('expand') @Watch('goToPageTwo') num1: number = 0;

aboutToAppear(): void {
  if (!getMyNode()) {
    createMyNode(this.getUIContext(), false);
  }
  this.imageGalleryNodeController = getMyNode();
}
创建 NodeController 节点类:
export class ImageGalleryNodeController extends NodeController {
  private rootNode: BuilderNode<[Params]> | null = null;
  private wrapBuilder: WrappedBuilder<[Params]> = wrapBuilder(ImageGalleryBuilder);
  private isExpand: boolean = false;

  constructor(isExpand: boolean) {
    super();
    this.isExpand = isExpand;
  }

  makeNode(uiContext: UIContext): FrameNode | null {
    if (this.rootNode === null) {
      this.rootNode = new BuilderNode(uiContext);
      this.rootNode.build(this.wrapBuilder, { isExpand: this.isExpand });
    }
    return this.rootNode.getFrameNode();
  }

  update(isExpand: boolean) {
    if (this.rootNode !== null) {
      this.rootNode.update({ isExpand });
    }
  }
}
手势处理:
PinchGesture()
  .onActionStart((event: GestureEvent) => {
    this.offsetY = getTranslateToFullScreen(this.getUIContext(), 'swiper')?.offsetY || 0
    this.imageHeight = this.getUIContext().vp2px(Number(event.target.area.height))
    this.imageWidth = this.getUIContext().vp2px(Number(event.target.area.width))
    this.status = Status.PINCHING;
    this.updateCenter([this.getUIContext().vp2px(event.pinchCenterX),
      this.getUIContext().vp2px(event.pinchCenterY)])
    this.updateTranslateAccordingToCenter();
    this.startGestureScale = this.imageScale;
    this.gestureCount++;
  })
  .onActionUpdate((event: GestureEvent) => {
    this.imageScale = this.startGestureScale * event.scale;
    if (!this.isExpand && this.imageScale >= 1) {
      this.onExpand();
    }
    this.updateExtremeOffset();
  })
查看大图转场
场景:图片在九宫格中显示,点击查看大图,支持手势下拉返回。
实现方式:geometryTransition() + 位移缩放。
首页通过网格布局实现三行三列图片布局:
NavDestination() {
  Column() {
    Grid(this.scroller) {
      ForEach(this.data, (item: number) => {
        GridItem() {
          if (this.clickedIndex !== item || (this.isFirstPageShow)) {
            Image($r(`app.media.img_${item % 9}`))
              .width('100%')
              .height('100%')
              .objectFit(ImageFit.Cover)
              .id('item2_' + item)
              .onClick(() => {
                this.onItemClick(item);
              })
              .geometryTransition(this.clickedIndex === item ? 'app.media.img_' + item.toString() : '')
              .transition(TransitionEffect.opacity(0.99))
          }
        }
        .width(this.getUIContext().px2vp(381))
        .height(this.getUIContext().px2vp(381))
      }, (item: number) => item + '')
    }
    .rowsTemplate('1fr 1fr 1fr')
    .columnsTemplate('1fr 1fr 1fr')
    .columnsGap(2)
    .rowsGap(2)
  }
}
点击后通过属性动画切换:
onItemClick(index: number): void {
  let param: Record<string, Object> = {};
  this.needFollow = false;
  this.clickedIndex = index;
  param['selectedIndex'] = this.clickedIndex;

  this.getUIContext().animateTo({
    duration: 250,
    curve: Curve.EaseIn,
  }, () => {
    this.pageInfos.pushPath({ name: 'ShowLargeImageWithGesturePageTwo', param: param }, false);
    this.isFirstPageShow = false;
  })
}
注意:pushPath 时把动画选项设置成 false,避免触发 Navigation 的默认转场动画。
半模态转场
场景:图片从页面向半模态弹窗中转场显示。
实现方式:属性动画 + 节点迁移,半模态 SheetOptions 的 mode 设置为 SheetMode.EMBEDDED。
关键点:EMBEDDED 模式下新起的页面可以覆盖在半模态弹窗上,页面返回后半模态依旧存在,内容不丢失。
首页图片绑定半模态弹窗:
NavDestination() {
  Column() {
    Image($r('app.media.flower'))
      .opacity(this.opacityDegree)
      .width('90%')
      .id('origin')
      .enabled(this.isEnabled)
      .onClick(() => {
        this.originInfo = this.calculateData('origin');
        this.scaleValue = this.originInfo.scale;
        this.translateX = this.originInfo.translateX;
        this.translateY = this.originInfo.translateY;
        this.clipWidth = this.originInfo.clipWidth;
        this.clipHeight = this.originInfo.clipHeight;
        this.radius = 0;
        this.opacityDegree = 0;
        this.isShowSheet = true;
        this.isShowOverlay = true;
        // 设置图片为非交互中断抵抗
        this.isEnabled = false;
      })
  }
  .bindSheet(this.isShowSheet, this.mySheet(), {
    mode: SheetMode.EMBEDDED,
    height: this.bindSheetHeight,
    onDisappear: () => {
      // 确保半模态消失时状态正确
      this.isShowImage = false;
      this.isShowSheet = false;
      // 设置动画结束时触发状态的镜像
      this.isAnimating = false;
      // 图片恢复可交互
      this.isEnabled = true;
    }
  })
  .bindContentCover(this.isShowOverlay, this.overlayNode(), {
    // 模态页面设置为无过渡
    transition: TransitionEffect.IDENTITY
  })
}
点击图片后节点迁移到半模态,半模态布局完成后触发 onLayoutComplete(),获取初始位置和半模态位置,通过自定义显示动画完成一镜到底:
aboutToAppear(): void {
  // 设置半模态上图片布局完成回调
  let onLayoutComplete: () => void = (): void => {
    // 获取目标图片布局完成时的布局信息
    this.targetInfo = this.calculateData('target');
    // 只有半模态正确布局且此时没有动画时才触发镜像
    if (this.targetInfo.scale !== 0 && this.targetInfo.clipWidth !== 0 && this.targetInfo.clipHeight !== 0 &&
      !this.isAnimating) {
      this.isAnimating = true;
      // 模态页面一镜到底属性动画
      this.getUIContext().animateTo({
        duration: 1000,
        curve: Curve.Friction,
        onFinish: () => {
          // 自定义节点在 overlay 页面下树
          this.isShowOverlay = false;
          // 自定义节点在半模态上树,完成节点迁移
          this.isShowImage = true;
        }
      }, () => {
        this.scaleValue = AppStorage.get('currentBreakpoint') === 'md' ? 0.382 : this.targetInfo.scale;
        this.translateX = AppStorage.get('currentBreakpoint') === 'md' ? 93.5 : this.targetInfo.translateX;
        this.clipWidth = AppStorage.get('currentBreakpoint') === 'md' ? 525 : this.targetInfo.clipWidth;
        this.clipHeight = AppStorage.get('currentBreakpoint') === 'md' ? 785 : this.targetInfo.clipHeight;
        // 固定因半模态高度和缩放引起的高度差异
        this.translateY = this.targetInfo.translateY +
          (this.getUIContext().px2vp(WindowUtils.windowHeight_px) - this.bindSheetHeight -
          this.getUIContext().px2vp(WindowUtils.navigationIndicatorHeight_px) -
          this.getUIContext().px2vp(WindowUtils.topAvoidAreaHeight_px)) -
          (AppStorage.get('currentBreakpoint') === 'md' ? 134.3 : 0);
        // 固定因缩放引起圆角差异
        this.radius = this.sheetRadius / this.scaleValue;
      })
      // 图片从透明到可见动画
      this.getUIContext().animateTo({
        duration: 2000,
        curve: Curve.Friction,
      }, () => {
        this.opacityDegree = 1;
      })
    }
  };
  // 开启布局监听
  this.listener.on('layout', onLayoutComplete);
}
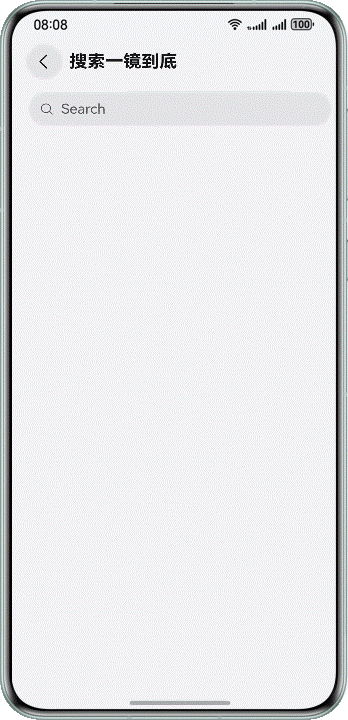
图标(搜索框)展开一镜到底
场景:搜索框点击后转场到搜索结果页面。

实现方式:geometryTransition() + 显示动画。
搜索框首页添加 geometryTransition 属性:
// 搜索动画
private showSearchPage(): void {
  this.transitionEffect = TransitionEffect.OPACITY;
  this.getUIContext().animateTo({
    curve: curves.interpolatingSpring(0, 1, 342, 38)
  }, () => {
    this.pageInfos.pushPath({ name: 'SearchLongTakeTransitionPageTwo' }, false);
  })
}
搜索组件绑定 geometryTransition:
Search({ placeholder: 'Search' })
  .height(40)
  .placeholderColor($r('sys.color.mask_secondary'))
  .width('100%')
  // 设置几何转场
  .geometryTransition('SEARCH_ONE_SHOT_DEMO_TRANSITION_ID', { follow: true })
  .backgroundColor('#0D000000')
  .defaultFocus(false)
  .focusOnTouch(false)
  .focusable(false)
搜索页面中的 Search 组件也添加 geometryTransition,绑定同一个 id。
五、实战案例:容器转场
卡片展开一镜到底
场景:瀑布流或列表流布局中,点击卡片平滑转场到详情页面。
实现方式:Navigation 自定义动画 + 位移缩放,结合 componentSnapshot() 截图避免跳转页面白屏。
卡片列表页点击时截图:
private onColumnClicked(indexValue: string): void {
  let param: Record<string, Object> = {};
  let clickedIndex = parseInt(indexValue);
  param['indexValue'] = clickedIndex;
  this.clickedIndex = clickedIndex;
  // 点击卡片获取对应截图并保存
  this.getUIContext()
    .getComponentSnapshot()
    .get('FlowItem_' + indexValue, (error: BusinessError, pixelMap: image.PixelMap) => {
      if (error) {
        hilog.error(0x0000, 'CardLongTakePageOne',
          `componentSnapshot.get error, reason: Code is ${error.code}, message is ${error.message}`);
        // 截图失败走默认左右转场
        this.pageInfos.pushPath({ name: 'CardLongTakeTransitionPageTwo', param: param });
        return;
      } else {
        hilog.info(0x0000, 'CardLongTakePageOne', 'componentSnapshot.get success!');
        // 截图成功走自定义一镜到底转场
        param['clickedComponentId'] = CardUtil.getFlowItemIdByIndex(indexValue);
        param['doDefaultTransition'] = () => {
          this.doFinishTransition();
        };
        SnapShotImage.pixelMap = pixelMap;
        this.pageInfos.pushPath({ name: 'CardLongTakeTransitionPageTwo', param: param });
        this.dataSource.getData(this.clickedIndex).isVisible = Visibility.Hidden;
      }
    })
}
详情页通过 Navigation 自定义动画实现一镜到底:
// 尝试注册自定义转场动画,异常时恢复页面属性为正常状态
tryRegisterCustomTransition(clickedCardId: string): void {
  try {
    // 先初始化一些转场信息
    this.longTakeAnimationProperties.init(clickedCardId, this.prePageDoFinishTransition);
    CustomTransition.getInstance().registerNavParam(this.pageId, 2000,
      (transitionProxy: NavigationTransitionProxy) => {
        this.longTakeAnimationProperties.doAnimation(transitionProxy);
      });
    hilog.info(0x0000, 'CardLongTakePageTwo', 'register successes');
  } catch (error) {
    let err = error as BusinessError;
    hilog.error(0x0000, 'CardLongTakePageTwo', `this is error:code=${err.code}, message=${err.message}`);
    this.longTakeAnimationProperties.setFinalStatus();
  }
}

build() {
  NavDestination() {
    // Stack 要设置 alignContent 为 TopStart,不然截图和内容会随高度变化重新定位
    Stack({ alignContent: Alignment.TopStart }) {
      Stack({ alignContent: Alignment.TopStart }) {
        // 用于显示上一页点击卡片的截图
        Image(this.snapShotImage)
          .size(this.longTakeAnimationProperties.snapShotSize)
          .objectFit(ImageFit.Auto)
          .opacity(this.longTakeAnimationProperties.snapShotOpacity)
          .syncLoad(true)
          .position({
            x: this.longTakeAnimationProperties.snapShotPositionX,
            y: this.longTakeAnimationProperties.snapShotPositionY
          })

        // 弹出页原本展示内容,加透明度控制动画期间的显示
        DetailPageContent({
          indexValue: this.indexValue,
          pageInfos: this.pageInfos,
          onBackPressed: () => {
            this.onBackPressed()
          },
          SharedComponentId: CardUtil.getPostPageImageId(this.clickedCardId)
        })
          .size({
            width: '100%',
            height: '100%'
          })
          .opacity(this.longTakeAnimationProperties.postPageOpacity)
      }
      .width('100%')
      .position({
        x: this.longTakeAnimationProperties.positionXValue,
        y: this.longTakeAnimationProperties.positionYValue
      })
    }
    .scale({
      x: this.longTakeAnimationProperties.scaleValue,
      y: this.longTakeAnimationProperties.scaleValue
    })
    .translate({
      x: this.longTakeAnimationProperties.translateX,
      y: this.longTakeAnimationProperties.translateY
    })
    .width(this.longTakeAnimationProperties.clipWidth)
    .height(this.longTakeAnimationProperties.clipHeight)
    .borderRadius(this.longTakeAnimationProperties.radius)
    .expandSafeArea([SafeAreaType.SYSTEM])
    .backgroundColor($r('app.color.water_flow_background_color'))
    .clip(true)
  }
  .backgroundColor(this.longTakeAnimationProperties.navDestinationBgColor)
  .hideTitleBar(true)
  .onReady((context: NavDestinationContext) => {
    this.pageInfos = context.pathStack;
    let param = context.pathInfo?.param as Record<string, Object>;
    let clickedCardId = param['clickedComponentId'] as string;
    this.indexValue = param['indexValue'] as number;
    this.prePageDoFinishTransition = param['doDefaultTransition'] as () => void;
    if (context.navDestinationId && clickedCardId) {
      this.pageId = context.navDestinationId;
      this.clickedCardId = clickedCardId;
      this.tryRegisterCustomTransition(clickedCardId);
    }
  })
  .onDisAppear(() => {
    CustomTransition.getInstance().unRegisterNavParam(this.pageId);
  })
}
这里套了两层 Stack,因为要放截图和原来的详情页内容。缩放、translate 设置在 Stack 这层实现边界动画,透明度设置在截图上实现内容过渡。
列表展开一镜到底
场景:列表项点击展开到详情页。
实现方式:geometryTransition() + 显示动画。
列表项设置 geometryTransition:
@Component
export struct MyButton {
  @Prop listContent: ListContent;
  @Prop indexValue: string;
  @State scaleValue: number = 1;

  build() {
    Column({ space: 10 }) {
      Row({ space: 5 }) {
        Line()
          .startPoint([0, 0])
          .endPoint([0, 20])
          .strokeWidth(5)
          .stroke(Color.Yellow)
          .strokeLineCap(LineCapStyle.Round)
        Text(this.listContent.title)
          .fontWeight(FontWeight.Medium)
          .fontSize(16)
      }

      Text(this.listContent.content)
        .fontColor(Color.Grey)
        .maxLines(1)
        .textOverflow({ overflow: TextOverflow.Ellipsis })
        .fontSize(14)
    }
    .alignItems(HorizontalAlign.Start)
    .padding({
      left: 20,
      right: 20,
      top: 20,
      bottom: 20
    })
    .width('91%')
    .backgroundColor(Color.White)
    .clip(true)
    .borderRadius(20)
    .scale({
      x: this.scaleValue,
      y: this.scaleValue
    })
    .geometryTransition(this.indexValue, { follow: true })
    .onTouch((event?: TouchEvent) => {
      this.onTouchProcess(event);
    })
    .onClick(() => {
      this.onButtonClicked?.(this.indexValue);
    })
  }

  onButtonClicked: (index: string) => void = (_index: string) => {
  };

  private onTouchProcess(event?: TouchEvent): void {
    if (!event) {
      return;
    }
    if (event.type === TouchType.Down) {
      this.getUIContext().animateTo({ curve: curves.interpolatingSpring(0, 1, 350, 35) }, () => {
        this.scaleValue = 0.95;
      })
    } else if (event.type === TouchType.Up) {
      this.getUIContext().animateTo({ curve: curves.interpolatingSpring(0, 1, 350, 35) }, () => {
        this.scaleValue = 1;
      })
    } else if (event.type === TouchType.Cancel) {
      this.getUIContext().animateTo({ curve: curves.interpolatingSpring(0, 1, 350, 35) }, () => {
        this.scaleValue = 1;
      })
    }
  }
}
详情页容器也设置 geometryTransition,绑定同一个 id:
NavDestination() {
  Column({ space: 20 }) {
    Text(this.param.title)
      .fontSize(30)
      .fontWeight(FontWeight.Medium)
    Text(this.param.content)
      .fontColor($r('sys.color.password_icon_focus_color'))
      .lineHeight(28)
      .fontSize(16)
  }
  .alignItems(HorizontalAlign.Start)
  .clip(true)
  .size({
    width: '100%',
    height: '100%'
  })
  .geometryTransition(this.param.geometryId)
}
.padding({
  top: 46,
  left: 16,
  right: 16
})
.backgroundColor(Constants.DEFAULT_BG_COLOR)
.transition(TransitionEffect.OPACITY)
.hideTitleBar(true)
.backgroundColor(Color.Transparent)
.onReady((context: NavDestinationContext) => {
  this.pageInfos = context.pathStack;
  this.param = (context.pathInfo.param as ListDetailPageExtraInfo);
})
.onBackPressed(() => {
  this.getUIContext().animateTo({ curve: curves.interpolatingSpring(0, 1, 342, 38) }, () => {
    this.pageInfos.pop(false);
  })
  return true;
})
图书翻页展开一镜到底
场景:阅读类应用中,点击"图书"图标后模拟翻页展开效果,转场到书本内容页面。
实现方式:Navigation 自定义动画 + rotate 旋转效果。
书架页面布局:
build() {
  NavDestination() {
    Scroll() {
      Column({ space: 12 }) {
        // 一镜到底返回第一位
        Grid() {
          ForEach(this.dataSource, (item: BookItem, index: number) => {
            GridItem() {
              Image($r(item.coverImageUrl))
                .id(item.id)
                .width('100%')
                .onClick(() => {
                  this.onColumnClicked(item.id, item.coverImageUrl, this.dataSource[0].id, () => {
                    this.dataSource.sort((a, b) => b.timestamp - a.timestamp);
                  })
                  this.dataSource[index].timestamp = Number(new Date());
                })
            }
            .width(this.columnWidth)
          }, (item: BookItem) => JSON.stringify(item))
        }
        .padding({
          left: 12,
          right: 12,
          top: 12
        })
        .columnsTemplate(this.columnType)
        .columnsGap(10)
        .rowsGap(10)

        // 一镜到底返回原位
        Column({ space: 12 }) {
          Text('Recently read')
            .fontSize(16)
            .fontWeight(FontWeight.Medium)
            .fontColor(Color.Gray)
          Swiper(this.swiperController) {
            ForEach(this.recentData, (item: BookItem) => {
              GridItem() {
                Image($r(item.coverImageUrl))
                  .id(item.id)
                  .onClick(() => {
                    this.onColumnClicked(item.id, item.coverImageUrl);
                  })
              }
            }, (item: BookItem) => JSON.stringify(item))
          }
          .indicator(false)
          .displayCount(3)
          .loop(false)
          .itemSpace(10)
        }
        .padding({
          left: 12,
          right: 12
        })
        .alignItems(HorizontalAlign.Start)
      }
    }
  }
}

private onColumnClicked(bookId: string, bookCoverUrl: string, toBookId?: string, prePageCallback?: () => void): void {
  try {
    CustomTransition.getInstance().unRegisterNavParam(this.pageId);
    const fromCardItemInfo: RectInfoInPx =
      ComponentAttrUtils.getRectInfoById(WindowUtils.window.getUIContext(), bookId);
    let param: Record<string, Object> = {};
    param['fromCardItemInfo'] = fromCardItemInfo;
    param['bookCoverUrl'] = bookCoverUrl;
    if (toBookId) {
      const toCardItemInfo: RectInfoInPx =
        ComponentAttrUtils.getRectInfoById(WindowUtils.window.getUIContext(), toBookId);
      param['toCardItemInfo'] = toCardItemInfo;
    }
    if (prePageCallback) {
      param['prePageCallback'] = prePageCallback;
    }
    this.pageInfos.pushPath({ name: 'BookFlipLongTakeTransitionPageTwo', param: param });
  } catch (err) {
    let error = err as BusinessError;
    hilog.error(0x0000, 'BookFlipLongTakeTransitionPageOne',
      `onColumnClicked failed. error code=${error.code}, message=${error.message}`);
  }
}
详情页用 rotate 实现翻页效果:
NavDestination() {
  Stack() {
    Column() {
      Text($r('app.string.DetailPage_text'))
        .fontColor($r('sys.color.password_icon_focus_color'))
        .lineHeight(28)
        .fontSize(16)
    }
    .width(AppStorage.get('currentBreakpoint') === 'md' ? '75%' : '100%')
    .height('100%')
    .alignItems(HorizontalAlign.Start)
    .padding({
      left: 16,
      right: 16,
      top: 46
    })

    if (!this.doDefaultTransition) {
      Image($r(this.bookCoverUrl))
        .objectFit(ImageFit.Cover)
        .syncLoad(true)
        .rotate({
          x: 0,
          y: 1,
          z: 0,
          angle: this.bookFlipLongTakeTransitionProperties.coverRotateAngle,
          centerX: 0,
          centerY: '50%'
        })
        .scale({
          x: this.bookFlipLongTakeTransitionProperties.coverScale,
          centerX: 0,
          centerY: '50%'
        })
    }
  }
  .scale({
    x: this.bookFlipLongTakeTransitionProperties.scaleValue,
    y: this.bookFlipLongTakeTransitionProperties.scaleValue
  })
  .translate({
    x: this.bookFlipLongTakeTransitionProperties.translateX,
    y: this.bookFlipLongTakeTransitionProperties.translateY
  })
  .width(this.bookFlipLongTakeTransitionProperties.clipWidth)
  .height(this.bookFlipLongTakeTransitionProperties.clipHeight)
  .backgroundColor('#DEDFDF')
}
.backgroundColor(this.bookFlipLongTakeTransitionProperties.navDestinationBgColor)
.hideTitleBar(true)
.onReady((context: NavDestinationContext) => {
  this.pageInfos = context.pathStack;
  let param = context.pathInfo?.param as Record<string, Object>;
  this.bookCoverUrl = param['bookCoverUrl'] as string;
  this.fromCardItemInfo = param['fromCardItemInfo'] as RectInfoInPx;
  this.toCardItemInfo = (param['toCardItemInfo'] || param['fromCardItemInfo']) as RectInfoInPx;
  this.prePageCallback = param['prePageCallback'] as () => void;
  if (context.navDestinationId) {
    this.pageId = context.navDestinationId;
  }
  CustomTransition.getInstance()
    .registerNavParam(this.pageId, 500, (transitionProxy: NavigationTransitionProxy) => {
      this.bookFlipLongTakeTransitionProperties.doAnimation(transitionProxy, this.fromCardItemInfo,
        this.toCardItemInfo);
    }, () => {
      this.bookFlipLongTakeTransitionProperties.onInteractiveFinish();
    }, () => {
      this.bookFlipLongTakeTransitionProperties.onInteractive(
        this.fromCardItemInfo, this.toCardItemInfo);
    });
})
.onDisAppear(() => {
  CustomTransition.getInstance().unRegisterNavParam(this.pageId);
})
关键点:rotate 属性的 centerX 设置为 0,centerY 设置为 ‘50%’,这样翻页效果就像书从左边缘翻开一样。
视频展开一镜到底
场景:视频组件从一个页面向目标页面转场,转场过程中视频需要持续播放。
实现方式:Navigation 自定义动画 + NodeController 节点迁移。
创建 NodeController:
export class MyNodeController extends NodeController {
  // ...
}
视频首页布局:
NavDestination() {
  WaterFlow() {
    LazyForEach(this.dataSource, (_: CardAttr, index: number) => {
      FlowItem() {
        VideoCardComponent({
          isPlaying: false,
          index,
          onColumnClicked: (prePageCallback) => {
            this.onColumnClicked(`xComponent_${index}`, prePageCallback)
          }
        })
      }
      .width('100%')
      .borderRadius(10)
      .clip(true)
      .id('FlowItem_' + index.toString())
    }, (item: string) => item)
  }
  .edgeEffect(EdgeEffect.Spring)
  .onScrollIndex((first: number) => {
    this.scrollFirstIndex = first;
  })
  .padding(12)
  .columnsTemplate(this.columnType)
  .columnsGap(12)
  .rowsGap(10)
  .width('100%')
  .height('100%')
}
.backgroundColor(Constants.DEFAULT_BG_COLOR)
.title(getResourceString(this.getUIContext(), $r('app.string.video_title'), this))
.onReady((context: NavDestinationContext) => {
  this.pageInfos = context.pathStack;
  if (context.navDestinationId) {
    this.pageId = context.navDestinationId;
  }
})
.onDisAppear(() => {
  CustomTransition.getInstance().unRegisterNavParam(this.pageId);
})
这场景的关键:视频节点迁移过程中要保持播放,用 NodeController 把视频组件从首页迁移到播放页,转场过程视频不中断。
六、避坑指南
坑一:节点迁移时位置算不对
用 NodeController 做节点迁移时,迁移开始时要算好前后布局的位置大小,给组件添加位移缩放,确保迁移开始时组件能对齐初始布局。
不然的话,视觉上会有跳变,一镜到底效果直接毁掉。
咋解决:迁移前先获取目标位置信息,计算好 translate 和 scale,动画开始时先设置这些属性,然后再动画复位。
坑二:geometryTransition id 不一致
geometryTransition 的核心是两个组件绑定同一个 id。id 不一致就没效果,甚至可能出错。
咋解决:id 值要全局唯一且前后一致。建议用内容相关的值作为 id,比如图片的 url 或列表项的 index。
坑三:Navigation 转场动画冲突
用 geometryTransition 或自定义转场时,要禁用 Navigation 的默认转场动画。
咋解决:pushPath 时把动画选项设置成 false,或者在 customNavContentTransition 里返回自定义协议对象。
坑四:动画参数选不对
一镜到底的效果好不好,很大程度取决于动画曲线和时长。
我踩过的坑:
- 时长太短(比如 100ms),转场太快,看不出一镜到底效果
- 时长太长(比如 2000ms),用户等得心烦
- 曲线选不对,效果生硬
咋解决:
- 时长推荐 250-500ms
- 曲线推荐用 interpolatingSpring 或 Curve.Friction,效果比较自然
- 如果有手势交互,时长要配合手势速度动态调整
坑五:截图时机不对
卡片展开一镜到底需要截图,截图时机不对会导致截图内容错误。
咋解决:点击后先截图,截图成功再 pushPath。截图失败就走默认转场,别硬撑。
坑六:手势返回处理不当
一镜到底支持手势返回时,要处理好手势状态和动画状态。
咋解决:
- 手势开始时禁用其他交互
- 手势过程中动态计算位置
- 手势结束时根据速度决定是完成转场还是取消转场
- 转场完成后恢复交互状态
七、总结
一镜到底转场动效是 HarmonyOS 转场设计里的重点推荐技法。实现方式有三种:
- NodeController 节点迁移:适合视频等大对象场景,迁移时要算好位置
- geometryTransition 共享元素转场:适合小对象场景,系统自动处理,省心
- Navigation 自定义动画:适合页面切换场景,可控性强,但要自己写动画逻辑
核心记住几点:
- 元素转场用 geometryTransition
- 容器转场用自定义动画或节点迁移
- 动画时长和曲线要选对
- 手势交互要处理好状态
- id 绑定要一致
最后说一句:一镜到底这玩意儿,用好了体验丝滑,用不好就是炫技。别为了炫而炫,要根据场景选合适的方式,用户体验才是第一位的。

讨论HarmonyOS开发技术,专注于API与组件、DevEco Studio、测试、元服务和应用上架分发等。
更多推荐
 8
8 0
0- 0


 已为社区贡献122条内容

所有评论(0)