HarmonyOS 照片浏览器手势交互实现:打造流畅的滑动体验
在移动应用中,照片浏览是最常见的场景之一。用户期望通过直观的手势完成浏览、筛选和删除操作。上下滑动切换照片左右滑动删除照片拖拽动画实时跟手撤回机制误删恢复智能背景色自适应照片主色调这个照片浏览器组件的设计有几个值得借鉴的地方:✅分层架构: 容器层管理状态,交互层处理手势,职责清晰✅软删除机制: 标记删除 + 延迟提交,支持撤回和二次确认✅响应式动画@Trace装饰器 + 独立动画属性,实现流畅跟手
前言
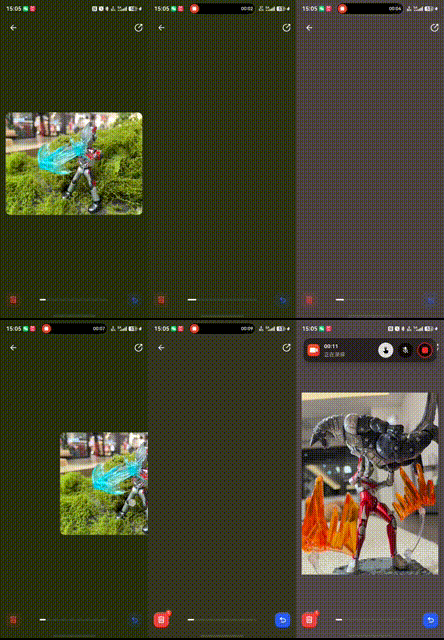
在移动应用中,照片浏览是最常见的场景之一。用户期望通过直观的手势完成浏览、筛选和删除操作。本文将深入解析一个基于 HarmonyOS ArkUI 实现的照片浏览器组件,它支持:
- 上下滑动切换照片
- 左右滑动删除照片
- 拖拽动画实时跟手
- 撤回机制误删恢复
- 智能背景色自适应照片主色调
一、架构设计
1.1 组件分层
整个照片浏览器采用分层架构:
PhotoBrowserPage (容器层)
├── 状态管理:照片列表、删除历史、UI状态
├── 业务逻辑:删除、撤回、导航
└── PhotoBrowserComponent (交互层)
    ├── 手势识别:Pan/Swipe手势
    ├── 动画驱动:位置/缩放/透明度
    └── 事件回调:删除/切换/到达末尾
容器层负责数据管理和业务流程,交互层专注于手势识别和动画表现,职责清晰。
1.2 核心数据模型
照片数据模型 PhotoItem 是整个交互系统的基础:
@ObservedV2
export class PhotoItem {
  uri: string;
  id: number;
  displayName: string = '';
  width: number = 0;
  height: number = 0;

  // 核心动画属性
  @Trace public offsetX: number = 0;      // X轴偏移(左右滑动)
  @Trace public offsetY: number = 0;      // Y轴偏移(上下滑动)
  @Trace public opacitX: number = 1;      // 透明度
  @Trace public positionX: number = 0;    // 位置X
  @Trace public positionY: number = 0;    // 位置Y
  @Trace public sizeRatio: number = 1;    // 缩放比例
  @Trace public rotation: number = 0;     // 旋转角度
  @Trace public isDragging: boolean = false;
  @Trace public dragScale: number = 1;    // 拖拽缩放
  @Trace public dragOpacity: number = 1;  // 拖拽透明度
  @Trace public swipeOffset: number = 0;  // 滑动偏移

  // 业务属性
  isDeleted: boolean = false;
  isCollected: boolean = false;
  isMovingPhoto: boolean = false;
}
关键设计点:
- @Trace 装饰器: 标记需要响应式更新的属性,手势改变这些值时 UI 自动刷新
- 分离动画属性:
offsetX/Y、positionX/Y、rotation等独立控制,便于组合变换 - 初始化策略: 构造函数中根据
id预设初始位置,实现卡片堆叠效果
二、手势交互实现
2.1 初始化布局策略
在构造函数中,根据照片索引预设初始位置,形成卡片堆叠效果:
constructor(uri: string, id: number) {
  this.uri = uri;
  this.id = id;

  if (this.id <= 2) {
    // 前3张卡片:可见堆叠
    this.offsetX = 50 * this.id;              // 水平错开
    this.positionX = this.offsetX;
    this.opacitX = 1 - 0.3 * Math.abs(id - 1); // 中间最亮
    this.sizeRatio = 1 - 0.17 * Math.abs(id - 1); // 中间最大
  } else {
    // 后续卡片:隐藏待命
    this.offsetX = 0;
    this.positionX = 0;
    this.opacitX = 0;
    this.sizeRatio = 0.7;
  }
}
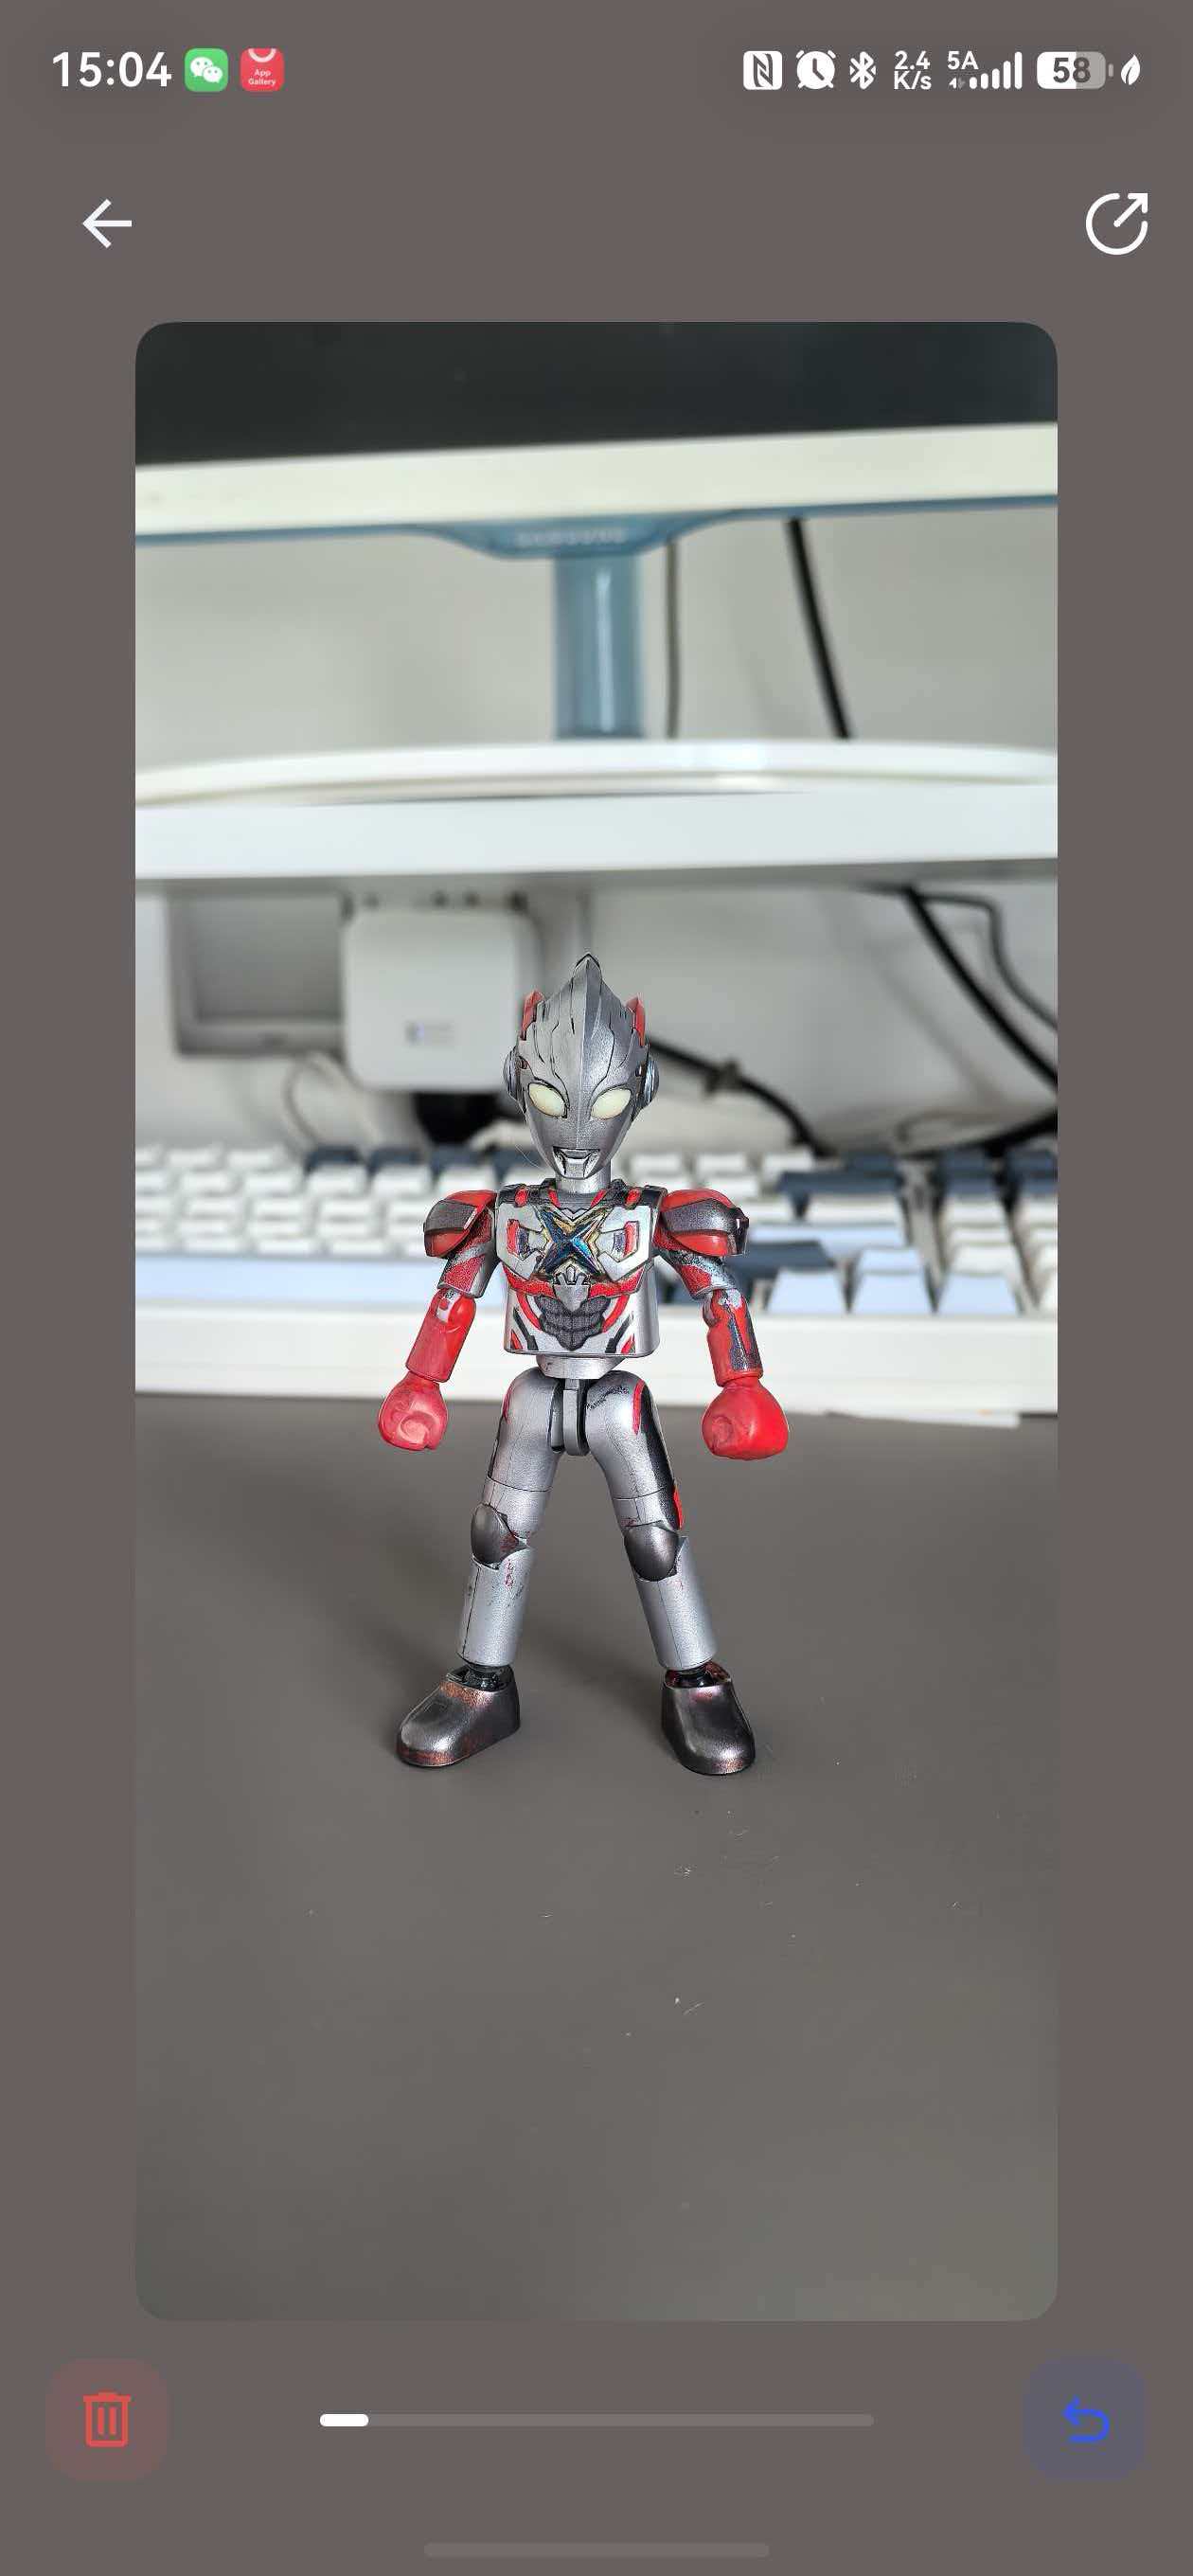
视觉效果:
- 第0张:
offsetX=0,opacity=0.7,scale=0.83(左侧) - 第1张:
offsetX=50,opacity=1.0,scale=1.0(中心,最大) - 第2张:
offsetX=100,opacity=0.7,scale=0.83(右侧)
2.2 手势回调架构
PhotoBrowserComponent 通过回调函数与容器层通信:
PhotoBrowserComponent({
  photos: $visiblePhotos,
  isLeftSwipeDelete: this.isLeftSwipeDelete,
  groupId: this.groupId,

  // 删除回调
  onPhotoDeleted: (visibleIndex: number) => {
    const photo = this.visiblePhotos[visibleIndex];
    const globalIndex = this.photos.findIndex(p => p.uri === photo.uri);

    // 标记删除
    this.photos[globalIndex].isDeleted = true;
    this.pendingDeleteUris.push(photo.uri);

    // 记录历史(用于撤回)
    this.deletedHistory.push(new DeletedRecord(photo, globalIndex));
    this.deleteCount++;

    // 更新可见列表
    this.updateVisiblePhotos();

    // 查找下一张
    const nextIndex = this.findNextVisibleIndex(globalIndex);
    if (nextIndex === -1) {
      this.navigateToConfirm(); // 全部浏览完毕
      return;
    }

    this.currentIndex = nextIndex;
    this.currentUri = this.photos[nextIndex].uri;
    this.extractColorFromUri(this.currentUri);
  },

  // 索引变化回调(上下滑动切换)
  onIndexChange: (visibleIndex: number) => {
    const photo = this.visiblePhotos[visibleIndex];
    this.currentUri = photo.uri;
    this.currentIndex = this.photos.findIndex(p => p.uri === photo.uri);
    this.extractColorFromUri(this.currentUri);
  },

  // 到达末尾回调
  onReachEnd: () => {
    this.navigateToConfirm();
  }
})
三、删除与撤回机制
3.1 软删除设计
采用"标记删除 + 延迟提交"的策略:
// 删除历史记录
class DeletedRecord {
  photo: PhotoItem;
  index: number;

  constructor(photo: PhotoItem, index: number) {
    this.photo = photo;
    this.index = index;
  }
}

// 状态管理
private pendingDeleteUris: string[] = [];      // 待删除URI列表
private deletedHistory: Array<DeletedRecord> = []; // 删除历史栈
@State private deleteCount: number = 0;         // 删除计数
工作流程:
- 标记阶段: 设置
photo.isDeleted = true,从可见列表移除 - 暂存阶段: URI 加入
pendingDeleteUris,记录加入deletedHistory - 提交阶段: 浏览完毕后,用户确认才真正调用系统 API 删除
3.2 撤回实现
private undoDelete(): void {
  if (this.deletedHistory.length === 0) {
    return;
  }

  // 从历史栈弹出最后一条
  const last = this.deletedHistory.pop()!;

  // 恢复照片状态
  last.photo.isDeleted = false;
  this.pendingDeleteUris.pop();
  this.deleteCount--;

  // 跳转回该照片
  this.currentIndex = last.index;
  this.currentUri = last.photo.uri;

  // 刷新可见列表
  this.updateVisiblePhotos();
}
关键点:
- 使用栈结构存储删除历史,支持多次撤回
- 恢复时直接修改
isDeleted标志,无需重新加载数据 - 自动跳转回被恢复的照片位置
3.3 批量删除确认
浏览完毕后,展示确认卡片:
@Component
struct PhotoEndCard {
  @Prop deletedUris: string[] = [];
  @State private selectedUris: Set<string> = new Set();
  @State private thumbnails: Map<string, image.PixelMap> = new Map();

  aboutToAppear() {
    this.selectedUris = new Set(this.deletedUris); // 默认全选
    this.loadThumbnails(); // 加载缩略图
  }

  build() {
    Column({ space: 24 }) {
      Text(`已标记 ${this.selectedUris.size} 张照片待删除`)

      // 缩略图网格(支持取消勾选)
      Grid() {
        ForEach(this.deletedUris, (uri: string) => {
          GridItem() {
            Stack() {
              Image(this.thumbnails.get(uri))
              Checkbox()
                .select(this.selectedUris.has(uri))
                .onChange((value: boolean) => {
                  if (value) {
                    this.selectedUris.add(uri);
                  } else {
                    this.selectedUris.delete(uri);
                  }
                })
            }
          }
        })
      }
      .columnsTemplate('1fr 1fr 1fr 1fr') // 4列布局

      Button('确认删除')
        .enabled(this.selectedUris.size > 0)
        .onClick(() => this.onFinish(Array.from(this.selectedUris)))
    }
  }
}
用户可以在最后一步取消勾选不想删除的照片,提供二次确认机会。
四、智能背景色系统
4.1 颜色提取算法
从当前照片提取主色调作为背景色,提升视觉沉浸感:
private async extractColorFromUri(uri: string): Promise<void> {
  try {
    const ctx = getContext() as common.UIAbilityContext;
    const helper = photoAccessHelper.getPhotoAccessHelper(ctx);

    // 查询照片资源
    const pred = new dataSharePredicates.DataSharePredicates();
    pred.equalTo(photoAccessHelper.PhotoKeys.URI, uri);
    const fetchOpts: photoAccessHelper.FetchOptions = {
      fetchColumns: [],
      predicates: pred
    };
    const result = await helper.getAssets(fetchOpts);
    const objs = await result.getAllObjects();

    if (objs.length > 0) {
      // 获取低分辨率缩略图(100x100)
      const pixelMap = await objs[0].getThumbnail({
        width: 100,
        height: 100
      });

      // 使用 effectKit 提取主色调
      effectKit.createColorPicker(pixelMap, (err, colorPicker) => {
        if (!err) {
          const color = colorPicker.getLargestProportionColor();
          const darkColor = this.ensureDarkColor(
            color.red, color.green, color.blue
          );

          // 平滑过渡到新颜色
          animateTo({ duration: 500, curve: Curve.Linear }, () => {
            this.bgColor = `#${color.alpha.toString(16).padStart(2, '0')}${darkColor.r.toString(16).padStart(2, '0')}${darkColor.g.toString(16).padStart(2, '0')}${darkColor.b.toString(16).padStart(2, '0')}`;
          });
        }
      });
    }
    await result.close();
  } catch (e) {
    Logger.error('[PhotoBrowserPage] 提取颜色失败:', e);
  }
}
4.2 亮度限制策略
为保证文字可读性,限制背景色最大亮度:
private ensureDarkColor(r: number, g: number, b: number): RGBColor {
  // 计算感知亮度(人眼对绿色最敏感)
  const luminance = 0.299 * r + 0.587 * g + 0.114 * b;
  const maxLuminance = 100; // 最大亮度阈值

  if (luminance > maxLuminance) {
    // 等比例降低 RGB 值
    const ratio = maxLuminance / luminance;
    return new RGBColor(
      Math.floor(r * ratio),
      Math.floor(g * ratio),
      Math.floor(b * ratio)
    );
  }
  return new RGBColor(r, g, b);
}
原理:
- 使用 ITU-R BT.601 标准计算亮度:
L = 0.299R + 0.587G + 0.114B - 若亮度超过阈值,等比例缩放 RGB 保持色相不变
- 确保白色文字在任何背景上都清晰可见
五、新手引导系统
5.1 引导状态管理
首次使用时展示操作引导,使用 Preferences 持久化状态:
private async checkGuideStatus(): Promise<void> {
  const ctx = getContext() as common.UIAbilityContext;
  const prefs = await preferences.getPreferences(ctx, 'photo_manager');
  const hasShown = await prefs.get('photo_browser_guide_shown', false) as boolean;

  if (!hasShown) {
    this.showGuide = true;
    this.startGuideAnimation();
  }
}

private async closeGuide(): Promise<void> {
  this.showGuide = false;
  if (this.shimmerTimer !== -1) {
    clearInterval(this.shimmerTimer);
  }

  // 保存已展示标记
  const ctx = getContext() as common.UIAbilityContext;
  const prefs = await preferences.getPreferences(ctx, 'photo_manager');
  await prefs.put('photo_browser_guide_shown', true);
  await prefs.flush();
}
5.2 分步引导动画
引导分为3个步骤,每步独立动画:
@State private guideStep: number = 0; // 0=上下滑动, 1=左滑删除, 2=点击开始
@State private guideArrowOffset: number = 0;
@State private guideContentOpacity: number = 1;
@State private shimmerPos: number = -0.2; // 光泽位置

private startGuideAnimation(): void {
  // 箭头循环动画
  const animate = () => {
    if (!this.showGuide) return;
    animateTo({ duration: 1200, curve: Curve.EaseInOut }, () => {
      this.guideArrowOffset = 15;
    });
    setTimeout(() => {
      if (!this.showGuide) return;
      animateTo({ duration: 1200, curve: Curve.EaseInOut }, () => {
        this.guideArrowOffset = 0;
      });
      setTimeout(animate, 1200);
    }, 1200);
  };
  animate();

  // 文字光泽扫过效果
  this.shimmerTimer = setInterval(() => {
    this.shimmerPos = (this.shimmerPos + 0.008) % 1.4;
  }, 16); // 60fps
}
5.3 渐变光泽文字
使用 shaderStyle 实现文字光泽扫过效果:
Text('上下滑动切换照片')
  .shaderStyle({
    angle: 90,
    colors: [
      ['#88FFFFFF', Math.max(0, this.shimmerPos - 0.2)],
      ['#FFFFFFFF', Math.min(1, this.shimmerPos)],
      ['#88FFFFFF', Math.min(1, this.shimmerPos + 0.2)]
    ]
  } as LinearGradientOptions)
原理:
shimmerPos从 -0.2 循环到 1.4,每帧递增 0.008- 中心位置
shimmerPos为纯白色#FFFFFF - 前后 ±0.2 范围为半透明白色
#88FFFFFF - 形成宽度约 0.4 的高亮带从左向右扫过
5.4 步骤切换逻辑
点击任意位置切换到下一步,带淡入淡出过渡:
private handleGuideClick(): void {
  // 淡出当前内容
  animateTo({ duration: 300 }, () => {
    this.guideContentOpacity = 0;
  });

  setTimeout(() => {
    if (this.guideStep < 2) {
      this.guideStep++;
      // 淡入新内容
      animateTo({ duration: 300 }, () => {
        this.guideContentOpacity = 1;
      });
    } else {
      this.closeGuide(); // 第3步后关闭引导
    }
  }, 300);
}
六、性能优化与细节处理
6.1 可见照片过滤
只渲染未删除的照片,减少渲染负担:
@State private photos: Array<PhotoItem> = [];        // 全量列表
@State private visiblePhotos: Array<PhotoItem> = []; // 可见列表

private updateVisiblePhotos(): void {
  this.visiblePhotos = this.photos.filter(p => !p.isDeleted);
}
PhotoBrowserComponent 只接收 visiblePhotos,删除操作后立即调用 updateVisiblePhotos() 更新。
6.2 动态照片支持
检测并加载 Live Photo (动态照片):
private async loadMovingPhotos(): Promise<void> {
  const ctx = getContext() as common.UIAbilityContext;
  const helper = photoAccessHelper.getPhotoAccessHelper(ctx);

  for (const photo of this.photos) {
    try {
      const pred = new dataSharePredicates.DataSharePredicates();
      pred.equalTo(photoAccessHelper.PhotoKeys.URI, photo.uri);
      const fetchOpts: photoAccessHelper.FetchOptions = {
        fetchColumns: [photoAccessHelper.PhotoKeys.PHOTO_SUBTYPE],
        predicates: pred
      };
      const result = await helper.getAssets(fetchOpts);
      const assets = await result.getAllObjects();

      if (assets.length > 0) {
        const asset = assets[0];
        const subtype = asset.get(photoAccessHelper.PhotoKeys.PHOTO_SUBTYPE) as number;

        // 检测是否为动态照片
        if (subtype === photoAccessHelper.PhotoSubtype.MOVING_PHOTO) {
          photo.isMovingPhoto = true;

          // 请求动态照片对象
          await photoAccessHelper.MediaAssetManager.requestMovingPhoto(
            ctx, asset,
            { deliveryMode: photoAccessHelper.DeliveryMode.FAST_MODE },
            {
              async onDataPrepared(movingPhoto: photoAccessHelper.MovingPhoto) {
                if (movingPhoto) {
                  photo.movingPhoto = movingPhoto;
                }
              }
            }
          );
        }
      }
      await result.close();
    } catch (e) {
      Logger.error('[PhotoBrowserPage] 加载动态照片失败:', e);
    }
  }
}
6.3 避让区适配
监听系统避让区变化,适配刘海屏、挖孔屏、导航栏:
private async initAvoidArea(): Promise<void> {
  const ctx = getContext() as common.UIAbilityContext;
  this.mainWindow = await ctx.windowStage.getMainWindow();

  // 获取顶部避让区(状态栏/刘海)
  const topArea = this.mainWindow.getWindowAvoidArea(
    window.AvoidAreaType.TYPE_SYSTEM
  );
  this.topAvoidHeight = px2vp(topArea.topRect.height);

  // 获取底部避让区(导航栏/手势条)
  const bottomArea = this.mainWindow.getWindowAvoidArea(
    window.AvoidAreaType.TYPE_NAVIGATION_INDICATOR
  );
  this.bottomAvoidHeight = px2vp(bottomArea.bottomRect.height);

  // 监听避让区变化(折叠屏展开/收起)
  this.mainWindow.on('avoidAreaChange', (data: window.AvoidAreaOptions) => {
    if (data.type === window.AvoidAreaType.TYPE_SYSTEM) {
      this.topAvoidHeight = px2vp(data.area.topRect.height);
    } else if (data.type === window.AvoidAreaType.TYPE_NAVIGATION_INDICATOR) {
      this.bottomAvoidHeight = px2vp(data.area.bottomRect.height);
    }
  });
}
在布局中应用避让高度:
Row() {
  Image($r('app.media.ic_back'))
  // ...
}
.padding({ top: this.topAvoidHeight })
6.4 垃圾桶角标动画
删除照片时触发弹跳动画,增强反馈:
private triggerTrashBounce(): void {
  // 瞬间放大到 1.8 倍
  animateTo({ duration: 0 }, () => {
    this.trashBadgeScale = 1.8;
  });

  // 弹簧回弹到 1.0 倍
  animateTo({ curve: curves.springMotion(0.3, 0.55) }, () => {
    this.trashBadgeScale = 1.0;
  });
}
角标渲染:
Stack({ alignContent: Alignment.TopEnd }) {
  Image($r('app.media.ic_photo_delete'))

  if (this.deleteCount > 0) {
    Text(`${this.deleteCount}`)
      .fontSize(10)
      .backgroundColor('#FF3B30')
      .borderRadius(8)
      .scale({ x: this.trashBadgeScale, y: this.trashBadgeScale });
  }
}
七、统计与数据持久化
7.1 删除统计保存
记录删除的照片数量和释放的空间:
private async saveDeleteStats(uris: string[], size: number): Promise<void> {
  const ctx = getContext() as common.UIAbilityContext;
  const prefs = await preferences.getPreferences(ctx, 'photo_manager');

  // 累加删除的 URI 列表
  const existingUris = await prefs.get('deleted_photo_uris', '[]') as string;
  const existingList = JSON.parse(existingUris) as string[];
  const newList = [...existingList, ...uris];
  await prefs.put('deleted_photo_uris', JSON.stringify(newList));

  // 累加释放的空间大小
  const existingSize = await prefs.get('deleted_photo_size', 0) as number;
  await prefs.put('deleted_photo_size', existingSize + size);

  await prefs.flush();

  // 通知用户中心刷新统计
  AppStorage.set('shouldRefreshUserCenter', Date.now());
}
7.2 文件大小格式化
private formatSize(bytes: number): string {
  if (bytes < 1024) return `${bytes}B`;
  if (bytes < 1024 * 1024) return `${(bytes / 1024).toFixed(1)}KB`;
  if (bytes < 1024 * 1024 * 1024) return `${(bytes / (1024 * 1024)).toFixed(1)}MB`;
  return `${(bytes / (1024 * 1024 * 1024)).toFixed(2)}GB`;
}
八、总结与思考
8.1 核心亮点
这个照片浏览器组件的设计有几个值得借鉴的地方:
✅ 分层架构: 容器层管理状态,交互层处理手势,职责清晰
✅ 软删除机制: 标记删除 + 延迟提交,支持撤回和二次确认
✅ 响应式动画: @Trace 装饰器 + 独立动画属性,实现流畅跟手
✅ 智能背景色: 提取照片主色调 + 亮度限制,提升沉浸感
✅ 新手引导: 分步引导 + 光泽动画 + 持久化状态,降低学习成本
✅ 细节打磨: 避让区适配、动态照片支持、角标弹跳动画
8.2 技术要点回顾
| 技术点 | 实现方式 | 关键API |
|---|---|---|
| 手势识别 | PanGesture + 回调架构 | PanGesture, onActionUpdate |
| 动画驱动 | @Trace 响应式属性 | @ObservedV2, @Trace |
| 颜色提取 | 缩略图 + ColorPicker | effectKit.createColorPicker |
| 删除管理 | 软删除 + 历史栈 | photoAccessHelper.deleteAssets |
| 数据持久化 | Preferences | preferences.getPreferences |
| 避让区适配 | 窗口监听 | window.getWindowAvoidArea |
8.3 可扩展方向
- 手势自定义: 支持用户配置左滑/右滑的操作(删除/收藏/分享)
- 批量操作: 长按进入多选模式,批量删除/移动
- AI 辅助: 自动识别模糊、重复照片,智能推荐删除
- 云端同步: 删除记录同步到云端,多设备一致
技术栈: HarmonyOS Next | ArkTS | ArkUI | PhotoAccessHelper
关键词: 手势交互 | 照片浏览 | 滑动删除 | 动画系统 | 响应式设计
如果这篇文章对你有帮助,欢迎点赞收藏。有问题可以在评论区交流~

讨论HarmonyOS开发技术,专注于API与组件、DevEco Studio、测试、元服务和应用上架分发等。
更多推荐

 4
4 0
0- 0


 已为社区贡献26条内容

所有评论(0)