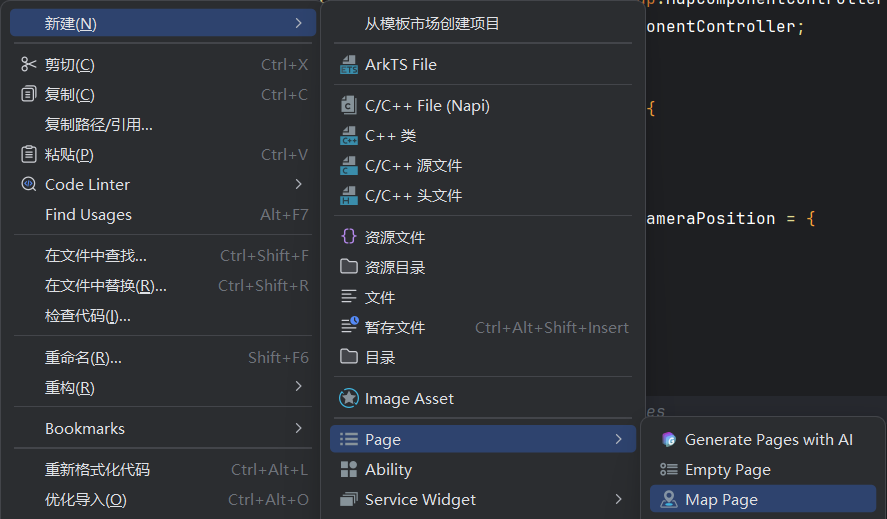
HarmonyOS地图及导航学习笔记
地图服务(Map Kit)
创建地图
快速初始化地图
代码如下:
import { MapComponent, mapCommon, map } from '@kit.MapKit';
import { AsyncCallback, BusinessError } from '@kit.BasicServicesKit';

@Entry
@Component
struct Page  {
  private mapOptions?: mapCommon.MapOptions;
  private callback?: AsyncCallback<map.MapComponentController>;
  private mapController?: map.MapComponentController;

  aboutToAppear(): void {
    const target: mapCommon.LatLng = {
      latitude: 39.9181,
      longitude: 116.3970193
    };
    const cameraPosition: mapCommon.CameraPosition = {
      target: target,
      zoom: 12,
    };
    this.mapOptions = {
      position: cameraPosition,
    };

    this.callback = (err: BusinessError | undefined, mapController: map.MapComponentController | undefined) => {
      if (!err) {
        this.mapController = mapController;
        const markerOptions: mapCommon.MarkerOptions = {
          position: {
            latitude: 39.9181,
            longitude: 116.3970193
          }
        };
        this.mapController?.addMarker(markerOptions).catch(() => {
          console.log('add marker failed');
        });
      }
    };
  }

  build() {
    Column() {
      MapComponent({ mapOptions: this.mapOptions, mapCallback: this.callback })
        .width('100%')
        .height('100%')
    }
    .width('100%')
    .height('100%')
  }
}
权限配置:
基础的网络权限
{
"name": "ohos.permission.INTERNET",
"reason": "$string:internet_permission_reason",
"usedScene": {
"abilities": [
"EntryAbility"
],
"when": "always"
}
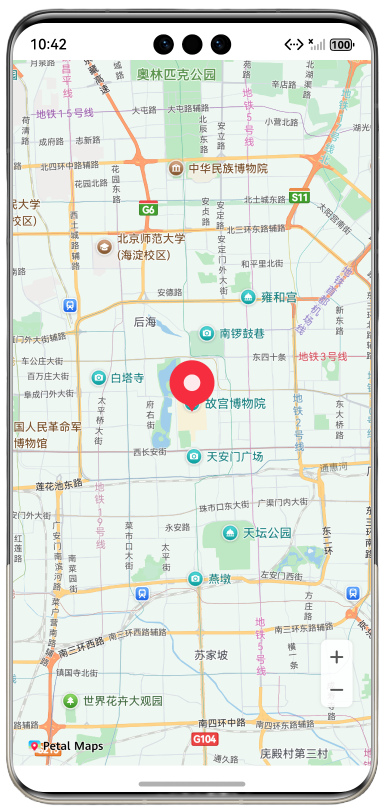
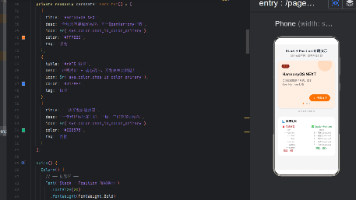
}效果预览:
(预览器不行,至少需要虚拟机)
代码解读:
1.Maker
const markerOptions: mapCommon.MarkerOptions = {
          position: {
            latitude: 39.9181,
            longitude: 116.3970193
          }
        };
        this.mapController?.addMarker(markerOptions).catch(() => {
          console.log('add marker failed');
        });
这一部分用来创建一个默认类型的maker(地图标记),图中红色的玩意儿,去掉不影响。
通过给地图的控制器mapController添加addMaker()方法给指定位置添加标记。参数类型是mapCommon.MakerOptions类型
MakerOption类型有很多种参数,position是必须的,其他的可以在创建时就添加
const markerOptions: mapCommon.MarkerOptions = {
position: {
latitude: 39.9181,
longitude: 116.3970193
},
icon: 'foreground.png'
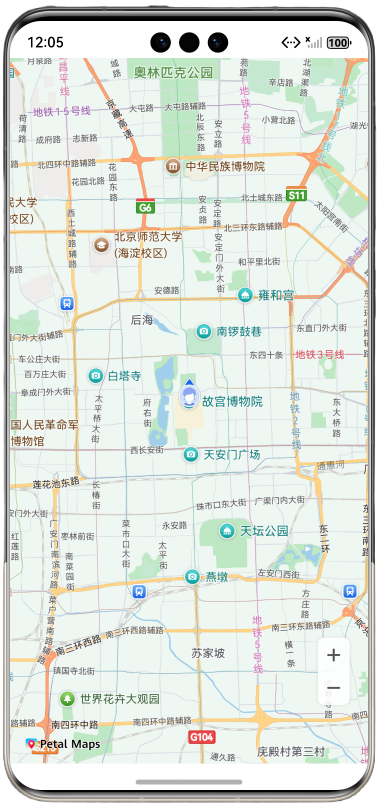
};如icon设置自定义标记图片,该图片存储于rawfile目录下。
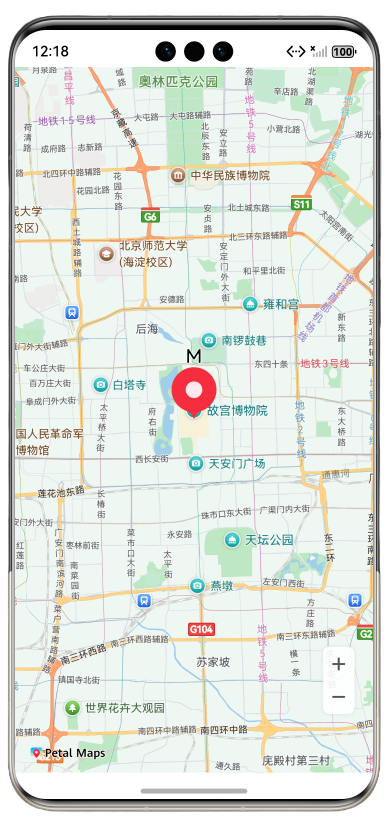
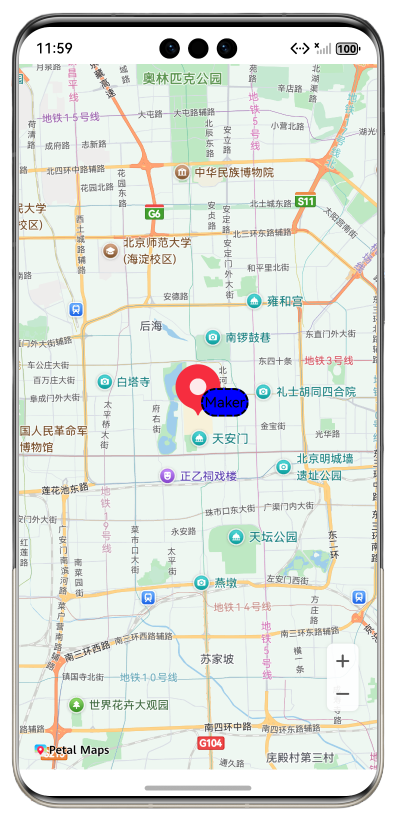
图标上也能加一些文字
const markerOptions: mapCommon.MarkerOptions = {
          position: {
            latitude: 39.9181,
            longitude: 116.3970193
          },
          annotations: [
            {
              content: 'M',
              fontSize: 20
            }
          ]
        };
或者通过其他方式添加:
const markerOptions: mapCommon.MarkerOptions = {
          position: {
            latitude: 39.9181,
            longitude: 116.3970193
          },
          draggable: true,
          clickable: true,
        };
        markerOptions.title = 'Maker'
        markerOptions.snippet = 'maker'
这里添加了一个信息窗,但是是看不见的,需要给map.marker设置setInfoWindowVisible属性和setInfoWindowAnchor属性但是这个属性不能直接加,需要await
this.marker = await this.mapController?.addMarker(markerOptions)
this.marker?.setInfoWindowAnchor(1, 1);
this.marker?.setInfoWindowVisible( true)
使用marker来控制标记更方便。
private marker?: map.Marker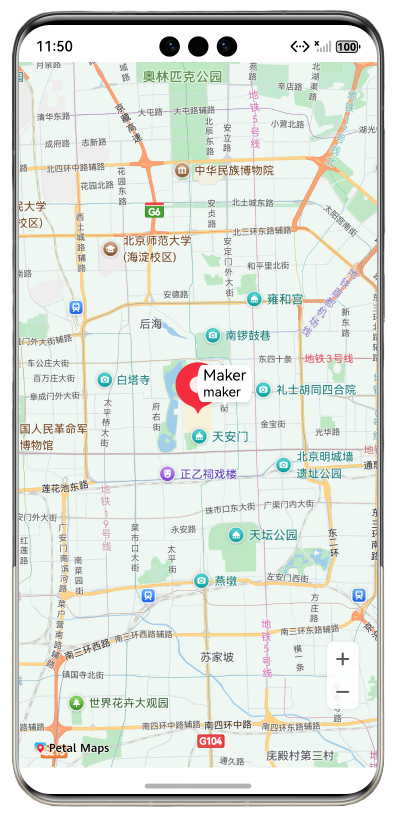
当然也支持自定义信息窗:
build() {
    Column() {
      MapComponent({ mapOptions: this.mapOptions, mapCallback: this.callback , customInfoWindow: this.customInfoWindow})
        .width('100%')
        .height('100%')
    }
    .width('100%')
    .height('100%')
  }
  // 自定义信息窗BuilderParam
  @BuilderParam customInfoWindow: ($$: map.MarkerDelegate) => void = this.customInfoWindowBuilder;
  // 自定义信息窗Builder
  @Builder
  customInfoWindowBuilder($$: map.MarkerDelegate) {
    if ($$.marker) {
      Text($$.marker.getTitle())
        .width(50)
        .height(30)
        .backgroundColor(Color.Blue)
        .textAlign(TextAlign.Center)
        .fontColor(Color.Black)
        .font({ size: 15, weight: 10})
        .border({ width: 2, color: Color.Black, radius: 15, style: BorderStyle.Dashed })
    }
  }
Marker的动画,拖动改天在整理。
2.地图类型
通过mapType来设置地图类型。
可以在地图初始化时就设置地图类型:
const target: mapCommon.LatLng = {
      latitude: 39.9181,
      longitude: 116.3970193
    };
    const cameraPosition: mapCommon.CameraPosition = {
      target: target,
      zoom: 12,

    };
    this.mapOptions = {
      position: cameraPosition,
      mapType: mapCommon.MapType.STANDARD//默认就是这个
    };
地形图
mapType: mapCommon.MapType.TERRAIN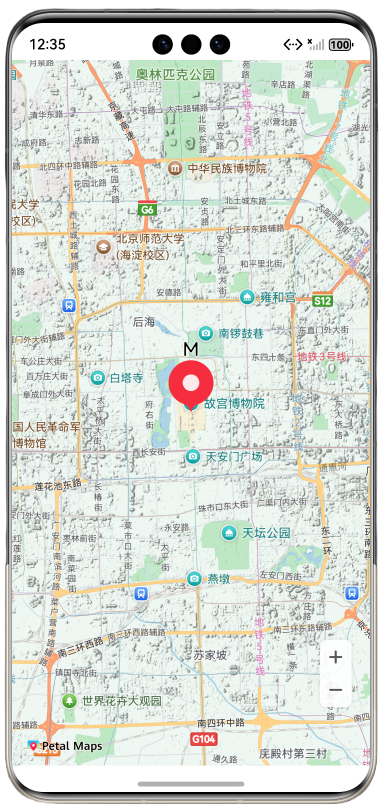
也可以在地图创建好后动态设置地图类型:
this.mapController?.setMapType(mapCommon.MapType.SATELLITE)卫星图,显示卫星照片的地图,虚拟机好像不支持。
3.定位(我的位置)
添加位置权限
{
        "name": "ohos.permission.LOCATION",//精准定位
        "reason": "$string:location_permission_reason",
        "usedScene": {
          "abilities": [
            "EntryAbility"
          ],
          "when": "always"
        }
      },
{
        "name": "ohos.permission.APPROXIMATELY_LOCATION",//模糊定位
        "reason": "$string:approximately_location_permission_reason",
        "usedScene": {
          "abilities": [
            "EntryAbility"
          ],
          "when": "always"
        }
      }
添加我的位置图层功能开关
this.mapController?.setMyLocationEnabled( true)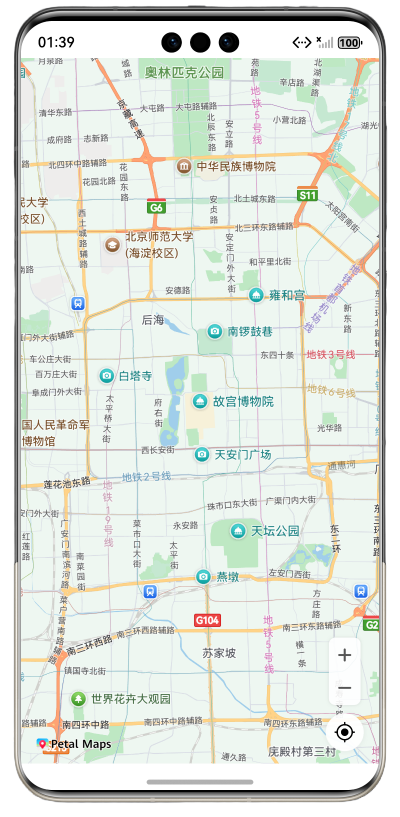
启用这个开关
this.mapController?.setMyLocationControlsEnabled( true)不过要先申请权限
同意之后再显示按钮
  // 如果没有被授予定位权限,动态向用户申请授权
  requestPermissions(): void {
    let atManager: abilityAccessCtrl.AtManager = abilityAccessCtrl.createAtManager();
    atManager.requestPermissionsFromUser(this.getUIContext().getHostContext() as common.UIAbilityContext,
      ['ohos.permission.LOCATION', 'ohos.permission.APPROXIMATELY_LOCATION'])
      .then((data: PermissionRequestResult) => {
        // 启用我的位置图层
        this.mapController?.setMyLocationEnabled(true);
      })
      .catch((err: BusinessError) => {
        console.error(`Failed to request permissions from user. Code is ${err.code}, message is ${err.message}`);
      })
  }
按这个顺序
        this.requestPermissions();
        this.mapController?.setMyLocationControlsEnabled(true);
添加地图监听事件管理器
private mapEventManager?: map.MapEventManager;//地图监听事件管理器给定位按钮添加返回事件
    let callback = async () => {
      console.info("myLocationButtonClick", `myLocationButtonClick`);
      let location = await geoLocationManager.getCurrentLocation();
      this.mapController?.setMyLocation(location);
    };
    this.mapEventManager?.on("myLocationButtonClick", callback);
更新一下导入
import { MapComponent, mapCommon, map } from '@kit.MapKit';
import { AsyncCallback, BusinessError } from '@kit.BasicServicesKit';
import { geoLocationManager } from '@kit.LocationKit';
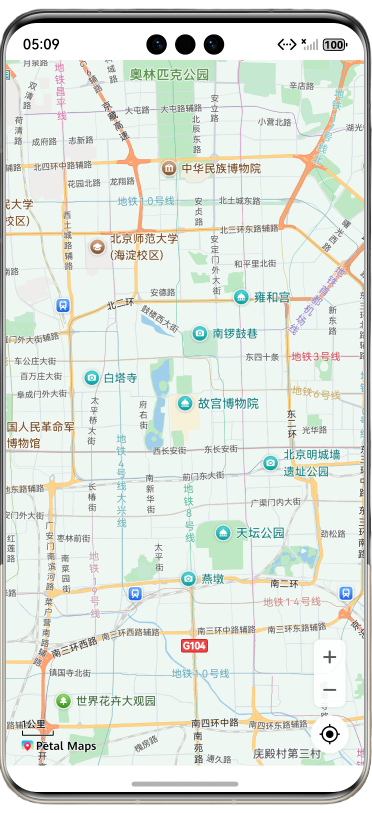
import { abilityAccessCtrl, PermissionRequestResult,common } from '@kit.AbilityKit';效果:
相机会自动移动到何时的位置,并调整缩放大小。
同样可以自定义图标样式
let style: mapCommon.MyLocationStyle = {
          anchorU: 0.5,
          anchorV: 0.5,
          radiusFillColor: 0xffff0000,
          icon: 'foreground.png'
        };
        await this.mapController?.setMyLocationStyle(style);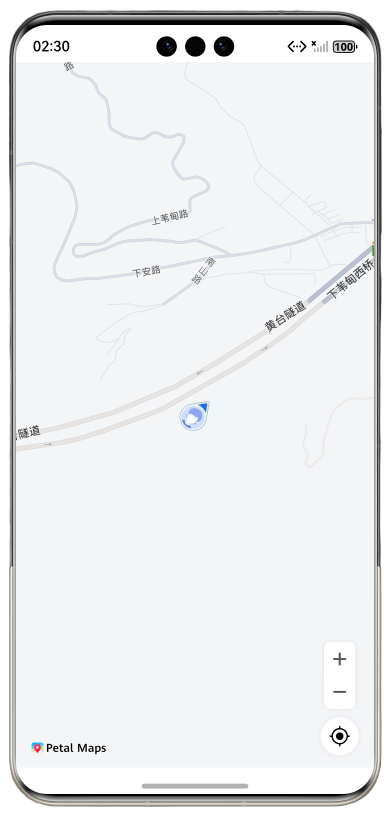
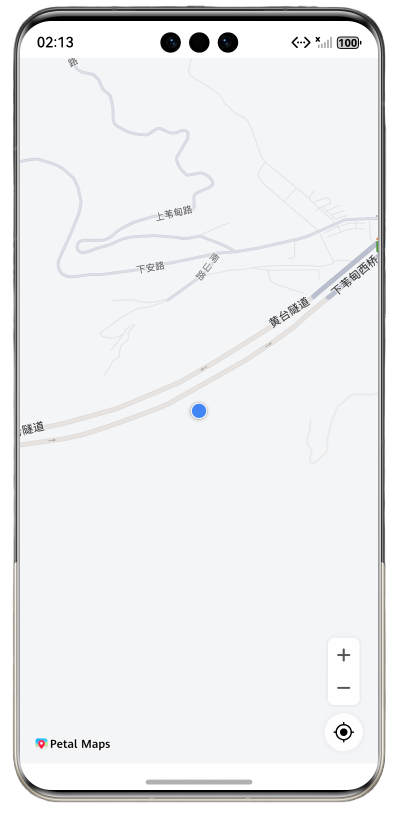
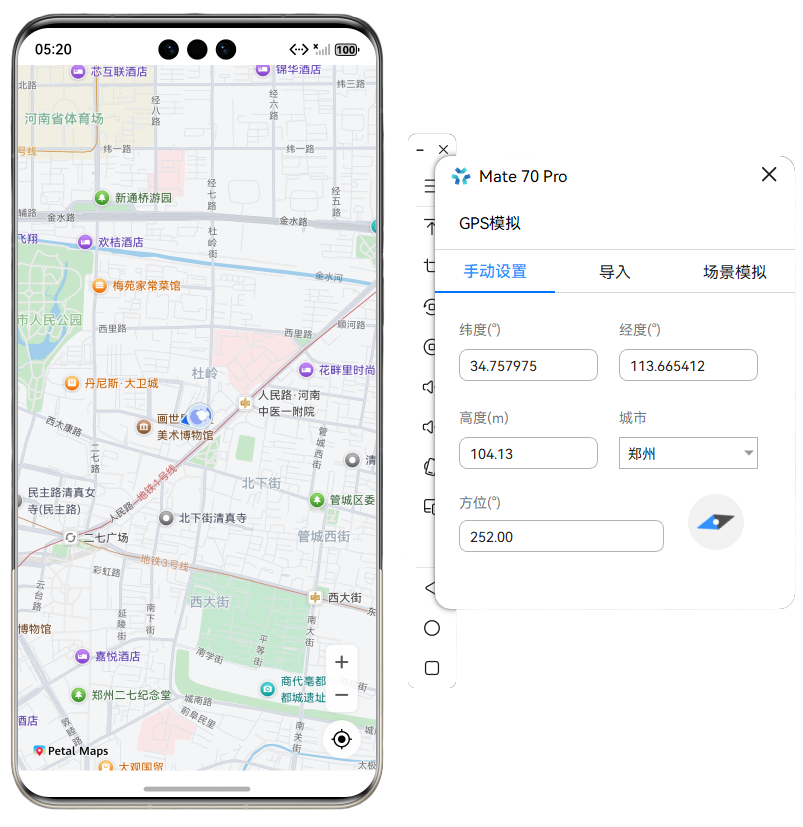
虚拟机需要手动输入位置,是没有传感器的,不会自动获取。
地图交互
缩放控制器
缩放控制器是默认打开的
this.mapController?.setZoomControlsEnabled(true);除了上面说过的我的位置控制器,还有很多一般都是关闭的。
比例尺缩放器
this.mapController?.setScaleControlsEnabled(true);比例尺缩放器默认情况下是会自动隐藏的,可以通过
this.mapController?.setAlwaysShowScaleEnabled(true);设置常显
并可以通过setScalePosition调整位置
官方文档说是以左上角为原点,但是我感觉是以左下角为原点的。
let point: mapCommon.MapPoint = {
          // 以当前地图组件左下角为原点,向右移动1000px
          positionX: 1000,
          // 以当前地图组件左下角为原点,向上移动1000px
          positionY: 1000
        };
        this.mapController?.setScalePosition(point);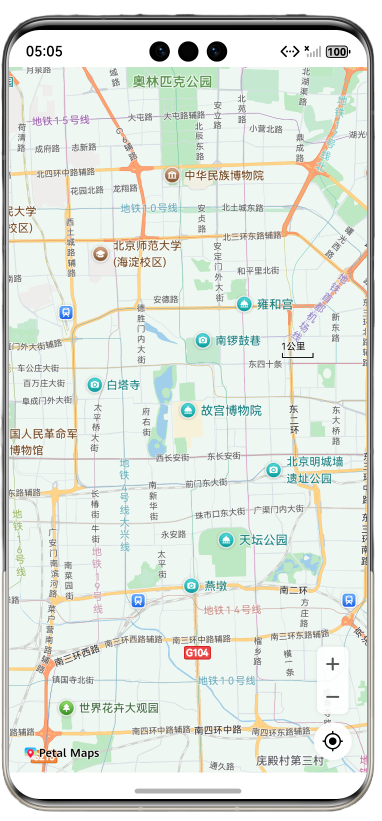
指南针
官方文档说也是默认开启的,但是只有在地图发生倾斜时才会出现。
this.mapController?.setCompassControlsEnabled(true);和比例尺不一样,并没有设置常显的方法。
调整位置的方法同比例尺一样。
地图LOGO
有意思的是这个东西不允许被遮挡。位置也不能随意调整,只能在几个角落调整。
感觉没啥卵用。
手势控制
默认都是全部开启的,可以在创建时和创建后两种方式来设置。
缩放手势:setZoomGesturesEnabled
滚动手势:setScrollGesturesEnabled
旋转手势:setRotateGesturesEnabled
倾斜手势:setTiltGesturesEnabled
全部手势控制:setAllGesturesEnabled
this.mapController?.setAllGesturesEnabled(false); this.mapOptions = {
position: cameraPosition,
zoomGesturesEnabled: true,
};不过mapOptions中不包含全部属性控制这个属性。
事件控制
在 定位(我的位置) 中就添加了事件控制器
初始化地图组件的事件管理接口
private mapEventManager?: map.MapEventManager;并设置了 我的位置 监听
    let callback = async () => {
      console.info("myLocationButtonClick", `myLocationButtonClick`);
      let location = await geoLocationManager.getCurrentLocation();
      this.mapController?.setMyLocation(location);
    };
    this.mapEventManager?.on("myLocationButtonClick", callback);
除了我的位置事件,还有很多
mapClick地图点击事件监听
mapLongClick地图长按事件监听
cameraMoveStart,cameraMove,cameraIdle相机移动监听
pointAnnotationClick点注释事件监听
markerClick标记点击事件监听
格式跟 我的位置 一样,具体功能还是需要自己来实现。
路径规划
mapkit中提供了路径规划的功能,但是吧,感觉只提供了一半吧
实例代码:(没找到官方的案例,就瞪着API研究了两天)
主函数
  // 规划步行路线
  async planWalkingRoute() {
    try {
      // 河南大学明伦校区坐标(起点)
      const universityLocation : mapCommon.LatLng = {
        latitude: 34.8114,
        longitude: 114.3695
      };
      // 河南大学金明校区坐标(终点)
      const jinmingCampus: mapCommon.LatLng = {
        latitude: 34.8172,
        longitude: 114.3090
      };
      // 构建路线规划参数
      let params: navi.RouteParams = {
        origins: [
          universityLocation
        ],  // 起点数组
        destination: jinmingCampus, // 终点
        language: 'zh_CN'           // 语言设置为中文
      };
      // 调用导航API获取步行路线
      const result = await navi.getWalkingRoutes(params);

      if (result.routes && result.routes.length > 0) {
        console.info(`路线数量:`, result.routes.length);
        // 提取所有polyline点
        const rawPolyline = result.routes.flatMap(route =>
          route.steps.flatMap(step =>
            step.roads.flatMap(road => road.polyline)
          )
        );
        // 简化折线以减少点的数量
        this.routePolyline = this.simplifyPolyline(rawPolyline, 50);

        console.info('简化后路线点坐标为:', JSON.stringify(this.routePolyline));
        console.info('简化后路线点数量:', this.routePolyline.length);

        // 显示路线
        this.showRoute = true;
        this.displayRouteOnMap();
      } else {
        console.warn('result.routes为空或不存在');
      }
    } catch (error) {

    }

  }
简化函数
  // 简化折线,减少点的数量
  private simplifyPolyline(points: mapCommon.LatLng[], maxPoints: number = 50): mapCommon.LatLng[] {
    // 如果点数少于等于最大点数,直接返回
    if (points.length <= maxPoints) {
      return points;
    }

    // 使用步长方式选择点
    const step = Math.ceil(points.length / maxPoints);
    const simplifiedPoints: mapCommon.LatLng[] = [];

    for (let i = 0; i < points.length; i += step) {
      simplifiedPoints.push(points[i]);
    }

    // 确保最后一个点被包含
    if (simplifiedPoints[simplifiedPoints.length - 1] !== points[points.length - 1]) {
      simplifiedPoints.push(points[points.length - 1]);
    }

    console.info(`折线已简化:从 ${points.length} 个点减少到 ${simplifiedPoints.length} 个点`);
    return simplifiedPoints;
  }
绘制函数
  // 在地图上显示路线
  // 负责将路线坐标点转换为地图上的可视元素
  private displayRouteOnMap() {
    if (this.mapController && this.routePolyline.length > 0) {
      let polylineOptions: mapCommon.MapPolylineOptions = {
        points: this.routePolyline, // 路线坐标点数组
        clickable: true,
        startCap: mapCommon.CapStyle.BUTT,
        endCap: mapCommon.CapStyle.BUTT,
        geodesic: false,
        jointType: mapCommon.JointType.BEVEL,
        visible: true,
        width: 10,
        zIndex: 10,
        gradient: false,
        color: 0xFF0000FF
      };
      this.mapController.addPolyline(polylineOptions);
      // 移动地图视野到路线范围
      this.moveCameraToRoute();
      console.log("Displaying route on map with", this.routePolyline.length, "points");
    }
  }
清理函数
  // 清除路线显示
  // 当用户选择非步行方式时调用此方法
  clearRoute() {
    this.routePolyline = [];  // 清空路线坐标点数组
    this.showRoute = false;   // 隐藏路线显示
  }
相机控制函数
  // 移动相机视野到路线范围
  private async moveCameraToRoute() {
    if (this.mapController && this.routePolyline.length > 0) {
      // 计算路线的边界
      let minLat = this.routePolyline[0].latitude;
      let maxLat = this.routePolyline[0].latitude;
      let minLng = this.routePolyline[0].longitude;
      let maxLng = this.routePolyline[0].longitude;

      for (let point of this.routePolyline) {
        minLat = Math.min(minLat, point.latitude);
        maxLat = Math.max(maxLat, point.latitude);
        minLng = Math.min(minLng, point.longitude);
        maxLng = Math.max(maxLng, point.longitude);
      }

      // 计算中心点和合适的缩放级别
      let centerLat = (minLat + maxLat) / 2;
      let centerLng = (minLng + maxLng) / 2;

      let cameraPosition: mapCommon.CameraPosition = {
        target: { latitude: centerLat, longitude: centerLng },
        zoom: 12
      };

      let cameraUpdate: map.CameraUpdate = map.newCameraPosition(cameraPosition);
      await this.mapController.animateCameraStatus(cameraUpdate, 1000);
    }
  }
效果预览:

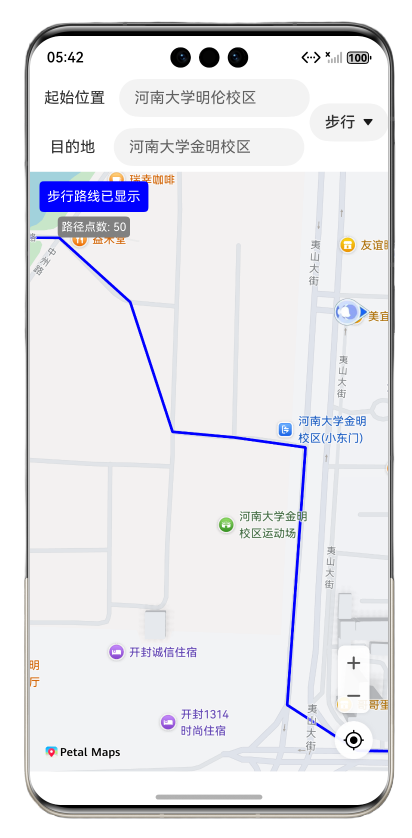
代码解读:
明天更

讨论HarmonyOS开发技术,专注于API与组件、DevEco Studio、测试、元服务和应用上架分发等。
更多推荐

 14
14 0
0- 0


 已为社区贡献8条内容

所有评论(0)