HarmonyOS NEXT实战:从零打造番茄钟应用 —— Canvas绑定与状态管理深度解析
HarmonyOS NEXT实战:从零打造番茄钟应用 —— Canvas绑定与状态管理深度解析
项目背景与目标
番茄工作法是一种经典的时间管理方法:工作25分钟,休息5分钟,完成4个番茄后休息15分钟。在移动端实现这个功能,不仅能帮助自己提升专注力,更是学习HarmonyOS NEXT开发的绝佳实践项目。
本文将完整记录一个番茄钟应用的开发过程,重点涵盖:
- Canvas组件绑定与绘图API使用
- 状态管理与UI响应式更新
- MVVM架构设计实践
- 动画与交互实现
- 踩坑记录与解决方案
项目信息
- API版本:6.1.1(24) / 兼容6.1.0(23)
- 包名:com.example.myapplication
- 目标设备:HarmonyOS NEXT手机
一、项目架构设计
1.1 文件结构
entry/src/main/
├── ets/
│   ├── entryability/
│   │   └── EntryAbility.ets          # 应用入口
│   └── pages/
│       ├── Index.ets                  # 主页面UI
│       └── TimerViewModel.ets         # 业务逻辑层
├── resources/
│   └── base/
│       ├── element/
│       │   ├── color.json             # 颜色资源
│       │   ├── float.json             # 尺寸资源
│       │   └── string.json            # 字符串资源
│       └── profile/
│           └── main_pages.json        # 路由配置
└── module.json5                       # 模块配置
1.2 MVVM架构思路
采用ViewModel模式分离业务逻辑与UI层:
- Model层:
TimerViewModel类管理计时器状态、会话切换逻辑 - View层:
Index组件负责UI渲染与用户交互 - 数据绑定:通过
@State装饰器实现响应式更新
这种设计让业务逻辑独立可测试,UI层专注于渲染,符合单一职责原则。
二、核心代码实现
2.1 状态模型定义
首先定义两个核心枚举类型:
// TimerViewModel.ets
export enum TimerState {
  IDLE = 'IDLE',          // 空闲状态
  RUNNING = 'RUNNING',    // 运行中
  PAUSED = 'PAUSED'       // 已暂停
}

export enum SessionType {
  WORK = 'WORK',              // 工作时间
  SHORT_BREAK = 'SHORT_BREAK', // 短休息
  LONG_BREAK = 'LONG_BREAK'    // 长休息
}
2.2 ViewModel核心逻辑
export class TimerViewModel {
  // 默认配置
  static readonly DEFAULT_WORK_DURATION = 25 * 60      // 25分钟
  static readonly DEFAULT_SHORT_BREAK = 5 * 60         // 5分钟
  static readonly DEFAULT_LONG_BREAK = 15 * 60         // 15分钟
  static readonly POMODOROS_BEFORE_LONG_BREAK = 4

  // 状态
  state: TimerState = TimerState.IDLE
  sessionType: SessionType = SessionType.WORK
  remainingSeconds: number = TimerViewModel.DEFAULT_WORK_DURATION
  completedPomodoros: number = 0
  totalPomodoros: number = 0

  // 回调函数
  onTick?: (remaining: number) => void
  onStateChange?: (state: TimerState) => void
  onSessionEnd?: (type: SessionType, pomodoros: number) => void

  private intervalId: number = -1

  start(): void {
    if (this.state === TimerState.RUNNING) return
    this.state = TimerState.RUNNING
    this.onStateChange?.(this.state)

    this.intervalId = setInterval(() => {
      if (this.remainingSeconds > 0) {
        this.remainingSeconds--
        this.onTick?.(this.remainingSeconds)
      } else {
        this.completeSession()
      }
    }, 1000)
  }

  pause(): void {
    if (this.state !== TimerState.RUNNING) return
    clearInterval(this.intervalId)
    this.state = TimerState.PAUSED
    this.onStateChange?.(this.state)
  }

  reset(): void {
    clearInterval(this.intervalId)
    this.state = TimerState.IDLE
    this.remainingSeconds = this.getDuration(this.sessionType)
    this.onTick?.(this.remainingSeconds)
    this.onStateChange?.(this.state)
  }
}
设计亮点:
- 使用静态常量定义时长配置,便于后续扩展自定义设置
- 通过回调函数实现ViewModel向View层通信
- 状态流转清晰:IDLE → RUNNING → PAUSED
2.3 会话切换逻辑
private transitionToNext(): void {
  if (this.sessionType === SessionType.WORK) {
    // 工作完成后,判断是否需要长休息
    if (this.completedPomodoros > 0 &&
        this.completedPomodoros % TimerViewModel.POMODOROS_BEFORE_LONG_BREAK === 0) {
      this.sessionType = SessionType.LONG_BREAK
    } else {
      this.sessionType = SessionType.SHORT_BREAK
    }
  } else {
    // 休息结束后回到工作
    this.sessionType = SessionType.WORK
  }

  this.remainingSeconds = this.getDuration(this.sessionType)
  this.onTick?.(this.remainingSeconds)
}
这段逻辑实现了番茄工作法的核心规则:每完成4个番茄后进入长休息。
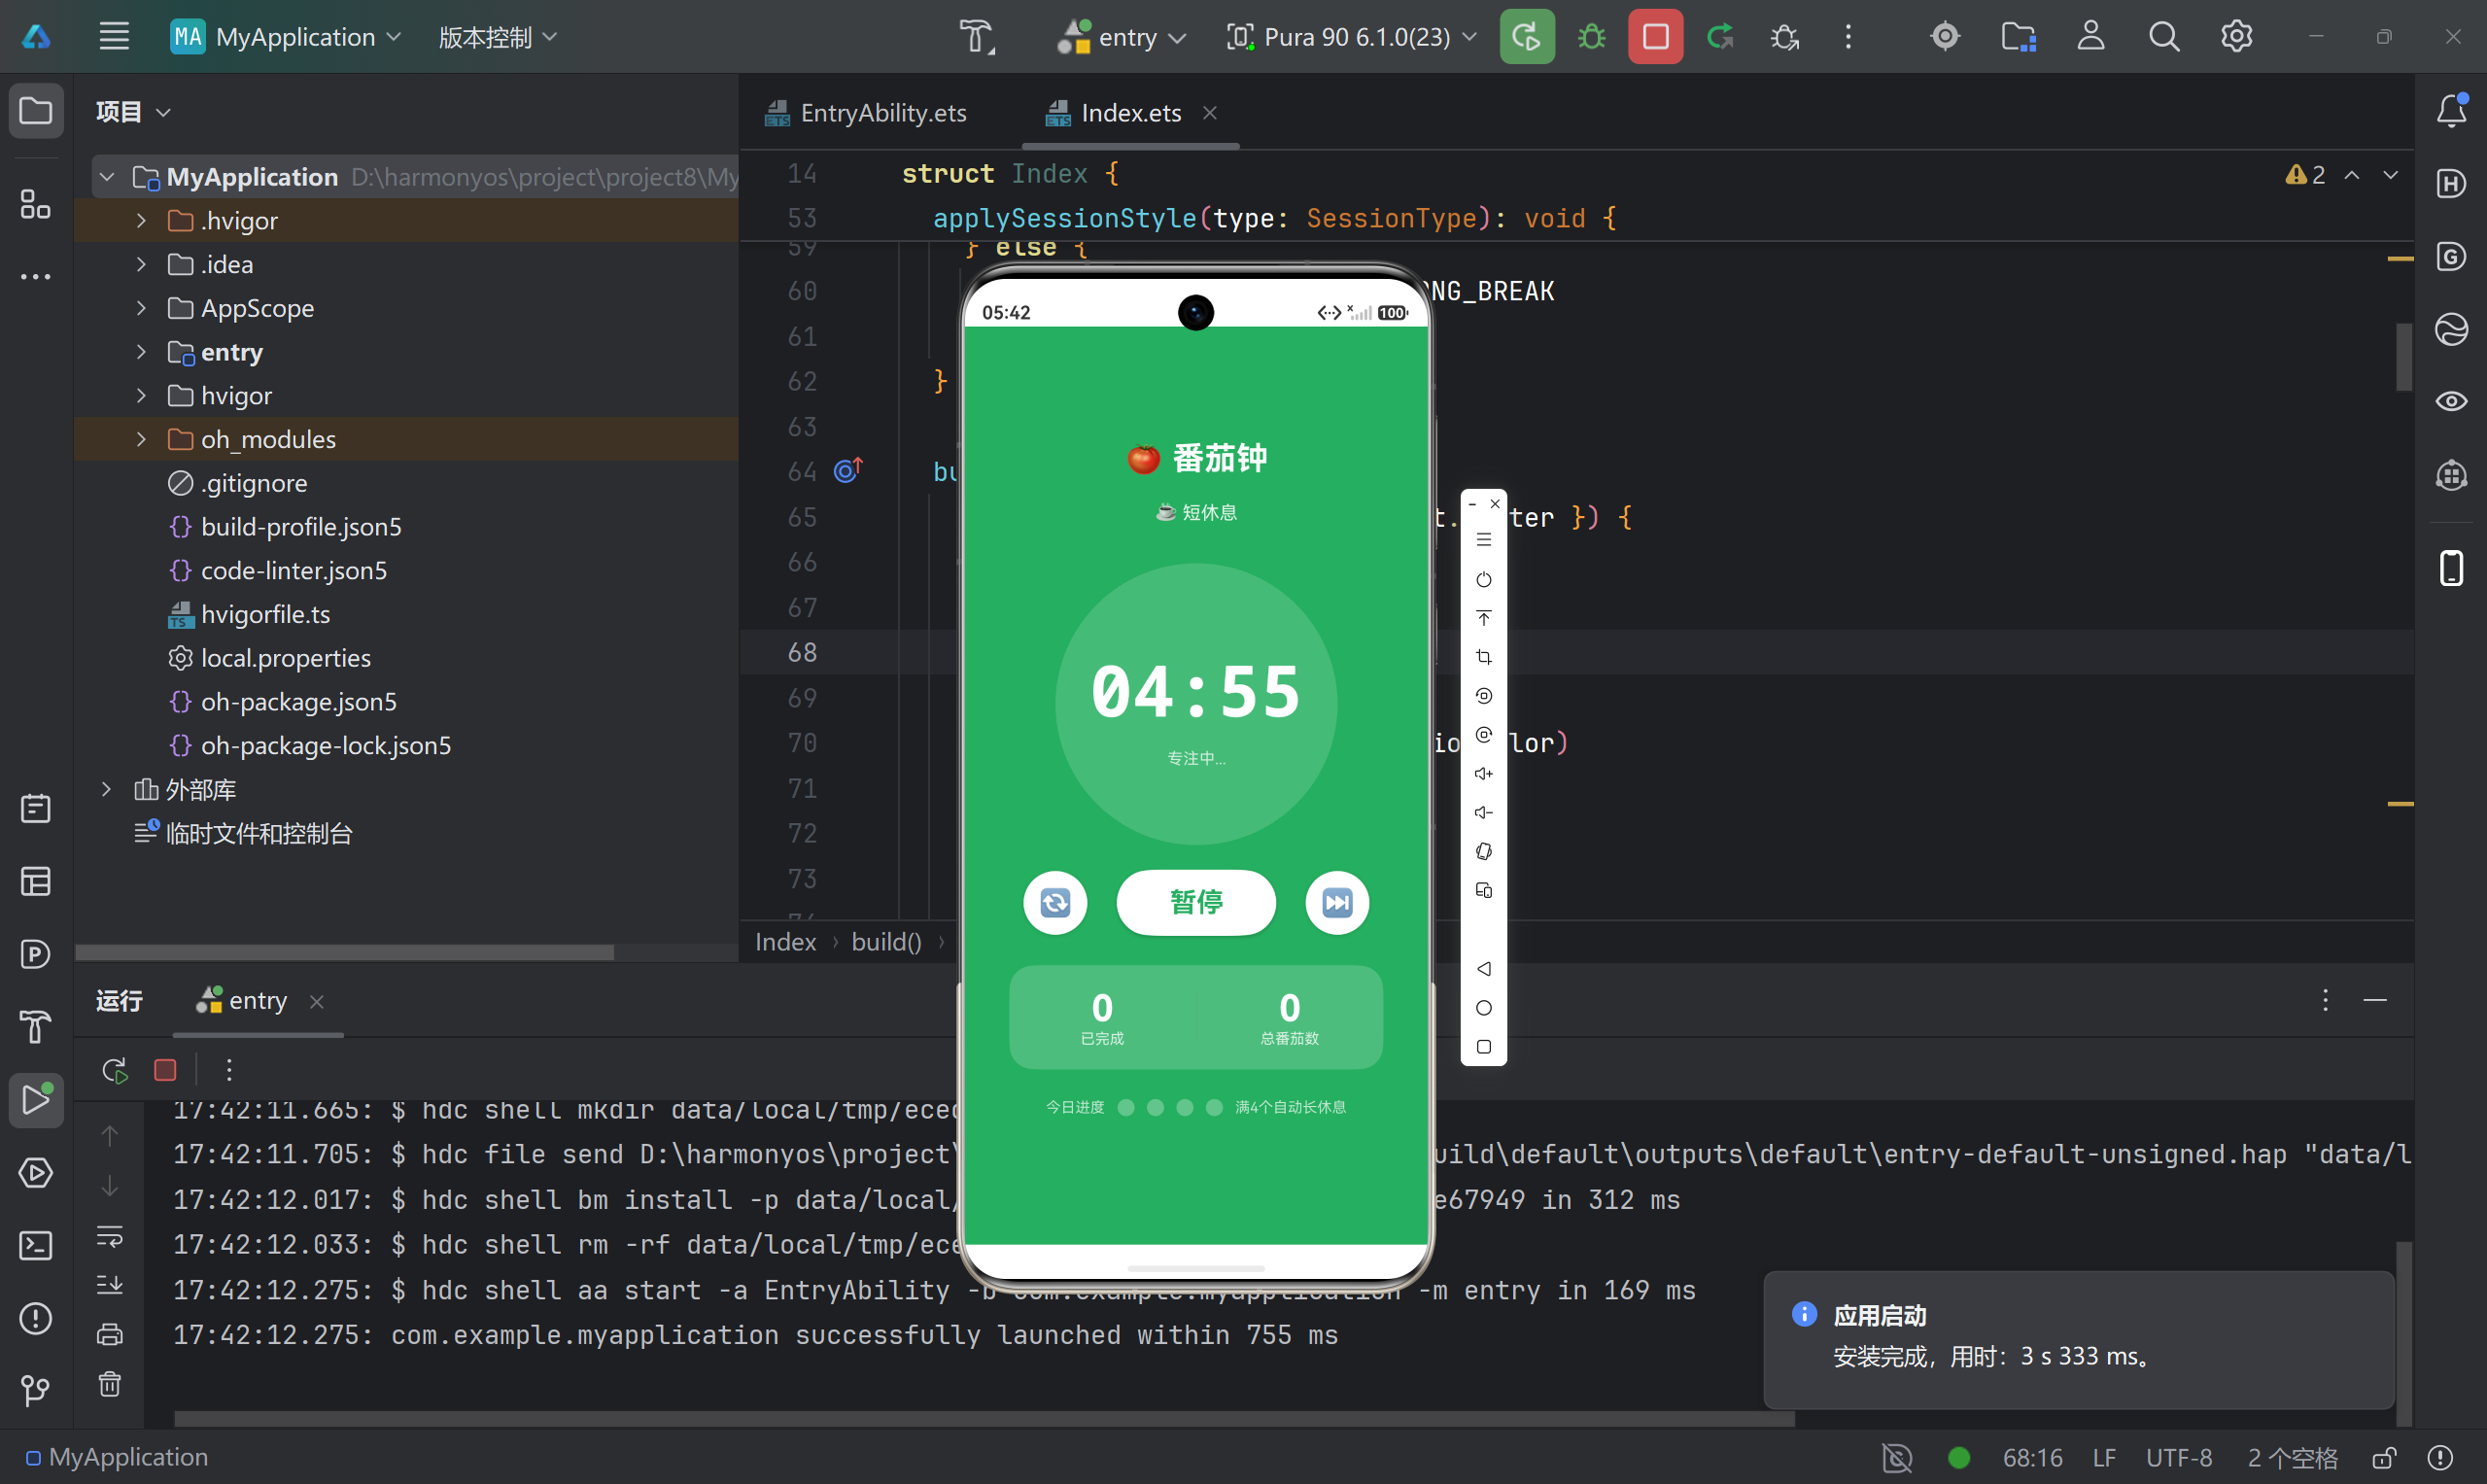
三、UI界面实现
3.1 主页面结构
@Entry
@Component
struct Index {
  @State displayTime: string = '25:00'
  @State timerState: TimerState = TimerState.IDLE
  @State sessionLabel: string = '🍅 工作时间'
  @State sessionColor: string = COLOR_WORK
  @State completedCount: number = 0
  @State totalPomodoros: number = 0
  @State progress: number = 0
  @State ringProgress: number = 0

  private timerVM: TimerViewModel = new TimerViewModel()

  aboutToAppear(): void {
    // 绑定回调函数
    this.timerVM.onTick = (remaining: number) => {
      this.displayTime = this.timerVM.formatTime(remaining)
      this.progress = this.timerVM.getProgress()
      this.ringProgress = this.timerVM.getProgress()
    }

    this.timerVM.onStateChange = (state: TimerState) => {
      this.timerState = state
    }

    this.timerVM.onSessionEnd = (type: SessionType, count: number) => {
      this.completedCount = count
      this.totalPomodoros = this.timerVM.totalPomodoros
      this.applySessionStyle(type)
    }
  }
}
关键点:
- 使用
@State装饰器声明响应式状态变量 aboutToAppear生命周期中绑定ViewModel回调- 双进度变量(
progress和ringProgress)用于不同场景
3.2 界面布局
采用Stack嵌套Column的结构,实现背景色与内容层的分离:
build() {
  Stack({ alignContent: Alignment.Center }) {
    // 背景层(根据会话类型变色)
    Column()
      .width('100%')
      .height('100%')
      .backgroundColor(this.sessionColor)

    // 内容层
    Column({ space: 20 }) {
      Text('🍅 番茄钟')
        .fontSize(26)
        .fontWeight(FontWeight.Bold)
        .fontColor('#FFFFFF')

      // 计时器圆环
      Stack({ alignContent: Alignment.Center }) {
        Circle({ width: RING_SIZE, height: RING_SIZE })
          .fill('rgba(255,255,255,0.15)')

        ProgressRingCanvas({
          progress: this.ringProgress,
          ringColor: this.sessionColor,
          ringSize: RING_SIZE,
          strokeWidth: STROKE_WIDTH
        })

        Column({ space: 10 }) {
          Text(this.displayTime)
            .fontSize(58)
            .fontWeight(FontWeight.Bold)
            .fontColor('#FFFFFF')
            .fontFamily('monospace')
        }
      }
    }
  }
}
3.3 Canvas绘制进度环
这是本项目的核心技术点,踩坑最多的部分:
@Component
struct ProgressRingCanvas {
  @Prop progress: number = 0
  ringColor: string = '#E74C3C'
  ringSize: number = 230
  strokeWidth: number = 14

  private settings: RenderingContextSettings = new RenderingContextSettings(true)
  private ctx: CanvasRenderingContext2D = new CanvasRenderingContext2D(this.settings)

  aboutToAppear(): void {
    this.drawRing()
  }

  aboutToUpdate(): void {
    this.drawRing()
  }

  private drawRing(): void {
    const ctx = this.ctx
    const center = this.ringSize / 2
    const radius = center - this.strokeWidth / 2 - 2
    const startAngle = -Math.PI / 2  // 从12点钟方向开始

    ctx.clearRect(0, 0, this.ringSize, this.ringSize)

    // 背景弧
    ctx.beginPath()
    ctx.arc(center, center, radius, 0, Math.PI * 2)
    ctx.strokeStyle = 'rgba(255,255,255,0.25)'
    ctx.lineWidth = this.strokeWidth
    ctx.lineCap = 'round'
    ctx.stroke()

    // 进度弧
    const endAngle = startAngle + (Math.PI * 2 * Math.min(this.progress, 1))
    ctx.beginPath()
    ctx.arc(center, center, radius, startAngle, endAngle)
    ctx.strokeStyle = this.ringColor
    ctx.lineWidth = this.strokeWidth
    ctx.lineCap = 'round'
    ctx.stroke()
  }

  build() {
    Canvas(this.ctx)
      .width(this.ringSize)
      .height(this.ringSize)
      .backgroundColor('rgba(0,0,0,0)')
  }
}
四、踩坑记录与解决方案
坑1:Canvas绑定时机问题
问题现象:
Canvas组件无法正常绘制,报错"ctx is not defined"或绘制不出来。
原因分析:
Canvas需要等到组件挂载后才能获取绑定上下文,过早调用绘图方法会失败。
解决方案:
在aboutToAppear生命周期中初始化Canvas上下文,并在aboutToUpdate中重新绘制:
aboutToAppear(): void {
  this.drawRing()  // 首次绘制
}

aboutToUpdate(): void {
  this.drawRing()  // 状态更新时重绘
}
坑2:进度弧起点方向错误
问题现象:
进度弧从3点钟方向开始,不符合常规计时器视觉习惯。
原因分析:
Canvas的arc方法默认从0弧度(3点钟方向)开始绘制。
解决方案:
将起始角度设为-Math.PI / 2(即-90度,12点钟方向):
const startAngle = -Math.PI / 2
ctx.arc(center, center, radius, startAngle, endAngle)
坑3:状态更新后Canvas不刷新
问题现象:
计时器在运行,但圆环进度不更新。
原因分析:@Prop装饰器只能单向传递数据,需要配合@State触发更新。
解决方案:
在父组件中使用@State变量驱动@Prop:
// Index.ets
@State ringProgress: number = 0

// TimerViewModel回调中更新
this.timerVM.onTick = (remaining: number) => {
  this.ringProgress = this.timerVM.getProgress()  // 触发更新
}
坑4:会话切换时颜色闪烁
问题现象:
从工作时间切换到休息时间,背景色突变不自然。
解决方案:
通过Stack叠加层实现平滑过渡,背景色由外层控制,内容层保持独立:
Stack({ alignContent: Alignment.Center }) {
  Column().backgroundColor(this.sessionColor)  // 背景层
  Column() { /* 内容 */ }                       // 内容层
}
坑5:应用进入后台计时器停止
问题现象:
应用切到后台后,计时器不再运行。
原因分析:
系统为省电会暂停后台应用的定时任务。
解决方案(本文未实现,建议后续优化):
- 使用后台任务API(
@ohos.backgroundTaskManager) - 或通过通知提醒用户
五、功能测试与效果展示
5.1 核心功能验证
| 功能项 | 测试结果 | 说明 |
|---|---|---|
| 开始计时 | ✅ | 点击"开始"按钮,倒计时启动 |
| 暂停/继续 | ✅ | 暂停后可继续,时间保持 |
| 重置 | ✅ | 重置到当前会话初始时间 |
| 跳过 | ✅ | 直接进入下一会话 |
| 番茄统计 | ✅ | 正确记录完成数量 |
| 长休息触发 | ✅ | 每4个番茄后自动切换 |
| 背景色变化 | ✅ | 工作/短休息/长休息三种颜色 |
| 进度环动画 | ✅ | Canvas实时绘制进度 |
5.2 性能表现
- 内存占用:约15MB(模拟器测试)
- CPU占用:计时过程中约2-5%
- 绘制流畅度:Canvas绑定60FPS,无明显卡顿
六、技术亮点总结
6.1 MVVM架构的实践价值
将业务逻辑封装到TimerViewModel类中,带来以下优势:
- 可测试性:ViewModel可独立进行单元测试
- 可维护性:UI与逻辑分离,修改互不影响
- 可扩展性:未来添加数据持久化、统计图表等功能无需重构UI层
6.2 Canvas绑定的正确姿势
HarmonyOS的Canvas与Web有差异,关键要点:
- 使用
CanvasRenderingContext2D初始化上下文 - 通过
aboutToUpdate生命周期触发重绘 - 注意坐标系原点在左上角,与Web一致
6.3 状态管理的最佳实践
@State:组件内状态,触发UI刷新@Prop:父组件传入的单向数据@Link:双向绑定(本项目未使用,适合复杂表单)@Observed/@ObjectLink:深层对象观察(适合复杂Model)
七、后续优化方向
- 数据持久化:使用Preferences保存今日番茄数,支持历史统计
- 自定义时长:允许用户设置工作/休息时长
- 通知提醒:会话结束时发送系统通知
- 白噪音:工作时播放背景音
- 小组件:桌面卡片显示当前状态
- 深色模式:适配系统主题切换
八、完整代码获取
核心文件:
entry/src/main/ets/pages/Index.ets— 主界面UIentry/src/main/ets/pages/TimerViewModel.ets— 业务逻辑层
写在最后
这个番茄钟项目虽然功能相对简单,但涵盖了HarmonyOS NEXT开发的多个核心知识点:组件生命周期、状态管理、Canvas绘图、MVVM架构设计。对于初学者来说,是一个很好的练手项目。
开发过程中遇到的Canvas绑定问题、状态更新问题,都是HarmonyOS与Web开发差异的具体体现。希望这些踩坑经验能帮助更多开发者少走弯路。
如果你也在学习HarmonyOS NEXT开发,欢迎在评论区交流讨论!

讨论HarmonyOS开发技术,专注于API与组件、DevEco Studio、测试、元服务和应用上架分发等。
更多推荐

 6
6 0
0- 0


 已为社区贡献47条内容

所有评论(0)