HarmonyOS NEXT应用开发之@Link装饰器:父子双向同步
- 当装饰的对象是Date时,可以观察到Date整体的赋值,同时可通过调用Date的接口
setFullYear,setMonth,setDate,setHours,setMinutes,setSeconds,setMilliseconds,setTime,setUTCFullYear,setUTCMonth,setUTCDate,setUTCHours,setUTCMinutes,setUTCSeconds,setUTCMilliseconds更新Date的属性。
@Component
struct DateComponent {
  @Link selectedDate: Date;

  build() {
    Column() {
      Button(`child increase the year by 1`).onClick(() => {
        this.selectedDate.setFullYear(this.selectedDate.getFullYear() + 1)
      })
      Button('child update the new date')
        .margin(10)
        .onClick(() => {
          this.selectedDate = new Date('2023-09-09')
        })
      DatePicker({
        start: new Date('1970-1-1'),
        end: new Date('2100-1-1'),
        selected: this.selectedDate
      })
    }

  }
}

@Entry
@Component
struct ParentComponent {
  @State parentSelectedDate: Date = new Date('2021-08-08');

  build() {
    Column() {
      Button('parent increase the month by 1')
        .margin(10)
        .onClick(() => {
          this.parentSelectedDate.setMonth(this.parentSelectedDate.getMonth() + 1)
        })
      Button('parent update the new date')
        .margin(10)
        .onClick(() => {
          this.parentSelectedDate = new Date('2023-07-07')
        })
      DatePicker({
        start: new Date('1970-1-1'),
        end: new Date('2100-1-1'),
        selected: this.parentSelectedDate
      })

      DateComponent({ selectedDate:this.parentSelectedDate })
    }
  }
}
- 当装饰的变量是Map时,可以观察到Map整体的赋值,同时可通过调用Map的接口
set,clear,delete更新Map的值。 - 当装饰的变量是Set时,可以观察到Set整体的赋值,同时可通过调用Set的接口
add,clear,delete更新Set的值。
框架行为
@Link装饰的变量和其所属的自定义组件共享生命周期。
为了了解@Link变量初始化和更新机制,有必要先了解父组件和拥有@Link变量的子组件的关系,初始渲染和双向更新的流程(以父组件为@State为例)。
-
初始渲染:执行父组件的build()函数后将创建子组件的新实例。初始化过程如下:
- 必须指定父组件中的@State变量,用于初始化子组件的@Link变量。子组件的@Link变量值与其父组件的数据源变量保持同步(双向数据同步)。
- 父组件的@State状态变量包装类通过构造函数传给子组件,子组件的@Link包装类拿到父组件的@State的状态变量后,将当前@Link包装类this指针注册给父组件的@State变量。
-
@Link的数据源的更新:即父组件中状态变量更新,引起相关子组件的@Link的更新。处理步骤:
- 通过初始渲染的步骤可知,子组件@Link包装类把当前this指针注册给父组件。父组件@State变量变更后,会遍历更新所有依赖它的系统组件(elementid)和状态变量(比如@Link包装类)。
- 通知@Link包装类更新后,子组件中所有依赖@Link状态变量的系统组件(elementId)都会被通知更新。以此实现父组件对子组件的状态数据同步。
-
@Link的更新:当子组件中@Link更新后,处理步骤如下(以父组件为@State为例):
- @Link更新后,调用父组件的@State包装类的set方法,将更新后的数值同步回父组件。
- 子组件@Link和父组件@State分别遍历依赖的系统组件,进行对应的UI的更新。以此实现子组件@Link同步回父组件@State。
使用场景
简单类型和类对象类型的@Link
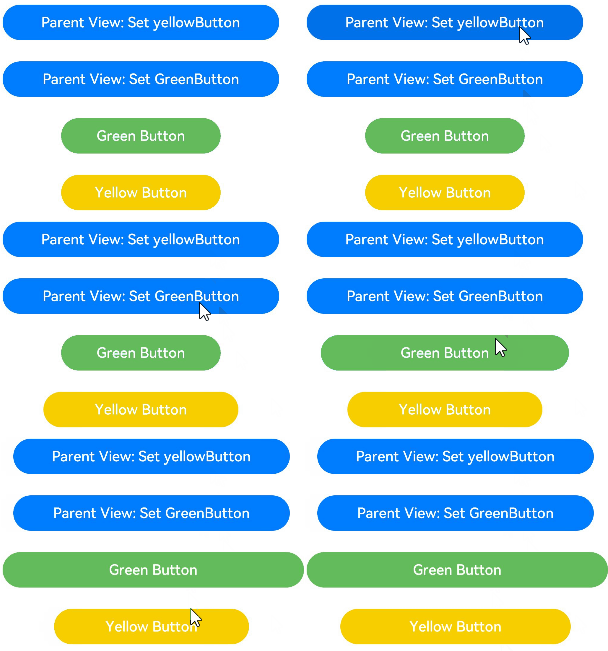
以下示例中,点击父组件ShufflingContainer中的“Parent View: Set yellowButton”和“Parent View: Set GreenButton”,可以从父组件将变化同步给子组件。
1.点击子组件GreenButton和YellowButton中的Button,子组件会发生相应变化,将变化同步给父组件。因为@Link是双向同步,会将变化同步给@State。
2.当点击父组件ShufflingContainer中的Button时,@State变化,也会同步给@Link,子组件也会发生对应的刷新。
class GreenButtonState {
  width: number = 0;

  constructor(width: number) {
    this.width = width;
  }
}

@Component
struct GreenButton {
  @Link greenButtonState: GreenButtonState;

  build() {
    Button('Green Button')
      .width(this.greenButtonState.width)
      .height(40)
      .backgroundColor('#64bb5c')
      .fontColor('#FFFFFF,90%')
      .onClick(() => {
        if (this.greenButtonState.width < 700) {
          // 更新class的属性,变化可以被观察到同步回父组件
          this.greenButtonState.width += 60;
        } else {
          // 更新class,变化可以被观察到同步回父组件
          this.greenButtonState = new GreenButtonState(180);
        }
      })
  }
}

@Component
struct YellowButton {
  @Link yellowButtonState: number;

  build() {
    Button('Yellow Button')
      .width(this.yellowButtonState)
      .height(40)
      .backgroundColor('#f7ce00')
      .fontColor('#FFFFFF,90%')
      .onClick(() => {
        // 子组件的简单类型可以同步回父组件
        this.yellowButtonState += 40.0;
      })
  }
}

@Entry
@Component
struct ShufflingContainer {
  @State greenButtonState: GreenButtonState = new GreenButtonState(180);
  @State yellowButtonProp: number = 180;

  build() {
    Column() {
      Flex({ direction: FlexDirection.Column, alignItems: ItemAlign.Center }) {
        // 简单类型从父组件@State向子组件@Link数据同步
        Button('Parent View: Set yellowButton')
          .width(312)
          .height(40)
          .margin(12)
          .fontColor('#FFFFFF,90%')
          .onClick(() => {
            this.yellowButtonProp = (this.yellowButtonProp < 700) ? this.yellowButtonProp + 40 : 100;
          })
        // class类型从父组件@State向子组件@Link数据同步
        Button('Parent View: Set GreenButton')
          .width(312)
          .height(40)
          .margin(12)
          .fontColor('#FFFFFF,90%')
          .onClick(() => {
            this.greenButtonState.width = (this.greenButtonState.width < 700) ? this.greenButtonState.width + 100 : 100;
          })
        // class类型初始化@Link
        GreenButton({ greenButtonState: $greenButtonState }).margin(12)
        // 简单类型初始化@Link
        YellowButton({ yellowButtonState: $yellowButtonProp }).margin(12)
      }
    }
  }
}
数组类型的@Link
@Component
struct Child {
  @Link items: number[];

  build() {
    Column() {
      Button(`Button1: push`)
        .margin(12)
        .width(312)
        .height(40)
        .fontColor('#FFFFFF,90%')
        .onClick(() => {
          this.items.push(this.items.length + 1);
        })
      Button(`Button2: replace whole item`)
        .margin(12)
        .width(312)
        .height(40)
        .fontColor('#FFFFFF,90%')
        .onClick(() => {
          this.items = [100, 200, 300];
        })
    }
  }
}

@Entry
@Component
struct Parent {
  @State arr: number[] = [1, 2, 3];

  build() {
    Column() {
      Child({ items: $arr })
        .margin(12)
      ForEach(this.arr,
        (item: number) => {
          Button(`${item}`)
            .margin(12)
            .width(312)
            .height(40)
            .backgroundColor('#11a2a2a2')
            .fontColor('#e6000000')
        },
        (item: ForEachInterface) => item.toString()
      )
    }
  }
}

上文所述,ArkUI框架可以观察到数组元素的添加,删除和替换。在该示例中@State和@Link的类型是相同的number[],不允许将@Link定义成number类型(@Link item : number),并在父组件中用@State数组中每个数据项创建子组件。如果要使用这个场景,可以参考 @Prop 和@Observed。
装饰Map类型变量
说明:
从API version 11开始,@Link支持Map类型。
在下面的示例中,value类型为Map<number, string>,点击Button改变message的值,视图会随之刷新。
@Component
struct Child {
  @Link value: Map<number, string>

  build() {
    Column() {
      ForEach(Array.from(this.value.entries()), (item: [number, string]) => {
        Text(`${item[0]}`).fontSize(30)
        Text(`${item[1]}`).fontSize(30)
        Divider()
      })
      Button('child init map').onClick(() => {
        this.value = new Map([[0, "a"], [1, "b"], [3, "c"]])
      })
      Button('child set new one').onClick(() => {
        this.value.set(4, "d")
      })
      Button('child clear').onClick(() => {
        this.value.clear()
      })
      Button('child replace the first one').onClick(() => {
        this.value.set(0, "aa")
      })
      Button('child delete the first one').onClick(() => {
        this.value.delete(0)
      })
    }
  }
}


@Entry
@Component
struct MapSample2 {
  @State message: Map<number, string> = new Map([[0, "a"], [1, "b"], [3, "c"]])

  build() {
    Row() {
      Column() {
        Child({ value: this.message })
      }
      .width('100%')
    }
    .height('100%')
  }
}
装饰Set类型变量
说明:
从API version 11开始,@Link支持Set类型。
在下面的示例中,message类型为Set,点击Button改变message的值,视图会随之刷新。
@Component
struct Child {
  @Link message: Set<number>

  build() {
    Column() {
      ForEach(Array.from(this.message.entries()), (item: [number, string]) => {
        Text(`${item[0]}`).fontSize(30)
        Divider()
      })
      Button('init set').onClick(() => {
        this.message = new Set([0, 1, 2, 3, 4])
      })
      Button('set new one').onClick(() => {
        this.message.add(5)
      })
      Button('clear').onClick(() => {
        this.message.clear()
      })
      Button('delete the first one').onClick(() => {
        this.message.delete(0)
      })
    }
    .width('100%')
  }
}


@Entry
@Component
struct SetSample1 {
  @State message: Set<number> = new Set([0, 1, 2, 3, 4])

  build() {
    Row() {
      Column() {
        Child({ message: this.message })
      }
      .width('100%')
    }
    .height('100%')
  }
}
Link支持联合类型实例
@Link支持联合类型和undefined和null,在下面的示例中,name类型为string | undefined,点击父组件Index中的Button改变name的属性或者类型,Child中也会对应刷新。
@Component
struct Child {
  @Link name: string | undefined

  build() {
    Column() {

      Button('Child change name to Bob')
        .onClick(() => {
          this.name = "Bob"
        })

      Button('Child change animal to undefined')
        .onClick(() => {
          this.name = undefined
        })

    }.width('100%')
  }
}

@Entry
@Component
struct Index {
  @State name: string | undefined = "mary"

  build() {
    Column() {
      Text(`The name is ${this.name}`).fontSize(30)

      Child({ name: this.name })

      Button('Parents change name to Peter')
        .onClick(() => {
          this.name = "Peter"
        })

      Button('Parents change name to undefined')
        .onClick(() => {
          this.name = undefined
        })
    }
  }
}
常见问题
@Link装饰状态变量类型错误
在子组件中使用@Link装饰状态变量需要保证该变量与数据源类型完全相同,且该数据源需为被诸如@State等装饰器装饰的状态变量。
【反例】
@Observed
class ClassA {
public c: number = 0;
constructor(c: number) {
this.c = c;
}
}
@Component
struct LinkChild {
@Link testNum: number;
build() {
Text(`LinkChild testNum ${this.testNum}`)
}
}
@Entry
@Component
struct Parent {
@State testNum: ClassA[] = [new ClassA(1)];
build() {
Column() {
Text(`Parent testNum ${this.testNum[0].c}`)
.onClick(() => {
this.testNum[0].c += 1;
})
// @Link装饰的变量需要和数据源@State类型一致
**自我介绍一下,小编13年上海交大毕业,曾经在小公司待过,也去过华为、OPPO等大厂,18年进入阿里一直到现在。**
**深知大多数HarmonyOS鸿蒙开发工程师,想要提升技能,往往是自己摸索成长或者是报班学习,但对于培训机构动则几千的学费,着实压力不小。自己不成体系的自学效果低效又漫长,而且极易碰到天花板技术停滞不前!**
**因此收集整理了一份《2024年HarmonyOS鸿蒙开发全套学习资料》,初衷也很简单,就是希望能够帮助到想自学提升又不知道该从何学起的朋友,同时减轻大家的负担。**
**既有适合小白学习的零基础资料,也有适合3年以上经验的小伙伴深入学习提升的进阶课程,基本涵盖了95%以上HarmonyOS鸿蒙开发知识点,真正体系化!**
**由于文件比较大,这里只是将部分目录大纲截图出来,每个节点里面都包含大厂面经、学习笔记、源码讲义、实战项目、讲解视频,并且会持续更新**
**如果你觉得这些内容对你有帮助,可以添加VX:vip204888 (备注鸿蒙获取)**

**一个人可以走的很快,但一群人才能走的更远。不论你是正从事IT行业的老鸟或是对IT行业感兴趣的新人,都欢迎扫码加入我们的的圈子(技术交流、学习资源、职场吐槽、大厂内推、面试辅导),让我们一起学习成长!**
升又不知道该从何学起的朋友,同时减轻大家的负担。**
[外链图片转存中...(img-i0eCwvgF-1712842337495)]
[外链图片转存中...(img-HjG73m9q-1712842337496)]
[外链图片转存中...(img-d6uNbn1v-1712842337496)]
**既有适合小白学习的零基础资料,也有适合3年以上经验的小伙伴深入学习提升的进阶课程,基本涵盖了95%以上HarmonyOS鸿蒙开发知识点,真正体系化!**
**由于文件比较大,这里只是将部分目录大纲截图出来,每个节点里面都包含大厂面经、学习笔记、源码讲义、实战项目、讲解视频,并且会持续更新**
**如果你觉得这些内容对你有帮助,可以添加VX:vip204888 (备注鸿蒙获取)**
[外链图片转存中...(img-GKxiC0Op-1712842337496)]
**一个人可以走的很快,但一群人才能走的更远。不论你是正从事IT行业的老鸟或是对IT行业感兴趣的新人,都欢迎扫码加入我们的的圈子(技术交流、学习资源、职场吐槽、大厂内推、面试辅导),让我们一起学习成长!**

讨论HarmonyOS开发技术,专注于API与组件、DevEco Studio、测试、元服务和应用上架分发等。
更多推荐
 22
22 0
0- 0


 已为社区贡献19条内容

所有评论(0)