Neural Network from Scratch in Cangjie: Part 2 - 仓颉从头开始的神经网络:第二部分
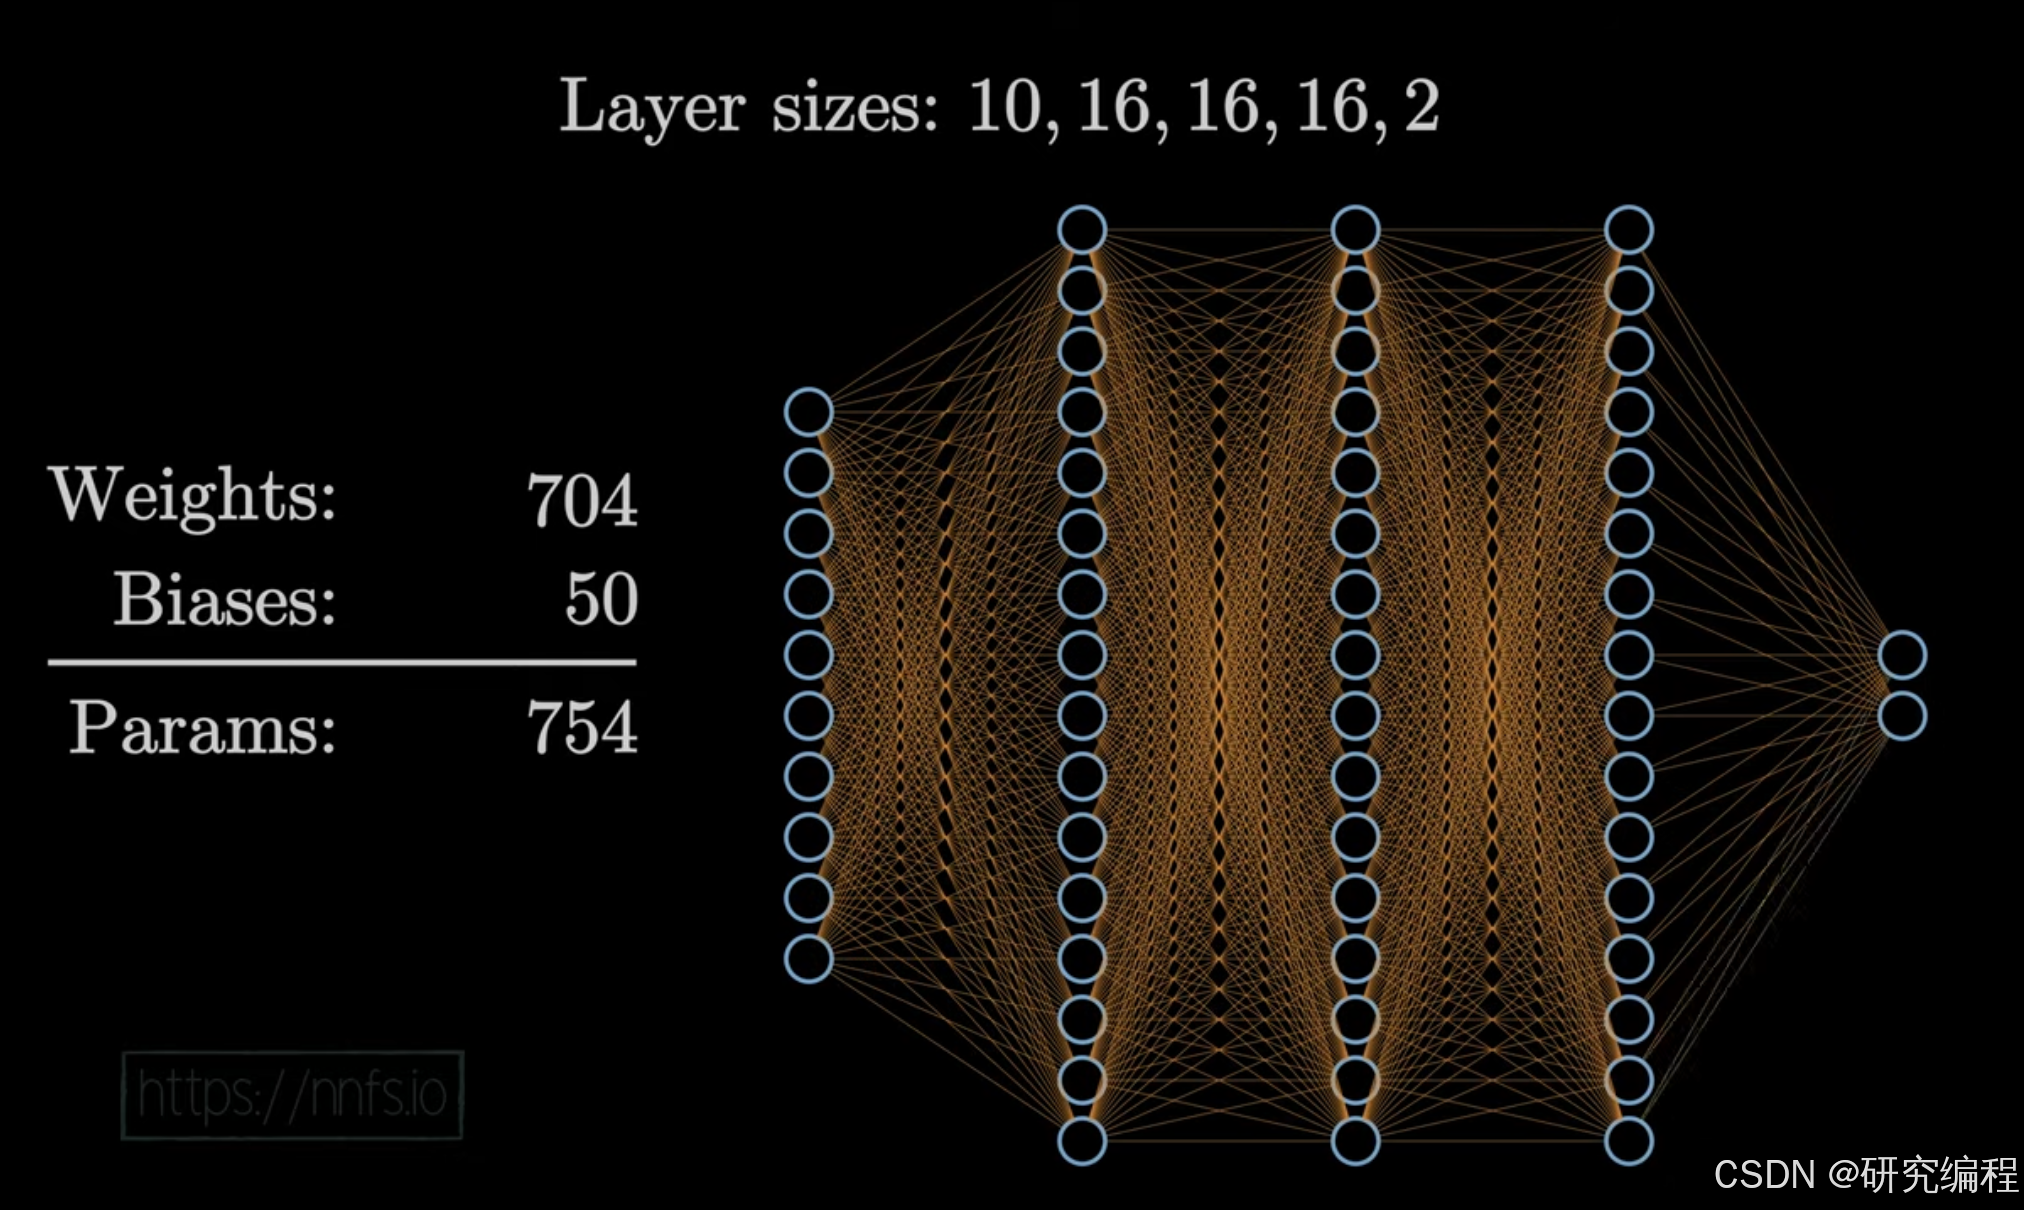
Today, we continue where we left off in part 1 - specifically, coding a single hidden layer in raw Cangjie.
In this part, we will implement batching, or the ability to feed multiple samples of data to the network at the same time. This necessitates further improvement to our code as we move from simple dot product of one input and many weights to many inputs and many weights - matrix product. We also need a way to better represent our hidden layers. As it is right now, everything lives in the main function. We also need the ability to initialize weights and biases without hard-coding the values ourselves. And finally, we need data. We will use simulated data generated by the `nnfs` Python helper package created by the book's author, because we need to compare our results as we progress, and check for inconsistencies.
The plan is to 1) install the dependencies - `matrix4cj` and `csv4cj`, 2) get our simulated data, 3) create a function that will load our data from a `csv` file, 4) refactor our code and transition to matrix based calculations, 5) put everything in a layer class and give it the ability to generate weights and biases without predefining values, 6) do the first "real" forward pass through the network.
Installing the dependencies
As I mentioned, we need to install `matrix4cj` and `csv4cj` packages to make our progress easier.
Please refer to my tutorial on how to install third-party packages in Cangjie.
[dependencies]
  matrix4cj = {git = "https://gitcode.com/Cangjie-TPC/matrix4cj.git", branch = "cjc_0.53.13", version = "1.0.0"}
  csv4cj = {git = "https://gitcode.com/Cangjie-TPC/csv4cj.git", branch = "cjc_0.53.13"}

[package]
  cjc-version = "0.53.13"
  compile-option = ""
  description = "nothing here"
  link-option = ""
  name = "aa"
  output-type = "executable"
  src-dir = ""
  target-dir = ""
  version = "1.0.0"
  package-configuration = {}
At this point, our `cjpm.toml` file looks like this.
Getting simulated data for our network
Because we are closely following the book but working with Cangjie instead of Python, our data exists on the Python side, so to speak. The book uses a self-developed `nnfs` package to provide readers with a way to generate sample data for the network. We will switch to Python for a moment to generate the very same data and export it to CSV to later load in Cangjie.
# Installing the dependencies in Python
pip install pandas nnfs
import nnfs
import pandas as pd
from nnfs.datasets import spiral_data
nnfs.init(random_seed=0)
X, y = spiral_data(samples=100, classes=3)
df = pd.DataFrame(X)
df = pd.concat([df, pd.Series(y)], axis=1)
print(df.sample(5))
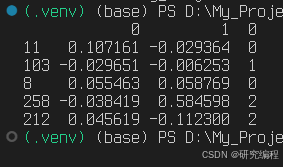
df.to_csv("test.csv", index=False, header=False)We use the so-called "spiral" data that has 3 classes and 100 samples per class, which equals 300 rows or data points. The first 2 columns are (x, y) coordinates and the third column is the predicted class. Below is a sample of 5 rows.
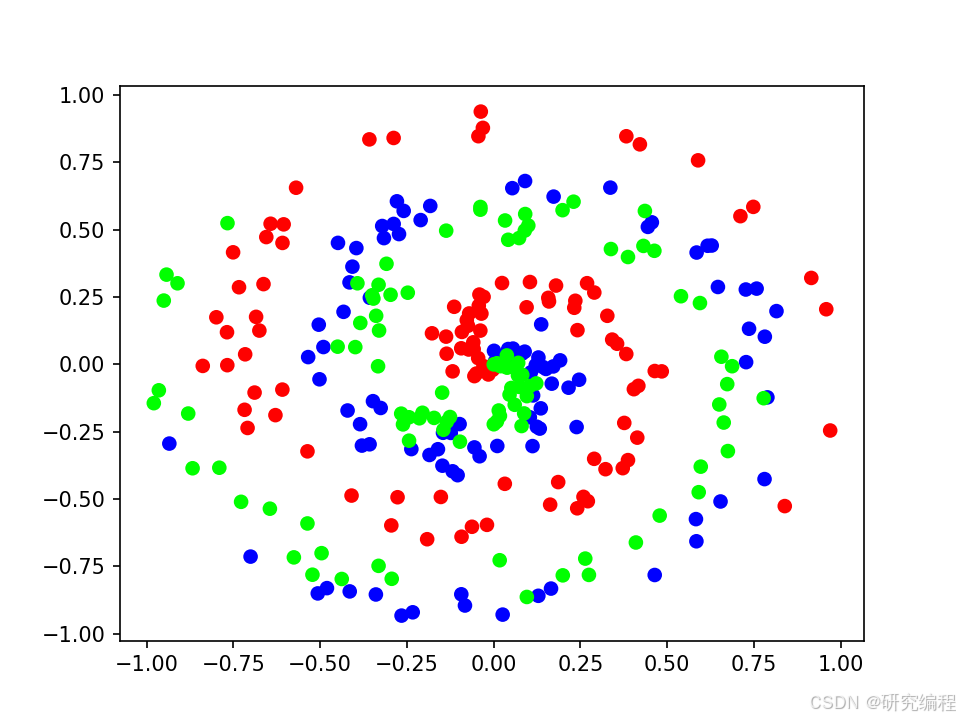
And this is how the data looks, illustrated. You can make the same plot with the code below (make sure to `pip install matplotlib` first):
import matplotlib.pyplot as plt

plt.scatter(X[:, 0], X[:, 1], c=y, cmap="brg")
plt.show()
Now we have our `test.csv` file that we can copy to the Cangjie project folder.
This task is done. Moving onto the next one.
Loading the test data in Cangjie
import matrix4cj.*
import std.collection.*
import std.random.*

// csv4cj dependencies
import csv4cj.*
import std.os.posix.*
import std.fs.*
import std.convert.*


func getData() {
    let yIdx: Int64 = 2
    let X = ArrayList<Array<Float64>>([])
    let y = ArrayList<Int64>([])

    let path: String = getcwd()
    let fileStream = File("${path}/test.csv", OpenOption.Open(true, false))

    //打开文件流
    if (fileStream.canRead()) {
        //创建字符读取的解析流
        let stream = UTF8ReaderStream(fileStream)
        let reader = CSVReader(stream)

        //创建格式化的解析参数
        let format: CSVParseFormat = CSVParseFormat.DEFAULT

        //创建解析器
        let csvParser = CSVParser(reader, format)
        for (csvRecord in csvParser) {
            let values = csvRecord.getValues()
            X.append(Array<Float64>(values[..yIdx].size, {j => Float64.parse(values[..yIdx][j].toString())}))
            y.append(Int64.parse(values[yIdx].toString()))
        }

        fileStream.close()
    }

    return (X.toArray(), y.toArray())
}
The first 7 rows is the dependencies so far in our project, the last 4 of which belong to `csv4cj` and our data loader.
I started with the example of a `csv` file reader provided by the package developer and removed all unrelated code:
https://gitcode.com/Cangjie-TPC/csv4cj/blob/cjc_0.53.13/samples/read_csv_file/src/read_csv_file.cj
First, I specify the `y` column index which is 2 and create empty array lists X and y that will hold our loaded and processed data.
Second, we iterate through each record (row) and get its values. Because we have 3 columns, we get an array of size 3.
Third, we slice the array by `yIdx` to separate our X and y. Because the CSV parser thinks that the values are strings, we loop through the array in place (similar to a list comprehension in Python), and with the help of a lambda function, convert the value types from string to the ones specified in the book - `float` for X, `int` for y - in this case Float64 and Int64. Given that we only have 3 classes for the `y`, we could convert the column to Int8 instead, but for the sake of simplicity we represent everything in 64 bits.
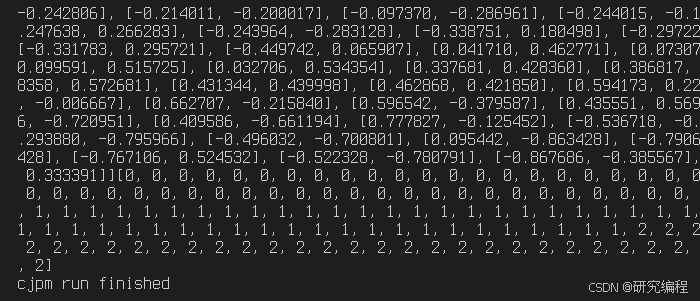
Finally, we return our X and y as a tuple. We can access our data as follows:
main() {
    let data = getData()

    print(data[0]) // X
    print(data[1]) // y
}
Transitioning to matrix based calculations
As a reminder, in part 1 we finished with code that looked like this:
main() {
    let inputs = ArrayList<Float64>([1.0, 2.0, 3.0, 2.5])
    let weights = ArrayList<Array<Float64>>([[0.2, 0.8, -0.5, 1.0], [0.5, -0.91, 0.26, -0.5], [-0.26, -0.27, 0.17, 0.87]]
    )
    let biases = ArrayList<Float64>([2.0, 3.0, 0.5])

    let layerOutputs = ArrayList<Float64>([])

    for (i in 0..weights.size) {
        let neuronWeights = weights[i]
        let neuronBias = biases[i]

        var neuronOutput = 0.0
        for (j in 0..inputs.size) {
            let nInput = inputs[j]
            let weight = neuronWeights[j]

            neuronOutput += nInput * weight
        }
        neuronOutput += neuronBias

        layerOutputs.append(neuronOutput)
    }

    println(layerOutputs)
}
The problem with this code is that if we add another sample to the input array, it becomes a nested array of 2, which will make calculating dot product more complex and the code less readable, as we would need a third nested loop, and as we know from Python: "Flat is better than nested."
main() {
    let inputs = Array<Array<Float64>>([[1.0, 2.0, 3.0, 2.5], [2.0, 5.0, -1.0, 2.0], [-1.5, 2.7, 3.3, -0.8]])

    let weights = Array<Array<Float64>>([[0.2, 0.8, -0.5, 1.0], [0.5, -0.91, 0.26, -0.5], [-0.26, -0.27, 0.17, 0.87]])

    // let biases = Array<Float64>([2.0, 3.0, 0.5])
    let biases = Array<Array<Float64>>(inputs.size, {_ => Array<Float64>([2.0, 3.0, 0.5])})
    println(biases)

    let weightsMatrix: Matrix = Matrix(weights)
    let inputsMatrix: Matrix = Matrix(inputs)
    let biasesMatrix: Matrix = Matrix(biases)

    let layerOutputs = inputsMatrix.times(weightsMatrix.transpose()).plus(biasesMatrix)

    println(layerOutputs.getArray())
}
In this version of code, the weights array remains the same - we have 3 sets of weights (3 neurons in a layer) for the input of size 4. These 4 values are our features, or values of 4 columns in X. Because neural networks learn better with batches of data and not with just one row at a time, we add another 2 rows of data, making it a sample of 3. The biases remain the same, except for one little issue that I will discuss later.
Now, it is time to convert our arrays to the Matrix data structure. So far, we have inputs as a matrix of size 3x4, weights of size 3x4 and biases of size 1x3. Although the sizes of inputs and weights matrices match, in order to calculate matrix product, we need to transpose the matrix basically rotating it 90 degrees counterclockwise and mirroring it so that the shape becomes 4x3 instead. We do that with the `transpose()` method.
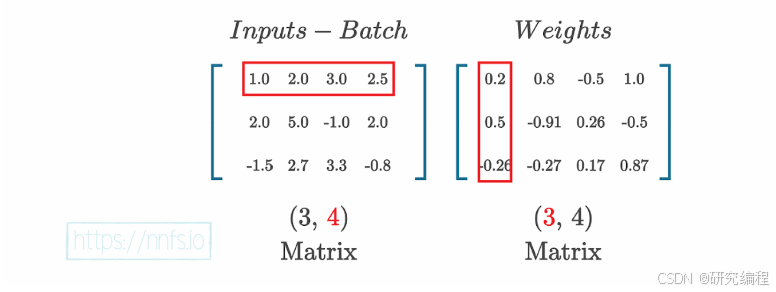
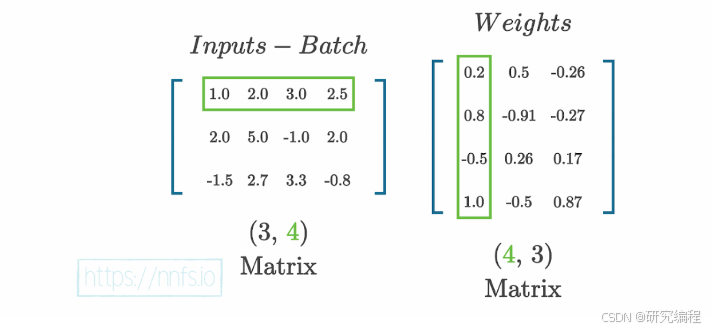
First, we calculate the matrix product with the following line of code:
inputsMatrix.times(weightsMatrix.transpose())We get a new matrix of size 3x3.
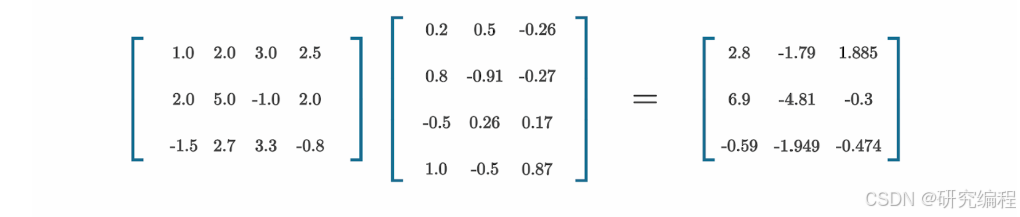
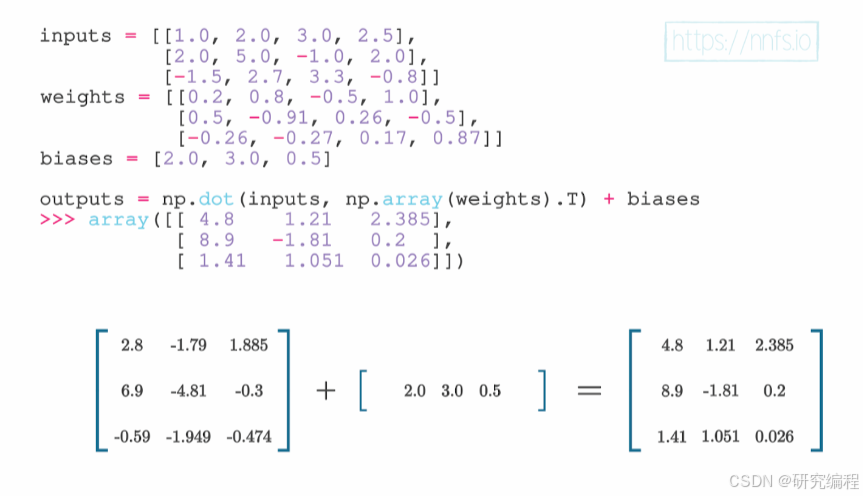
The next step is to add biases to the matrix product. If we were using Python's `numpy`, the following operation would be very straightforward.
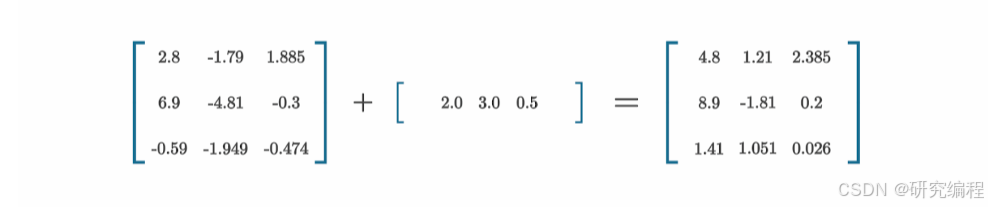
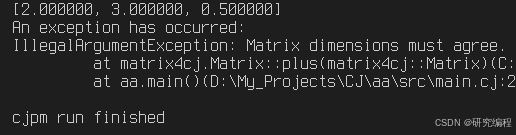
However, I discovered a problem: `matrix4cj` needs matrices to be of the same size when performing matrix addition. The above would result in `IllegalArgumentException`.
Because addition is a row by row operation, we can fix that by "padding" the biases matrix with copies of itself:
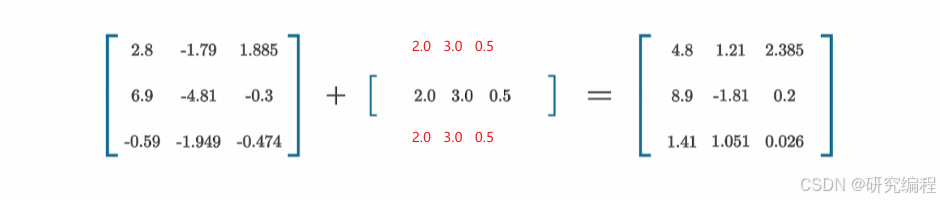
We do this with a lambda function by taking the array of biases and creating 3 copies of it in place. How do we know how many rows to create? We do that by looking at the size of our `inputs` array, which is 3. This way, if we have inputs of size 6, for example, the biases array will adjust itself to match the size of `inputs`.
let biases = Array<Array<Float64>>(inputs.size, {_ => Array<Float64>([2.0, 3.0, 0.5])})A 6x4 matrix multiplied by a 4x3 transposed matrix would give us a 6x3 matrix, which means that we need the size of the `biases` matrix to be 6x3 as well, therefore we need 6 rows in total.

We get the same layer outputs as in the book. To compare, below is the same code written in Python.
Moving onto the next step.
Making a layer class and writing generator functions
let random = Random(0)

class Layer_Dense {
    var weights: Matrix
    var biases: Matrix
    var output: Array<Array<Float64>>

    public init(nInputs: Int64, nNeurons: Int64, batchSize: Int64) {
        this.weights = Matrix(
            Array<Array<Float64>>(nNeurons, {_ => Array<Float64>(nInputs, {_ => random.nextFloat64() * 0.01})}))

        this.biases = Matrix(Array<Array<Float64>>(batchSize, {_ => Array<Float64>(nNeurons, {_ => 0.0})}))
        this.output = []
    }

    public func forward(inputs: Array<Array<Float64>>) {
        this.output = Matrix(inputs).times(this.weights.transpose()).plus(this.biases).getArray()
    }
}
First, we set up the random number generator with the seed of 0. We do this so that when you run the code on your machine, your results and my results will be the same.
Second, we create our dense layer class by initializing `weights` and `biases` as Matrix type. `output` needs to be the same type as the input - an array of arrays of floats. Notice that we use `var` keyword instead of `let` for weights and biases, as we would later need to go back and adjust them during backpropagation.
Second, we write the init function. For that, we need the number of inputs (which equals to the number of features - in our case 2), the number of neurons (usually a multiple of 2: 8, 16, 32, 64, 128), and batch size to control the size of the biases matrix, as discussed before.
To generate weights, we use a lambda function that creates an array of arrays of size `the number of neurons` x `the number of inputs`. Each value is a random Float64 multiplied by 0.01 in order to start with smaller values. The `_` in `{_ => random.nextFloat64() * 0.01}` indicates that we don't actually use the `i` iterator but take our values from the generator method instead. We do that to suppress the unused variable 'y' compiler warning. Finally, we convert the array to a Matrix. Biases are generated the same way as weights, but instead of random floats, we get all zeroes. The output is an empty array for now.
Lastly, we create the forward pass method, which takes inputs (either our X or outputs from a previous layer) and performs matrix product and addition as discussed before. Our layer code is complete!
Doing the first forward pass through the network
Here is the complete code:
package aa

import matrix4cj.*
import std.collection.*
import std.random.*
import csv4cj.*
import std.os.posix.*
import std.fs.*
import std.convert.*

let random = Random(0) // seed = 0

main() {
    let X: Array<Array<Float64>>
    let y: Array<Int64>

    (X, y) = getData()

    let dense1 = Layer_Dense(2, 4, X.size)
    let dense2 = Layer_Dense(4, 4, X.size)

    dense1.forward(X)
    println(dense1.output[..5])

    dense2.forward(dense1.output)
    println(dense2.output[..5])
}

class Layer_Dense {
    var weights: Matrix
    var biases: Matrix
    var output: Array<Array<Float64>>

    public init(nInputs: Int64, nNeurons: Int64, batchSize: Int64) {
        this.weights = Matrix(
            Array<Array<Float64>>(nNeurons, {_ => Array<Float64>(nInputs, {_ => random.nextFloat64() * 0.01})}))

        this.biases = Matrix(Array<Array<Float64>>(batchSize, {_ => Array<Float64>(nNeurons, {_ => 0.0})}))
        this.output = []
    }

    public func forward(inputs: Array<Array<Float64>>) {
        this.output = Matrix(inputs).times(this.weights.transpose()).plus(this.biases).getArray()
    }
}

func getData() {
    let yIdx: Int64 = 2
    let X = ArrayList<Array<Float64>>([])
    let y = ArrayList<Int64>([])

    let path: String = getcwd()
    let fileStream = File("${path}/test.csv", OpenOption.Open(true, false))

    //打开文件流
    if (fileStream.canRead()) {
        //创建字符读取的解析流
        let stream = UTF8ReaderStream(fileStream)
        let reader = CSVReader(stream)

        //创建格式化的解析参数
        let format: CSVParseFormat = CSVParseFormat.DEFAULT

        //创建解析器
        let csvParser = CSVParser(reader, format)
        for (csvRecord in csvParser) {
            let values = csvRecord.getValues()
            X.append(Array<Float64>(values[..yIdx].size, {j => Float64.parse(values[..yIdx][j].toString())}))
            y.append(Int64.parse(values[yIdx].toString()))
        }

        fileStream.close()
    }

    return (X.toArray(), y.toArray())
}
Let's take a look at the main function.
First, we load our data as before. Because the `getData()` function outputs a tuple, we can conveniently unpack it to X and y and avoid using `data[0]` and `data[1]`. Right now, `y` is unused.
Then, we create two dense layers - both consisting of 4 neurons. Based on our `X`, we have two features, making our input layer of size 2.
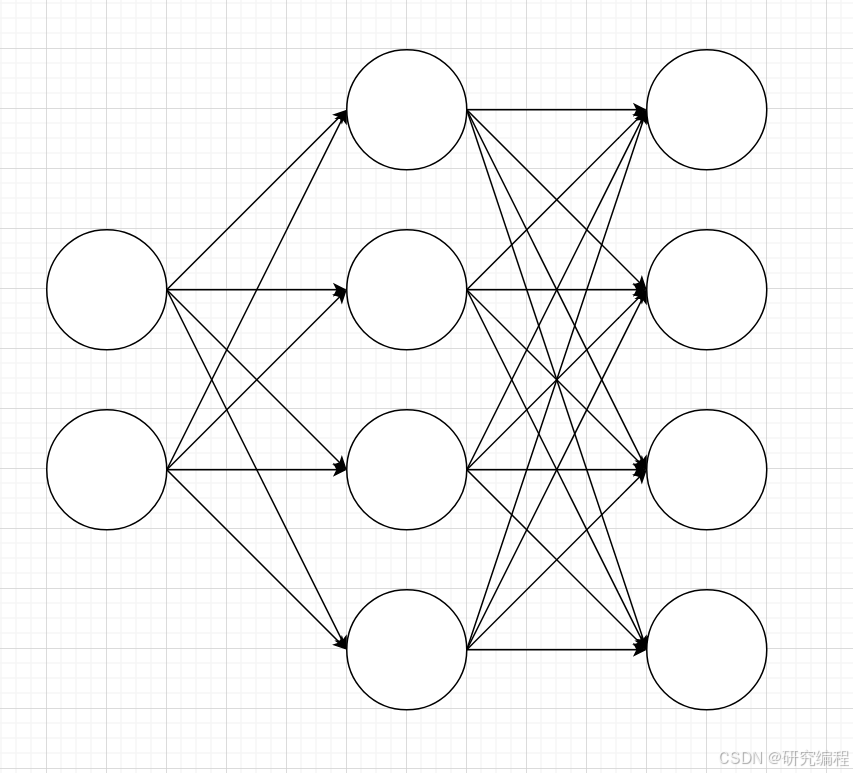
We write it as follows:
let dense1 = Layer_Dense(2, 4, X.size)
At this point, the batch size is 100, as we feed all the data through the network.
let dense2 = Layer_Dense(4, 4, X.size)
Based on the diagram, the input size of the second hidden layer is 4, as the first layer has 4 outputs, because we have 4 neurons.
It's time to do a forward pass; the output of the first hidden layer becomes the input of the second:
dense1.forward(X)
dense2.forward(dense1.output)
println(dense2.output[..5])

Notice how the outputs are approaching 0 - our network is still raw and unstable.
In the next tutorial, we will try to implement an activation function to control the layers' output.

讨论HarmonyOS开发技术,专注于API与组件、DevEco Studio、测试、元服务和应用上架分发等。
更多推荐



 11
11 0
0- 0


 已为社区贡献7条内容

所有评论(0)