如何创建一个HarmonyOS项目?_新建harmony项目
低代码开发方式具有丰富的UI界面编辑功能,通过可视化界面开发方式快速构建布局,可有效降低开发者的上手成本并提升开发者构建UI界面的效率。
如需使用低代码开发方式,请打开上图中的Enable Super Visual开关。
1. 点击**Finish**,工具会自动生成示例代码和相关资源,等待工程创建完成。
2. 工程创建完成后,在**entry > build-profile.json5**文件中,将targets中的runtimeOS改为“OpenHarmony”,然后点击右上角提示框的**Sync Now**以进行OpenHarmony应用开发。
### ArkTS工程目录结构(Stage模型)
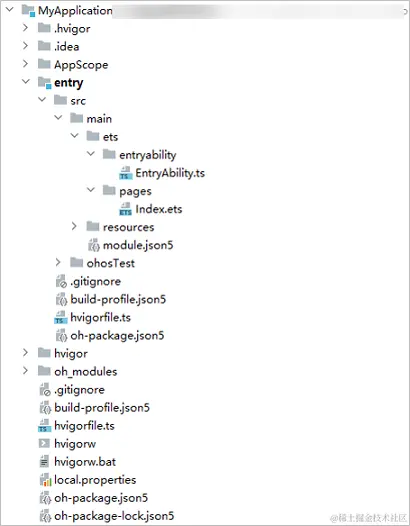
* **AppScope > app.json5**:应用的全局配置信息。
* **entry**:OpenHarmony工程模块,编译构建生成一个[HAP]( )包。
+ **src > main > ets**:用于存放ArkTS源码。
+ **src > main > ets > entryability**:应用/服务的入口。
+ **src > main > ets > pages**:应用/服务包含的页面。
+ **src > main > resources**:用于存放应用/服务所用到的资源文件,如图形、多媒体、字符串、布局文件等。
+ **src > main > module.json5**:模块配置文件。主要包含HAP的配置信息、应用/服务在具体设备上的配置信息以及应用/服务的全局配置信息。
+ **build-profile.json5**:当前的模块信息 、编译信息配置项,包括buildOption、targets配置等。其中targets中可配置当前运行环境,默认为HarmonyOS。若需开发OpenHarmony应用,则需开发者自行修改为OpenHarmony。
+ **hvigorfile.ts**:模块级编译构建任务脚本,开发者可以自定义相关任务和代码实现。
* **oh\_modules**:用于存放三方库依赖信息。
* **build-profile.json5**:应用级配置信息,包括签名、产品配置等。
* **hvigorfile.ts**:应用级编译构建任务脚本。
### 构建第一个页面
1. 使用文本组件。
工程同步完成后,在“**Project**”窗口,点击“**entry > src > main > ets > pages**”,打开“**Index.ets**”文件,可以看到页面由Text组件组成。“**Index.ets**”文件的示例如下:
// Index.ets
@Entry
@Component
struct Index {
@State message: string = ‘Hello World’
build() {
Row() {
Column() {
Text(this.message)
.fontSize(50)
.fontWeight(FontWeight.Bold)
}
.width(‘100%’)
}
.height(‘100%’)
}
}
ts
2. 添加按钮。

 在默认页面基础上,我们添加一个Button组件,作为按钮响应用户点击,从而实现跳转到另一个页面。“**Index.ets**”文件的示例如下:
// Index.ets
@Entry
@Component
struct Index {
@State message: string = ‘Hello World’
build() {
Row() {
Column() {
Text(this.message)
.fontSize(50)
.fontWeight(FontWeight.Bold)
// 添加按钮,以响应用户点击
Button() {
Text(‘Next’)
.fontSize(30)
.fontWeight(FontWeight.Bold)
}
.type(ButtonType.Capsule)
.margin({
top: 20
})
.backgroundColor(‘#0D9FFB’)
.width(‘40%’)
.height(‘5%’)
}
.width(‘100%’)
}
.height(‘100%’)
}
}
ts
3. 在编辑窗口右上角的侧边工具栏,点击Previewer,打开预览器。第一个页面效果如下图所示:

### 构建第二个页面
1. 创建第二个页面。
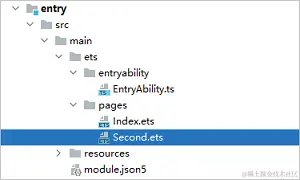
* 新建第二个页面文件。在“**Project**”窗口,打开“**entry > src > main > ets**”,右键点击“**pages**”文件夹,选择“**New > ArkTS File**”,命名为“**Second**”,点击“**Finish**”。可以看到文件目录结构如下:
> **说明:**
>
> 开发者也可以在右键点击“**pages**”文件夹时,选择“**New > Page**”,则无需手动配置相关页面路由。
-
配置第二个页面的路由。在“Project”窗口,打开“entry > src > main > resources > base > profile”,在main_pages.json文件中的“src”下配置第二个页面的路由“pages/Second”。示例如下:
{
  "src": [
    "pages/Index",
    "pages/Second"
  ]
}
json
1. 添加文本及按钮。

 参照第一个页面,在第二个页面添加Text组件、Button组件等,并设置其样式。“**Second.ets**”文件的示例如下:
// Second.ets
@Entry
@Component
struct Second {
@State message: string = ‘Hi there’
build() {
Row() {
Column() {
Text(this.message)
.fontSize(50)
.fontWeight(FontWeight.Bold)
Button() {
Text(‘Back’)
.fontSize(25)
.fontWeight(FontWeight.Bold)
}
.type(ButtonType.Capsule)
.margin({
top: 20
})
.backgroundColor(‘#0D9FFB’)
.width(‘40%’)
.height(‘5%’)
}
.width(‘100%’)
}
.height(‘100%’)
}
}
ts
### 实现页面间的跳转


页面间的导航可以通过[页面路由router]( )来实现。页面路由router根据页面url找到目标页面,从而实现跳转。使用页面路由请导入router模块。


1. 第一个页面跳转到第二个页面。

 在第一个页面中,跳转按钮绑定onClick事件,点击按钮时跳转到第二页。“**Index.ets**”文件的示例如下:
// Index.ets
// 导入页面路由模块
import router from ‘@ohos.router’;
@Entry
@Component
struct Index {
@State message: string = ‘Hello World’
build() {
Row() {
Column() {
Text(this.message)
.fontSize(50)
.fontWeight(FontWeight.Bold)
// 添加按钮,以响应用户点击
Button() {
Text(‘Next’)
.fontSize(30)
.fontWeight(FontWeight.Bold)
}
.type(ButtonType.Capsule)
.margin({
top: 20
})
.backgroundColor(‘#0D9FFB’)
.width(‘40%’)
.height(‘5%’)
// 跳转按钮绑定onClick事件,点击时跳转到第二页
.onClick(() => {
console.info(Succeeded in clicking the 'Next' button.)
// 跳转到第二页
router.pushUrl({ url: ‘pages/Second’ }).then(() => {
console.info(‘Succeeded in jumping to the second page.’)
}).catch((err) => {
console.error(Failed to jump to the second page.Code is ${err.code}, message is ${err.message})
})
})
}
.width(‘100%’)
}
.height(‘100%’)
}
}
ts
2. 第二个页面返回到第一个页面。

 在第二个页面中,返回按钮绑定onClick事件,点击按钮时返回到第一页。“**Second.ets**”文件的示例如下:
// Second.ets
// 导入页面路由模块
import router from ‘@ohos.router’;
@Entry
@Component
struct Second {
@State message: string = ‘Hi there’
build() {
Row() {
Column() {
Text(this.message)
.fontSize(50)
.fontWeight(FontWeight.Bold)
Button() {
Text(‘Back’)
.fontSize(25)
.fontWeight(FontWeight.Bold)
}
.type(ButtonType.Capsule)
.margin({
top: 20
})
.backgroundColor(‘#0D9FFB’)
.width(‘40%’)
.height(‘5%’)
// 返回按钮绑定onClick事件,点击按钮时返回到第一页
.onClick(() => {
console.info(Succeeded in clicking the 'Back' button.)
try {
// 返回第一页
router.back()
console.info(‘Succeeded in returning to the first page.’)
} catch (err) {
console.error(Failed to return to the first page.Code is ${err.code}, message is ${err.message})
}
})
}
.width(‘100%’)
}
.height(‘100%’)
}
}
ts
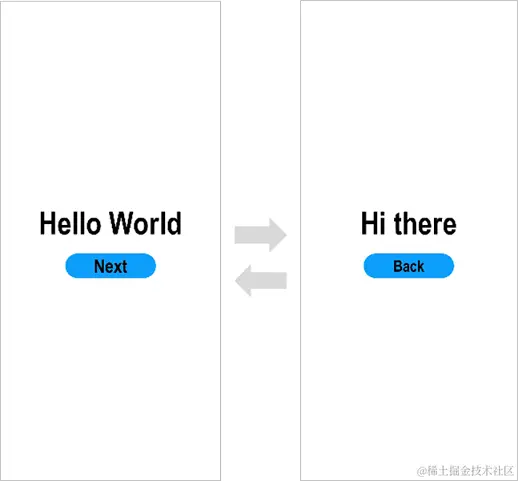
3. 打开Index.ets文件,点击预览器中的

按钮进行刷新。效果如下图所示:

讨论HarmonyOS开发技术,专注于API与组件、DevEco Studio、测试、元服务和应用上架分发等。
更多推荐


 11
11 0
0- 0


 已为社区贡献1条内容

所有评论(0)