HarmonyOS 5.0开发,USB服务开发(批量传输)
目录
1、如何得知USB设备异常断开?例如,拔掉USB线、将设备关机等?
前言
本专栏记录鸿蒙应用开发的一些知识,供鸿蒙开发者学习。
本文主要讲解HarmonyOS 5.0 USB服务开发,包括USB设备的扫描、连接USB设备、读取USB设备消息,向USB设备传输数据等,其中数据传输方式采用批量传输的方式。
gitee地址:harmony_connect_demo: HarmonyOS 5.0 IoT物联网开发
git仓库:git@gitee.com:zywQAQ/harmony_connect_demo.git
版本说明:本文的API版本为14
一、业务场景
1、POS机
USB服务开发,目前我知道的业务场景是那种一体化的安卓机POS机,见下图。笔者目前的工作就属于打印机行业,所以有USB开发的需求。至于其他的业务场景,目前博主还没遇到。如果读者有了解的,可以在评论区留言。后续笔者换了工作,有新的USB服务开发需求,也会积极补充。
如果是PC,一般也是在系统层用USB驱动去管理设备,很少会在应用层用API去管理设备。
iPhone想要开发USB服务,好像要苹果的MFi认证。
感觉鸿蒙弄USB服务开发,也是和安卓那样,做鸿蒙POS机,当然这只是笔者的一孔之见。后续国产化,现在的POS机可能都得换成鸿蒙的,所以USB服务开发需求,应该也是有的。
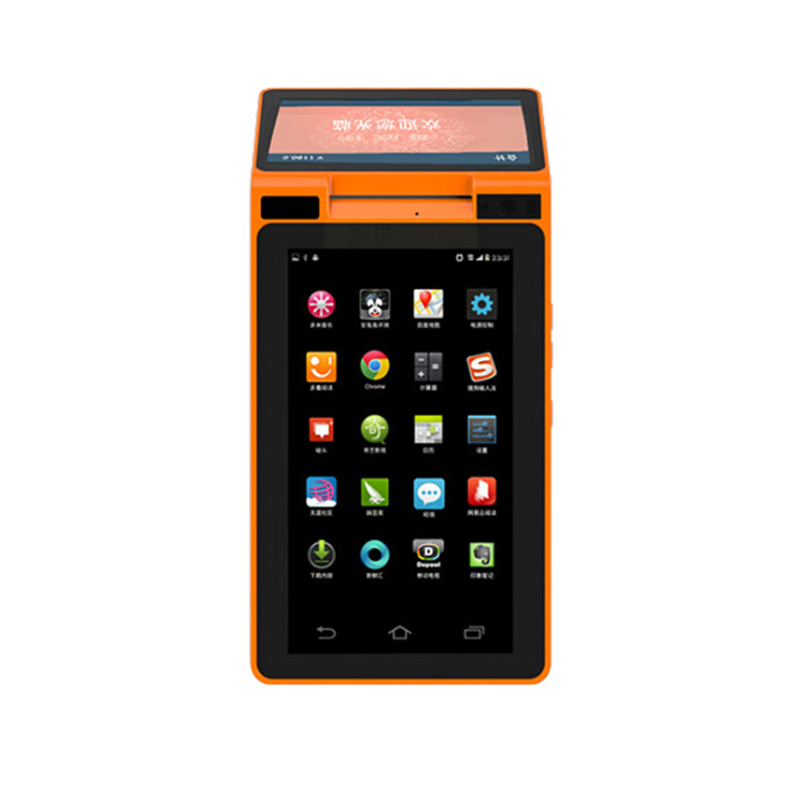
图片来自网络,侵权删
二、代码编写
1、定义连接状态常量,列举所有可能的连接状态
连接周期如下:
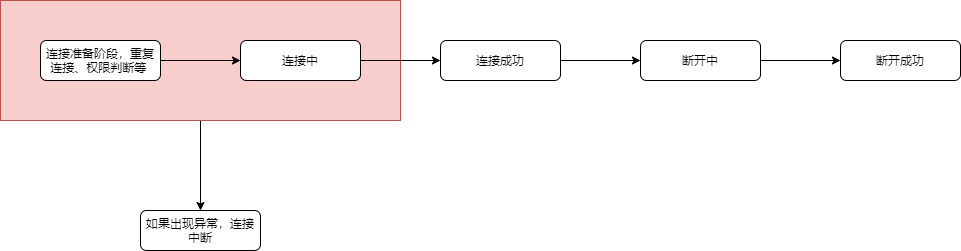
详细代码如下:
/**
 * 设备连接状态
 */
export class ConnectionState {
  /**
   * 连接中
   */
  static readonly STATE_CONNECTING = 1
  /**
   * 已连接
   */
  static readonly STATE_CONNECTED = 2
  /**
   * 断开中
   */
  static readonly STATE_DISCONNECTING = 3
  /**
   * 已断开
   */
  static readonly STATE_DISCONNECTED = 4
  /**
   * 连接中断 -- 连接时,设备id错误,无权限等情况触发
   */
  static readonly STATE_INTERRUPTED = 5
}
2、定义USB设备实体
虽然官方定义的USB实体类型是usbManager.USBDevice,但可读性不强,我们可以在usbManager.USBDevice的基础上,根据业务需求再加几个属性,封装成新的、易读的USB实体类。
本文新增的属性有:
deviceId:由usbManager.USBDevice.name得来。用于后续申请USB连接权限,以及判断是否重复连接。此属性唯一,可以理解USB设备接入了终端设备的哪一个USB口。
deviceName:自定义属性。可以自己按自己的想法给USB设备取名字,例如manufacturerName(制造商)+ deviceId(设备Id)的形式,或pid + vid形式。
manufacturerName:由usbManager.USBDevice.manufacturerName得来。把manufacturerName提取出来,可以方便查看制造商名称。
pid:由usbManager.USBDevice.productId得来。把pid提取出来,pid和vid一起,相当于USB设备的身份证,无论是什么平台的API,安卓也好、flutter也好、还是鸿蒙,扫描得到的pid都是一样的。根据这个特性,我们可以用pid + vid的方式,判断这个USB设备是否是我们的设备。
vid:由usbManager.USBDevice.vendorId得来。把vid提取出来,pid和vid一起,相当于USB设备的身份证,无论是什么平台的API,安卓也好、flutter也好、还是鸿蒙,扫描得到的vid都是一样的。根据这个特性,我们可以用pid + vid的方式,判断这个USB设备是否是我们的设备。
usbDevice:由usbManager.USBDevice得来,就是官方定义的USB实体。
connectionState:新增属性,意为当前USB实体的连接状态。默认状态“已断开”,即ConnectionState.STATE_DISCONNECTED。
connectTime:新增属性,意为当前USB实体成功连接时的时间戳。
详细代码如下:
/**
 * Usb设备实体
 */
export class UsbDevice {
  /**
   * 设备 ID
   */
  deviceId: string
  /**
   * 设备名称
   */
  deviceName: string
  /**
   * 制造商
   */
  manufacturerName: string
  /**
   * pid
   */
  pid: number
  /**
   * vid
   */
  vid: number
  /**
   * usbManager.USBDevice
   */
  usbDevice: usbManager.USBDevice
  /**
   * 设备当前连接状态
   */
  connectionState: number = ConnectionState.STATE_DISCONNECTED
  /**
   * Device连接成功时间戳
   */
  connectTime: number = -1

  /**
   * 构造函数
   * @param deviceId
   * @param deviceName
   * @param manufacturerName
   * @param pid
   * @param vid
   * @param usbDevice
   */
  constructor(
    deviceId: string,
    deviceName: string,
    manufacturerName: string,
    pid: number,
    vid: number,
    usbDevice: usbManager.USBDevice,
  ) {
    this.deviceId = deviceId
    this.deviceName = deviceName
    this.manufacturerName = manufacturerName
    this.pid = pid
    this.vid = vid
    this.usbDevice = usbDevice
  }
}
3、扫描USB设备
3.1 涉及到的官方API
扫描USB设备:usbManager.getDevices
let devicesList: Array<usbManager.USBDevice> = usbManager.getDevices();
console.log(`devicesList = ${devicesList}`);
3.2 封装
定义一个公共方法 [ startScan ],参数只有一个 -- Usb设备实体回调。我们把使用usbManager.getDevices得到的USB设备列表,遍历,封装成UsbDevice暴露给用户。
注:USB扫描是一瞬间完成的,不像蓝牙,需要不断扫描。所以USB没有停止扫描的说法。
详细代码如下:
/**
 * 扫描 USB 设备
 * @param callback  设备回调
 */
public startScan(callback: Callback<UsbDevice>): void {
  // 替换用户参数
  this.onScanDeviceFound = callback
  // 正式开始扫描设备
  this.startScanDevice()
}

/**
 * 由用户决定设备后续的处理逻辑
 */
private onScanDeviceFound: Callback<UsbDevice> = (device: UsbDevice): void => {
  console.info(this.TAG, `扫描到设备: ${JSON.stringify(device, null, 2)}`)
}
/**
 * 扫描到设备回调,用户无法指定。封装一层 { onScanDeviceFound }
 */
private USBDeviceFindFunc: Callback<Array<usbManager.USBDevice>> = (devices: Array<usbManager.
  devices.forEach((device: usbManager.USBDevice) => {
    const deviceId = device.name
    const deviceName = device.productName
    const manufacturerName = device.manufacturerName
    const pid = device.productId
    const vid = device.vendorId
    // 把 scanDevice 暴露出去,供外部函数回调获得
    const scanDevice: UsbDevice = new UsbDevice(
      deviceId,
      `${deviceName} ${deviceId}`,
      manufacturerName,
      pid,
      vid,
      device
    )
    this.onScanDeviceFound(scanDevice)
  })
}
/**
 * 正式开始扫描USB设备
 */
private startScanDevice() {
  try {
    console.info(this.TAG, '开始扫描USB设备')
    // 开始扫描
    const devices: Array<usbManager.USBDevice> = usbManager.getDevices()
    // 处理扫描到的设备
    this.USBDeviceFindFunc(devices)
  } catch (err) {
    console.error(this.TAG, `startScanDevice: err = ${JSON.stringify(err)}`)
  }
}
4、连接USB设备
4.1 涉及到的官方API
是否有权访问此USB设备:usbManager.hasRight
let devicesList: Array<usbManager.USBDevice> = usbManager.getDevices();
if (devicesList.length == 0) {
  console.log(`device list is empty`);
}

let device: usbManager.USBDevice = devicesList[0];
usbManager.requestRight(device.name);
let right: boolean = usbManager.hasRight(device.name);
console.log(`${right}`);申请访问此USB设备:usbManager.requestRight
let devicesList: Array<usbManager.USBDevice> = usbManager.getDevices();
if (devicesList.length == 0) {
  console.log(`device list is empty`);
}

let device: usbManager.USBDevice = devicesList[0];
usbManager.requestRight(device.name).then(ret => {
  console.log(`requestRight = ${ret}`);
});连接USB设备:usbManager.connectDevice
注:官网给的示例代码是错的,usbManager.requestRight是异步函数,未等待异步函数返回结果就执行usbManager.connectDevice,程序会奔溃
let devicesList: Array<usbManager.USBDevice> = usbManager.getDevices();
if (devicesList.length == 0) {
  console.log(`device list is empty`);
}

let device: usbManager.USBDevice = devicesList[0];
usbManager.requestRight(device.name);
let devicepipe: usbManager.USBDevicePipe = usbManager.connectDevice(device);
console.log(`devicepipe = ${devicepipe}`);注册通讯接口:usbManager.claimInterface
let devicesList: Array<usbManager.USBDevice> = usbManager.getDevices();
if (devicesList.length == 0) {
  console.log(`device list is empty`);
}

let device: usbManager.USBDevice = devicesList[0];
usbManager.requestRight(device.name);
let devicepipe: usbManager.USBDevicePipe = usbManager.connectDevice(device);
let interfaces: usbManager.USBInterface = device.configs[0].interfaces[0];
let ret: number= usbManager.claimInterface(devicepipe, interfaces);
console.log(`claimInterface = ${ret}`);
4.2 封装
连接流程图:
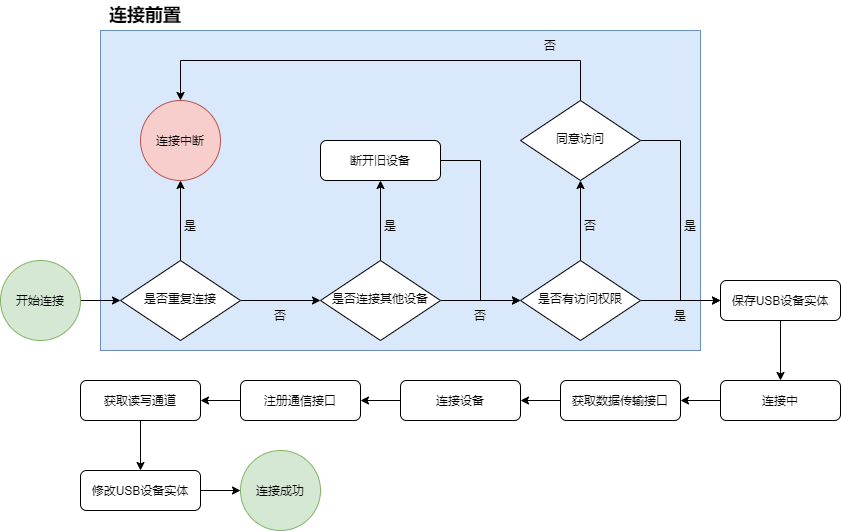
定义一个公共方法 [ connect ],参数有:
device:扫描到的USB设备实体。连接USB设备必须先扫描得到USB设备,不可以像蓝牙一样,仅通过deviceId(虚拟MAC地址),就可以完成连接。
callbcak:连接状态回调,需要告诉用户,当前连接是成功还是失败。
详细代码如下:
/**
 * 当前连接的设备
 */
private mUsbDevice: UsbDevice | null = null
/**
 * 设备传输接口
 */
private mInterfaces: usbManager.USBInterface | null = null
/**
 * 连接标识
 */
private mPipe: usbManager.USBDevicePipe | null = null
/**
 * 通信接口打开标识
 */
private mOpenId: number = -1
/**
 * 读通道
 */
private mReadChannel: usbManager.USBEndpoint | null = null
/**
 * 写通道
 */
private mWriteChannel: usbManager.USBEndpoint | null = null

/**
 * 连接 USB 设备 -- 只允许搜索连接,不允许快速连接
 * @param device    设备
 * @param callback  连接状态回调
 * @returns
 */
public async connect(device: UsbDevice, callback: Callback<ConnectionState>): Promise<void> {
  // 替换用户参数
  this.onConnectStateChange = callback
  // 不允许重复连接
  if (this.mUsbDevice?.deviceId === device.deviceId) {
    console.warn(this.TAG, "重复连接")
    // 通知用户连接中断
    this.onConnectStateChange(ConnectionState.STATE_INTERRUPTED)
    return
  }
  // 如果已经连接其他设备
  if (this.mUsbDevice?.deviceId) {
    console.warn(this.TAG, "断开以前的连接")
    this.disconnect()
  }
  // 是否有访问权限
  const right: boolean = usbManager.hasRight(device.deviceId)
  if (!right) {
    // 申请权限
    const right: boolean = await usbManager.requestRight(device.deviceId)
    if (!right) {
      console.warn(this.TAG, "访问权限被拒绝")
      // 通知用户连接中断
      this.onConnectStateChange(ConnectionState.STATE_INTERRUPTED)
      return
    }
  }
  // 刷新当前的设备
  this.mUsbDevice = device
  // 正式连接设备
  this.connectDevice()
}

/**
 * 可由用户决定设备连接状态的具体处理逻辑
 */
private onConnectStateChange: Callback<ConnectionState> = (state: ConnectionState): void => {
  console.info(this.TAG, `设备连接信息: ${JSON.stringify(state)}`)
}
/**
 * 连接设备回调,用户无法指定。封装一层 { onConnectStateChange }
 */
private USBConnectionStateChangeFunc = (err?: BusinessError): void => {
  if (err) {
    console.error(this.TAG, `设备连接失败: err = ${JSON.stringify(err)}`)
    // 一般正常的USB设备都不会报错,这个分支没遇见过,不做主要逻辑
    // 断开连接
    this.disconnect()
    return
  }
  // 有且只有这里通知用户设备连接成功,且需要修改 [Device] 的 [connectionState]
  console.info(this.TAG, "设备连接成功")
  this.mUsbDevice!!.connectionState = ConnectionState.STATE_CONNECTED
  this.mUsbDevice!!.connectTime = systemDateTime.getTime()
  this.onConnectStateChange(ConnectionState.STATE_CONNECTED)
}
/**
 * 正式连接设备
 */
private connectDevice(): void {
  try {
    console.info(this.TAG, "开始连接设备")
    this.onConnectStateChange(ConnectionState.STATE_CONNECTING)
    // 获取数据传输接口 TODO interfaces可能不止一个
    const configs: Array<usbManager.USBConfiguration> = this.mUsbDevice!!.usbDevice.configs
    const interfaces: usbManager.USBInterface = configs[0].interfaces[0]
    this.mInterfaces = interfaces
    // 连接设备
    const pipe: usbManager.USBDevicePipe = usbManager.connectDevice(this.mUsbDevice!!.usbDevice)
    this.mPipe = pipe
    // 注册通信接口
    const openId = usbManager.claimInterface(this.mPipe, this.mInterfaces)
    this.mOpenId = openId
    // 获取读写通道
    this.mInterfaces.endpoints.forEach((item) => {
      if (item.direction === usbManager.USBRequestDirection.USB_REQUEST_DIR_FROM_DEVICE) {
        this.mReadChannel = item
      } else if (item.direction === usbManager.USBRequestDirection.USB_REQUEST_DIR_TO_DEVICE) {
        this.mWriteChannel = item
      }
    })
    // 读写通道获取完成
    this.USBConnectionStateChangeFunc()
  } catch (err) {
    console.error(this.TAG, `connectDevice: err = ${JSON.stringify(err)}`)
    this.USBConnectionStateChangeFunc(err as BusinessError)
  }
}
5、断开USB设备
5.1 涉及到的官方API
释放注册过的通信接口:usbManager.releaseInterface
let devicesList: Array<usbManager.USBDevice> = usbManager.getDevices();
if (devicesList.length == 0) {
  console.log(`device list is empty`);
}

let device: usbManager.USBDevice = devicesList[0];
usbManager.requestRight(device.name);
let devicepipe: usbManager.USBDevicePipe = usbManager.connectDevice(device);
let interfaces: usbManager.USBInterface = device.configs[0].interfaces[0];
let ret: number = usbManager.claimInterface(devicepipe, interfaces);
ret = usbManager.releaseInterface(devicepipe, interfaces);
console.log(`releaseInterface = ${ret}`);关闭设备消息控制通道:usbManager.closePipe
let devicesList: Array<usbManager.USBDevice> = usbManager.getDevices();
if (devicesList.length == 0) {
  console.log(`device list is empty`);
}

usbManager.requestRight(devicesList[0].name);
let devicepipe: usbManager.USBDevicePipe = usbManager.connectDevice(devicesList[0]);
let ret: number = usbManager.closePipe(devicepipe);
console.log(`closePipe = ${ret}`);
5.2 封装
断开流程图:
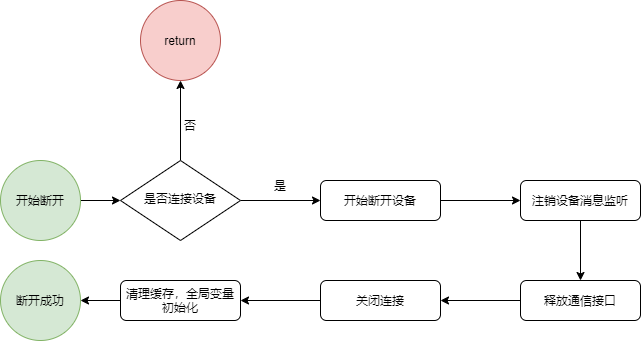
定义一个公共方法 [ disconnect ],没有参数。断开设备成功,会在 [ onConnectStateChange ]中给出提示,而用户在连接设备时,已经传入连接状态回调的处理方式。
详细代码如下:
/**
 * 断开连接
 */
public disconnect(): void {
  // 必须连接设备
  if (!this.hasDeviceConnected()) {
    console.error(this.TAG, "请先连接设备")
    return
  }
  // 正式断开连接
  this.disconnectDevice()
  // 清理缓存
  this.clearCache()
  // 通知用户设备断开 -- 有且只有这里通知用户设备断开
  this.onConnectStateChange(ConnectionState.STATE_DISCONNECTED)
}

/**
 * 正式断开设备
 */
private disconnectDevice(): void {
  // 注销监听事件和断开设备。一般连接成功后,断开连接时需要执行
  try {
    console.error(this.TAG, "开始断开设备")
    this.onConnectStateChange(ConnectionState.STATE_DISCONNECTING)
    // 注销设备消息事件
    this.unRegisterDeviceMsg()
    // 注销通信接口
    usbManager.releaseInterface(this.mPipe, this.mInterfaces)
    // 关闭连接
    usbManager.closePipe(this.mPipe)
  } catch (err) {
    console.error(this.TAG, `disconnectDevice: err = ${JSON.stringify(err)}`)
  }
}
/**
 * 清空设备缓存
 */
private clearCache(): void {
  // 清理连接器各属性变量
  console.info(this.TAG, "清空设备缓存")
  // 重置连接参数
  this.mUsbDevice = null
  this.mInterfaces = null
  this.mPipe = null
  this.mOpenId = -1
  this.mReadChannel = null
  this.mWriteChannel = null
}
6、监听设备消息
6.1 涉及到的官方API
//usbManager.getDevices 接口返回数据集合,取其中一个设备对象,并获取权限。
//把获取到的设备对象作为参数传入usbManager.connectDevice;当usbManager.connectDevice接口成功返回之后;
//才可以调用第三个接口usbManager.claimInterface.当usbManager.claimInterface 调用成功以后,再调用该接口。
let devicesList: Array<usbManager.USBDevice> = usbManager.getDevices();
if (devicesList.length == 0) {
  console.log(`device list is empty`);
}


let device: usbManager.USBDevice = devicesList[0];
usbManager.requestRight(device.name);


let devicepipe: usbManager.USBDevicePipe = usbManager.connectDevice(device);
for (let i = 0; i < device.configs[0].interfaces.length; i++) {
  if (device.configs[0].interfaces[i].endpoints[0].attributes == 2) {
    let endpoint: usbManager.USBEndpoint = device.configs[0].interfaces[i].endpoints[0];
    let interfaces: usbManager.USBInterface = device.configs[0].interfaces[i];
    let ret: number = usbManager.claimInterface(devicepipe, interfaces);
    let buffer =  new Uint8Array(128);
    usbManager.bulkTransfer(devicepipe, endpoint, buffer).then((ret: number) => {
      console.log(`bulkTransfer = ${ret}`);
    });
  }
}
6.2 封装
监听设备消息流程图:
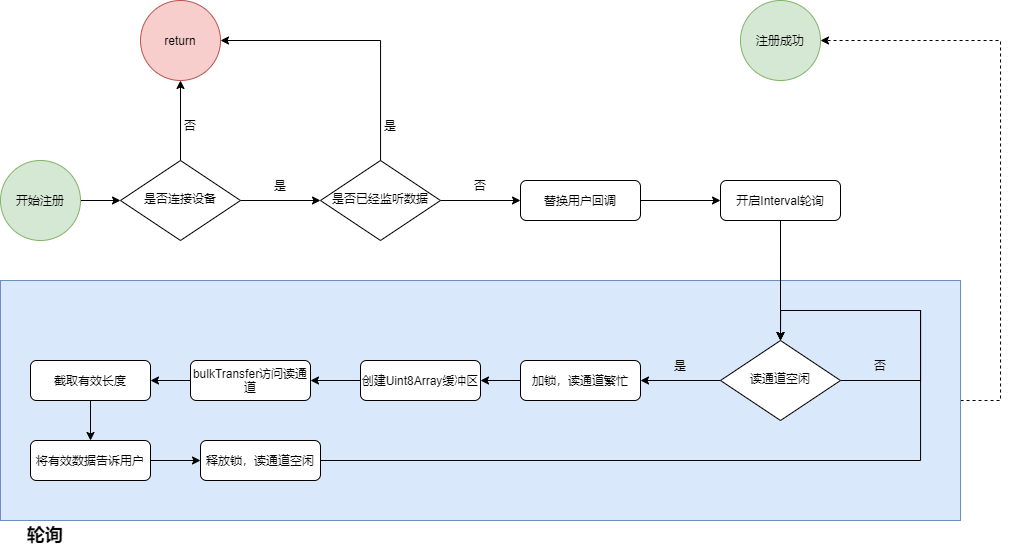
定义一个公共方法 [ registerDeviceMsg ],参数是设备消息回调,即十进制数组(ASCII码)。读取设备消息,需要用到我们刚刚连接设备时,获取的读通道。本文已用 [ mReadChannel ] 全局保存设备读通道
调用官方API [ usbManager.bulkTransfer ],仅读取一次数据。所以想要持续的监听设备消息,我们需要创建一个定时器,持续轮询的读取设备消息。而读取数据是异步耗时操作,所以我得加锁,创建一个变量 [ mIsReadFree ],判断读通道是否空闲,只有空闲时,才读取数据。因此轮询时间可以设为0。
值得注意的是,我们需要指定 [ usbManager.bulkTransfer ] 的参数 [ timeout ]。虽然可以不设置,默认为0,但带点延迟,可以防止读通道卡死。读取数据这个异步耗时操作,当设备无消息返回时,耗时大概等于你设置的这个 [ timeout ] 。如果有数据返回,则大概是几毫秒的时间。
详细代码如下:
/**
 * 是否注册了设备消息事件。用于判断是否注册的/注销该事件,防止重复执行
 */
private mIsRegisterDeviceMsg: boolean = false
/**
 * 轮询访问读通道定时器
 */
private mIntervalReadID: number = -1
/**
 * 超时时间 -- 延迟多久执行读写操作,单位ms,最好带点延迟,不如通道会卡死,卡死你就只能重启外设
 */
private readonly mBulkTransferTime: number = 1000
/**
 * 读通道是否空闲
 */
private mIsReadFree: boolean = true

/**
 * 注册设备消息事件
 * @param callback 可选,设备消息回调
 */
public registerDeviceMsg(callback: Callback<number[]> = this.onReadMsg): void {
  // 必须连接设备
  if (!this.hasDeviceConnected()) {
    console.error(this.TAG, "请先连接设备")
    return
  }
  // 防止重复注册
  if (this.mIsRegisterDeviceMsg) {
    console.warn(this.TAG, "当前已注册监听设备消息事件")
    return
  }
  // 替换用户参数
  this.onReadMsg = callback
  // 正式注册事件
  this.registerValue()
}

/**
 * 可由用户决定设备返回数据的具体处理逻辑
 */
private onReadMsg: Callback<number[]> = (msg: number[]): void => {
  console.info(this.TAG, `收到设备消息: ${msg}`)
  const str: string = String.fromCharCode(...msg)
  console.info(this.TAG, `收到设备消息: ${str}`)
}
/**
 * 接收设备消息回调,用户无法指定。封装一层 { onReadMsg }
 */
private USBValueChangeFunc = (data: Uint8Array): void => {
  // 将设备返回的二进制数据,转换成十进制数组,供用户自己指定后续处理逻辑
  const byteArr: number[] = Array.from(data)
  // 返回数据给用户
  this.onReadMsg(byteArr)
}
/**
 * 正式监听设备消息
 */
private registerValue(): void {
  try {
    console.info(this.TAG, "开始监听设备数据")
    // 轮询读取 USB 缓冲区数据
    this.mIntervalReadID = setInterval(async () => {
      // 读通道是否空闲
      if (this.mIsReadFree) {
        // 加锁,防止通道卡死
        this.mIsReadFree = false
        // 读取
        let cache = new Uint8Array(512)
        const dataLength = await usbManager.bulkTransfer(
          this.mPipe,
          this.mReadChannel,
          cache,
          this.mBulkTransferTime
        )
        if (dataLength > 0) {
          // 截取有效部分
          this.USBValueChangeFunc(cache.slice(0, dataLength))
        }
        // 释放锁
        this.mIsReadFree = true
      }
    }, 0)
    // 注册成功
    this.mIsRegisterDeviceMsg = true
  } catch (err) {
    console.error(this.TAG, `registerValue: err = ${JSON.stringify(err)}`)
  }
}
7、注销设备消息监听
7.1 封装
定义一个公共方法 [ unRegisterDeviceMsg ],没有参数。
注销设备消息监听十分简单,只需清理注册时的定时器,以及释放锁即可。当然,注销前,需要判断是否注册了设备消息事件。
详细代码如下:
/**
 * 注销设备消息事件
 */
public unRegisterDeviceMsg(): void {
  // 必须先注册该事件
  if (!this.mIsRegisterDeviceMsg) {
    console.warn(this.TAG, "当前未注册监听设备消息事件")
    return
  }
  // 正式注销事件
  this.unRegisterValue()
}

/**
 * 正式注销设备消息
 */
private unRegisterValue(): void {
  try {
    console.info(this.TAG, "注销监听设备数据事件")
    // 清理定时器
    clearInterval(this.mIntervalReadID)
    this.mIntervalReadID = -1
    // 释放锁
    this.mIsReadFree = true
    // 注销成功
    this.mIsRegisterDeviceMsg = false
  } catch (err) {
    console.error(this.TAG, `unRegisterValue: err = ${JSON.stringify(err)}`)
  }
}
8、写入数据
8.1 涉及到的官方API
是的,与读取设备消息用的是同一个API,不过一个参数传入的是读通道,一个是写通道。
//usbManager.getDevices 接口返回数据集合,取其中一个设备对象,并获取权限。
//把获取到的设备对象作为参数传入usbManager.connectDevice;当usbManager.connectDevice接口成功返回之后;
//才可以调用第三个接口usbManager.claimInterface.当usbManager.claimInterface 调用成功以后,再调用该接口。
let devicesList: Array<usbManager.USBDevice> = usbManager.getDevices();
if (devicesList.length == 0) {
  console.log(`device list is empty`);
}


let device: usbManager.USBDevice = devicesList[0];
usbManager.requestRight(device.name);


let devicepipe: usbManager.USBDevicePipe = usbManager.connectDevice(device);
for (let i = 0; i < device.configs[0].interfaces.length; i++) {
  if (device.configs[0].interfaces[i].endpoints[0].attributes == 2) {
    let endpoint: usbManager.USBEndpoint = device.configs[0].interfaces[i].endpoints[0];
    let interfaces: usbManager.USBInterface = device.configs[0].interfaces[i];
    let ret: number = usbManager.claimInterface(devicepipe, interfaces);
    let buffer =  new Uint8Array(128);
    usbManager.bulkTransfer(devicepipe, endpoint, buffer).then((ret: number) => {
      console.log(`bulkTransfer = ${ret}`);
    });
  }
}
8.2 封装
写入数据流程图:
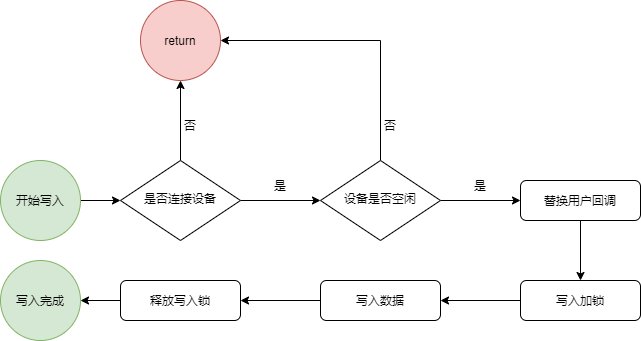
定义一个公共方法 [ write ],参数有:
command:需要写入设备的二进制数据。
callbcak:可选,写入状态回调,告诉用户当前写入操作是否执行完成。
写入数据,需要用到我们刚刚连接设备时,获取的写通道。本文已用 [ mWriteChannel ] 全局保存设备写通道。同时,写入数据是一个异步耗时操作,我们需要用一个锁 [ mIsWriteFree ] 去表示,设备是否处于空闲状态(是否可写)。
详细代码如下:
/**
 * 设备是否空闲 -- 给写数据线程加锁
 */
private mIsWriteFree: boolean = true

/**
 * 写入数据
 * @param command   二进制数据
 * @param callback  可选,写入状态回调 -- false: 写入中; true: 写入成功
 */
public write(command: ArrayBuffer, callback: Callback<boolean> = this.onWriteStatus): void {
  // 必须连接设备
  if (!this.hasDeviceConnected()) {
    console.error(this.TAG, "请先连接设备")
    return
  }
  if (!this.mIsWriteFree) {
    console.error(this.TAG, "设备繁忙")
    return
  }
  // 替换回调
  this.onWriteStatus = callback
  // 正式写入数据
  this.writeValue(command)
}

/**
 * 可由用户决定写入状态的具体处理逻辑
 */
private onWriteStatus: Callback<boolean> = (status: boolean): void => {
  if (status) {
    console.info(this.TAG, "指令发送完成")
  } else {
    console.info(this.TAG, "正在发送指令")
  }
}
/**
 * 正式写入数据
 */
private async writeValue(data: ArrayBuffer): Promise<void> {
  try {
    console.info(this.TAG, "写入数据")
    this.mIsWriteFree = false
    this.onWriteStatus(this.mIsWriteFree)
    // 写数据
    await usbManager.bulkTransfer(this.mPipe, this.mWriteChannel, new Uint8Array(data))
    this.mIsWriteFree = true
    this.onWriteStatus(this.mIsWriteFree)
  } catch (err) {
    console.error(this.TAG, `writeValue: err = ${JSON.stringify(err)}`)
  }
}
写入数据涉及锁 [ mIsWriteFree ] ,所以,在断开连接时,记得释放写入锁。
/**
 * 清空设备缓存
 */
private clearCache(): void {
  // 清理连接器各属性变量
  console.info(this.TAG, "清空设备缓存")
  // 重置连接参数
  this.mUsbDevice = null
  this.mInterfaces = null
  this.mPipe = null
  this.mOpenId = -1
  this.mReadChannel = null
  this.mWriteChannel = null

  this.mIsWriteFree = true
  this.onWriteStatus(this.mIsWriteFree)
}
三、进阶操作
1、如何得知USB设备异常断开?例如,拔掉USB线、将设备关机等?
UsbManager.ACTION_USB_DEVICE_DETACHED 是 Android 系统中用于标识 USB 设备被拔出事件的广播动作。
而鸿蒙关于 USB 设备被拔出事件的是公共事件 commonEventManager.Support.COMMON_EVENT_USB_DEVICE_DETACHED。
这个公共事件很坑,不在文档 - @ohos.usbManager (USB管理) 里,要自己额外去翻公共事件种类文档,不熟悉真的不知道。
1.1 涉及到的官方API
创建订阅者:commonEventManager.createSubscriberSync
import { BusinessError } from '@kit.BasicServicesKit';


// 定义订阅者,用于保存创建成功的订阅者对象,后续使用其完成订阅及退订的动作
let subscriber: commonEventManager.CommonEventSubscriber;
// 订阅者信息
let subscribeInfo: commonEventManager.CommonEventSubscribeInfo = {
  events: ['event']
};
// 创建订阅者
try {
  subscriber = commonEventManager.createSubscriberSync(subscribeInfo);
} catch (error) {
  let err: BusinessError = error as BusinessError;
  console.error(`Failed to create subscriber. Code is ${err.code}, message is ${err.message}`);
}订阅公共事件:commonEventManager.subscribe
// 官方示例代码太长,暂不展出,有兴趣的读者可以自行跳转API超链接查看取消订阅公共事件:commonEventManager.unsubscribe
// 官方示例代码太长,暂不展出,有兴趣的读者可以自行跳转API超链接查看1.2 封装
详细代码如下:
/**
 * 公共事件订阅者
 */
private subscriber: commonEventManager.CommonEventSubscriber | undefined = undefined

/**
 * 订阅当用户设备作为USB主机时,USB设备被卸载事件
 */
private subscriberUsbDetached(): void {
  // 订阅者信息
  const subscribeInfo: commonEventManager.CommonEventSubscribeInfo = {
    events: [commonEventManager.Support.COMMON_EVENT_USB_DEVICE_DETACHED]
  }
  // 创建订阅者
  this.subscriber = commonEventManager.createSubscriberSync(subscribeInfo)
  // 事件回调
  const callback = (err: BusinessError, data: commonEventManager.CommonEventData) => {
    if (data.event === commonEventManager.Support.COMMON_EVENT_USB_DEVICE_DETACHED) {
      // 可以得知是哪一个USB设备断开连接
      const usbDevice: usbManager.USBDevice = JSON.parse(data.data!!) as usbManager.USBDevice
      console.error(this.TAG, `USB设备异常断开: ${JSON.stringify(usbDevice, null, 2)}`)
      this.disconnect()
    }
  }
  // 订阅回调
  commonEventManager.subscribe(this.subscriber, callback)
}
编写完毕,我们可以在设备连接成功后调用
/**
 * 连接设备回调,用户无法指定。封装一层 { onConnectStateChange }
 */
private USBConnectionStateChangeFunc = (err?: BusinessError): void => {
  if (err) {
    console.error(this.TAG, `设备连接失败: err = ${JSON.stringify(err)}`)
    // 一般正常的USB设备都不会报错,这个分支没遇见过,不做主要逻辑
    // 断开连接
    this.disconnect()
    return
  }

  // 订阅USB设备卸载事件
  this.subscriberUsbDetached()

  // 有且只有这里通知用户设备连接成功,且需要修改 [Device] 的 [connectionState]
  console.info(this.TAG, "设备连接成功")
  this.mUsbDevice!!.connectionState = ConnectionState.STATE_CONNECTED
  this.mUsbDevice!!.connectTime = systemDateTime.getTime()
  this.onConnectStateChange(ConnectionState.STATE_CONNECTED)
}
断开连接时,记得释放缓存
/**
 * 取消订阅USB被卸载事件
 */
private unsubscribeUsbDetached(): void {
  commonEventManager.unsubscribe(this.subscriber, () => {
    this.subscriber = undefined
  })
}
在正式断开设备时调用
/**
 * 正式断开设备
 */
private disconnectDevice(): void {
  // 注销监听事件和断开设备。一般连接成功后,断开连接时需要执行
  try {
    console.error(this.TAG, "开始断开设备")
    this.onConnectStateChange(ConnectionState.STATE_DISCONNECTING)
    // 注销设备消息事件
    this.unRegisterDeviceMsg()
    // 注销公共事件
    this.unsubscribeUsbDetached()
    // 注销通信接口
    usbManager.releaseInterface(this.mPipe, this.mInterfaces)
    // 关闭连接
    usbManager.closePipe(this.mPipe)
  } catch (err) {
    console.error(this.TAG, `disconnectDevice: err = ${JSON.stringify(err)}`)
  }
}
2、如何实现USB设备即插即连?
根据第一点,我们可以订阅另外一个公共事件 commonEventManager.Support.COMMON_EVENT_USB_DEVICE_ATTACHED
代码如下,详细写法暂不写出,给读者做一个参考,读者可以根据自己的业务需求,完善代码。
/**
 * 订阅当用户设备作为USB主机时,USB设备被挂载事件
 */
private subscriberUsbAttached(): void {
  // 订阅者信息
  const subscribeInfo: commonEventManager.CommonEventSubscribeInfo = {
    events: [commonEventManager.Support.COMMON_EVENT_USB_DEVICE_ATTACHED]
  }
  // 创建订阅者
  const subscriber = commonEventManager.createSubscriberSync(subscribeInfo)
  // 事件回调
  const callback = (err: BusinessError, data: commonEventManager.CommonEventData) => {
    if (data.event === commonEventManager.Support.COMMON_EVENT_USB_DEVICE_ATTACHED) {
      const device: usbManager.USBDevice = JSON.parse(data.data!!) as usbManager.USBDevice
      const deviceId = device.name
      const deviceName = device.productName
      const manufacturerName = device.manufacturerName
      const pid = device.productId
      const vid = device.vendorId
      const usbPrinter: UsbDevice = new UsbDevice(
        deviceId,
        `${deviceName} ${deviceId}`,
        manufacturerName,
        pid,
        vid,
        device
      )
      // 执行连接
      this.connect(usbPrinter, () => {
      })

    }
  }
  // 订阅回调
  commonEventManager.subscribe(subscriber, callback)
}
四、完整代码
文件1:连接状态常量
/**
 * 设备连接状态
 */
export class ConnectionState {
  /**
   * 连接中
   */
  static readonly STATE_CONNECTING = 1
  /**
   * 已连接
   */
  static readonly STATE_CONNECTED = 2
  /**
   * 断开中
   */
  static readonly STATE_DISCONNECTING = 3
  /**
   * 已断开
   */
  static readonly STATE_DISCONNECTED = 4
  /**
   * 连接中断 -- 连接时,设备id错误,无权限等情况触发
   */
  static readonly STATE_INTERRUPTED = 5
}
文件2:USB设备实体类
import { ConnectionState } from "./ConnectionState"
import { usbManager } from "@kit.BasicServicesKit"

/**
 * Usb设备实体
 */
export class UsbDevice {
  /**
   * 设备 ID
   */
  deviceId: string
  /**
   * 设备名称
   */
  deviceName: string
  /**
   * 制造商
   */
  manufacturerName: string
  /**
   * pid
   */
  pid: number
  /**
   * vid
   */
  vid: number
  /**
   * usbManager.USBDevice
   */
  usbDevice: usbManager.USBDevice
  /**
   * 设备当前连接状态
   */
  connectionState: number = ConnectionState.STATE_DISCONNECTED
  /**
   * Device连接成功时间戳
   */
  connectTime: number = -1

  /**
   * 构造函数
   * @param deviceId
   * @param deviceName
   * @param manufacturerName
   * @param pid
   * @param vid
   * @param usbDevice
   */
  constructor(
    deviceId: string,
    deviceName: string,
    manufacturerName: string,
    pid: number,
    vid: number,
    usbDevice: usbManager.USBDevice,
  ) {
    this.deviceId = deviceId
    this.deviceName = deviceName
    this.manufacturerName = manufacturerName
    this.pid = pid
    this.vid = vid
    this.usbDevice = usbDevice
  }
}
文件3:USB连接器
import { BusinessError, commonEventManager, systemDateTime, usbManager } from "@kit.BasicServicesKit"
import { ConnectionState } from "./ConnectionState"
import { UsbDevice } from "./UsbDevice"

/**
 * USB连接器
 *
 * 一个连接器实例对应一台设备的连接
 *
 * 1. 不允许重复连接同一台和设备
 * 2. 连接新设备,需断开旧设备
 * 3. 连接设备需要判断当前设备是否允许访问
 *
 * 连接所有可能的情况
 *
 * 1. 扫描设备,然后连接设备       连接中 ==> 连接成功 ==> 断开连接
 * 2. 连接设备后,拔掉USB线       设备断开
 * 3. 连接设备后,将设备关机       设备断开
 */
export class UsbConnector {
  /**
   * 标识
   */
  private readonly TAG: string = "UsbConnector ===> "
  /**
   * 当前连接的设备
   */
  private mUsbDevice: UsbDevice | null = null
  /**
   * 设备传输接口
   */
  private mInterfaces: usbManager.USBInterface | null = null
  /**
   * 连接标识
   */
  private mPipe: usbManager.USBDevicePipe | null = null
  /**
   * 通信接口打开标识
   */
  private mOpenId: number = -1
  /**
   * 读通道
   */
  private mReadChannel: usbManager.USBEndpoint | null = null
  /**
   * 写通道
   */
  private mWriteChannel: usbManager.USBEndpoint | null = null
  /**
   * 是否注册了设备消息事件。用于判断是否注册的/注销该事件,防止重复执行
   */
  private mIsRegisterDeviceMsg: boolean = false
  /**
   * 轮询访问读通道定时器
   */
  private mIntervalReadID: number = -1
  /**
   * 超时时间 -- 延迟多久执行读写操作,单位ms,最好带点延迟,不如通道会卡死,卡死你就只能重启外设
   */
  private readonly mBulkTransferTime: number = 1000
  /**
   * 读通道是否空闲
   */
  private mIsReadFree: boolean = true
  /**
   * 设备是否空闲 -- 给写数据线程加锁
   */
  private mIsWriteFree: boolean = true
  /**
   * 公共事件订阅者
   */
  private subscriber: commonEventManager.CommonEventSubscriber | undefined = undefined

  /**
   * 扫描 USB 设备
   * @param callback  设备回调
   */
  public startScan(callback: Callback<UsbDevice>): void {
    // 替换用户参数
    this.onScanDeviceFound = callback

    // 正式开始扫描设备
    this.startScanDevice()
  }

  /**
   * USB没有停止扫描的说法,USB连上,查询就是一瞬间的事
   */

  /**
   * 连接 USB 设备 -- 只允许搜索连接,不允许快速连接
   * @param device    设备
   * @param callback  连接状态回调
   * @returns
   */
  public async connect(device: UsbDevice, callback: Callback<ConnectionState>): Promise<void> {
    // 替换用户参数
    this.onConnectStateChange = callback

    /**
     * 一个连接器实例对应一台设备的连接
     *
     * 1. 不允许重复连接同一台和设备
     * 2. 连接新设备,需断开旧设备
     * 3. 连接设备需要判断当前设备是否允许访问
     */

    // 不允许重复连接
    if (this.mUsbDevice?.deviceId === device.deviceId) {
      console.warn(this.TAG, "重复连接")
      // 通知用户连接中断
      this.onConnectStateChange(ConnectionState.STATE_INTERRUPTED)
      return
    }

    // 如果已经连接其他设备
    if (this.mUsbDevice?.deviceId) {
      console.warn(this.TAG, "断开以前的连接")

      this.disconnect()
    }

    // 是否有访问权限
    const right: boolean = usbManager.hasRight(device.deviceId)
    if (!right) {
      // 申请权限
      const right: boolean = await usbManager.requestRight(device.deviceId)
      if (!right) {
        console.warn(this.TAG, "访问权限被拒绝")
        // 通知用户连接中断
        this.onConnectStateChange(ConnectionState.STATE_INTERRUPTED)
        return
      }
    }

    /**
     * 连接所有可能的情况 -- 需要及时通知用户连接状态
     *
     * 1. 扫描设备,然后连接设备       连接中 ==> 连接成功 ==> 断开连接
     *
     * 2. 连接设备后,拔掉USB线       轮询访问读通道,访问时间不卡顿,视为设备断开
     * 3. 连接设备后,将设备关机       ~...
     */

    // 刷新当前的设备
    this.mUsbDevice = device

    // 正式连接设备
    this.connectDevice()
  }

  /**
   * 断开连接
   */
  public disconnect(): void {
    /**
     * 完整的断开一个设备
     *
     * 1. 判断是否有设备连接中
     * 2. 注销事件、断开设备
     * 3. 重置参数
     * 4. 通知用户设备断开
     *
     * 有些函数的断开逻辑可能只需完成其中的几项即可
     */

    // 必须连接设备
    if (!this.hasDeviceConnected()) {
      console.error(this.TAG, "请先连接设备")
      return
    }

    // 正式断开连接
    this.disconnectDevice()

    // 清理缓存
    this.clearCache()

    // 通知用户设备断开 -- 有且只有这里通知用户设备断开
    this.onConnectStateChange(ConnectionState.STATE_DISCONNECTED)
  }

  /**
   * 注册设备消息事件
   * @param callback 可选,设备消息回调
   */
  public registerDeviceMsg(callback: Callback<number[]> = this.onReadMsg): void {
    // 必须连接设备
    if (!this.hasDeviceConnected()) {
      console.error(this.TAG, "请先连接设备")
      return
    }

    // 防止重复注册
    if (this.mIsRegisterDeviceMsg) {
      console.warn(this.TAG, "当前已注册监听设备消息事件,帮您更新回调函数")
      // 可能用户只是想更换监听回调
      this.onReadMsg = callback
      return
    }

    // 替换用户参数
    this.onReadMsg = callback

    // 正式注册事件
    this.registerValue()
  }

  /**
   * 注销设备消息事件
   */
  public unRegisterDeviceMsg(): void {
    // 必须先注册该事件
    if (!this.mIsRegisterDeviceMsg) {
      console.warn(this.TAG, "当前未注册监听设备消息事件")
      return
    }

    // 正式注销事件
    this.unRegisterValue()
  }

  /**
   * 写入数据
   * @param command   二进制数据
   * @param callback  可选,写入状态回调 -- false: 写入中; true: 写入成功
   */
  public write(command: ArrayBuffer, callback: Callback<boolean> = this.onWriteStatus): void {
    // 必须连接设备
    if (!this.hasDeviceConnected()) {
      console.error(this.TAG, "请先连接设备")
      return
    }

    if (!this.mIsWriteFree) {
      console.error(this.TAG, "设备繁忙")
      return
    }

    // 替换回调
    this.onWriteStatus = callback

    // 正式写入数据
    this.writeValue(command)
  }

  /**
   * 当前是否有设备连接
   * @returns
   */
  public hasDeviceConnected(): boolean {
    if (this.mUsbDevice && this.mOpenId !== -1) {
      return true
    }
    return false
  }

  /**
   * 获取当前连接的设备
   * @returns
   */
  public getConnectedDevice(): UsbDevice | null {
    return this.mUsbDevice
  }

  /**
   * 由用户决定设备后续的处理逻辑
   */
  private onScanDeviceFound: Callback<UsbDevice> = (device: UsbDevice): void => {
    console.info(this.TAG, `扫描到设备: ${JSON.stringify(device, null, 2)}`)
  }
  /**
   * 扫描到设备回调,用户无法指定。封装一层 { onScanDeviceFound }
   */
  private USBDeviceFindFunc: Callback<Array<usbManager.USBDevice>> = (devices: Array<usbManager.USBDevice>): void => {
    devices.forEach((device: usbManager.USBDevice) => {

      const deviceId = device.name
      const deviceName = device.productName
      const manufacturerName = device.manufacturerName
      const pid = device.productId
      const vid = device.vendorId

      // 把 scanDevice 暴露出去,供外部函数回调获得
      const scanDevice: UsbDevice = new UsbDevice(
        deviceId,
        `${deviceName} ${deviceId}`,
        manufacturerName,
        pid,
        vid,
        device
      )
      this.onScanDeviceFound(scanDevice)

    })
  }

  /**
   * 正式开始扫描USB设备
   */
  private startScanDevice() {
    try {
      console.info(this.TAG, '开始扫描USB设备')

      // 开始扫描
      const devices: Array<usbManager.USBDevice> = usbManager.getDevices()

      // 处理扫描到的设备
      this.USBDeviceFindFunc(devices)

    } catch (err) {
      console.error(this.TAG, `startScanDevice: err = ${JSON.stringify(err)}`)
    }
  }

  /**
   * 无正式停止扫描USB设备
   */

  /**
   * 可由用户决定设备连接状态的具体处理逻辑
   */
  private onConnectStateChange: Callback<ConnectionState> = (state: ConnectionState): void => {
    console.info(this.TAG, `设备连接信息: ${JSON.stringify(state)}`)
  }

  /**
   * 连接设备回调,用户无法指定。封装一层 { onConnectStateChange }
   */
  private USBConnectionStateChangeFunc = (err?: BusinessError): void => {
    if (err) {
      console.error(this.TAG, `设备连接失败: err = ${JSON.stringify(err)}`)

      // 一般正常的USB设备都不会报错,这个分支没遇见过,不做主要逻辑

      // 断开连接
      this.disconnect()

      return
    }

    // 订阅USB设备卸载事件
    this.subscriberUsbDetached()

    // 有且只有这里通知用户设备连接成功,且需要修改 [Device] 的 [connectionState]
    console.info(this.TAG, "设备连接成功")
    this.mUsbDevice!!.connectionState = ConnectionState.STATE_CONNECTED

    this.mUsbDevice!!.connectTime = systemDateTime.getTime()
    this.onConnectStateChange(ConnectionState.STATE_CONNECTED)
  }

  /**
   * 正式连接设备
   */
  private connectDevice(): void {
    try {
      console.info(this.TAG, "开始连接设备")
      this.onConnectStateChange(ConnectionState.STATE_CONNECTING)

      // 获取数据传输接口 TODO interfaces可能不止一个
      const configs: Array<usbManager.USBConfiguration> = this.mUsbDevice!!.usbDevice.configs
      const interfaces: usbManager.USBInterface = configs[0].interfaces[0]
      this.mInterfaces = interfaces

      // 连接设备
      const pipe: usbManager.USBDevicePipe = usbManager.connectDevice(this.mUsbDevice!!.usbDevice)
      this.mPipe = pipe

      // 注册通信接口
      const openId = usbManager.claimInterface(this.mPipe, this.mInterfaces)
      this.mOpenId = openId

      // 获取读写通道
      this.mInterfaces.endpoints.forEach((item) => {
        if (item.direction === usbManager.USBRequestDirection.USB_REQUEST_DIR_FROM_DEVICE) {
          this.mReadChannel = item
        } else if (item.direction === usbManager.USBRequestDirection.USB_REQUEST_DIR_TO_DEVICE) {
          this.mWriteChannel = item
        }
      })

      // 读写通道获取完成
      this.USBConnectionStateChangeFunc()

    } catch (err) {
      console.error(this.TAG, `connectDevice: err = ${JSON.stringify(err)}`)
      this.USBConnectionStateChangeFunc(err as BusinessError)
    }
  }

  /**
   * 订阅当用户设备作为USB主机时,USB设备被卸载事件
   */
  private subscriberUsbDetached(): void {
    // 订阅者信息
    const subscribeInfo: commonEventManager.CommonEventSubscribeInfo = {
      events: [commonEventManager.Support.COMMON_EVENT_USB_DEVICE_DETACHED]
    }
    // 创建订阅者
    this.subscriber = commonEventManager.createSubscriberSync(subscribeInfo)

    // 事件回调
    const callback = (err: BusinessError, data: commonEventManager.CommonEventData) => {
      if (data.event === commonEventManager.Support.COMMON_EVENT_USB_DEVICE_DETACHED) {

        // 可以得知是哪一个USB设备断开连接
        const usbDevice: usbManager.USBDevice = JSON.parse(data.data!!) as usbManager.USBDevice
        console.error(this.TAG, `USB设备异常断开: ${JSON.stringify(usbDevice, null, 2)}`)

        /**
         * 以下两种原因,而造成的设备断开,走此分支
         *
         * 1. 连接设备后,拔掉USB线
         * 2. 连接成功后,将设备关机
         */

        // 此时已经连上设备,正常断开连接
        this.disconnect()
      }
    }

    // 订阅回调
    commonEventManager.subscribe(this.subscriber, callback)
  }

  /**
   * 取消订阅USB被卸载事件
   */
  private unsubscribeUsbDetached(): void {
    commonEventManager.unsubscribe(this.subscriber, () => {
      this.subscriber = undefined
    })
  }

  /**
   * 订阅当用户设备作为USB主机时,USB设备被挂载事件
   */
  private subscriberUsbAttached(): void {
    // 订阅者信息
    const subscribeInfo: commonEventManager.CommonEventSubscribeInfo = {
      events: [commonEventManager.Support.COMMON_EVENT_USB_DEVICE_ATTACHED]
    }
    // 创建订阅者
    const subscriber = commonEventManager.createSubscriberSync(subscribeInfo)

    // 事件回调
    const callback = (err: BusinessError, data: commonEventManager.CommonEventData) => {
      if (data.event === commonEventManager.Support.COMMON_EVENT_USB_DEVICE_ATTACHED) {
        const device: usbManager.USBDevice = JSON.parse(data.data!!) as usbManager.USBDevice

        const deviceId = device.name
        const deviceName = device.productName
        const manufacturerName = device.manufacturerName
        const pid = device.productId
        const vid = device.vendorId

        const usbPrinter: UsbDevice = new UsbDevice(
          deviceId,
          `${deviceName} ${deviceId}`,
          manufacturerName,
          pid,
          vid,
          device
        )

        // 执行连接
        this.connect(usbPrinter, () => {

        })

      }
    }
    // 订阅回调
    commonEventManager.subscribe(subscriber, callback)
  }

  /**
   * 正式断开设备
   */
  private disconnectDevice(): void {
    // 注销监听事件和断开设备。一般连接成功后,断开连接时需要执行
    try {
      console.error(this.TAG, "开始断开设备")
      this.onConnectStateChange(ConnectionState.STATE_DISCONNECTING)

      // 注销设备消息事件
      this.unRegisterDeviceMsg()
      // 注销公共事件
      this.unsubscribeUsbDetached()

      // 注销通信接口
      usbManager.releaseInterface(this.mPipe, this.mInterfaces)

      // 关闭连接
      usbManager.closePipe(this.mPipe)

    } catch (err) {
      console.error(this.TAG, `disconnectDevice: err = ${JSON.stringify(err)}`)
    }
  }

  /**
   * 清空设备缓存
   */
  private clearCache(): void {
    // 清理连接器各属性变量
    console.info(this.TAG, "清空设备缓存")

    // 重置连接参数
    this.mUsbDevice = null
    this.mInterfaces = null
    this.mPipe = null
    this.mOpenId = -1
    this.mReadChannel = null
    this.mWriteChannel = null

    this.mIsWriteFree = true
    this.onWriteStatus(this.mIsWriteFree)
  }

  /**
   * 可由用户决定设备返回数据的具体处理逻辑
   */
  private onReadMsg: Callback<number[]> = (msg: number[]): void => {
    console.info(this.TAG, `收到设备消息: ${msg}`)
    const str: string = String.fromCharCode(...msg)
    console.info(this.TAG, `收到设备消息: ${str}`)
  }

  /**
   * 接收设备消息回调,用户无法指定。封装一层 { onReadMsg }
   */
  private USBValueChangeFunc = (data: Uint8Array): void => {
    // 将设备返回的二进制数据,转换成十进制数组,供用户自己指定后续处理逻辑
    const byteArr: number[] = Array.from(data)

    // 返回数据给用户
    this.onReadMsg(byteArr)
  }

  /**
   * 正式监听设备消息
   */
  private registerValue(): void {
    try {
      console.info(this.TAG, "开始监听设备数据")

      // 轮询读取 USB 缓冲区数据
      this.mIntervalReadID = setInterval(async () => {
        // 读通道是否空闲
        if (this.mIsReadFree) {

          // 加锁,防止通道卡死
          this.mIsReadFree = false

          // 读取
          let cache = new Uint8Array(512)
          const dataLength = await usbManager.bulkTransfer(
            this.mPipe,
            this.mReadChannel,
            cache,
            this.mBulkTransferTime
          )

          if (dataLength > 0) {
            // 截取有效部分
            this.USBValueChangeFunc(cache.slice(0, dataLength))
          }

          // 释放锁
          this.mIsReadFree = true
        }
      }, 0)

      // 注册成功
      this.mIsRegisterDeviceMsg = true

    } catch (err) {
      console.error(this.TAG, `registerValue: err = ${JSON.stringify(err)}`)
    }
  }

  /**
   * 正式注销设备消息
   */
  private unRegisterValue(): void {
    try {
      console.info(this.TAG, "注销监听设备数据事件")

      // 清理定时器
      clearInterval(this.mIntervalReadID)
      this.mIntervalReadID = -1

      // 释放锁
      this.mIsReadFree = true

      // 注销成功
      this.mIsRegisterDeviceMsg = false

    } catch (err) {
      console.error(this.TAG, `unRegisterValue: err = ${JSON.stringify(err)}`)
    }
  }

  /**
   * 可由用户决定写入状态的具体处理逻辑
   */
  private onWriteStatus: Callback<boolean> = (status: boolean): void => {
    if (status) {
      console.info(this.TAG, "指令发送完成")
    } else {
      console.info(this.TAG, "正在发送指令")
    }
  }

  /**
   * 正式写入数据
   */
  private async writeValue(data: ArrayBuffer): Promise<void> {
    try {
      console.info(this.TAG, "写入数据")

      this.mIsWriteFree = false
      this.onWriteStatus(this.mIsWriteFree)

      // 写数据
      await usbManager.bulkTransfer(this.mPipe, this.mWriteChannel, new Uint8Array(data))

      this.mIsWriteFree = true
      this.onWriteStatus(this.mIsWriteFree)

    } catch (err) {
      console.error(this.TAG, `writeValue: err = ${JSON.stringify(err)}`)
    }
  }
}
附录
官方指导:USB服务开发指导-USB服务-Basic Services Kit(基础服务)-基础功能-系统 - 华为HarmonyOS开发者
官方API:@ohos.usbManager (USB管理)-设备管理-ArkTS API-Basic Services Kit(基础服务)-基础功能-系统 - 华为HarmonyOS开发者
系统定义的公共事件:系统定义的公共事件-进程线程通信-ArkTS API-Basic Services Kit(基础服务)-基础功能-系统 - 华为HarmonyOS开发者
公共事件模块:@ohos.commonEventManager (公共事件模块)-进程线程通信-ArkTS API-Basic Services Kit(基础服务)-基础功能-系统 - 华为HarmonyOS开发者

讨论HarmonyOS开发技术,专注于API与组件、DevEco Studio、测试、元服务和应用上架分发等。
更多推荐

 2
2 0
0- 0


 已为社区贡献3条内容

所有评论(0)