HarmonyOS5 NEXT 如何实现音频录播功能哪?
·
在鸿蒙日常开发过程中,有很多需要进行音频功能实现,今日借此机会,封装一个录制音频的工具类,以供大家参考和指正。
目录
一、音频录制功能实现
1.1:具体的代码实现如下:
第一步:先创建一个页面:并写一个button组件给绑定一个点击事件
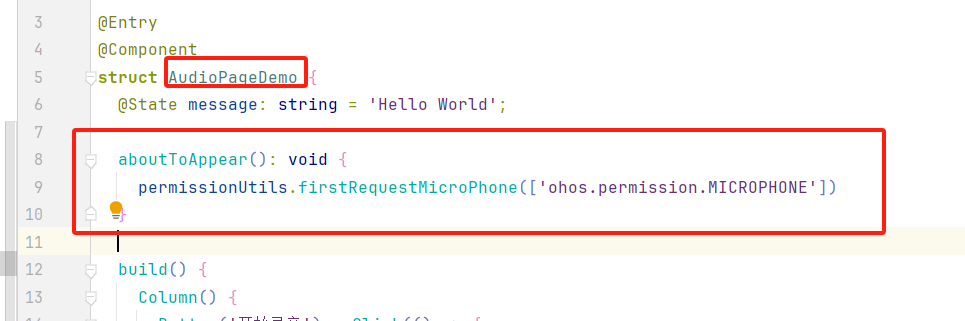
@Entry
@Component
struct AudioPageDemo {
  @State message: string = 'Hello World';
  build() {
    Column() {
     Button('开始录音').onClick(() => {
      })
      Button('结束录音').onClick(() => {
      })
     Button('开始播放').onClick(() => {

      })
      Button('结束播放').onClick(() => {
      })
    }
    .height('100%')
    .width('100%')
  }
}
1.2:第二步:创建一个arkts文件,并封住一个权限工具类
import { abilityAccessCtrl, PermissionRequestResult, Permissions } from "@kit.AbilityKit";
import { promptAction, router } from "@kit.ArkUI";
const manger = abilityAccessCtrl.createAtManager()
//在启动uiability时存储的一个context,可以用getContext()代替
const ctx = AppStorage.get<Context>('context')
export class PermissionUtils {
permissionList: Permissions[] = ['ohos.permission.MICROPHONE']
async getPermission(permissionList: Permissions[]) {
if (ctx) {
const ok = await manger.requestPermissionsFromUser(ctx, permissionList)
if (ok) {
return
}
//弹窗提示
const confirm = await promptAction.showDialog({
title: '温馨提示', message: '未授权使用麦克风将无法使用该面试录音功能,是否前往设置进行授权?', buttons: [
{ text: '取消授权', color: '#ccc' },
{ text: '确认授权', color: '#fff' }
]
})
if (confirm.index == 1) {
const ok2 = await manger.requestPermissionOnSetting(ctx, this.permissionList)
if (ok2) {
return
}
}
router.back()
}
}
}
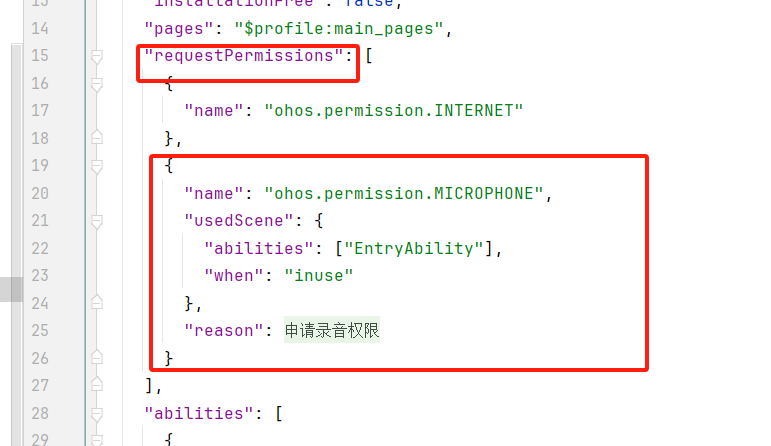
export const permissionUtils = new PermissionUtils()1.3:第三步:在模块文件下的modul.json5文件配置麦克风权限,如下图
1.4:第四步:封装录音工具类并在第一步的页面中的点击事件中调用相对于的方法。
import { media } from "@kit.MediaKit";
import { fileIo } from "@kit.CoreFileKit";
import { promptAction } from "@kit.ArkUI";

export class RecordAndPlayerAudioUtils {
  filePath: string | null = null
  fd?: number
  record?: media.AVRecorder
  avPlayer: media.AVPlayer | null = null

  //开始录音
  async startRecord() {
    //第一步:准备录音存放地址
    let filePath = getContext().filesDir + '/' + Date.now() + '.m4a'
    this.filePath = filePath
    let file = fileIo.openSync(this.filePath, fileIo.OpenMode.CREATE | fileIo.OpenMode.READ_WRITE)
    this.fd = file.fd

    //第二步:配置录音参数
    const config: media.AVRecorderConfig = {
      audioSourceType: media.AudioSourceType.AUDIO_SOURCE_TYPE_MIC,
      profile: {
        audioBitrate: 100000, // 音频比特率
        audioChannels: 2, // 音频声道数
        audioCodec: media.CodecMimeType.AUDIO_AAC, // 音频编码格式,当前只支持aac
        audioSampleRate: 48000, // 音频采样率
        fileFormat: media.ContainerFormatType.CFT_MPEG_4A, // 封装格式,当前只支持m4a},
      },
      url: `fd://${this.fd}`
    }
    //第三步:创建录音对象
    const avRecorder = await media.createAVRecorder()
    await avRecorder.prepare(config)
    //第四步:开始录音
    await avRecorder.start()
    this.record = avRecorder
  }
  //结束录音
  endRecord() {
    if (this.record) {
      this.record.stop()
      this.record.release()
      fileIo.closeSync(this.fd)
    }
  }
}
1.5:第五步:在第一步新建的页面中添加如下代码:
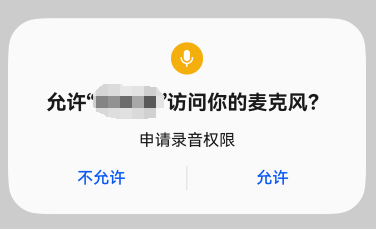
1.6:第六步:启动页面,但需要在模拟器中进行测试:第一次启动,弹出页面时会有如下弹窗弹出,点击允许即可,如果点击不允许,则不能完成录音。
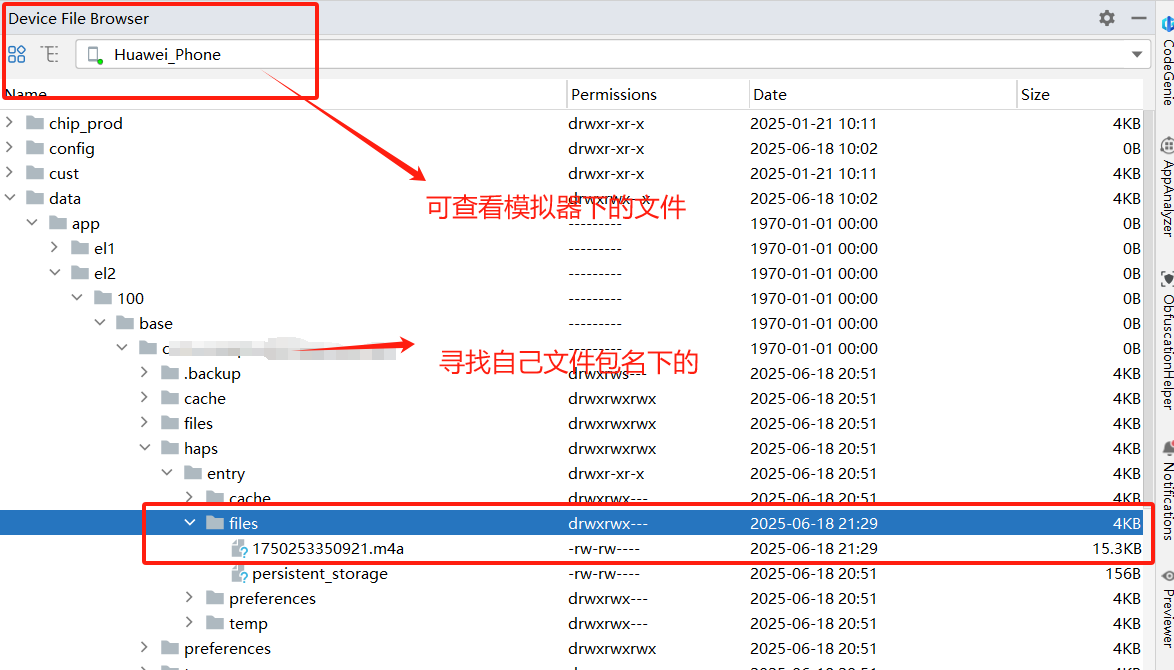
1.7:第七步:点击页面开始录音的按钮,录音完毕则点击录音结束按钮,然后查看录音文件,如果有文件,并且文件大小复合实际大小,则表示录音成功。
注意事项:
1:有的低版本模拟器不支持录音,则可借助真机进行测试
2:注意打开电脑的麦克风功能。
3:录音时一定要注意麦克风权限是否赋予。
4:可能有的会出现使用电脑录音不可以,但可以使用插耳机可以录音的现象。
总结
今天主要介绍如何在鸿蒙开发中完成录音和播音的功能,希望能够帮到有缘人,今天时间有限,播放音频功能不能实现,就放在下期给大家介绍有关如何播放音频以及将音频持久化到本地,敬请期待。

讨论HarmonyOS开发技术,专注于API与组件、DevEco Studio、测试、元服务和应用上架分发等。
更多推荐


 3
3 0
0- 0


 已为社区贡献5条内容

所有评论(0)