手把手教你开发 HarmonyOS 秒表应用
·
手把手教你开发 HarmonyOS 秒表应用
写在前面
本文适合刚接触 HarmonyOS NEXT 开发的同学,我们会从零开始,一步步实现一个功能完整的秒表应用。每个功能点都会详细讲解,确保你能跟着做出来。
学习本文后,你将掌握:
- ✅ ArkTS 基础语法
- ✅ 状态管理 (@State 装饰器)
- ✅ 定时器使用
- ✅ 列表渲染 (ForEach)
- ✅ 常用 UI 组件布局
第一步:创建项目
打开 DevEco Studio,创建新项目:
- 选择 “Empty Ability”
- 项目名称:MyApplication
- Bundle name:com.example.myapplication
- API 版本:选择 API 23
创建完成后,项目结构如下:
MyApplication/
├── AppScope/app.json5           # 应用配置
├── entry/
│   └── src/main/
│       ├── ets/
│       │   └── pages/Index.ets  # 主页面(我们主要改这个文件)
│       └── module.json5         # 模块配置
└── build-profile.json5          # 构建配置
第二步:设计数据结构
在写代码之前,先想清楚需要什么数据。
秒表应用的核心数据是"计次记录",每条记录包含:
- 圈数(第几圈)
- 单圈时间(这一圈用了多久)
- 总时间(从开始到现在用了多久)
在 Index.ets 文件开头定义接口:
interface LapRecord {
  lapNumber: number    // 圈数,如 1、2、3...
  lapTime: string      // 单圈时间,如 "01:23.45"
  totalTime: string    // 总时间,如 "05:30.12"
}
第三步:定义状态变量
使用 @State 装饰器声明需要触发界面更新的变量:
@Entry
@Component
struct Index {
  // 界面显示相关
  @State displayTime: string = '00:00.00'  // 当前显示的时间
  @State isRunning: boolean = false        // 是否正在计时
  @State lapCount: number = 0              // 已记录的圈数
  @State laps: LapRecord[] = []            // 所有计次记录
  @State bestLapIndex: number = -1         // 最快圈的索引
  @State worstLapIndex: number = -1        // 最慢圈的索引

  // 内部计算用(不需要触发界面更新)
  private startTime: number = 0            // 本轮启动的时间戳
  private elapsedBeforePause: number = 0   // 暂停前累计的时间(毫秒)
  private lastLapTime: number = 0          // 上次计次时的累计时间
  private timerId: number = -1             // 定时器 ID
}
重要:只有需要触发界面更新的变量才加 @State,否则会影响性能。
第四步:实现计时逻辑
4.1 时间格式化函数
将毫秒数转换为 分:秒.厘秒 格式:
formatTime(ms: number): string {
  const totalCs = Math.floor(ms / 10)              // 总厘秒数
  const minutes = Math.floor(totalCs / 6000)       // 分钟数
  const seconds = Math.floor((totalCs % 6000) / 100) // 秒数
  const centiseconds = totalCs % 100               // 厘秒数
  return `${this.pad(minutes)}:${this.pad(seconds)}.${this.pad(centiseconds)}`
}

pad(n: number): string {
  return n < 10 ? '0' + n : '' + n
}
4.2 开始计时
start(): void {
  if (this.isRunning) return  // 防止重复启动

  this.startTime = Date.now()
  this.isRunning = true
  this.lastLapTime = this.elapsedBeforePause

  // 每 20 毫秒更新一次显示
  this.timerId = setInterval(() => {
    const now = Date.now()
    const elapsed = this.elapsedBeforePause + (now - this.startTime)
    this.displayTime = this.formatTime(elapsed)
  }, 20)
}
为什么需要 elapsedBeforePause?
因为用户可能会多次"暂停→继续",我们需要累计所有运行过的时间。公式是:
当前总时间 = 暂停前累计 + 本次启动到现在的时间
4.3 暂停计时
stop(): void {
  if (!this.isRunning) return

  clearInterval(this.timerId)
  this.elapsedBeforePause += Date.now() - this.startTime
  this.isRunning = false
}
4.4 重置
reset(): void {
  clearInterval(this.timerId)
  this.isRunning = false
  this.displayTime = '00:00.00'
  this.elapsedBeforePause = 0
  this.lastLapTime = 0
  this.lapCount = 0
  this.laps = []
  this.bestLapIndex = -1
  this.worstLapIndex = -1
}
第五步:实现计次功能
当用户点击"计次"时,需要:
- 计算这一圈花了多长时间
- 更新累计时间基准
- 创建记录并添加到列表
- 更新最快/最慢圈标记
lap(): void {
  if (!this.isRunning) return  // 只有运行时才能计次

  const now = Date.now()
  const totalElapsed = this.elapsedBeforePause + (now - this.startTime)
  const thisLapMs = totalElapsed - this.lastLapTime  // 单圈时间 = 当前累计 - 上次累计

  this.lastLapTime = totalElapsed
  this.lapCount++

  const record: LapRecord = {
    lapNumber: this.lapCount,
    lapTime: this.formatTime(thisLapMs),
    totalTime: this.formatTime(totalElapsed)
  }

  this.laps = [record, ...this.laps]  // 新记录插到数组开头
  this.updateBestWorst()
}
自动标记最快/最慢圈
updateBestWorst(): void {
  if (this.laps.length === 0) return

  let bestIdx = 0
  let worstIdx = 0
  const lapTimes = this.laps.map(l => this.parseMs(l.lapTime))

  for (let i = 1; i < lapTimes.length; i++) {
    if (lapTimes[i] < lapTimes[bestIdx]) bestIdx = i
    if (lapTimes[i] > lapTimes[worstIdx]) worstIdx = i
  }

  this.bestLapIndex = bestIdx
  this.worstLapIndex = worstIdx
}

parseMs(time: string): number {
  const parts = time.split(/[:.]/)
  return parseInt(parts[0]) * 60000 + parseInt(parts[1]) * 1000 + parseInt(parts[2]) * 10
}
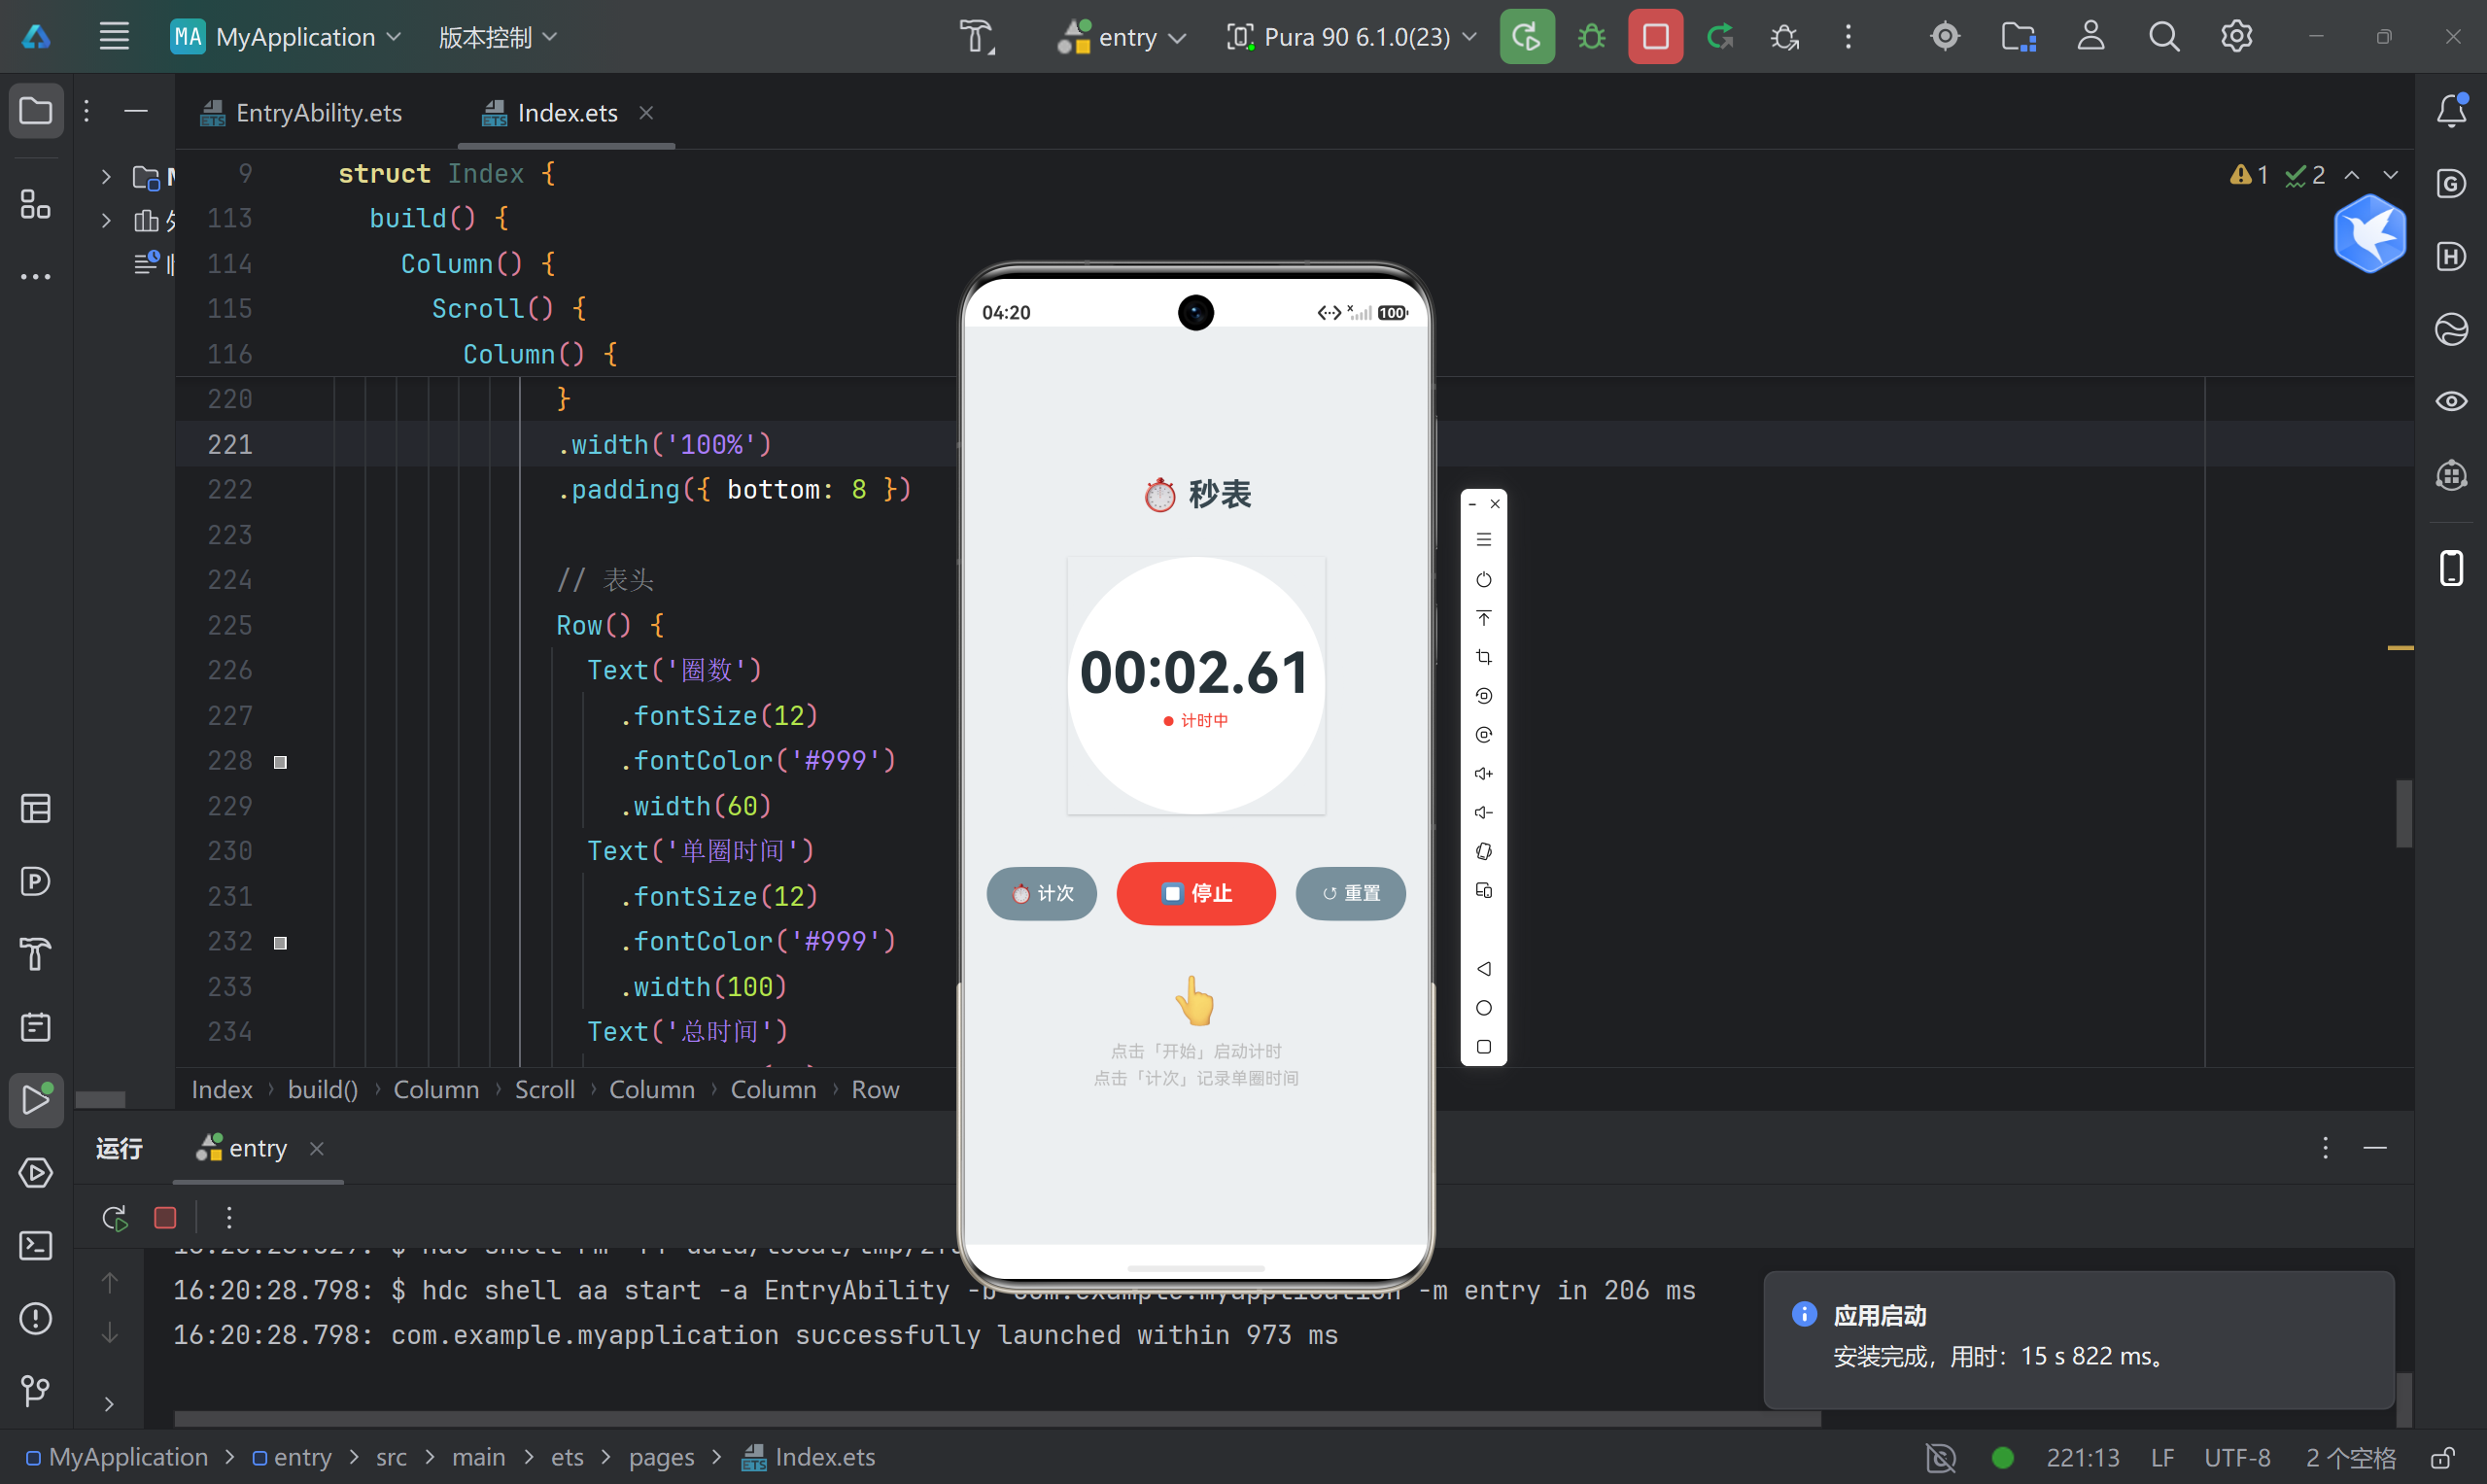
第六步:绘制界面
6.1 整体布局结构
build() {
  Column() {
    Scroll() {
      Column() {
        // 1. 标题
        // 2. 圆形表盘(时间显示)
        // 3. 控制按钮
        // 4. 计次列表
      }
      .width('100%')
      .alignItems(HorizontalAlign.Center)
    }
    .width('100%')
    .height('100%')
  }
  .width('100%')
  .height('100%')
  .backgroundColor('#ECEFF1')
}
6.2 圆形表盘
使用 Stack 组件实现层叠布局:
Stack() {
  // 外圈(灰色背景)
  Circle()
    .width(240)
    .height(240)
    .fill('#ECEFF1')

  // 内圈(白色,带阴影)
  Circle()
    .width(210)
    .height(210)
    .fill(Color.White)
    .shadow({ radius: 6, color: '#33000000', offsetY: 3 })

  // 时间文字
  Column() {
    Text(this.displayTime)
      .fontSize(46)
      .fontWeight(FontWeight.Bold)
      .fontColor('#263238')
      .fontFamily('Courier New')  // 等宽字体

    // 状态指示
    if (this.isRunning) {
      Row() {
        Circle().width(8).height(8).fill('#F44336').margin({ right: 6 })
        Text('计时中').fontSize(13).fontColor('#F44336')
      }
    } else if (this.elapsedBeforePause > 0) {
      Text('已暂停').fontSize(13).fontColor('#FF9800')
    }
  }
  .alignItems(HorizontalAlign.Center)
}
.margin({ top: 20 })
6.3 控制按钮
三个按钮:计次、开始/停止、重置
Row() {
  Button('⏱ 计次')
    .width(90)
    .height(44)
    .backgroundColor('#78909C')
    .borderRadius(22)
    .onClick(() => this.lap())

  Button(this.isRunning ? '⏹ 停止' : '▶ 开始')
    .width(130)
    .height(52)
    .backgroundColor(this.isRunning ? '#F44336' : '#4CAF50')
    .borderRadius(26)
    .fontWeight(FontWeight.Bold)
    .margin({ left: 16, right: 16 })
    .onClick(() => this.isRunning ? this.stop() : this.start())

  Button('↺ 重置')
    .width(90)
    .height(44)
    .backgroundColor('#78909C')
    .borderRadius(22)
    .onClick(() => this.reset())
}
.margin({ top: 24 })
设计要点:
- 开始/停止按钮会变颜色:绿色表示"开始",红色表示"停止"
- 计次和重置按钮样式统一,视觉层次低于主按钮
6.4 计次列表
使用 ForEach 渲染列表:
if (this.laps.length > 0) {
  Column() {
    // 标题
    Text(`计次记录 (${this.laps.length})`)
      .fontSize(16)
      .fontWeight(FontWeight.Medium)

    // 表头
    Row() {
      Text('圈数').width(60).fontSize(12).fontColor('#999')
      Text('单圈时间').width(100).fontSize(12).fontColor('#999')
      Text('总时间').width(100).fontSize(12).fontColor('#999')
    }
    .width('100%')
    .padding({ left: 8, right: 8 })

    // 列表项
    ForEach(this.laps, (lap: LapRecord, index: number) => {
      Row() {
        Row() {
          if (index === this.bestLapIndex && this.laps.length > 1) {
            Text('🏆').fontSize(14)
          } else if (index === this.worstLapIndex && this.laps.length > 1) {
            Text('🐢').fontSize(14)
          }
          Text(`第 ${lap.lapNumber} 圈`).fontSize(14)
        }.width(60)

        Text(lap.lapTime)
          .width(100)
          .fontSize(15)
          .fontWeight(FontWeight.Bold)
          .fontColor('#1976D2')

        Text(lap.totalTime)
          .width(100)
          .fontSize(14)
          .fontColor('#666')
      }
      .width('100%')
      .padding(8)
      .backgroundColor(index % 2 === 0 ? '#FFFFFF' : '#FAFAFA')
    }, (lap: LapRecord, index: number) => lap.lapNumber.toString() + index)
  }
  .width('100%')
  .padding(16)
  .backgroundColor(Color.White)
  .borderRadius(12)
  .margin({ top: 24, left: 16, right: 16 })
}
关键点:ForEach 的第三个参数必须返回唯一值,否则列表更新会出问题。
第七步:生命周期管理
在组件销毁时清理定时器,防止内存泄漏:
aboutToDisappear(): void {
  if (this.timerId !== -1) {
    clearInterval(this.timerId)
  }
}
常见问题
Q1: 暂停后继续,时间从 0 开始?
原因:没有记录暂停前的累计时间。
解决:使用 elapsedBeforePause 变量,在 start() 时将其作为基准。
Q2: ForEach 列表渲染异常?
原因:key 函数返回了重复值。
解决:使用 圈数 + 索引 组合作为 key:
(lap: LapRecord, index: number) => lap.lapNumber.toString() + index
Q3: 组件销毁后定时器还在运行?
解决:在 aboutToDisappear() 中清理定时器。
总结
本文实现了一个功能完整的秒表应用,涵盖了鸿蒙开发的几个核心知识点:
| 知识点 | 在项目中的应用 |
|---|---|
| @State 装饰器 | 响应式状态管理 |
| setInterval | 定时更新时间 |
| ForEach | 列表渲染 |
| Stack + Column + Row | UI 布局 |
| Circle + Text + Button | 基础组件 |
扩展思路
如果你想继续优化这个项目,可以考虑:
- 数据持久化:使用 Preferences 保存计次记录
- 深色模式:适配系统暗色主题
- 振动反馈:计次时触发振动
- 数据导出:分享计次结果
有问题欢迎留言讨论!

讨论HarmonyOS开发技术,专注于API与组件、DevEco Studio、测试、元服务和应用上架分发等。
更多推荐
 7
7 0
0- 0


 已为社区贡献51条内容

所有评论(0)