HarmonyOS NEXT 随机颜色生成器:颜色算法与网格布局的工程实践
·
HarmonyOS NEXT 随机颜色生成器:颜色算法与网格布局的工程实践
摘要
本文探讨在 HarmonyOS NEXT 平台上开发随机颜色生成工具的技术实现,重点分析颜色空间转换算法、随机数分布策略、Grid 网格布局应用等核心技术点。通过本案例,开发者可以深入理解 ArkTS 声明式 UI 范式下的状态管理与数据绑定机制。
关键词:HarmonyOS NEXT、颜色空间、随机数、Grid布局、ArkTS、状态管理
一、技术背景
1.1 应用场景分析
随机颜色生成器在设计、开发、测试等场景有广泛应用:
| 场景 | 用途 |
|---|---|
| UI 设计 | 快速生成配色方案 |
| 数据可视化 | 随机分配图表颜色 |
| 测试验证 | 生成测试数据 |
| 创意探索 | 激发配色灵感 |
1.2 技术选型
| 维度 | 选择 | 理由 |
|---|---|---|
| 开发语言 | ArkTS | 鸿蒙官方语言,声明式语法 |
| UI 框架 | ArkUI | 原生性能,组件丰富 |
| SDK 版本 | API 23/24 | 平衡兼容性与新特性 |
| 布局方案 | Grid | 规整的网格展示 |
二、颜色空间与格式
2.1 HEX 格式解析
HEX(十六进制)颜色格式:#RRGGBB
#  R  R  G  G  B  B
│  │  │  │  │  │  │
│  └──┴──┴──┴──┴──┴── 16进制颜色分量
│
└── 前缀符号
取值范围:
- 每个 color channel:
00-FF(0 - 255) - 颜色总数:256³ = 16,777,216 种
2.2 RGB 格式解析
RGB(红绿蓝)颜色格式:rgb(R, G, B)
- R:红色分量(0-255)
- G:绿色分量(0-255)
- B:蓝色分量(0-255)
2.3 ArkUI 颜色格式要求
ArkUI 的 backgroundColor 属性要求 #AARRGGBB 格式:
#  A  A  R  R  G  G  B  B
│  │  │  │  │  │  │  │
│  └──┴──┴──┴──┴──┴──┴──┴── 颜色分量
│     │
│     └── Alpha(透明度)
│
└── 前缀符号
Alpha 值说明:
FF:完全不透明00:完全透明80:50% 透明度
三、随机颜色生成算法
3.1 基础算法
generateColor(): void {
  let r = Math.floor(Math.random() * 200) + 30;
  let g = Math.floor(Math.random() * 200) + 30;
  let b = Math.floor(Math.random() * 200) + 30;

  // ... 转换逻辑
}
3.2 分布策略分析
问题:为什么使用 30-230 而非 0-255?
| 范围 | 问题 | 效果 |
|---|---|---|
| 0-255 | RGB 都接近 0 | 颜色过暗(接近黑色) |
| 0-255 | RGB 都接近 255 | 颜色过亮(接近白色) |
| 30-230 | 限制极端值 | 颜色鲜艳、饱和度适中 |
数学分析:
P(RGB 三值均 < 30) = (30/255)³ ≈ 0.2%
P(RGB 三值均 > 230) = (25/255)³ ≈ 0.1%

使用 30-230 范围:
- 完全避免极端暗色
- 完全避免极端亮色
- 色彩饱和度保持在可接受范围
3.3 进制转换算法
RGB → HEX
let hexR = r.toString(16).padStart(2, '0').toUpperCase();
转换流程:
98 (十进制)
    ↓ toString(16)
"62" (十六进制字符串)
    ↓ padStart(2, '0')
"62" (补零后,不变)
    ↓ toUpperCase()
"62" (大写)
HEX → RGB
this.rValue = parseInt(color.substring(1, 3), 16);
解析示例:
"#6200EE"
    ↓ substring(1, 3)
"62"
    ↓ parseInt(..., 16)
98 (十进制)
3.4 完整生成算法
generateColor(): void {
  // Step 1: 生成 RGB 分量
  let r = Math.floor(Math.random() * 200) + 30;
  let g = Math.floor(Math.random() * 200) + 30;
  let b = Math.floor(Math.random() * 200) + 30;

  // Step 2: 更新状态
  this.rValue = r;
  this.gValue = g;
  this.bValue = b;

  // Step 3: 转换 HEX
  let hexR = r.toString(16).padStart(2, '0').toUpperCase();
  let hexG = g.toString(16).padStart(2, '0').toUpperCase();
  let hexB = b.toString(16).padStart(2, '0').toUpperCase();

  // Step 4: 组装颜色值
  this.hexValue = `#${hexR}${hexG}${hexB}`;
  this.currentColor = `#FF${hexR}${hexG}${hexB}`;

  // Step 5: 添加历史
  this.addToHistory();
}
四、历史记录管理
4.1 数据结构
@State colorHistory: string[] = [];
private maxHistory: number = 12;
容量设计:12 个 = 4 列 × 3 行,正好填满 Grid。
4.2 添加逻辑
addToHistory(): void {
  // 去重
  let index = this.colorHistory.indexOf(this.hexValue);
  if (index >= 0) {
    this.colorHistory.splice(index, 1);
  }

  // 插入到头部
  this.colorHistory.unshift(this.hexValue);

  // 限制容量
  if (this.colorHistory.length > this.maxHistory) {
    this.colorHistory.pop();
  }

  // 强制刷新
  this.colorHistory = [...this.colorHistory];
}
算法复杂度:
| 操作 | 时间复杂度 |
|---|---|
| indexOf | O(n) |
| splice | O(n) |
| unshift | O(n) |
| pop | O(1) |
总体复杂度:O(n),n ≤ 12,可忽略不计。
4.3 响应式更新问题
问题:直接修改数组不触发 UI 更新。
原因:ArkTS 的响应式系统通过引用比较检测变化。
解决方案:
// ❌ 不会触发更新
this.colorHistory.push(color);

// ✅ 创建新数组,触发更新
this.colorHistory = [...this.colorHistory];
五、UI 架构设计
5.1 组件层级
Column (根容器)
├── Column (颜色预览区) [layoutWeight=4]
│   ├── Column (颜色值显示)
│   │   ├── Text (HEX)
│   │   └── Text (RGB)
│   └── Text (提示文字)
│
├── Column (历史记录区) [layoutWeight=3]
│   ├── Row (标题栏)
│   │   ├── Text (标题)
│   │   ├── Text (数量)
│   │   └── Text (清空按钮)
│   │
│   ├── Grid (历史网格)
│   │   └── GridItem × 12
│   │       └── Column
│   │           ├── Row (色块)
│   │           └── Text (颜色标签)
│   │
│   └── Column (空状态)
│
├── Row (底部工具栏)
│   ├── Button (生成按钮)
│   └── Button (保存按钮)
│
└── Text (反馈提示)
5.2 颜色预览区
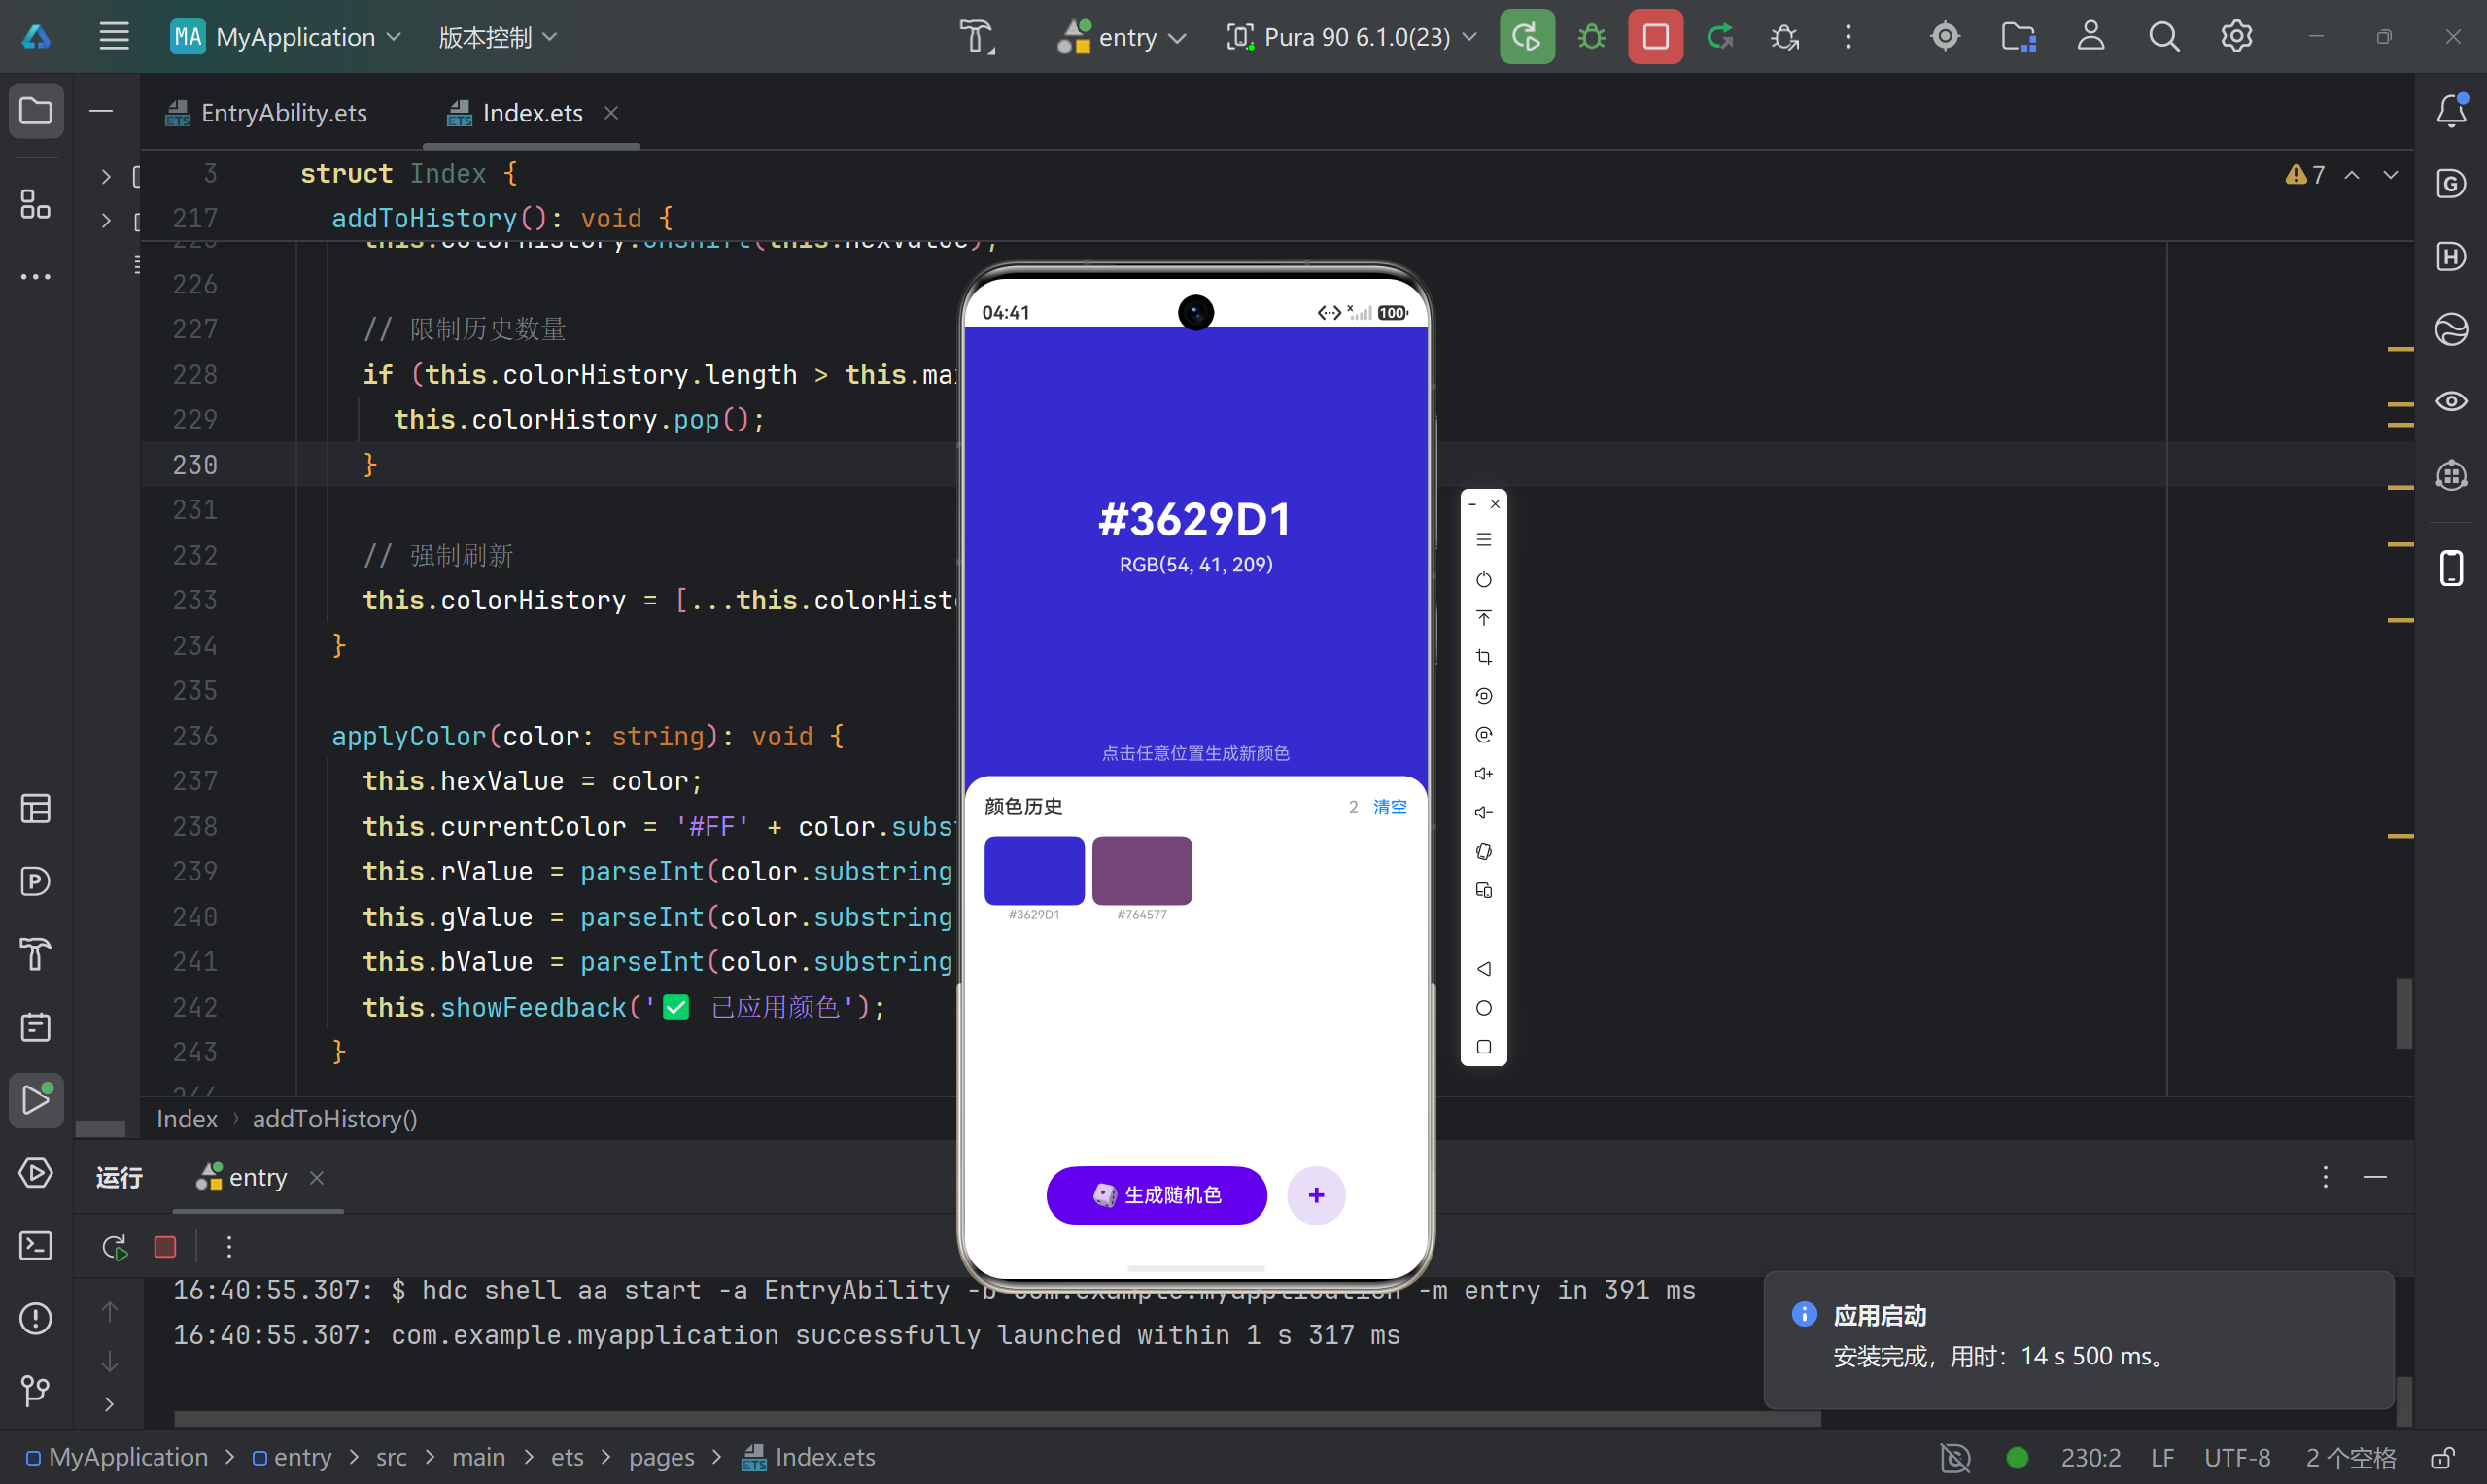
Column() {
  Column() {
    Text(this.hexValue)
      .fontSize(36)
      .fontWeight(FontWeight.Bold)
      .fontColor(Color.White)

    Text(`RGB(${this.rValue}, ${this.gValue}, ${this.bValue})`)
      .fontSize(16)
      .fontColor('#DDFFFFFF')
      .margin({ top: 6 })
  }
  .width('100%')
  .layoutWeight(1)

  Text('点击任意位置生成新颜色')
    .fontSize(14)
    .fontColor('#99FFFFFF')
}
.width('100%')
.layoutWeight(4)
.backgroundColor(this.currentColor)
.onClick(() => this.generateColor())
5.3 Grid 网格布局
Grid() {
  ForEach(this.colorHistory, (color: string, index: number) => {
    GridItem() {
      Column() {
        Row()
          .width('100%')
          .layoutWeight(1)
          .backgroundColor(color)
          .borderRadius(8)
          .onClick(() => this.applyColor(color))

        Text(color.length > 7 ? color.substring(0, 7) : color)
          .fontSize(10)
          .fontColor('#66000000')
      }
      .width('100%')
      .height(70)
    }
  })
}
.columnsTemplate('1fr 1fr 1fr 1fr')
.rowsTemplate('1fr 1fr 1fr')
.columnsGap(6)
.rowsGap(6)
Grid 属性解析:
| 属性 | 值 | 说明 |
|---|---|---|
| columnsTemplate | 1fr 1fr 1fr 1fr |
4 列等宽 |
| rowsTemplate | 1fr 1fr 1fr |
3 行等高 |
| columnsGap | 6 | 列间距 6vp |
| rowsGap | 6 | 行间距 6vp |
5.4 圆角卡片设计
Column() {
  // 历史内容...
}
.backgroundColor(Color.White)
.borderRadius({ topLeft: 20, topRight: 20 })
.margin({ top: -20 })
.padding({ top: 16 })
视觉效果:
- 只设置顶部圆角
- 负边距让卡片向上偏移
- 形成悬浮在预览区上的效果
六、交互设计
6.1 交互方式矩阵
| 触发方式 | 区域 | 行为 |
|---|---|---|
| 点击 | 预览区 | 生成新颜色 |
| 点击 | 生成按钮 | 生成新颜色 |
| 点击 | 保存按钮 | 手动保存到历史 |
| 点击 | 历史色块 | 应用该颜色 |
| 点击 | 清空按钮 | 清空历史 |
6.2 反馈机制
showFeedback(msg: string): void {
  this.copyFeedback = msg;
  setTimeout(() => {
    this.copyFeedback = '';
  }, 2000);
}
反馈时机:
- 应用历史颜色:
✅ 已应用颜色 - 保存成功:
✅ 已保存到历史
七、完整代码
@Entry
@Component
struct Index {
  @State currentColor: string = '#FF6200EE';
  @State hexValue: string = '#6200EE';
  @State rValue: number = 98;
  @State gValue: number = 0;
  @State bValue: number = 238;
  @State colorHistory: string[] = [];
  @State copyFeedback: string = '';

  private maxHistory: number = 12;

  aboutToAppear(): void {
    this.generateColor();
  }

  build() {
    Column() {
      Column() {
        Column() {
          Text(this.hexValue)
            .fontSize(36)
            .fontWeight(FontWeight.Bold)
            .fontColor(Color.White)

          Text(`RGB(${this.rValue}, ${this.gValue}, ${this.bValue})`)
            .fontSize(16)
            .fontColor('#DDFFFFFF')
            .margin({ top: 6 })
        }
        .alignItems(HorizontalAlign.Center)
        .justifyContent(FlexAlign.Center)
        .width('100%')
        .layoutWeight(1)

        Text('点击任意位置生成新颜色')
          .fontSize(14)
          .fontColor('#99FFFFFF')
          .margin({ bottom: 30 })
      }
      .width('100%')
      .layoutWeight(4)
      .backgroundColor(this.currentColor)
      .onClick(() => this.generateColor())

      Column() {
        Row() {
          Text('颜色历史').fontSize(16).fontWeight(FontWeight.Medium)
          Blank()
          Text(`${this.colorHistory.length}`).fontSize(14).fontColor('#66000000')
          if (this.colorHistory.length > 0) {
            Text('清空').fontSize(14).fontColor('#FF007AFF')
              .margin({ left: 12 }).onClick(() => this.colorHistory = [])
          }
        }
        .width('100%').padding({ left: 16, right: 16, bottom: 8 })

        if (this.colorHistory.length > 0) {
          Grid() {
            ForEach(this.colorHistory, (color: string) => {
              GridItem() {
                Column() {
                  Row().width('100%').layoutWeight(1).backgroundColor(color)
                    .borderRadius(8).onClick(() => this.applyColor(color))
                  Text(color.substring(0, 7)).fontSize(10)
                    .fontColor('#66000000').margin({ top: 2 })
                }.width('100%').height(70)
              }
            })
          }
          .columnsTemplate('1fr 1fr 1fr 1fr')
          .rowsTemplate('1fr 1fr 1fr')
          .columnsGap(6).rowsGap(6)
          .padding({ left: 16, right: 16, bottom: 8 })
          .width('100%').layoutWeight(1)
        } else {
          Column() {
            Text('点击上方生成颜色\n历史记录将显示在这里')
              .fontSize(14).fontColor('#66000000')
              .textAlign(TextAlign.Center).lineHeight(22)
          }.width('100%').layoutWeight(1).justifyContent(FlexAlign.Center)
        }
      }
      .width('100%').layoutWeight(3).backgroundColor(Color.White)
      .borderRadius({ topLeft: 20, topRight: 20 }).margin({ top: -20 }).padding({ top: 16 })

      Row() {
        Button({ type: ButtonType.Capsule }) {
          Row() {
            Text('🎲').fontSize(18)
            Text(' 生成随机色').fontSize(16).fontColor(Color.White)
          }
        }.width(180).height(48).backgroundColor('#FF6200EE')
        .onClick(() => this.generateColor())

        Button({ type: ButtonType.Circle }) {
          Text('+').fontSize(24).fontColor('#FF6200EE').fontWeight(FontWeight.Bold)
        }.width(48).height(48).backgroundColor('#FFE8DEF8').margin({ left: 16 })
        .onClick(() => this.addToHistory())
      }.width('100%').justifyContent(FlexAlign.Center)
      .padding({ top: 8, bottom: 16 }).backgroundColor(Color.White)

      if (this.copyFeedback) {
        Text(this.copyFeedback).fontSize(13).fontColor(Color.White)
          .backgroundColor('#CC000000').borderRadius(16)
          .padding({ left: 16, right: 16, top: 6, bottom: 6 }).margin({ bottom: 8 })
      }
    }.width('100%').height('100%').backgroundColor('#FFF2F2F7')
  }

  generateColor(): void {
    let r = Math.floor(Math.random() * 200) + 30;
    let g = Math.floor(Math.random() * 200) + 30;
    let b = Math.floor(Math.random() * 200) + 30;
    this.rValue = r; this.gValue = g; this.bValue = b;
    let hexR = r.toString(16).padStart(2, '0').toUpperCase();
    let hexG = g.toString(16).padStart(2, '0').toUpperCase();
    let hexB = b.toString(16).padStart(2, '0').toUpperCase();
    this.hexValue = `#${hexR}${hexG}${hexB}`;
    this.currentColor = `#FF${hexR}${hexG}${hexB}`;
    this.addToHistory();
  }

  addToHistory(): void {
    let index = this.colorHistory.indexOf(this.hexValue);
    if (index >= 0) this.colorHistory.splice(index, 1);
    this.colorHistory.unshift(this.hexValue);
    if (this.colorHistory.length > this.maxHistory) this.colorHistory.pop();
    this.colorHistory = [...this.colorHistory];
  }

  applyColor(color: string): void {
    this.hexValue = color;
    this.currentColor = '#FF' + color.substring(1);
    this.rValue = parseInt(color.substring(1, 3), 16);
    this.gValue = parseInt(color.substring(3, 5), 16);
    this.bValue = parseInt(color.substring(5, 7), 16);
    this.showFeedback('✅ 已应用颜色');
  }

  showFeedback(msg: string): void {
    this.copyFeedback = msg;
    setTimeout(() => this.copyFeedback = '', 2000);
  }
}
八、测试用例
| 测试场景 | 预期结果 |
|---|---|
| 首次打开 | 自动生成一个随机颜色 |
| 点击预览区 | 生成新颜色,添加到历史 |
| 点击生成按钮 | 同上 |
| 点击历史色块 | 应用该颜色,显示反馈 |
| 连续生成 13 次 | 历史保持 12 个,最旧的被移除 |
| 生成相同颜色 | 该颜色移到最前,不重复 |
| 点击清空 | 历史清空,显示空状态 |
九、总结
本文从颜色空间、算法设计、UI 架构等多个维度,详细阐述了 HarmonyOS NEXT 随机颜色生成器的开发过程。关键技术要点:
- 颜色算法:RGB-HEX 转换、随机分布优化
- 状态管理:响应式数组更新
- Grid 布局:规则的网格展示
- 交互设计:多种触发方式

讨论HarmonyOS开发技术,专注于API与组件、DevEco Studio、测试、元服务和应用上架分发等。
更多推荐

 12
12 0
0- 0


 已为社区贡献49条内容

所有评论(0)