第67篇 | HarmonyOS Muxer 与音轨:视频、音频如何封装成可播放文件
第67篇 | HarmonyOS Muxer 与音轨:视频、音频如何封装成可播放文件
编码器输出的是视频样本,用户需要的是可播放的 MP4。第 67 篇讲 Muxer 与音轨:Muxer.cpp 负责把编码后的视频样本写入 MP4,MovieAudioMuxer.cpp 负责把静音视频轨和 rawfile 音频轨重新封装到同一个输出文件。
这篇文章会把“写视频轨”和“合并音轨”分开讲。前者发生在本地短片编码阶段,后者发生在静音短片已经生成之后。理解这两个阶段,才能解释为什么配乐失败时可以保留静音视频。
本篇目标
- 理解 Muxer::Create、Config、Start、WriteSample、Release 的职责。
- 掌握 OH_AVMuxer_AddTrack 和 OH_AVMuxer_WriteSampleBuffer 的使用顺序。
- 理解 MovieAudioMuxer 如何读取视频轨、音频轨并复制样本。
- 掌握音轨合并失败时资源释放和错误提示的处理顺序。
对应源码位置
superImage/entry/src/main/cpp/capbilities/Muxer.cppsuperImage/entry/src/main/cpp/capbilities/MovieAudioMuxer.cppsuperImage/entry/src/main/ets/services/LocalImageMovieService.ets
先看封装器在短片中的职责
VideoEncoder 负责压缩视频帧,Muxer 负责把压缩后的样本写成容器文件。没有 Muxer,编码器输出只是缓冲中的样本,不能直接被系统播放器当成 MP4 播放。
配乐合并则是第二次封装:先读取已经生成的静音 MP4,再读取 rawfile 复制到沙箱后的音频文件,分别找到 video/ 和 audio/ 轨道,最后创建新的 MP4 输出文件。
Muxer 将编码样本和音轨封装成可播放 MP4
Muxer 先创建容器并添加视频轨
Muxer::Create 使用输出 fd 创建 MP4 封装器。Config 创建视频格式,写入帧率、宽高、mime 和 HDR 参数,然后调用 OH_AVMuxer_AddTrack 获取 videoTrackId,并设置旋转角度。
这个阶段只描述“将要写入什么格式的视频轨”,还没有真正写样本。只有 AddTrack 成功后,后续 WriteSample 才知道该把编码器输出写到哪一条轨道。
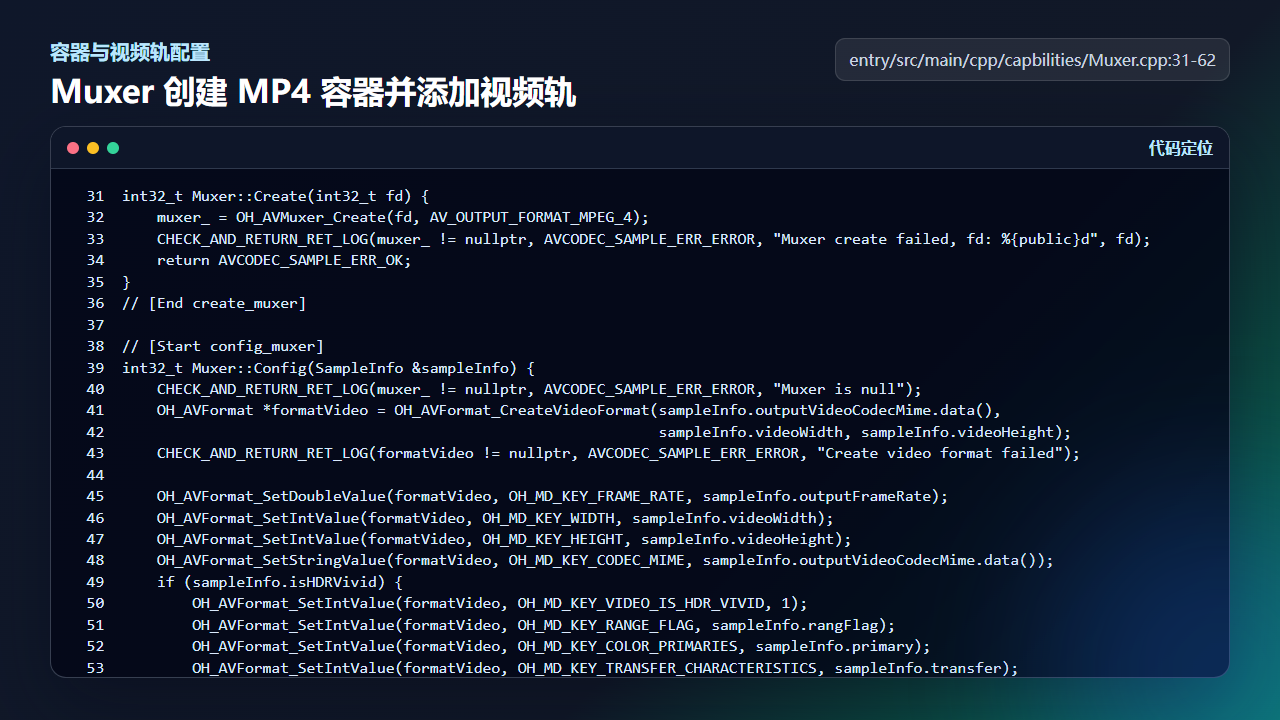
Muxer::Config 创建视频格式并添加 video track
int32_t Muxer::Create(int32_t fd) {
    muxer_ = OH_AVMuxer_Create(fd, AV_OUTPUT_FORMAT_MPEG_4);
    CHECK_AND_RETURN_RET_LOG(muxer_ != nullptr, AVCODEC_SAMPLE_ERR_ERROR, "Muxer create failed, fd: %{public}d", fd);
    return AVCODEC_SAMPLE_ERR_OK;
}
// [End create_muxer]

// [Start config_muxer]
int32_t Muxer::Config(SampleInfo &sampleInfo) {
    CHECK_AND_RETURN_RET_LOG(muxer_ != nullptr, AVCODEC_SAMPLE_ERR_ERROR, "Muxer is null");
    OH_AVFormat *formatVideo = OH_AVFormat_CreateVideoFormat(sampleInfo.outputVideoCodecMime.data(),
                                                             sampleInfo.videoWidth, sampleInfo.videoHeight);
    CHECK_AND_RETURN_RET_LOG(formatVideo != nullptr, AVCODEC_SAMPLE_ERR_ERROR, "Create video format failed");

    OH_AVFormat_SetDoubleValue(formatVideo, OH_MD_KEY_FRAME_RATE, sampleInfo.outputFrameRate);
    OH_AVFormat_SetIntValue(formatVideo, OH_MD_KEY_WIDTH, sampleInfo.videoWidth);
    OH_AVFormat_SetIntValue(formatVideo, OH_MD_KEY_HEIGHT, sampleInfo.videoHeight);
    OH_AVFormat_SetStringValue(formatVideo, OH_MD_KEY_CODEC_MIME, sampleInfo.outputVideoCodecMime.data());
    if (sampleInfo.isHDRVivid) {
        OH_AVFormat_SetIntValue(formatVideo, OH_MD_KEY_VIDEO_IS_HDR_VIVID, 1);
        OH_AVFormat_SetIntValue(formatVideo, OH_MD_KEY_RANGE_FLAG, sampleInfo.rangFlag);
        OH_AVFormat_SetIntValue(formatVideo, OH_MD_KEY_COLOR_PRIMARIES, sampleInfo.primary);
        OH_AVFormat_SetIntValue(formatVideo, OH_MD_KEY_TRANSFER_CHARACTERISTICS, sampleInfo.transfer);
        OH_AVFormat_SetIntValue(formatVideo, OH_MD_KEY_MATRIX_COEFFICIENTS, sampleInfo.matrix);
    }

    int32_t ret = OH_AVMuxer_AddTrack(muxer_, &videoTrackId_, formatVideo);
    OH_AVFormat_Destroy(formatVideo);
    formatVideo = nullptr;
    OH_AVMuxer_SetRotation(muxer_, sampleInfo.rotation);
    CHECK_AND_RETURN_RET_LOG(ret == AV_ERR_OK, AVCODEC_SAMPLE_ERR_ERROR, "AddTrack failed");
    return AVCODEC_SAMPLE_ERR_OK;
写样本前要先 Start
Muxer::Start 调用 OH_AVMuxer_Start,WriteSample 则在加锁后校验 muxer 和 buffer,再设置 buffer attr,最后调用 OH_AVMuxer_WriteSampleBuffer。Release 负责销毁 muxer。
写样本这一步要和编码器输出线程配合。输出线程从 outputBufferInfoQueue 里拿到编码器产生的 buffer 和 attr,再交给 Muxer 写入 MP4。attr 中的 flags、pts、size 都会影响最终文件是否可播放。
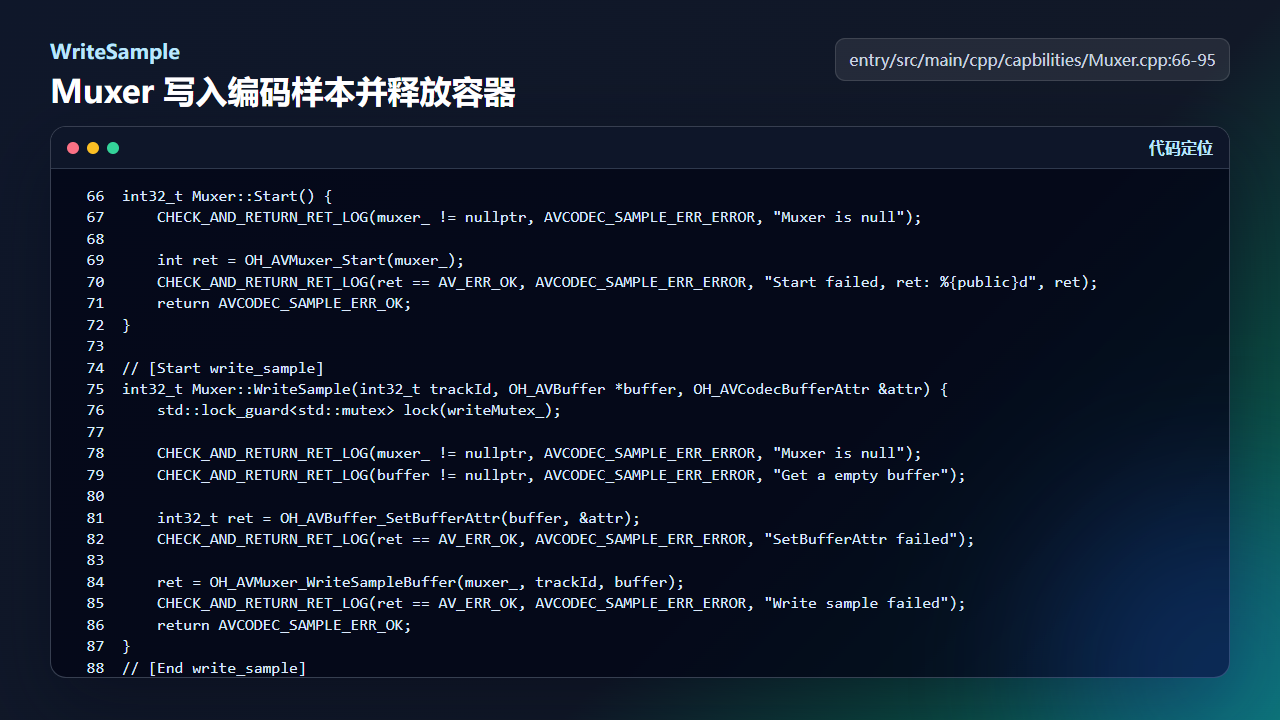
WriteSample 将编码器输出缓冲写入 MP4 视频轨
int32_t Muxer::Start() {
    CHECK_AND_RETURN_RET_LOG(muxer_ != nullptr, AVCODEC_SAMPLE_ERR_ERROR, "Muxer is null");

    int ret = OH_AVMuxer_Start(muxer_);
    CHECK_AND_RETURN_RET_LOG(ret == AV_ERR_OK, AVCODEC_SAMPLE_ERR_ERROR, "Start failed, ret: %{public}d", ret);
    return AVCODEC_SAMPLE_ERR_OK;
}

// [Start write_sample]
int32_t Muxer::WriteSample(int32_t trackId, OH_AVBuffer *buffer, OH_AVCodecBufferAttr &attr) {
    std::lock_guard<std::mutex> lock(writeMutex_);

    CHECK_AND_RETURN_RET_LOG(muxer_ != nullptr, AVCODEC_SAMPLE_ERR_ERROR, "Muxer is null");
    CHECK_AND_RETURN_RET_LOG(buffer != nullptr, AVCODEC_SAMPLE_ERR_ERROR, "Get a empty buffer");

    int32_t ret = OH_AVBuffer_SetBufferAttr(buffer, &attr);
    CHECK_AND_RETURN_RET_LOG(ret == AV_ERR_OK, AVCODEC_SAMPLE_ERR_ERROR, "SetBufferAttr failed");

    ret = OH_AVMuxer_WriteSampleBuffer(muxer_, trackId, buffer);
    CHECK_AND_RETURN_RET_LOG(ret == AV_ERR_OK, AVCODEC_SAMPLE_ERR_ERROR, "Write sample failed");
    return AVCODEC_SAMPLE_ERR_OK;
}
// [End write_sample]

int32_t Muxer::Release() {
    if (muxer_ != nullptr) {
        OH_AVMuxer_Destroy(muxer_);
        muxer_ = nullptr;
    }
    return AVCODEC_SAMPLE_ERR_OK;
复制轨道样本时按 EOS 和时长停止
MovieAudioMuxer 的 CopyTrackSamples 会从 demuxer 中读取样本,拿到 OH_AVCodecBufferAttr 后判断 EOS 和 maxDurationUs。视频轨通常完整复制,音频轨则按短片时长裁剪,避免 BGM 长过画面太多。
这段代码解释了为什么 createMovie 需要传入 getMovieDurationUs。音轨合并不是简单把整首歌塞进去,而是让音频跟随短片长度结束,播放体验更干净。
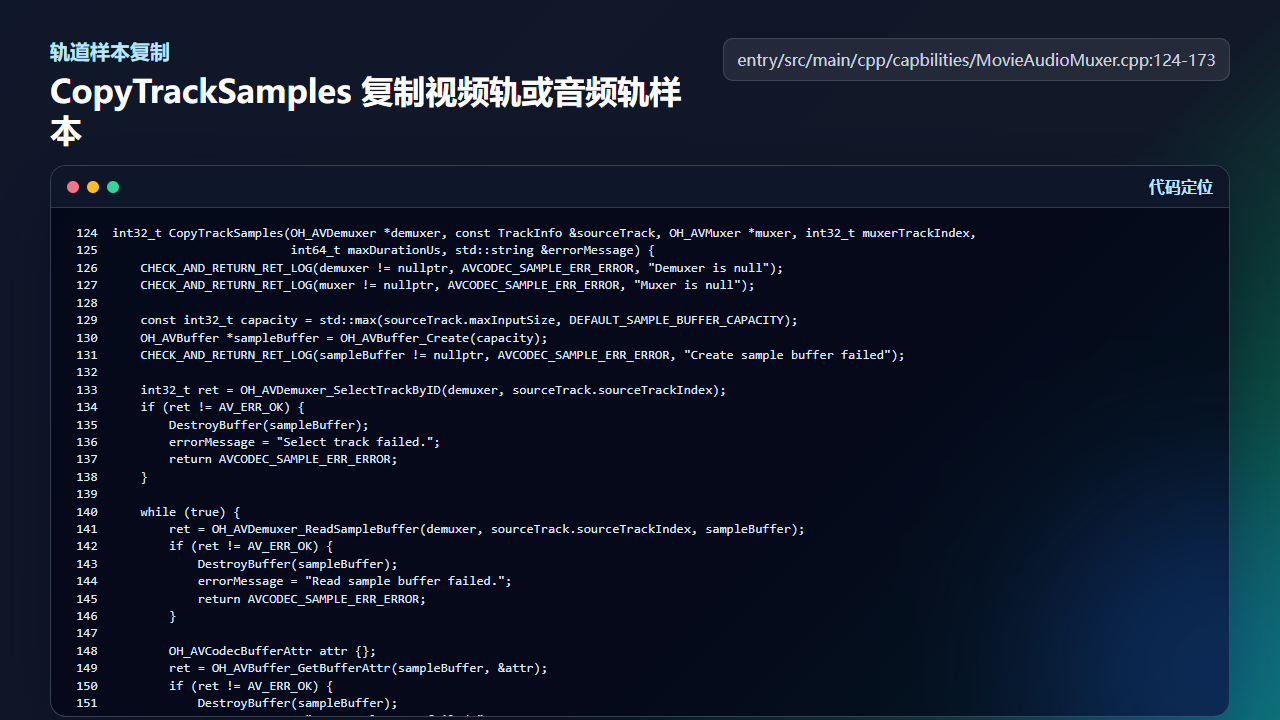
CopyTrackSamples 按 EOS 和最大时长控制样本复制
int32_t CopyTrackSamples(OH_AVDemuxer *demuxer, const TrackInfo &sourceTrack, OH_AVMuxer *muxer, int32_t muxerTrackIndex,
                         int64_t maxDurationUs, std::string &errorMessage) {
    CHECK_AND_RETURN_RET_LOG(demuxer != nullptr, AVCODEC_SAMPLE_ERR_ERROR, "Demuxer is null");
    CHECK_AND_RETURN_RET_LOG(muxer != nullptr, AVCODEC_SAMPLE_ERR_ERROR, "Muxer is null");

    const int32_t capacity = std::max(sourceTrack.maxInputSize, DEFAULT_SAMPLE_BUFFER_CAPACITY);
    OH_AVBuffer *sampleBuffer = OH_AVBuffer_Create(capacity);
    CHECK_AND_RETURN_RET_LOG(sampleBuffer != nullptr, AVCODEC_SAMPLE_ERR_ERROR, "Create sample buffer failed");

    int32_t ret = OH_AVDemuxer_SelectTrackByID(demuxer, sourceTrack.sourceTrackIndex);
    if (ret != AV_ERR_OK) {
        DestroyBuffer(sampleBuffer);
        errorMessage = "Select track failed.";
        return AVCODEC_SAMPLE_ERR_ERROR;
    }

    while (true) {
        ret = OH_AVDemuxer_ReadSampleBuffer(demuxer, sourceTrack.sourceTrackIndex, sampleBuffer);
        if (ret != AV_ERR_OK) {
            DestroyBuffer(sampleBuffer);
            errorMessage = "Read sample buffer failed.";
            return AVCODEC_SAMPLE_ERR_ERROR;
        }

        OH_AVCodecBufferAttr attr {};
        ret = OH_AVBuffer_GetBufferAttr(sampleBuffer, &attr);
        if (ret != AV_ERR_OK) {
            DestroyBuffer(sampleBuffer);
            errorMessage = "Get sample attr failed.";
            return AVCODEC_SAMPLE_ERR_ERROR;
        }

        if ((attr.flags & AVCODEC_BUFFER_FLAGS_EOS) != 0) {
            break;
        }

        if (maxDurationUs > 0 && attr.pts >= maxDurationUs) {
            break;
        }

        ret = OH_AVMuxer_WriteSampleBuffer(muxer, static_cast<uint32_t>(muxerTrackIndex), sampleBuffer);
        if (ret != AV_ERR_OK) {
            DestroyBuffer(sampleBuffer);
            errorMessage = "Write sample buffer failed.";
            return AVCODEC_SAMPLE_ERR_ERROR;
        }
    }

    DestroyBuffer(sampleBuffer);
    return AVCODEC_SAMPLE_ERR_OK;
二次封装合并视频轨和音频轨
MovieAudioMuxer::Merge 先检查静音视频和音乐文件大小,再打开两个输入 fd 和一个输出 fd。随后创建 AVSource、Demuxer,找到 video/ 与 audio/ 轨道,创建新的 AVMuxer,分别 AddTrack。
Start 后先复制视频轨,再按 trimDurationUs 复制音频轨。最后无论成功失败都进入 EXIT,按顺序 Stop、Destroy、ReleaseFormat、DestroySource、CloseFd。这个释放顺序让失败场景更可控。
MovieAudioMuxer 将静音视频轨和音频轨封装为最终 MP4
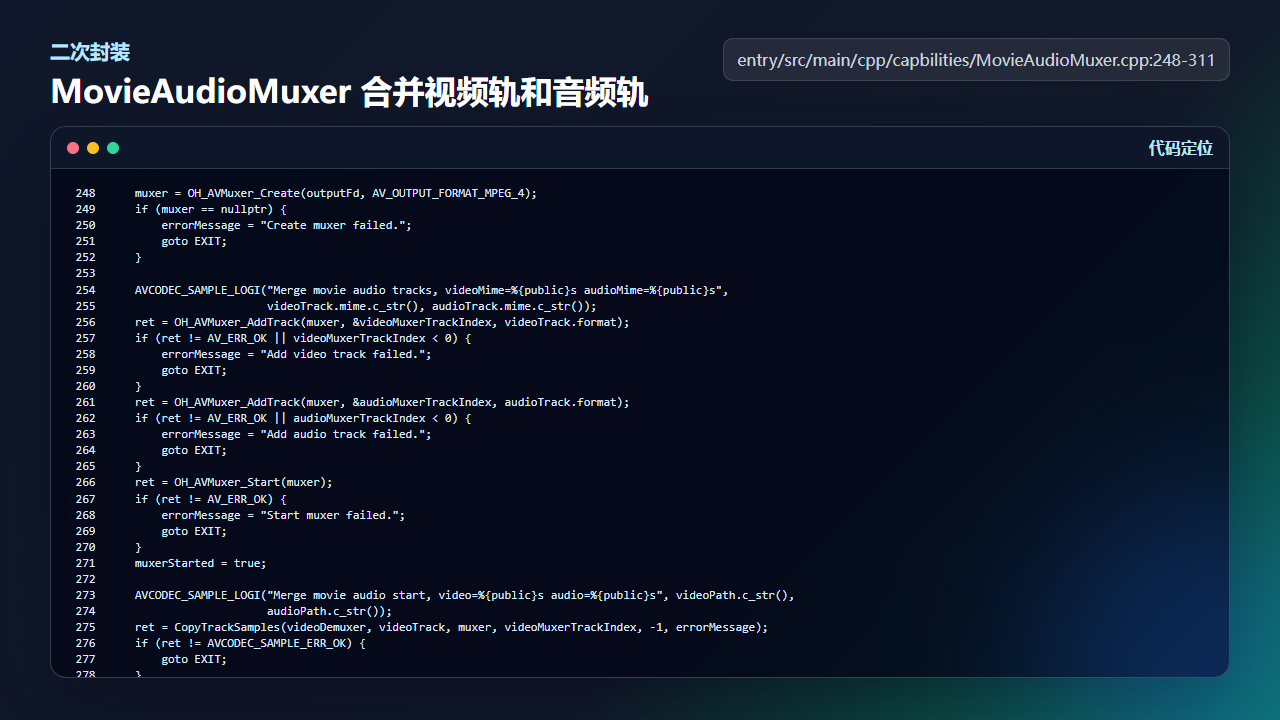
    muxer = OH_AVMuxer_Create(outputFd, AV_OUTPUT_FORMAT_MPEG_4);
    if (muxer == nullptr) {
        errorMessage = "Create muxer failed.";
        goto EXIT;
    }

    AVCODEC_SAMPLE_LOGI("Merge movie audio tracks, videoMime=%{public}s audioMime=%{public}s",
                        videoTrack.mime.c_str(), audioTrack.mime.c_str());
    ret = OH_AVMuxer_AddTrack(muxer, &videoMuxerTrackIndex, videoTrack.format);
    if (ret != AV_ERR_OK || videoMuxerTrackIndex < 0) {
        errorMessage = "Add video track failed.";
        goto EXIT;
    }
    ret = OH_AVMuxer_AddTrack(muxer, &audioMuxerTrackIndex, audioTrack.format);
    if (ret != AV_ERR_OK || audioMuxerTrackIndex < 0) {
        errorMessage = "Add audio track failed.";
        goto EXIT;
    }
    ret = OH_AVMuxer_Start(muxer);
    if (ret != AV_ERR_OK) {
        errorMessage = "Start muxer failed.";
        goto EXIT;
    }
    muxerStarted = true;

    AVCODEC_SAMPLE_LOGI("Merge movie audio start, video=%{public}s audio=%{public}s", videoPath.c_str(),
                        audioPath.c_str());
    ret = CopyTrackSamples(videoDemuxer, videoTrack, muxer, videoMuxerTrackIndex, -1, errorMessage);
    if (ret != AVCODEC_SAMPLE_ERR_OK) {
        goto EXIT;
    }

    trimDurationUs = maxDurationUs > 0
                         ? maxDurationUs
                         : (videoDurationUs > 0 ? videoDurationUs : audioTrack.durationUs);
    ret = CopyTrackSamples(audioDemuxer, audioTrack, muxer, audioMuxerTrackIndex, trimDurationUs, errorMessage);
    if (ret != AVCODEC_SAMPLE_ERR_OK) {
        goto EXIT;
    }

    AVCODEC_SAMPLE_LOGI("Merge movie audio finished, trim=%{public}" PRId64, trimDurationUs);
    errorMessage.clear();

EXIT:
    if (muxer != nullptr && muxerStarted) {
        OH_AVMuxer_Stop(muxer);
    }
    if (!errorMessage.empty()) {
        AVCODEC_SAMPLE_LOGE("Merge movie audio failed: %{public}s", errorMessage.c_str());
    }
    ReleaseFormat(videoTrack.format);
    ReleaseFormat(audioTrack.format);
    if (muxer != nullptr) {
        OH_AVMuxer_Destroy(muxer);
        muxer = nullptr;
    }
    DestroyDemuxer(videoDemuxer);
    DestroyDemuxer(audioDemuxer);
    DestroySource(videoSource);
    DestroySource(audioSource);
    CloseFd(outputFd);
    CloseFd(audioFd);
    CloseFd(videoFd);
    return errorMessage.empty() ? AVCODEC_SAMPLE_ERR_OK : AVCODEC_SAMPLE_ERR_ERROR;
工程检查清单
- Muxer 创建需要有效输出 fd,fd 来自 ArkTS 打开的沙箱文件。
- AddTrack 成功后才能 Start 和 WriteSample。
- WriteSample 要设置 buffer attr,不能丢掉 pts 和 flags。
- 音轨合并前要检查视频文件和音乐文件大小。
- 失败路径必须释放 muxer、demuxer、source、format 和 fd。
今日练习
- 把配乐时长裁剪参数改为 -1,观察音频是否可能长过画面。
- 在 MovieAudioMuxer::Merge 中记录 videoMime 和 audioMime,确认轨道识别结果。
- 模拟 AddTrack audio 失败,检查 EXIT 是否完整释放资源。
这一篇的重点不是背接口名,而是把功能拆成“入口状态、服务层数据、文件落点、异常兜底”四件事。写训练营文章时也按这个顺序推进:先让读者看见效果,再让读者能回到工程里找到实现,最后给出可以立刻验证的检查点。

讨论HarmonyOS开发技术,专注于API与组件、DevEco Studio、测试、元服务和应用上架分发等。
更多推荐


 6
6 0
0- 0


 已为社区贡献256条内容

所有评论(0)