鸿蒙Next ArkTS 实战:构建 AI 个人衣橱管家 App
鸿蒙Next ArkTS 实战:构建 AI 个人衣橱管家 App
作者: duluo
技术栈: HarmonyOS Next API 24 · ArkTS · ArkUI
源码: 本文所有代码均来自一个完整可构建

一、引言
1.1 开发背景
随着鸿蒙生态的快速发展,越来越多的开发者开始关注基于 HarmonyOS 的原生应用开发。HarmonyOS Next 作为面向全场景的分布式操作系统,其提供的 ArkTS 语言和 ArkUI 框架为开发者带来了声明式 UI 开发的全新体验。
在日常穿搭场景中,许多人面临着"衣橱爆满却不知穿什么"的困境。一个智能化的个人衣橱管家,可以帮助用户管理衣物、记录穿搭、获取 AI 搭配建议,从而提升穿衣效率和时尚感。本文将以"AI 个人衣橱管家"App 为例,系统讲解基于 HarmonyOS Next ArkTS 的全流程开发实战。
1.2 目标读者
本文面向具备一定 ArkTS 基础的开发者。如果你已经了解基本的 @Component、@State 等装饰器语法,但对项目级架构设计、组件封装、数据流管理、ArkTS 严格模式适配等实践仍有困惑,那么这篇文章非常适合你。文章将从零开始搭建一个包含 5 个页面、2 个数据模型层文件的完整 App,并在构建过程中讲解各种技巧和踩坑经验。
1.3 最终产出的 App 功能概览
| 功能模块 | 页面 | 核心能力 |
|---|---|---|
| 首页仪表盘 | HomePage | 天气/季节问候、分类网格、统计数据、快捷操作 |
| 衣橱列表 | ClosetPage | 搜索、分类/季节筛选、收藏、列表展示 |
| 添加衣物 | AddClothesPage | 表单录入、颜色选择器、多选场合 |
| 衣物详情 | ClothesDetailPage | 完整信息、编辑入口、删除确认 |
| AI 搭配推荐 | OutfitRecommendPage | 季节+场合场景选择、多套搭配方案生成 |
二、技术栈与项目结构
2.1 技术选型
| 层次 | 技术方案 |
|---|---|
| 语言 | ArkTS(TypeScript 的子集,鸿蒙原生语言) |
| UI 框架 | ArkUI(声明式 UI,类似 SwiftUI / Jetpack Compose) |
| 构建工具 | hvigor(鸿蒙项目构建工具) |
| 路由 | @ohos.router(页面级路由) |
| 数据持久化 | @kit.ArkData / preferences(后续可扩展) |
| 目标 SDK | API 24(HarmonyOS Next 6.1.0) |
选择 ArkTS 而非 JS/eTS 的原因在于:ArkTS 提供了静态类型检查、更严格的编译期验证,以及更好的运行时性能。特别是在鸿蒙 Next 版本中,ArkTS 已经成为官方主推的一等语言。
2.2 项目目录结构
构建完成的项目目录结构如下:
entry/src/main/ets/
├── models/
│   ├── ClothesItem.ets         # 衣物数据模型 + 常量定义
│   └── ClothesDatabase.ets     # 数据管理层(单例+CRUD+AI算法)
├── pages/
│   ├── HomePage.ets            # 首页仪表盘
│   ├── ClosetPage.ets          # 衣橱列表
│   ├── AddClothesPage.ets      # 添加/编辑衣物
│   ├── ClothesDetailPage.ets   # 衣物详情
│   └── OutfitRecommendPage.ets # AI搭配推荐
└── entryability/
    └── EntryAbility.ets        # 应用入口
这种按功能模块分层(model / page / ability)的结构,在 5~20 个页面的中小型应用中性价比最高:既不会因过度抽象而增加认知负担,也为未来扩展留有空间。
2.3 页面路由配置
页面的路由注册在 main_pages.json 中:
{
  "src": [
    "pages/HomePage",
    "pages/ClosetPage",
    "pages/AddClothesPage",
    "pages/ClothesDetailPage",
    "pages/OutfitRecommendPage"
  ]
}
每一个页面路径都需在此注册,否则运行时 router.pushUrl 会因找不到目标页面而静默失败——这是排查导航问题时的第一个排查点。
三、数据模型层的设计
3.1 衣物实体 ClothesItem
在 ArkTS 中,数据模型使用 export class 导出,而非 interface 或 type。这是因为 ArkTS 严格模式下禁止对象字面量作为类型声明(arkts-no-obj-literals-as-types),使用 class 可以保证类型安全且兼容状态管理系统的观察机制。
export class ClothesItem {
  id: number
  name: string
  category: string      // 上衣/裤子/裙子/外套/鞋子/配饰
  color: string
  colorHex: string      // 色值用于显示
  season: string        // 春/夏/秋/冬/四季
  occasions: string[]   // 休闲/商务/运动/正式/约会
  imagePath: string     // 图片路径
  brand: string
  material: string
  favorite: boolean
  createTime: string
  timesWorn: number

  constructor(id: number, name: string, category: string, color: string,
    colorHex: string = '#808080', season: string = '四季',
    occasions: string[] = ['休闲'], imagePath: string = '',
    brand: string = '', material: string = '', favorite: boolean = false,
    timesWorn: number = 0) {
    this.id = id
    this.name = name
    this.category = category
    this.color = color
    this.colorHex = colorHex
    this.season = season
    this.occasions = occasions
    this.imagePath = imagePath
    this.brand = brand
    this.material = material
    this.favorite = favorite
    this.createTime = new Date().toLocaleDateString()
    this.timesWorn = timesWorn
  }
}
设计要点:
- constructor 参数默认值:
colorHex、season、occasions等在构造函数中提供合理的默认值,避免调用方遗漏必填属性。 - colorHex 字段:存储颜色的十六进制值(如
#FF69B4),用于在 UI 中渲染颜色圆点。这是 ArkUI 组件中Circle().fill()方法直接接受的颜色格式。 - id 由数据层生成:构造函数中的
id参数初始为 0,实际 ID 在addClothes方法中通过自增赋值,这种"延迟賦值"模式避免了构造函数与递增逻辑的耦合。
3.2 常量定义体系
与衣物相关的枚举常量集中定义在同一个文件中,便于维护和引用:
export const CATEGORIES: string[] = ['上衣', '裤子', '裙子', '外套', '鞋子', '配饰', '连衣裙']
export const SEASONS: string[] = ['四季', '春', '夏', '秋', '冬']
export const OCCASIONS: string[] = ['休闲', '商务', '运动', '正式', '约会', '旅行']

export interface ColorOption {
  name: string
  hex: string
}

export const COLORS: ColorOption[] = [
  { name: '黑色', hex: '#1A1A1A' },
  { name: '白色', hex: '#FFFFFF' },
  // ...共 14 种颜色
]
注意:ColorOption 是项目中唯一使用 interface 的地方。在 ArkTS 严格模式下,interface 中的对象字面量可以用在 const 初始化中,但不能作为变量类型声明。这是 ArkTS 与标准 TypeScript 的一个关键区别——ArkTS 更加严格地限制了对象字面量的使用场景。
3.3 数据管理层 ClothesDatabase
数据管理采用了经典的单例模式:
export class ClothesDatabase {
  private clothes: ClothesItem[] = []
  private nextId: number = 1
  private static instance: ClothesDatabase

  static getInstance(): ClothesDatabase {
    if (!ClothesDatabase.instance) {
      ClothesDatabase.instance = new ClothesDatabase()
    }
    return ClothesDatabase.instance
  }
  // ... CRUD 方法
}
为什么使用单例而非全局变量? 在 ArkTS 中,页面组件的生命周期由框架管理,组件销毁后其内部状态也随之消失。单例模式保证了数据在页面切换间持续存活,且所有页面访问的是同一份数据实例。
CRUD 操作的实现要点:
getClothesById(id: number): ClothesItem | null {
  const found = this.clothes.find(item => item.id === id)
  return found ?? null
}

addClothes(item: ClothesItem): void {
  item.id = this.nextId++
  this.clothes.push(item)
}

toggleFavorite(id: number): void {
  const item = this.clothes.find(c => c.id === id)
  if (item) {
    item.favorite = !item.favorite
  }
}
需要注意的是,getClothesById 返回的是 ClothesItem | null 而非 undefined。这是因为 ArkTS 的 @State 变量无法与 undefined 兼容——当你在状态变量中声明 @State item: ClothesItem | null = null,但 getter 返回 ClothesItem | undefined 时,编译器会报类型不匹配错误。
这是 ArkTS 严格模式下一类常见陷阱:Array.find() 返回 T | undefined,但 ArkTS 中许多上下文(如状态管理)只接受 T | null。解决方案就是用 ?? null 将 undefined 转换为 null。
3.4 统计与辅助类
为了遵守 ArkTS 严格模式中"禁止对象字面量作为类型"的规则,需要为统计数据定义专门的类:
export class CategoryCount {
  category: string = ''
  count: number = 0
}

export class SeasonCount {
  season: string = ''
  count: number = 0
}

export class WardrobeStats {
  total: number = 0
  favorites: number = 0
  categoryCounts: CategoryCount[] = []
  mostWorn: ClothesItem | null = null
  seasonCounts: SeasonCount[] = []
}
在 getStats() 方法中,使用显式的类实例而非对象字面量来构建数据:
const cc = new CategoryCount()
cc.category = cat
cc.count = count
stats.categoryCounts.push(cc)
而不是:
// ❌ ArkTS 严格模式会报错:
stats.categoryCounts.push({ category: cat, count })
这是 ArkTS 与标准 TypeScript 最显著的语法差异之一。标准 TypeScript 中非常自然的对象字面量写法,在 ArkTS 中必须被替换为类实例。
四、ArkUI 页面实现详解
4.1 首页仪表盘(HomePage)—— 声明式 UI 的综合运用
首页是 App 的门面,它集成了问候语、天气建议、统计数据、分类网格、快捷操作和高频单品推荐等多个组件。下面逐一拆解其实现。
4.1.1 生命周期与数据初始化
@Entry
@Component
struct HomePage {
  @State stats: WardrobeStats = new WardrobeStats()
  @State greeting: string = ''
  @State weatherSuggestion: string = ''
  @State currentSeason: string = ''
  @State currentTemp: string = '25°C'

  private db: ClothesDatabase = ClothesDatabase.getInstance()

  aboutToAppear(): void {
    this.db.initSampleData()
    this.stats = this.db.getStats()
    this.setGreeting()
    this.setSeasonSuggestion()
  }
}
关键技术点:
aboutToAppear是 ArkUI 组件的一个生命周期回调,在组件即将出现在屏幕上时触发,类似于 Android 的onResume或 Flutter 的initState。所有需要在页面显示前完成的数据初始化工作应放在此方法中。@State装饰的变量一旦发生变化,框架会自动触发 UI 重渲染。这是声明式 UI 的核心机制。- 数据库实例通过
getInstance()获取——由于这是单例,多个页面共享同一份数据,当在添加页面中修改数据后,返回首页时只需重新调用getStats()即可获取最新状态。
4.1.2 条件渲染与日期推断
setGreeting(): void {
  const hour = new Date().getHours()
  if (hour < 12) this.greeting = '早上好 ☀️'
  else if (hour < 18) this.greeting = '下午好 🌤️'
  else this.greeting = '晚上好 🌙'
}

setSeasonSuggestion(): void {
  const month = new Date().getMonth() + 1
  if (month >= 3 && month <= 5) {
    this.currentSeason = '春'
    this.weatherSuggestion = '气温回升,轻便外套+内搭正合适 🌸'
  } else if (month >= 6 && month <= 8) {
    this.currentSeason = '夏'
    this.weatherSuggestion = '炎热天气,T恤+短裤清凉出行 ☀️'
  } else if (month >= 9 && month <= 11) {
    this.currentSeason = '秋'
    this.weatherSuggestion = '秋意渐浓,风衣+针织衫保暖时尚 🍂'
  } else {
    this.currentSeason = '冬'
    this.weatherSuggestion = '寒冷天气,厚外套+毛衣注意保暖 ❄️'
  }
}
这里没有调用任何天气 API,而是通过月份信息推断季节并给出固定的穿搭建议。这是一种"伪智能化"的设计模式:在真实 API 尚未接入时,先用本地规则模拟功能,保证 UI 层的完整性和可演示性——这在 MVP 原型开发中非常实用。
4.1.3 条件渲染:无数据时的占位
if (this.stats.total > 0) {
  // 显示穿搭建议卡片
} // 否则直接跳过,不显示
ArkUI 中通过 if 语句实现条件渲染。与 React 的 {condition && <Component/>} 不同,ArkUI 使用标准的 TypeScript if 块来控制组件的渲染与否——当条件不满足时,框架不会创建对应的组件实例,从而节省内存。
4.1.4 统计数据卡片组件
统计卡片使用了一个独立的子组件 StatCard:
@Component
struct StatCard {
  @Prop label: string
  @Prop value: string
  @Prop icon: string
  @Prop color: string

  build() {
    Column() {
      Text(this.icon).fontSize(24)
      Text(this.value).fontSize(20).fontWeight(FontWeight.Bold).margin({ top: 4 })
      Text(this.label).fontSize(12).fontColor('#888888').margin({ top: 2 })
    }
    .width('31%')
    .padding(12)
    .backgroundColor(Color.White)
    .borderRadius(16)
    .shadow({ radius: 3, color: '#1A000000', offsetY: 1 })
  }
}
这里使用 @Prop 装饰器从父组件接收数据。@Prop 与 @State 的区别在于:
@State:组件内部私有状态,组件自身管理其变更@Prop:从父组件传递过来的数据,当父组件中对应的@State变化时,@Prop自动同步更新
@Prop 的限制:子组件不能直接修改 @Prop 的值。如果需要修改并同步回父组件,应通过回调函数实现,如例中 ActionButton 的 onTap 回调。
4.1.5 分类网格 Grid 组件
ArkUI 的 Grid 组件用于实现规则的网格布局:
Grid() {
  ForEach(CATEGORIES, (cat: string) => {
    GridItem() {
      CategoryCard({ category: cat, count: this.getCategoryCount(cat) })
    }
  })
}
.columnsTemplate('1fr 1fr 1fr 1fr')
.rowsTemplate('1fr 1fr')
.columnsGap(10)
.rowsGap(10)
.padding({ left: 20, right: 20, top: 10 })
.height(200)
columnsTemplate 和 rowsTemplate 使用 fr 单位(类似 CSS 的 flex-grow),'1fr 1fr 1fr 1fr' 表示四等分列宽。这里固定了 200px 高度,配合 aspectRatio(1) 的 GridItem 子组件,实现了 4×2 的规则方块布局。
ForEach 是 ArkUI 的列表渲染指令,第一个参数是数据源数组,第二个参数是渲染回调。与 React 的 array.map() 类似,但 ForEach 提供了更高效的 diff 更新机制。
4.1.6 自定义事件回调的命名陷阱
在 ActionButton 的设计中,遇到过一个典型的 ArkTS 编译错误:
// ❌ 编译错误:Property 'onClick' conflicts with base component attribute
@Component
struct ActionButton {
  onClick?: () => void  // 与 Column/Button 的 .onClick() 方法冲突
}
原因分析:ArkUI 的自定义组件继承自基础组件,所有内置组件都提供了 .onClick() 链式方法。当你在自定义组件中声明同名的 onClick 属性时,编译器无法区分这是 Props 定义还是方法覆盖。
解决方案:将属性重命名为 onTap:
@Component
struct ActionButton {
  @Prop icon: string
  @Prop label: string
  @Prop color: string
  onTap?: () => void    // 使用不同名称避免冲突

  build() {
    Column() {
      // ...
    }
    .onClick(() => {
      if (this.onTap) this.onTap()
    })
  }
}
在使用时也相应改为:
ActionButton({ icon: '➕', label: '添加衣物', color: '#6C63FF', onTap: () => {
  router.pushUrl({ url: 'pages/AddClothesPage' })
} })
这个教训提醒我们:ArkTS 自定义组件的属性命名需要避开内置组件的 API 方法名,包括 onClick、onAppear、onDisAppear 等。
4.2 衣橱列表页(ClosetPage)—— 数据过滤与搜索
4.2.1 路由参数读取
aboutToAppear(): void {
  const params = router.getParams() as Record<string, string> | undefined
  if (params) {
    if (params['filter'] === 'favorite') {
      this.isFavoriteFilter = true
    }
    if (params['category']) {
      this.selectedCategory = decodeURIComponent(params['category'])
    }
  }
  this.refreshList()
}
router.getParams() 是鸿蒙路由的基础参数传递方式。从其他页面跳转时(如首页点击"收藏夹"或分类卡片),通过 URL 参数传递筛选条件。这里注意 decodeURIComponent 的调用,因为中文分类名在 URL 中经过了 encodeURIComponent 编码。
ArkTS 中 router.getParams() 的返回值类型标注需要显式转换:as Record<string, string> | undefined。这是为了保证类型安全——ArkTS 编译器不会自动推断动态属性。
4.2.2 多条件组合筛选
refreshList(): void {
  let items = this.db.getClothes()

  if (this.isFavoriteFilter) {
    items = items.filter(i => i.favorite)
  }
  if (this.selectedCategory !== '全部') {
    items = items.filter(i => i.category === this.selectedCategory)
  }
  if (this.selectedSeason !== '全部') {
    items = items.filter(i => i.season === this.selectedSeason || i.season === '四季')
  }
  if (this.searchText.trim()) {
    const q = this.searchText.toLowerCase()
    items = items.filter(i =>
      i.name.toLowerCase().includes(q) ||
      i.brand.toLowerCase().includes(q) ||
      i.color.toLowerCase().includes(q)
    )
  }
  this.clothes = items
}
筛选逻辑采用链式过滤模式:每次在已有结果集上叠加新的过滤条件。优点是逻辑清晰、易于扩展;缺点是每次重新过滤都会全量遍历数据——对于个人衣橱场景(通常 < 500 件)完全够用。
搜索降噪:在搜索时将所有文本 toLowerCase(),保证大小写不敏感匹配。搜索范围覆盖了名称、品牌和颜色三个维度,而不是单一字段——用户可以搜索"白"同时匹配"白色衬衫"和"白色运动鞋"。
4.2.3 内联筛选栏与展开交互
// 筛选展开/收起按钮
Button(this.showFilters ? '收起' : '筛选')
  .onClick(() => { this.showFilters = !this.showFilters })

// 条件渲染筛选区域
if (this.showFilters) {
  Column() {
    // 分类标签组
    Flex({ wrap: FlexWrap.Wrap }) {
      ForEach(['全部', ...CATEGORIES], (cat: string) => {
        Button(cat)
          .backgroundColor(this.selectedCategory === cat ? '#6C63FF' : '#F0F0F5')
          .fontColor(this.selectedCategory === cat ? Color.White : '#444')
          .onClick(() => this.onCategoryChange(cat))
      })
    }
    // 季节标签组
    // ...
  }
}
筛选栏采用折叠面板设计,默认收起以节省屏幕空间,用户需要时可展开。筛选按钮的 Flex 容器设置了 FlexWrap.Wrap 属性,当标签过多时会自动换行,不需要横向滚动——这种"自适应换行"模式比横向滑动更适合单手操作。
高亮选中的按钮使用三元表达式改变 backgroundColor 和 fontColor:
.backgroundColor(this.selectedCategory === cat ? '#6C63FF' : '#F0F0F5')
.fontColor(this.selectedCategory === cat ? Color.White : '#444')
这种模式在 ArkUI 的按钮组实现中非常普遍,相比为每个按钮维护独立的选中状态变量,通过统一的状态变量 + 索引比较更简洁高效。
4.2.4 ForEach 中的非空列表与空状态
if (this.clothes.length === 0) {
  // 空状态占位
  Column() {
    Text('📭').fontSize(64)
    Text('还没有衣物哦').fontSize(16).fontColor('#888888')
    Text('点击右上角"添加"开始构建你的智能衣橱吧').fontSize(13)
  }
} else {
  // 列表渲染
  List() {
    ForEach(this.clothes, (item: ClothesItem) => {
      ListItem() { ClothesCard({...}) }
    })
  }
}
ArkUI 的空状态渲染与正常列表是互斥的,通过 if/else 控制。这种设计使得空状态可以嵌入丰富的引导文案和操作按钮,比单纯显示一个空列表更友好。
List + ListItem 的组合是 ArkUI 中最常用的列表组件。与 Scroll + Column 组合相比,List 提供了更多列表特有功能:懒加载、回收复用、滚动定位等。但当列表项数量不多(< 20)时,两者性能差异可以忽略。
4.2.5 ClothesCard 组件中的 @Builder 用法
在 ClothesCard 中,为了实现 Circle 组件的文字叠加,需要使用 @Builder 装饰的方法:
@Component
struct ClothesCard {
  @Prop item: ClothesItem
  onFavoriteToggle?: (id: number) => void

  @Builder
  emojiOverlay() {
    Text(this.item.category === '上衣' ? '👕' :
         this.item.category === '裤子' ? '👖' :
         // ...
         '💍')
      .fontSize(24)
  }

  build() {
    Row() {
      Circle()
        .width(56).height(56)
        .fill(this.item.colorHex)
        .overlay(this.emojiOverlay())
      // ... 详情区域
    }
  }
}
记住一条规则:overlay() 的参数不能是链式调用的组件表达式(如 overlay(Text('xx').fontSize(24))),而必须是一个返回组件的 @Builder 方法。这是 ArkUI 编译器的硬性约束。任何你看到类似 .overlay(Text(...).fontSize(...)) 的代码,都会导致编译错误 TextAttribute is not assignable to parameter of type 'string | CustomBuilder'。
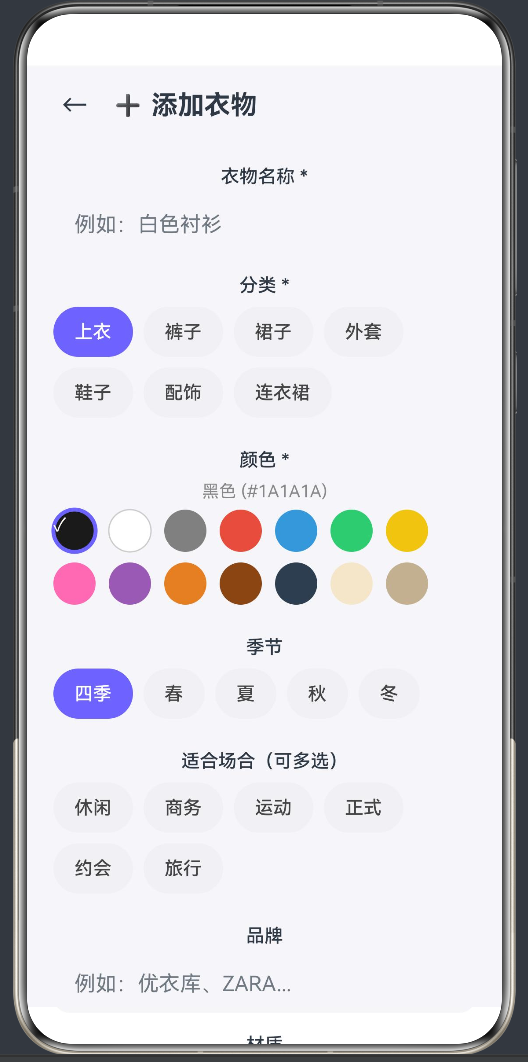
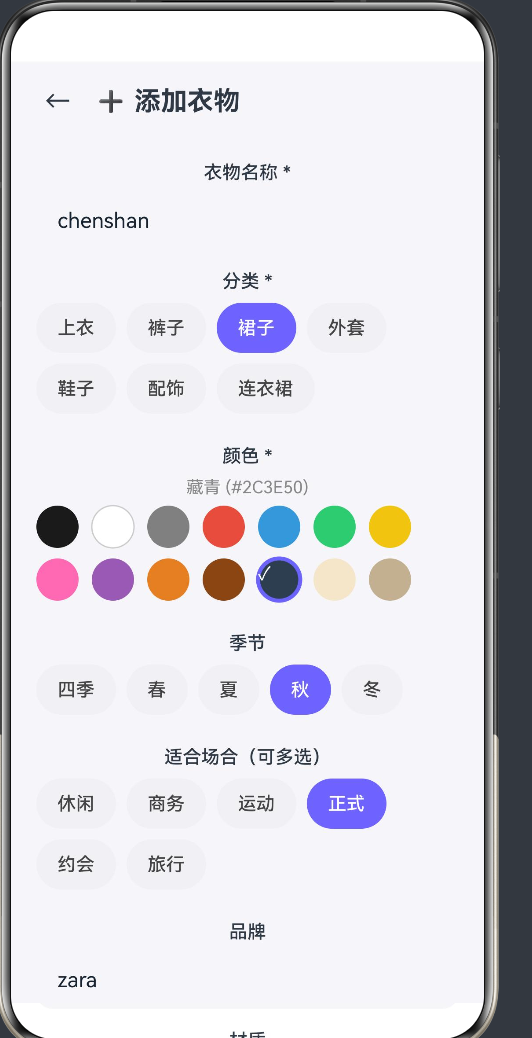
4.3 添加/编辑衣物页(AddClothesPage)—— 表单与多选交互
4.3.1 表单状态管理
添加页面是 App 中状态变量最多的页面:
@State name: string = ''
@State selectedCategory: number = 0
@State selectedColorIndex: number = 0
@State selectedSeason: number = 0
@State selectedOccasions: boolean[] = new Array(OCCASIONS.length).fill(false)
@State brand: string = ''
@State material: string = ''
@State showSuccess: boolean = false
使用 index 而非 string 来管理选中项,有两个好处:
- 类型安全:index 是数字,不会因字符串拼写错误导致匹配失败
- 双向绑定简洁:在按钮组中,通过 index 比较决定高亮状态,无需复杂的字符串匹配
多选场合使用了 boolean[] 数组:
this.selectedOccasions = new Array(OCCASIONS.length).fill(false)
OCCASIONS.length 保证了数组长度与选项数量一致,fill(false) 则将所有项初始化为未选中。当用户点击某个场合按钮时:
this.selectedOccasions[index] = !this.selectedOccasions[index]
这种"布尔数组"模式是实现多选交互的标准做法,比 Set<string> 更简单,也比字符串拼接更易于状态管理。
4.3.2 颜色选择器的可视化实现
颜色选择是衣橱管理的核心交互。实现方式是通过 ForEach 渲染 14 个 Circle 组件:
Flex({ wrap: FlexWrap.Wrap }) {
  ForEach(COLORS, (color: ColorOption, index: number) => {
    Column() {
      Circle()
        .width(32).height(32)
        .fill(color.hex)
        .stroke(this.selectedColorIndex === index ? '#6C63FF' :
                (color.hex === '#FFFFFF' ? '#CCCCCC' : 'transparent'))
        .strokeWidth(this.selectedColorIndex === index ? 3 : 1)
        .overlay(this.checkOverlay(this.selectedColorIndex === index, color.hex))
    }
    .onClick(() => { this.selectedColorIndex = index })
  })
}
边界情况处理:
- 白色背景的颜色圆(hex 为
#FFFFFF)在未选中时使用#CCCCCC边框,使其在白色页面背景上可见 - 选中时统一使用主题色
#6C63FF作为高亮边框 overlay中的对勾✓通过条件@Builder实现——只有选中时才渲染
4.3.3 编辑模式的路由复用
添加页面同时承担了编辑功能,通过检查路由参数中是否包含 id 来判断当前模式:
aboutToAppear(): void {
  const params = router.getParams() as Record<string, string> | undefined
  if (params && params['id']) {
    this.editId = parseInt(params['id'])
    const item = this.db.getClothesById(this.editId)
    if (item) {
      // 回填所有字段
      this.name = item.name
      this.selectedCategory = CATEGORIES.indexOf(item.category)
      // ...
    }
  }
}
提交时根据 editId 决定是新增还是更新:
if (this.editId > 0) {
  const existing = this.db.getClothesById(this.editId)
  if (existing) {
    existing.name = this.name.trim()
    // ... 更新所有字段
    this.db.updateClothes(existing)
  }
} else {
  const newItem = new ClothesItem(0, ...)
  this.db.addClothes(newItem)
}
@State 的重新初始化:当从详情页跳转到编辑页面时,aboutToAppear 中重新设置了所有状态变量。但需要注意,如果同一个页面实例被复用(例如从编辑页返回再进入),ArkUI 会重新创建组件实例,aboutToAppear 会再次被调用——所以这种模式是安全的。
4.3.4 表单验证与提交反馈
简单的必填验证:
submitForm(): void {
  if (!this.name.trim()) {
    return  // 名称为空时直接返回,不提交
  }
  // ...
  this.showSuccess = true
  setTimeout(() => {
    this.showSuccess = false
    router.back()
  }, 1500)
}
成功提示通过覆盖一个全屏半透明层来实现:
if (this.showSuccess) {
  Column() {
    Text('✅').fontSize(48)
    Text('已添加成功!').fontSize(18).fontWeight(FontWeight.Bold).margin({ top: 10 })
  }
  .width('100%').height('100%')
  .backgroundColor('#CCFFFFFF')
  .justifyContent(FlexAlign.Center)
  .alignItems(HorizontalAlign.Center)
  .position({ x: 0, y: 0 })
}
这里使用 position({ x: 0, y: 0 }) 实现绝对定位,覆盖在整个页面上方。#CCFFFFFF 是白色半透明背景(CC 为 80% 透明度),使得底层内容隐约可见,视觉上更加平滑。
4.4 衣物详情页(ClothesDetailPage)—— 数据展示与确认交互
4.4.1 空数据保护
由于详情页依赖路由参数传递的 ID 来加载数据,如果 ID 无效或数据已被删除,需要优雅地处理空状态:
if (this.item === null) {
  Column() {
    Text('😕').fontSize(64)
    Text('未找到该衣物').fontSize(18).fontColor('#888')
    Button('返回衣橱').onClick(() => router.back())
  }
  // ...
}
这种"守护条件"(guard clause)模式在 ArkUI 中非常适合:在页面主体渲染之前先检查数据是否可用,如果不可用则显示降级界面而非崩溃。
4.4.2 删除确认弹窗
删除操作使用自定义弹窗而非系统 Dialog:
if (this.showDeleteConfirm) {
  Column() {
    Column() {
      Text('⚠️ 确认删除').fontSize(18).fontWeight(FontWeight.Bold)
      Text(`确定要删除「${this.item?.name}」吗?`).margin({ top: 10 })
      Row() {
        Button('取消').onClick(() => { this.showDeleteConfirm = false })
        Button('确认删除').onClick(() => this.deleteItem())
      }.margin({ top: 20 })
    }
    .width('85%').padding(24).backgroundColor(Color.White).borderRadius(20)
  }
  .width('100%').height('100%')
  .backgroundColor('#88000000')
  .justifyContent(FlexAlign.Center)
  .alignItems(HorizontalAlign.Center)
  .position({ x: 0, y: 0 })
}
自定义弹窗的优点是样式可控,完全与 App 主题保持一致。背景使用 #88000000(约 53% 透明度的黑色),比上面的成功提示透明度更高,目的是模糊底层内容使用户注意力集中在确认对话框上。
4.4.3 try-catch 包裹导航调用
在编辑操作中,对 router.pushUrl 使用了 try-catch:
editItem(): void {
  if (this.item) {
    try {
      router.pushUrl({ url: 'pages/AddClothesPage?id=' + this.item.id })
    } catch (e) {
      console.error('pushUrl failed', e)
    }
  }
}
这是因为 ArkTS 编译器在严格模式下会对"可能抛出异常"的函数调用发出警告。虽然不是编译错误,但添加 try-catch 是一种良好的鲁棒性实践——特别是在路由跳转这种涉及系统能力的操作上。
4.5 AI 搭配推荐页(OutfitRecommendPage)—— 伪智能算法与推荐结果渲染
4.5.1 场景选择器
@State selectedSeason: number = 0
@State selectedOccasion: number = 0
季节和场合分别使用索引值管理选中状态。选择器按钮组与筛选栏的实现模式一致:
Flex({ wrap: FlexWrap.Wrap }) {
  ForEach(SEASONS, (season: string, index: number) => {
    Button(this.getSeasonEmoji(season) + ' ' + season)
      .backgroundColor(this.selectedSeason === index ? '#6C63FF' : '#F0F0F5')
      .onClick(() => { this.selectedSeason = index })
  })
}
每个按钮前方配有 emoji 图标(🌸 春 / ☀️ 夏 / 🍂 秋 / ❄️ 冬),增强了视觉识别度。
4.5.2 AI 推荐算法(简化版)
推荐算法的核心逻辑在 ClothesDatabase.recommendOutfit() 中:
recommendOutfit(season: string, occasion: string): ClothesItem[][] {
  const seasonItems = this.getBySeason(season)
  const suitable = seasonItems.filter(item =>
    item.occasions.includes(occasion) || item.occasions.includes('休闲')
  )
  if (suitable.length < 3) {
    return this.generateOutfits(this.clothes, season, occasion)
  }
  return this.generateOutfits(suitable, season, occasion)
}
算法步骤:
- 按季节筛选:获取该季节可穿的衣物(含"四季"类)
- 按场合匹配:优先匹配指定场合,没有时回退到"休闲"场合
- 兜底策略:如果匹配结果不足 3 件,就使用全部衣物参与搭配
private generateOutfits(source: ClothesItem[], ...): ClothesItem[][] {
  const tops = source.filter(i => i.category === '上衣' || i.category === '连衣裙')
  const bottoms = source.filter(i => i.category === '裤子' || i.category === '裙子')
  const outerwear = source.filter(i => i.category === '外套')
  const shoes = source.filter(i => i.category === '鞋子')
  const accessories = source.filter(i => i.category === '配饰')

  const outfits: ClothesItem[][] = []
  const count = Math.min(4, Math.max(1, Math.floor(source.length / 3)))

  for (let i = 0; i < count; i++) {
    const outfit: ClothesItem[] = []
    if (tops.length > 0) outfit.push(tops[i % tops.length])
    if (bottoms.length > 0) outfit.push(bottoms[i % bottoms.length])
    if (outerwear.length > 0 && i % 2 === 0) outfit.push(outerwear[i % outerwear.length])
    if (shoes.length > 0) outfit.push(shoes[i % shoes.length])
    if (accessories.length > 0 && i === 0) outfit.push(accessories[i % accessories.length])
    if (outfit.length > 0) outfits.push(outfit)
  }
  return outfits
}
算法特点:
- 按类别(上衣/下装/外套/鞋子/配饰)分组,保证每套搭配涵盖多个品类
- 使用
i % tops.length取模轮询,使得多套搭配中的同品类不会重复使用同一件衣服 - 外套每两套搭配出现一次(
i % 2 === 0),配饰只在第一套中出现——这样的策略模拟了真实穿搭中"不是每次都穿外套或戴配饰"的习惯 - 搭配数量根据源数据量动态计算:
Math.min(4, Math.max(1, Math.floor(source.length / 3))),最多 4 套,最少 1 套
这只是一个模拟算法,并非真正的 AI。在实际产品中,这里可以接入大语言模型 API 或基于协同过滤的推荐系统。但这个算法的设计已经体现了"按类别组合"和"动态生成数量"等核心思路,为后续的 AI 升级保留了清晰的接口。
4.5.3 推荐结果展示与色彩文案
每套搭配生成后,会自动生成一段色彩分析文案:
getOutfitDescription(outfit: ClothesItem[]): string {
  const colors = outfit.map(i => i.color)
  const uniqueColors: string[] = []
  for (let i = 0; i < colors.length; i++) {
    if (uniqueColors.indexOf(colors[i]) === -1) {
      uniqueColors.push(colors[i])
    }
  }
  if (uniqueColors.length === 1) {
    return `💡 同色系搭配:${uniqueColors[0]}色调,简约高级`
  } else if (uniqueColors.length <= 2) {
    return `💡 双色搭配:${uniqueColors.join('和')},经典不出错`
  } else {
    return `💡 多彩搭配:${uniqueColors.join('、')},层次丰富`
  }
}
禁止使用扩展运算符:注意这里使用 for 循环构建去重数组,而非 [...new Set(colors)]。这是因为 ArkTS 严格模式禁止展开运算符在非数组类型上的使用(arkts-no-spread)。虽然 new Set() 返回的迭代器可以展开为数组,但 ArkTS 编译器不允许这种写法——只能用传统的循环 + indexOf 实现去重。
五、ArkTS 严格模式的避坑指南
在开发过程中,ArkTS 严格模式给熟悉标准 TypeScript 的开发者带来了一些挑战。以下是在本项目中遇到的所有规则限制及其解决方案的完整汇总。
5.1 对象字面量规则
规则:arkts-no-obj-literals-as-types 和 arkts-no-untyped-obj-literals
错误示例:
// ❌ 编译错误
stats.categoryCounts.push({ category: cat, count })

// ❌ 编译错误
seasonCounts: { [key: string]: number } = {}
解决方案:为所有"形状"定义显式类:
export class CategoryCount {
  category: string = ''
  count: number = 0
}

// 类实例替代对象字面量
const cc = new CategoryCount()
cc.category = cat
cc.count = count
stats.categoryCounts.push(cc)
5.2 索引访问限制
规则:arkts-no-props-by-index
错误示例:
// ❌ 编译错误:Indexed access is not supported
stats.seasonCounts[s] = count
解决方案:使用数组替代字典:
// 将 Record<string, number> 改为数组
seasonCounts: SeasonCount[] = []

// 添加时使用 push
const sc = new SeasonCount()
sc.season = s
sc.count = count
seasonData.push(sc)
5.3 扩展运算符限制
规则:arkts-no-spread
错误示例:
// ❌ 编译错误
const uniqueColors = [...new Set(colors)]
const copy = [...this.clothes]
解决方案:
const uniqueColors: string[] = []
for (let i = 0; i < colors.length; i++) {
  if (uniqueColors.indexOf(colors[i]) === -1) {
    uniqueColors.push(colors[i])
  }
}

const copy: ClothesItem[] = []
for (let i = 0; i < this.clothes.length; i++) {
  copy.push(this.clothes[i])
}
5.4 overlay 参数类型限制
规则:overlay() 的参数必须是 string | CustomBuilder | ComponentContent<Object>
错误示例:
// ❌ 编译错误
.overlay(Text('✓').fontSize(14).fontColor(Color.White))
解决方案:
// ✓ 使用 @Builder 方法
@Builder
IconOverlay() {
  Text(this.icon).fontSize(22)
}

// 在 build 中引用
.overlay(this.IconOverlay())
5.5 onClick 命名冲突
规则:自定义组件属性名不能与内置 API 方法名冲突
错误示例:
@Component
struct MyComponent {
  onClick?: () => void  // ❌ 与 .onClick() API 方法冲突
}
解决方案:使用不同名称,如 onTap、onPress、onClicked 等。
5.6 undefined 与 null 的差异
规则:ArkTS 中 @State 变量不接受 undefined
错误示例:
@State item: ClothesItem | null = null
this.item = array.find(x => x.id === id)
// ❌ Array.find() 返回 T | undefined,不能赋值给 T | null
解决方案:
this.item = this.db.getClothesById(id) ?? null
此外,getClothesById 的返回值也改为显式返回 ClothesItem | null,从而在内部处理好 undefined → null 的转换。
5.7 索引签名限制
规则:arkts-no-indexed-signatures
错误示例:
// ❌ 编译错误
{ [key: string]: number }
解决方案:使用数组 + 自定义类的形式,或用 Map 容器(但 Map 在 ArkTS 中的支持有限),更推荐前者——因为数组的遍历和操作在 ArkUI 的 ForEach 等场景中更加自然。
六、构建与调试经验
6.1 构建流程
鸿蒙 App 的构建通过 hvigorw 完成:
hvigorw assembleHap --mode module -p module=entry --analyze=normal
关键的构建阶段包括:
| 阶段 | 耗时 | 说明 |
|---|---|---|
| CompileArkTS | ~2-5s | ArkTS 源码编译为字节码,最常出错的阶段 |
| ProcessProfile | <1s | 处理 module.json5 等配置文件 |
| CompileResource | <1s | 编译资源文件 |
| PackageHap | <1s | 打包为 HAP 安装包 |
常见构建错误:
- CompileArkTS 失败:几乎总是语法或类型错误,按错误提示中的行号排查
- Rollup Error:通常是资源引用问题,检查 import 路径
- Sign 警告:如果只做调试,可忽略签名警告;发布时需要配置签名
6.2 编译 vs 运行时错误
本项目的错误全部发生在编译期(CompileArkTS 阶段),无一运行时崩溃。这正是 ArkTS 静态类型系统的价值所在——类型错误、非法操作在编码阶段就能被发现。
如果遇到运行时问题(如页面跳转失败、数据不更新),排查顺序应为:
- 检查
main_pages.json:页面是否已注册? - 检查路由参数类型:
router.getParams()的解析是否正确? - 检查
@State变量:数据更新后,UI 是否自动刷新?如果修改了对象属性而非替换引用,ArkUI 的观察系统可能无法感知——这时需要使用新对象赋值而非就地修改。
6.3 调试技巧
ArkUI 提供了 console.info() / hilog 等日志工具。在开发阶段,推荐使用 console.info() 因为其输出更简洁易读:
console.info('Selected outfit count:', this.outfits.length)
对于 UI 布局问题,可以使用 Grid("span") 或 .debugLine() 来可视化组件边界(仅调试模式可用)。
七、后续优化与扩展方向
7.1 数据持久化
当前数据存储在内存中,App 重启后数据会丢失。接入 @kit.ArkData 的 preferences API 即可实现 KV 持久化:
import { preferences } from '@kit.ArkData'

async saveToStorage(context: Context): Promise<void> {
  const store = await preferences.getPreferences(context, 'wardrobe')
  const json = JSON.stringify(this.clothes.map(c => ({...c})))
  await store.put('clothes_data', json)
  await store.flush()
}
7.2 真正 AI 能力接入
目前的"AI 搭配"只是规则引擎。真正的 AI 推荐可以接入:
- 大语言模型 API:将衣橱数据作为 Prompt 上下文,让 LLM 给出搭配建议
- 协同过滤:基于用户历史穿搭数据,推荐高频搭配组合
- 图像识别:拍照识別衣物,自动提取颜色、类别等信息
7.3 更多功能扩展
- 穿搭日历:记录每日穿搭,生成穿搭历史
- 衣橱分析报告:季节性衣物占比、最常穿品牌分析
- 衣橱共享:家庭成员间共享衣物库
- 虚拟试穿:结合 3D 渲染技术,预览搭配效果
7.4 性能优化
- 衣物数量较大时,考虑使用
LazyForEach替代ForEach实现懒加载 - 对于频繁变化的数据,使用
@Observed+ObjectLink实现更精细的观察粒度
八、总结
本文通过在 HarmonyOS Next 上完整构建"AI 个人衣橱管家"App 的过程,系统地讲解了:
- ArkTS 数据模型设计:class 的定义、constructor 默认值、const 常量的组织
- ArkUI 声明式页面开发:@State / @Prop 装饰器、条件渲染、ForEach 列表渲染、Grid 网格布局
- 组件化设计:子组件的拆分、@Builder 的使用、事件回调的命名规则
- ArkTS 严格模式适配:对象字面量、索引访问、扩展运算符、overlay 参数等限制的解决方案
- 实用交互模式:颜色选择器、折叠筛选栏、确认弹窗、空状态处理
项目的 5 个页面 + 2 个模型文件共约 1500 行代码,构建后产出可安装的 HAP 包。虽然功能上还不是一个真正的 AI 应用,但其架构设计为后续升级留下了清晰的扩展接口:推荐算法可以替换为真实的 AI 模型、数据可以持久化、UI 可以添加更多交互动效。
本文最大的价值在于展示了在** ArkTS 严格模式的约束下如何编写出既符合语法规范又具有良好架构的代码**。希望读者在参考本项目的代码时,能够避开文章中提到的各种"坑",更高效地完成自己的鸿蒙 App 开发。
附录:项目文件清单
| 文件路径 | 行数 | 功能说明 |
|---|---|---|
models/ClothesItem.ets |
67 | 衣物数据模型 + 7 类常量定义 |
models/ClothesDatabase.ets |
187 | 单例数据管理 + CRUD + AI 搭配算法 |
pages/HomePage.ets |
331 | 首页仪表盘 + StatCard + CategoryCard + ActionButton |
pages/ClosetPage.ets |
314 | 衣橱列表 + 筛选 + 搜索 + ClothesCard |
pages/AddClothesPage.ets |
300 | 添加/编辑表单 + 颜色选择 + 场合多选 |
pages/ClothesDetailPage.ets |
345 | 详情展示 + 编辑入口 + 删除确认 |
pages/OutfitRecommendPage.ets |
293 | AI 搭配推荐 + 场景选择 + 搭配展示 |
entryability/EntryAbility.ets |
48 | 应用入口 + 页面加载 |
总计:约 1885 行有效代码。
本文代码基于 HarmonyOS Next SDK API 24(6.1.0.23)构建,使用 DevEco Studio 作为开发 IDE。文中涉及的 API 以对应 SDK 版本为準,后续版本若有变动请参考官方文档。

讨论HarmonyOS开发技术,专注于API与组件、DevEco Studio、测试、元服务和应用上架分发等。
更多推荐


 2
2 0
0- 0


 已为社区贡献13条内容

所有评论(0)