今日天气小应用 - HarmonyOS ArkUI 开发实战-PC版本
概述
天气应用是移动端最常见的应用类型之一,用户通过天气应用可以快速了解当前天气状况、温度变化、空气质量等信息。HarmonyOS ArkUI 提供了丰富的组件和状态管理机制,使得开发天气类应用变得简单高效。本文将从应用架构设计、状态管理、UI布局、数据绑定、样式定制等多个维度,深入讲解如何使用 ArkTS 开发一个完整的天气小应用。
一、应用架构设计
1.1 功能需求分析
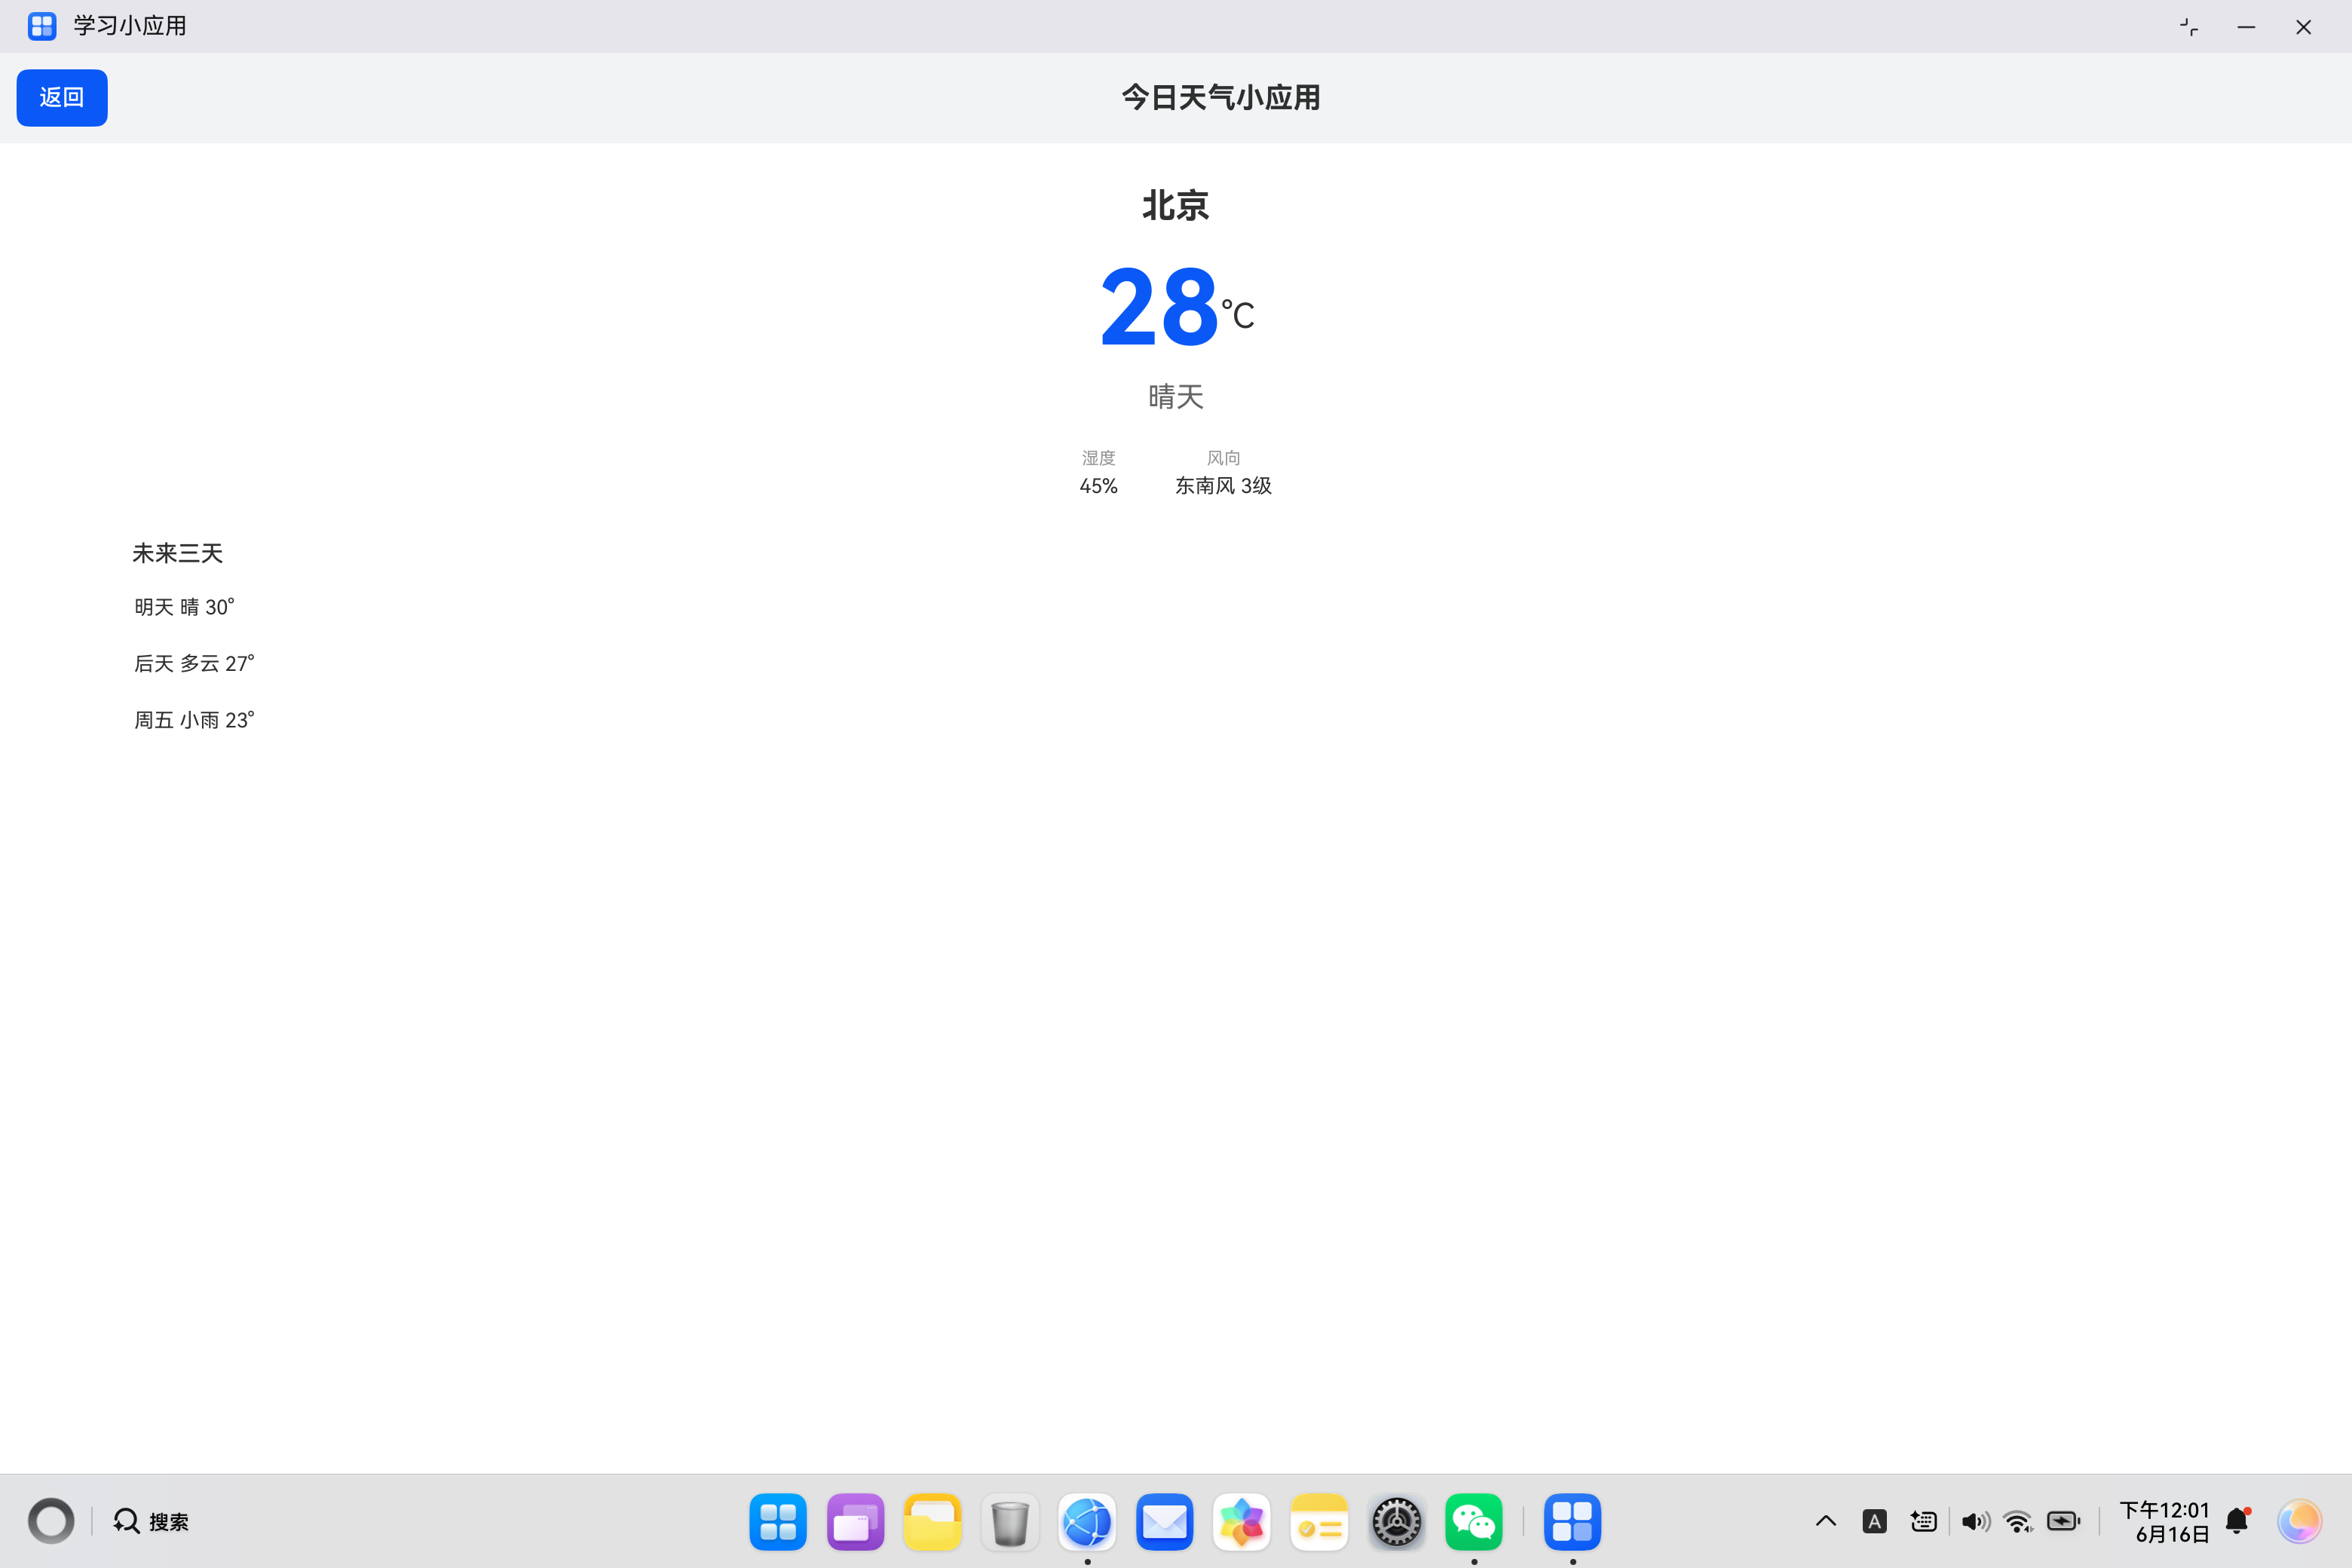
今日天气小应用需要实现以下核心功能:
| 功能模块 | 具体需求 | 实现方式 |
|---|---|---|
| 城市显示 | 显示当前城市名称 | 状态变量绑定 |
| 温度展示 | 实时温度数值 | 大号字体突出显示 |
| 天气状况 | 晴天、多云、小雨等 | 文字描述 |
| 湿度信息 | 当前湿度百分比 | 辅助信息展示 |
| 风向风力 | 风向和风力等级 | 辅助信息展示 |
| 天气预报 | 未来三天天气 | 列表组件展示 |
1.2 数据模型设计
在 ArkTS 中,由于不支持对象字面量作为类型声明,我们需要使用类来定义数据模型:
// 天气数据模型
class WeatherData_1 {
  city_1: string = '';           // 城市名称
  temperature_1: number = 0;     // 温度值
  weather_1: string = '';        // 天气状况
  humidity_1: string = '';       // 湿度信息
  wind_1: string = '';           // 风向风力
  forecast_1: string[] = [];     // 天气预报列表

  constructor(
    city_1: string,
    temperature_1: number,
    weather_1: string,
    humidity_1: string,
    wind_1: string,
    forecast_1: string[]
  ) {
    this.city_1 = city_1;
    this.temperature_1 = temperature_1;
    this.weather_1 = weather_1;
    this.humidity_1 = humidity_1;
    this.wind_1 = wind_1;
    this.forecast_1 = forecast_1;
  }
}
1.3 组件结构设计
天气应用采用经典的垂直布局结构,整体架构如下:
Column (根容器)
├── Row (标题栏)
│   ├── Button (返回按钮)
│   └── Text (应用标题)
└── Column (内容区域)
    ├── Text (城市名称)
    ├── Row (温度显示区域)
    │   ├── Text (温度数值)
    │   └── Text (温度单位)
    ├── Text (天气状况)
    ├── Row (详细信息区域)
    │   ├── Column (湿度信息)
    │   │   ├── Text (湿度标签)
    │   │   └── Text (湿度数值)
    │   └── Column (风向信息)
    │   │   ├── Text (风向标签)
    │   │   └── Text (风向数值)
    ├── Text (预报标题)
    └── List (预报列表)
        └── ListItem (预报项)
二、状态管理详解
2.1 @State 装饰器基础
在 HarmonyOS ArkUI 中,@State 装饰器用于声明组件内部的状态变量。当状态变量发生变化时,UI 会自动刷新以反映最新状态。
@Entry
@Component
struct WeatherApp {
  // 使用 @State 声明状态变量
  @State city_1: string = '北京';
  @State temperature_1: number = 28;
  @State weather_1: string = '晴天';
  @State humidity_1: string = '45%';
  @State wind_1: string = '东南风 3级';
  @State forecast_1: string[] = [
    '明天 晴 30°',
    '后天 多云 27°',
    '周五 小雨 23°'
  ];

  build() {
    // UI 构建
  }
}
2.2 状态变量的命名规范
在 ArkTS 中,由于关键字冲突问题,建议为变量名添加后缀。本文采用 _1 后缀方案:
| 原变量名 | 修改后变量名 | 说明 |
|---|---|---|
| city | city_1 | 城市名称 |
| temperature | temperature_1 | 温度值 |
| weather | weather_1 | 天气状况 |
| humidity | humidity_1 | 湿度信息 |
| wind | wind_1 | 风向风力 |
| forecast | forecast_1 | 天气预报 |
2.3 状态更新机制
ArkUI 采用声明式 UI 模式,状态更新会自动触发 UI 刷新:
// 状态更新示例
updateWeather_1(newCity_1: string, newTemp_1: number) {
  this.city_1 = newCity_1;       // 更新城市
  this.temperature_1 = newTemp_1; // 更新温度
  // UI 自动刷新,无需手动调用
}
2.4 数组状态的特殊处理
对于数组类型的状态变量,需要特别注意更新方式:
// 正确的数组更新方式
this.forecast_1 = this.forecast_1.concat(['新预报项']);

// 或使用展开运算符(仅支持数组展开)
let newForecast_1: string[] = ['周六 晴 28°'];
this.forecast_1 = newForecast_1.concat(this.forecast_1);
三、UI布局实现
3.1 标题栏布局
标题栏使用 Row 组件实现水平布局,包含返回按钮和应用标题:
Row() {
  Button('返回')
    .fontSize(14)
    .backgroundColor('#F1F3F5')
    .fontColor('#333333')
    .onClick(() => {
      router.back();
    })

  Text('今日天气小应用')
    .fontSize(20)
    .fontWeight(FontWeight.Bold)
    .layoutWeight(1)
    .textAlign(TextAlign.Center)
}
.width('100%')
.padding(12)
.backgroundColor('#F1F3F5')
布局要点说明:
| 属性 | 值 | 作用 |
|---|---|---|
| width | ‘100%’ | 占满父容器宽度 |
| padding | 12 | 内边距12像素 |
| backgroundColor | ‘#F1F3F5’ | 浅灰色背景 |
| layoutWeight | 1 | 占据剩余空间 |
| textAlign | TextAlign.Center | 文字居中 |
3.2 温度展示区域
温度是天气应用的核心信息,需要突出显示:
Column() {
  Text(this.city_1)
    .fontSize(24)
    .fontWeight(FontWeight.Bold)
    .margin({ top: 20 })

  Row() {
    Text(String(this.temperature_1))
      .fontSize(72)
      .fontWeight(FontWeight.Bold)
      .fontColor('#0A59F7')
    Text('°C')
      .fontSize(24)
      .margin({ top: 10 })
  }
  .margin({ top: 16 })
  .justifyContent(FlexAlign.Center)
}
.width('100%')
温度显示的设计考量:
- 字体大小层次:温度数值使用72号字体,单位使用24号字体,形成视觉层次
- 颜色选择:使用蓝色
#0A59F7作为主色调,符合天气应用的设计风格 - 对齐方式:使用
justifyContent(FlexAlign.Center)居中对齐 - 间距设置:通过
margin设置合理的间距
3.3 详细信息区域
湿度和风向信息采用并列布局:
Row() {
  Column() {
    Text('湿度')
      .fontSize(12)
      .fontColor('#999999')
    Text(this.humidity_1)
      .fontSize(14)
      .margin({ top: 4 })
  }
  .margin({ right: 40 })

  Column() {
    Text('风向')
      .fontSize(12)
      .fontColor('#999999')
    Text(this.wind_1)
      .fontSize(14)
      .margin({ top: 4 })
  }
}
.margin({ top: 24 })
.justifyContent(FlexAlign.Center)
布局分析:
| 组件 | 作用 | 关键属性 |
|---|---|---|
| Row | 横向容器 | justifyContent 居中 |
| Column | 纵向容器 | margin 设置间距 |
| Text | 文字显示 | fontSize、fontColor |
3.4 天气预报列表
使用 List 组件展示未来天气:
List() {
  ForEach(this.forecast_1, (item_1: string) => {
    ListItem() {
      Text(item_1)
        .fontSize(14)
        .padding(12)
        .width('100%')
        .backgroundColor('#F8F8F8')
        .borderRadius(8)
    }
  })
}
.width('90%')
.margin({ top: 8 })
.backgroundColor('#FFFFFF')
四、样式定制详解
4.1 颜色系统设计
天气应用采用统一的颜色系统:
| 颜色代码 | 用途 | 说明 |
|---|---|---|
| #0A59F7 | 主色调 | 温度数字、重要信息 |
| #333333 | 主文字 | 标题、正文 |
| #666666 | 次文字 | 辅助信息 |
| #999999 | 标签文字 | 小标签 |
| #F1F3F5 | 背景色 | 标题栏背景 |
| #F8F8F8 | 卡片背景 | 预报项背景 |
| #FFFFFF | 主背景 | 页面背景 |
4.2 字体大小层次
建立清晰的字体大小层次:
| 元素 | 字体大小 | 权重 |
|---|---|---|
| 温度数值 | 72px | Bold |
| 城市名称 | 24px | Bold |
| 天气状况 | 20px | Regular |
| 预报内容 | 14px | Regular |
| 标签文字 | 12px | Regular |
4.3 间距规范
统一的间距规范:
| 场景 | 间距值 | 说明 |
|---|---|---|
| 标题栏内边距 | 12px | padding |
| 城市名上边距 | 20px | margin-top |
| 温度区上边距 | 16px | margin-top |
| 详细信息上边距 | 24px | margin-top |
| 预报项内边距 | 12px | padding |
| 预报项间距 | 8px | margin-top |
4.4 圆角设计
// 预报项圆角
.borderRadius(8)

// 圆角按钮
.borderRadius(20)
五、实际案例:完整天气应用
5.1 需求分析
构建一个完整的天气应用页面,包含:
- 城市名称显示
- 实时温度展示
- 天气状况描述
- 湿度和风向信息
- 未来三天天气预报
- 返回导航功能
5.2 完整代码实现
import { router } from '@kit.ArkUI';

@Entry
@Component
struct WeatherApp {
  @State city_1: string = '北京';
  @State temperature_1: number = 28;
  @State weather_1: string = '晴天';
  @State humidity_1: string = '45%';
  @State wind_1: string = '东南风 3级';
  @State forecast_1: string[] = [
    '明天 晴 30°',
    '后天 多云 27°',
    '周五 小雨 23°'
  ];

  build() {
    Column() {
      // 标题栏
      Row() {
        Button('返回')
          .fontSize(14)
          .backgroundColor('#F1F3F5')
          .fontColor('#333333')
          .onClick(() => {
            router.back();
          })
        Text('今日天气小应用')
          .fontSize(20)
          .fontWeight(FontWeight.Bold)
          .layoutWeight(1)
          .textAlign(TextAlign.Center)
      }
      .width('100%')
      .padding(12)
      .backgroundColor('#F1F3F5')

      // 内容区域
      Column() {
        // 城市名称
        Text(this.city_1)
          .fontSize(24)
          .fontWeight(FontWeight.Bold)
          .margin({ top: 20 })

        // 温度显示
        Row() {
          Text(String(this.temperature_1))
            .fontSize(72)
            .fontWeight(FontWeight.Bold)
            .fontColor('#0A59F7')
          Text('°C')
            .fontSize(24)
            .margin({ top: 10 })
        }
        .margin({ top: 16 })
        .justifyContent(FlexAlign.Center)

        // 天气状况
        Text(this.weather_1)
          .fontSize(20)
          .margin({ top: 8 })

        // 详细信息
        Row() {
          Column() {
            Text('湿度')
              .fontSize(12)
              .fontColor('#999999')
            Text(this.humidity_1)
              .fontSize(14)
              .margin({ top: 4 })
          }
          .margin({ right: 40 })
          Column() {
            Text('风向')
              .fontSize(12)
              .fontColor('#999999')
            Text(this.wind_1)
              .fontSize(14)
              .margin({ top: 4 })
          }
        }
        .margin({ top: 24 })
        .justifyContent(FlexAlign.Center)

        // 预报标题
        Text('未来三天预报')
          .fontSize(16)
          .fontWeight(FontWeight.Medium)
          .margin({ top: 24, left: 20 })
          .width('90%')

        // 预报列表
        List() {
          ForEach(this.forecast_1, (item_1: string) => {
            ListItem() {
              Text(item_1)
                .fontSize(14)
                .padding(12)
                .width('100%')
                .backgroundColor('#F8F8F8')
                .borderRadius(8)
            }
          })
        }
        .width('90%')
        .margin({ top: 8 })

        // 提示信息
        Text('数据更新时间:' + new Date().toLocaleTimeString())
          .fontSize(12)
          .fontColor('#999999')
          .margin({ top: 24 })
      }
      .width('100%')
      .layoutWeight(1)
    }
    .width('100%')
    .height('100%')
    .backgroundColor('#FFFFFF')
  }
}
六、组件对比分析
6.1 布局组件对比
| 组件 | 特点 | 适用场景 |
|---|---|---|
| Column | 垂直排列 | 页面主体、卡片内容 |
| Row | 水平排列 | 标题栏、并列信息 |
| Stack | 堆叠排列 | 图标叠加、复杂布局 |
| Flex | 弹性布局 | 需要换行的场景 |
| Grid | 网格布局 | 多列展示、卡片列表 |
| List | 列表布局 | 动态数据列表 |
6.2 文本组件属性对比
| 属性 | TextInput | Text | TextArea |
|---|---|---|---|
| fontSize | 支持 | 支持 | 支持 |
| fontColor | 支持 | 支持 | 支持 |
| fontWeight | 支持 | 支持 | 支持 |
| placeholder | 支持 | 不支持 | 支持 |
| onChange | 支持 | 不支持 | 支持 |
七、最佳实践
7.1 状态管理建议
| 场景 | 建议 |
|---|---|
| 简单数据 | 使用 @State |
| 复杂数据 | 使用类定义数据模型 |
| 数组更新 | 使用 concat 或 filter |
| 跨组件共享 | 使用 @Prop 或 @Link |
7.2 布局设计建议
| 场景 | 建议 |
|---|---|
| 页面主体 | 使用 Column 垂直布局 |
| 标题栏 | 使用 Row 水平布局 |
| 信息卡片 | 使用 Column + Row 组合 |
| 动态列表 | 使用 List + ForEach |
7.3 样式规范建议
| 类型 | 建议 |
|---|---|
| 颜色 | 建立统一的颜色系统 |
| 字体 | 建立清晰的字体层次 |
| 间距 | 使用统一的间距规范 |
| 圆角 | 保持一致的圆角值 |
7.4 常见问题解决
| 问题 | 原因 | 解决方案 |
|---|---|---|
| 变量名冲突 | 使用了关键字 | 添加后缀如 _1 |
| UI不更新 | 状态未正确更新 | 使用 concat/filter |
| 布局错乱 | 未设置宽度 | 设置 width 或 layoutWeight |
| 路由失败 | 页面未注册 | 在 main_pages.json 注册 |
八、扩展功能设计
8.1 天气图标展示
可以使用图标替代文字描述:
// 天气图标映射
getWeatherIcon_1(weather_1: string): string {
  let iconMap_1: Record<string, string> = {
    '晴天': '☀',
    '多云': '☁',
    '小雨': '🌧',
    '大雨': '⛈',
    '雪': '❄'
  };
  return iconMap_1[weather_1] || '🌤';
}

// 使用示例
Text(this.getWeatherIcon_1(this.weather_1))
  .fontSize(48)
8.2 城市切换功能
添加城市选择功能:
@State cities_1: string[] = ['北京', '上海', '广州', '深圳'];
@State selectedCity_1: string = '北京';

// 城市选择器
Flex({ wrap: FlexWrap.Wrap }) {
  ForEach(this.cities_1, (city_1: string) => {
    Button(city_1)
      .fontSize(12)
      .backgroundColor(this.selectedCity_1 === city_1 ? '#0A59F7' : '#F1F3F5')
      .fontColor(this.selectedCity_1 === city_1 ? '#FFFFFF' : '#333333')
      .margin({ right: 8 })
      .onClick(() => {
        this.selectedCity_1 = city_1;
        this.updateWeatherByCity_1(city_1);
      })
  })
}
8.3 天气API接入
实际项目中可以接入天气API:
// 模拟API调用
async fetchWeather_1(city_1: string): Promise<WeatherData_1> {
  // 实际项目中使用 HTTP 请求
  // let response = await http.get('https://api.weather.com/' + city_1);
  // return response.data;

  // 模拟数据
  return new WeatherData_1(
    city_1,
    28,
    '晴天',
    '45%',
    '东南风 3级',
    ['明天 晴 30°', '后天 多云 27°', '周五 小雨 23°']
  );
}
九、性能优化
9.1 渲染优化
| 优化点 | 方法 |
|---|---|
| 减少嵌套 | 简化组件层级 |
| 合理使用 layoutWeight | 避免过度计算 |
| 条件渲染 | 使用条件判断减少组件 |
9.2 状态更新优化
| 优化点 | 方法 |
|---|---|
| 批量更新 | 合并多次状态更新 |
| 避免频繁更新 | 使用定时器控制更新频率 |
| 按需更新 | 只更新必要的状态变量 |
十、总结
本文详细讲解了如何使用 HarmonyOS ArkUI 开发一个完整的天气小应用,涵盖了从架构设计、状态管理、UI布局、样式定制到实际代码实现的完整流程。
核心技术要点:
- 状态管理:使用
@State装饰器管理组件内部状态,变量名添加_1后缀避免关键字冲突 - 数据模型:使用类定义数据结构,符合 ArkTS 语法规范
- 布局设计:使用
Column和Row组合实现页面布局 - 列表展示:使用
List和ForEach实现动态数据列表 - 样式定制:建立统一的颜色、字体、间距规范
开发流程总结:
需求分析 → 数据模型设计 → 状态管理 → UI布局 → 样式定制 → 功能实现 → 测试验证
希望本文能帮助你更好地理解 HarmonyOS ArkUI 的开发方式,构建出优秀的天气类应用。
参考资料:

讨论HarmonyOS开发技术,专注于API与组件、DevEco Studio、测试、元服务和应用上架分发等。
更多推荐
 5
5 0
0- 0


 已为社区贡献8条内容

所有评论(0)