家庭记账本小应用 - HarmonyOS ArkUI 开发实战-Tabs与List组件-PC版本
一、应用背景与需求分析
在日常生活中,家庭财务管理是一项重要的任务。传统的纸质记账方式存在诸多不便:记录容易丢失、统计困难、难以追溯历史数据。随着智能手机的普及,电子记账应用成为越来越多家庭的选择。
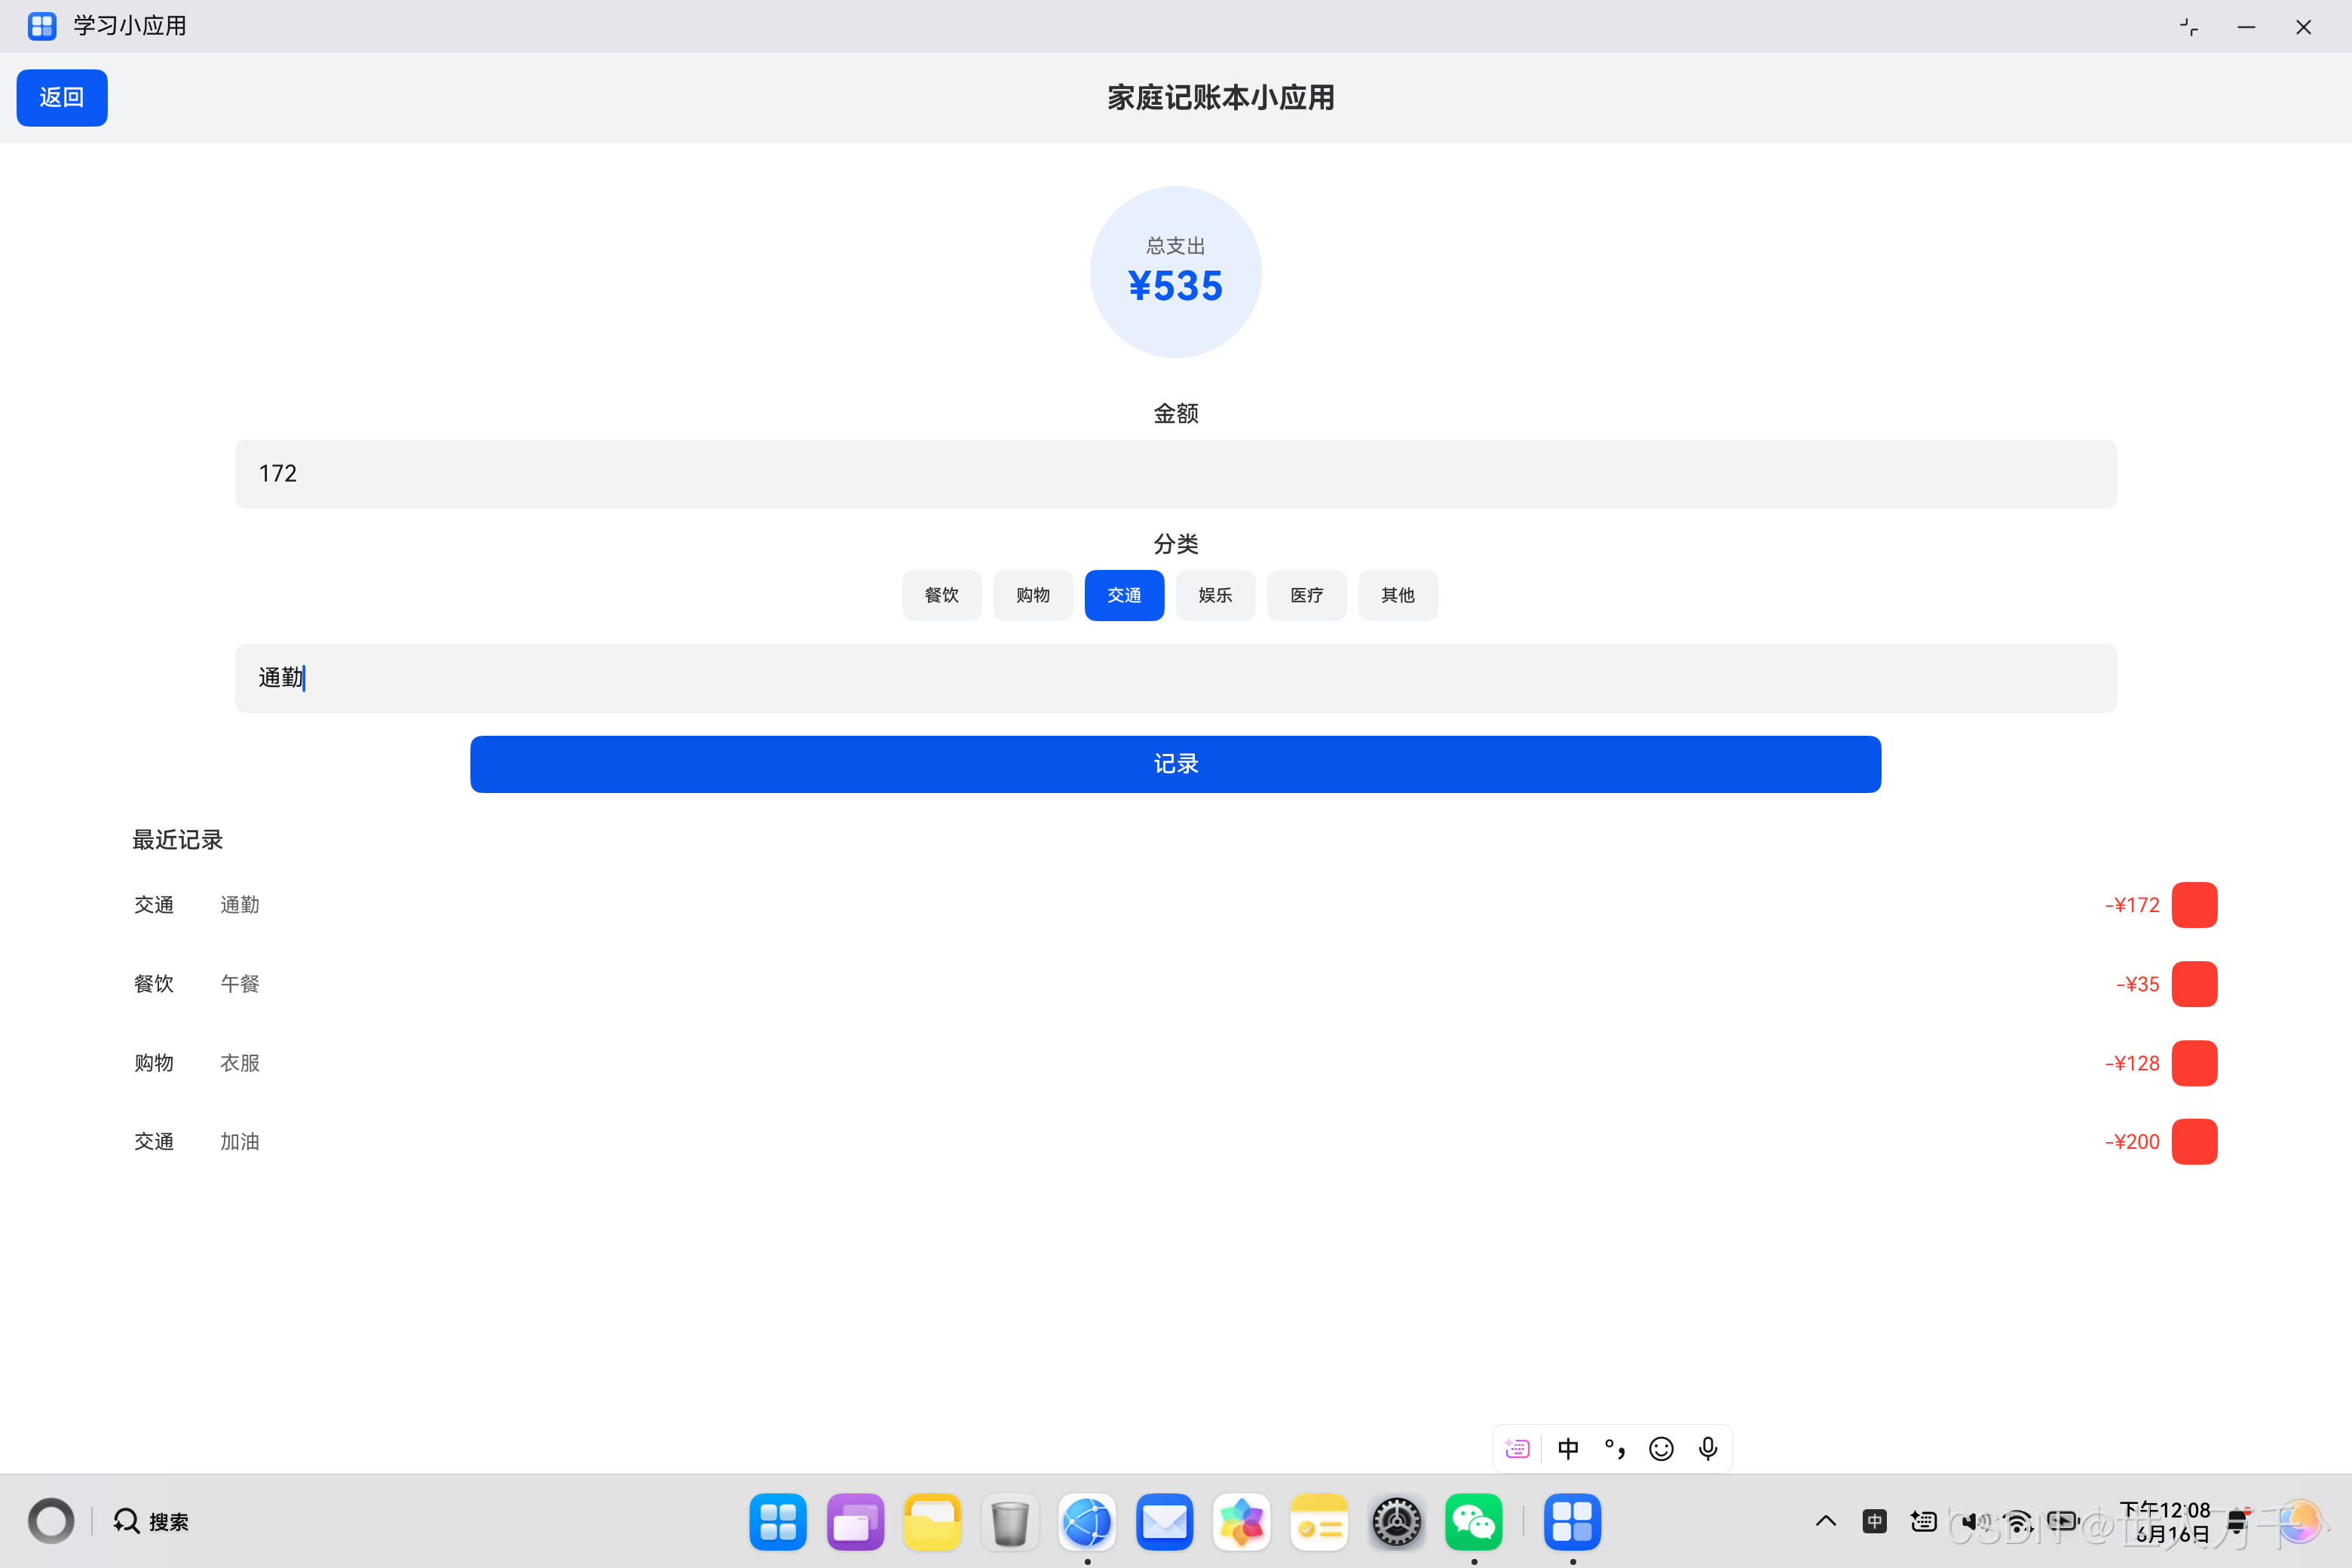
家庭记账本小应用正是基于这一需求而开发。它采用HarmonyOS ArkUI框架构建,具有界面简洁、操作便捷、功能实用的特点。用户可以快速记录每笔支出,包括金额、分类、备注等信息,并实时查看总支出统计和支出记录列表。
1.1 核心功能需求
根据家庭记账的实际场景,本应用需要实现以下核心功能:
- 支出记录:支持输入金额、选择分类、填写备注
- 分类管理:提供餐饮、购物、交通、娱乐、医疗、其他等常用分类
- 实时统计:自动计算并显示总支出金额
- 记录列表:以列表形式展示所有支出记录
- 删除功能:支持删除不需要的支出记录
- 数据持久化:应用重启后数据不丢失(扩展功能)
1.2 技术选型
本应用采用HarmonyOS原生开发技术栈:
| 技术组件 | 说明 |
|---|---|
| 开发框架 | ArkUI声明式UI框架 |
| 开发语言 | ArkTS(TypeScript扩展) |
| UI组件 | Column、Row、List、TextInput、Button等 |
| 状态管理 | @State装饰器 |
| 数据存储 | 内存数组(可扩展为Preferences) |
二、应用架构设计
2.1 整体架构
家庭记账本应用采用单页面架构,所有功能在一个页面中完成。整体架构分为三层:
2.2 数据模型设计
应用的核心数据模型是ExpenseItem类,用于表示单条支出记录:
class ExpenseItem_1 {
  amount_1: number = 0;      // 支出金额
  category_1: string = '';   // 支出分类
  note_1: string = '';       // 备注信息
  date_1: string = '';      // 记录日期

  constructor(amount_1: number, category_1: string, note_1: string, date_1: string) {
    this.amount_1 = amount_1;
    this.category_1 = category_1;
    this.note_1 = note_1;
    this.date_1 = date_1;
  }
}
设计要点:
- 类型安全:所有属性都有明确的类型声明,符合ArkTS的强类型要求
- 默认值:为每个属性设置默认值,避免空值问题
- 构造函数:提供便捷的对象创建方式
- 命名规范:使用
_1后缀避免命名冲突(ArkTS编译器要求)
2.3 状态管理
应用使用@State装饰器管理响应式状态:
@Entry
@Component
struct ExpenseTrackerApp {
  @State amount_1: number = 0;                          // 当前输入金额
  @State category_1: string = '餐饮';                   // 当前选中分类
  @State note_1: string = '';                          // 当前备注
  @State expenses_1: ExpenseItem_1[] = [               // 支出记录数组
    new ExpenseItem_1(35, '餐饮', '午餐', '今天'),
    new ExpenseItem_1(128, '购物', '衣服', '今天'),
    new ExpenseItem_1(200, '交通', '加油', '昨天')
  ];

  categories_1: string[] = ['餐饮', '购物', '交通', '娱乐', '医疗', '其他'];
}
状态说明:
amount_1:用户输入的支出金额,初始为0category_1:用户选择的支出分类,默认为"餐饮"note_1:用户输入的备注信息,初始为空字符串expenses_1:存储所有支出记录的数组,预置了3条示例数据categories_1:可选的支出分类列表(非响应式)
三、UI界面实现
3.1 页面布局结构
应用采用垂直布局(Column)作为主容器,从上到下依次为标题栏、总支出展示、输入区域和记录列表:
Column() {
  Row() {
    // 标题栏:返回按钮 + 标题
  }

  Column() {
    // 总支出圆形展示
    // 金额输入区
    // 分类选择器
    // 备注输入框
    // 记录按钮
    // 最近记录标题
    // 记录列表
  }
}
.width('100%')
.height('100%')
.backgroundColor('#FFFFFF')
3.2 标题栏实现
标题栏采用水平布局(Row),包含返回按钮和应用标题:
Row() {
  Button('返回')
    .onClick(() => router.back())
  Text('家庭记账本小应用')
    .fontSize(20)
    .fontWeight(FontWeight.Bold)
    .layoutWeight(1)
    .textAlign(TextAlign.Center)
}
.width('100%')
.padding(12)
.backgroundColor('#F1F3F5')
实现细节:
- 返回按钮:点击后调用
router.back()返回上一页 - 标题文本:使用
layoutWeight(1)占据剩余空间,居中显示 - 背景色:使用浅灰色
#F1F3F5作为背景,与内容区域区分
3.3 总支出展示
总支出采用圆形卡片设计,突出显示金额:
Stack() {
  Circle()
    .width(120)
    .height(120)
    .fill('#E8F0FE')
  Column() {
    Text('总支出')
      .fontSize(14)
      .fontColor('#666666')
    Text('¥' + String(this.totalExpense_1()))
      .fontSize(28)
      .fontWeight(FontWeight.Bold)
      .fontColor('#0A59F7')
      .margin({ top: 4 })
  }
}
.margin({ top: 30 })
设计要点:
- Stack布局:使用栈布局实现圆形背景与文字的叠加
- 圆形背景:使用
Circle组件绘制浅蓝色圆形 - 文字层次:"总支出"标签使用小字号灰色,金额使用大字号蓝色加粗
- 颜色搭配:浅蓝背景
#E8F0FE+ 深蓝文字#0A59F7,视觉舒适
3.4 金额输入区
金额输入使用TextInput组件,限制为数字输入:
Text('金额')
  .fontSize(16)
  .fontWeight(FontWeight.Medium)
  .margin({ top: 30 })

TextInput({ placeholder: '0.00' })
  .width('80%')
  .height(48)
  .margin({ top: 8 })
  .type(InputType.Number)
  .onChange((value_1: string) => {
    this.amount_1 = parseFloat(value_1) || 0;
  })
关键实现:
- 输入类型:设置
InputType.Number,弹出数字键盘 - 占位符:显示"0.00"提示用户输入格式
- 数据转换:使用
parseFloat将字符串转为数字,转换失败时默认为0 - 宽度控制:设置80%宽度,两侧留白
3.5 分类选择器
分类选择器使用按钮组实现,选中状态通过背景色区分:
Text('分类')
  .fontSize(16)
  .fontWeight(FontWeight.Medium)
  .margin({ top: 16 })

Row() {
  ForEach(this.categories_1, (cat_1: string) => {
    Button(cat_1)
      .height(36)
      .fontSize(12)
      .backgroundColor(this.category_1 === cat_1 ? '#0A59F7' : '#F1F3F5')
      .fontColor(this.category_1 === cat_1 ? '#FFFFFF' : '#333333')
      .margin({ right: 8 })
      .onClick(() => {
        this.category_1 = cat_1;
      })
  })
}
.margin({ top: 8 })
交互逻辑:
- 遍历渲染:使用
ForEach遍历分类数组,动态生成按钮 - 选中状态:当前分类与按钮分类相等时,显示蓝色背景白色文字
- 未选中状态:显示浅灰背景深灰文字
- 点击事件:点击按钮更新
category_1状态,触发UI刷新
3.6 备注输入框
备注输入同样使用TextInput组件:
TextInput({ placeholder: '备注(可选)' })
  .width('80%')
  .height(48)
  .margin({ top: 16 })
  .onChange((value_1: string) => {
    this.note_1 = value_1;
  })
特点:
- 占位符提示"备注(可选)",说明该项非必填
- 宽度与金额输入框一致,保持视觉统一
- 输入内容实时更新到
note_1状态
3.7 记录按钮
记录按钮点击后将支出信息添加到记录列表:
Button('记录')
  .width('60%')
  .height(40)
  .margin({ top: 16 })
  .backgroundColor('#0A59F7')
  .onClick(() => {
    if (this.amount_1 > 0) {
      let newExpense_1 = new ExpenseItem_1(this.amount_1, this.category_1, this.note_1, '今天');
      this.expenses_1 = [newExpense_1].concat(this.expenses_1);
      this.amount_1 = 0;
      this.note_1 = '';
    }
  })
业务逻辑:
- 金额验证:只有金额大于0时才添加记录
- 创建记录:使用当前输入数据创建
ExpenseItem对象 - 添加到列表:将新记录添加到数组开头,保证最新记录显示在最前
- 清空输入:添加成功后清空金额和备注,准备下一次输入
3.8 记录列表
记录列表使用List组件实现,支持滚动和删除操作:
Text('最近记录')
  .fontSize(16)
  .fontWeight(FontWeight.Medium)
  .margin({ top: 24, left: 20 })
  .width('90%')

List() {
  ForEach(this.expenses_1, (item_1: ExpenseItem_1, index_1: number) => {
    ListItem() {
      Row() {
        Text(item_1.category_1)
          .width(60)
          .fontSize(14)
        Text(item_1.note_1)
          .fontSize(14)
          .fontColor('#666666')
          .layoutWeight(1)
        Text('-¥' + String(item_1.amount_1))
          .fontSize(14)
          .fontColor('#FF3B30')
        Button('删')
          .width(32)
          .height(32)
          .fontSize(12)
          .backgroundColor('#FF3B30')
          .margin({ left: 8 })
          .onClick(() => {
            this.expenses_1 = this.expenses_1.filter((_, i_1: number) => i_1 !== index_1);
          })
      }
      .padding(12)
      .width('100%')
    }
  })
}
.width('90%')
.height(250)
.margin({ top: 8 })
列表项布局:
| 组件 | 宽度 | 内容 | 颜色 |
|---|---|---|---|
| 分类 | 60 | 支出分类 | 默认黑色 |
| 备注 | 自适应 | 备注信息 | 灰色#666666 |
| 金额 | 自适应 | -¥金额 | 红色#FF3B30 |
| 删除按钮 | 32x32 | “删” | 红色#FF3B30 |
删除逻辑:
使用filter方法过滤掉要删除的记录:
this.expenses_1 = this.expenses_1.filter((_, i_1: number) => i_1 !== index_1);
四、核心功能实现
4.1 总支出计算
总支出计算方法遍历所有记录并累加金额:
totalExpense_1(): number {
  let total_1: number = 0;
  for (let i_1 = 0; i_1 < this.expenses_1.length; i_1++) {
    total_1 += this.expenses_1[i_1].amount_1;
  }
  return total_1;
}
实现说明:
- 方法定义:定义在组件内部的方法,返回
number类型 - 遍历累加:使用
for循环遍历数组,累加每条记录的金额 - 实时计算:每次调用都重新计算,保证数据准确性
- 性能考虑:对于少量数据,实时计算性能足够;大量数据可考虑缓存
4.2 记录添加流程
记录添加的完整流程如下:
代码实现:
if (this.amount_1 > 0) {
  // 1. 创建新记录
  let newExpense_1 = new ExpenseItem_1(
    this.amount_1,      // 金额
    this.category_1,    // 分类
    this.note_1,        // 备注
    '今天'              // 日期
  );

  // 2. 添加到数组开头
  this.expenses_1 = [newExpense_1].concat(this.expenses_1);

  // 3. 清空输入
  this.amount_1 = 0;
  this.note_1 = '';
}
4.3 记录删除流程
记录删除使用filter方法实现:
关键技术:
- 索引传递:
ForEach的第二个参数提供索引值 - 过滤逻辑:保留索引不等于删除索引的记录
- 数组更新:将过滤后的新数组赋值给状态变量,触发UI刷新
4.4 数据流分析
应用的数据流遵循单向数据流原则:
数据流说明:
- 输入流:用户输入 → 状态更新 → UI刷新
- 计算流:expenses数组 → 总支出计算 → 显示
- 操作流:添加/删除操作 → 更新expenses数组 → 触发计算和渲染
五、样式设计详解
5.1 颜色方案
应用采用简洁的蓝白配色方案:
| 用途 | 颜色值 | 说明 |
|---|---|---|
| 主色调 | #0A59F7 | 蓝色,用于按钮、选中状态、金额 |
| 背景色 | #FFFFFF | 白色,页面背景 |
| 次级背景 | #F1F3F5 | 浅灰,标题栏背景 |
| 强调背景 | #E8F0FE | 浅蓝,圆形卡片背景 |
| 危险色 | #FF3B30 | 红色,删除按钮、支出金额 |
| 次要文字 | #666666 | 灰色,备注、标签 |
5.2 字体规范
| 元素 | 字号 | 字重 | 颜色 |
|---|---|---|---|
| 标题 | 20 | Bold | 默认 |
| 标签 | 16 | Medium | 默认 |
| 按钮文字 | 18/12 | Regular | 白色/黑色 |
| 列表文字 | 14 | Regular | 默认/灰色 |
| 金额 | 28 | Bold | #0A59F7 |
5.3 间距规范
| 元素 | 上边距 | 左右边距 |
|---|---|---|
| 标题栏 | - | padding: 12 |
| 圆形卡片 | 30 | - |
| 输入框 | 8/16 | 宽度80% |
| 按钮 | 16/30 | 宽度60% |
| 列表 | 24/8 | 宽度90% |
六、性能优化策略
6.1 列表渲染优化
使用List和ForEach组件实现高效列表渲染:
List() {
  ForEach(this.expenses_1, (item_1: ExpenseItem_1, index_1: number) => {
    ListItem() {
      // 列表项内容
    }
  })
}
.height(250)  // 固定高度,启用虚拟滚动
优化要点:
- 虚拟滚动:设置固定高度后,
List组件启用虚拟滚动,只渲染可见项 - 唯一标识:
ForEach自动使用数组索引作为标识 - 按需更新:只有变化的列表项会重新渲染
6.2 状态更新优化
状态更新采用不可变数据模式:
// 添加记录:创建新数组
this.expenses_1 = [newExpense_1].concat(this.expenses_1);

// 删除记录:过滤生成新数组
this.expenses_1 = this.expenses_1.filter((_, i_1: number) => i_1 !== index_1);
优势:
- 避免直接修改数组,保证数据一致性
- ArkUI框架可以准确检测变化,优化渲染
- 符合函数式编程思想,代码更易维护
6.3 计算缓存
对于总支出计算,可以考虑缓存优化:
// 当前实现:每次都重新计算
totalExpense_1(): number {
  let total_1: number = 0;
  for (let i_1 = 0; i_1 < this.expenses_1.length; i_1++) {
    total_1 += this.expenses_1[i_1].amount_1;
  }
  return total_1;
}

// 优化方案:使用缓存(扩展功能)
@State cachedTotal_1: number = 0;

updateTotal_1() {
  this.cachedTotal_1 = this.totalExpense_1();
}
七、扩展功能设计
7.1 数据持久化
当前应用数据存储在内存中,应用关闭后数据丢失。可以使用Preferences实现数据持久化:
// 导入Preferences模块
import { preferences } from '@kit.ArkData';

// 保存数据
async saveExpenses_1() {
  let context = getContext(this);
  let prefs = await preferences.getPreferences(context, 'expense_data');
  await prefs.put('expenses', JSON.stringify(this.expenses_1));
  await prefs.flush();
}

// 加载数据
async loadExpenses_1() {
  let context = getContext(this);
  let prefs = await preferences.getPreferences(context, 'expense_data');
  let data = await prefs.get('expenses', '[]');
  this.expenses_1 = JSON.parse(data as string);
}
7.2 收入记录
扩展为支持收入记录:
class ExpenseItem_1 {
  amount_1: number = 0;
  category_1: string = '';
  note_1: string = '';
  date_1: string = '';
  type_1: string = 'expense';  // 新增:expense或income

  constructor(amount_1: number, category_1: string, note_1: string, date_1: string, type_1: string = 'expense') {
    this.amount_1 = amount_1;
    this.category_1 = category_1;
    this.note_1 = note_1;
    this.date_1 = date_1;
    this.type_1 = type_1;
  }
}

// 计算总收入
totalIncome_1(): number {
  let total_1: number = 0;
  for (let i_1 = 0; i_1 < this.expenses_1.length; i_1++) {
    if (this.expenses_1[i_1].type_1 === 'income') {
      total_1 += this.expenses_1[i_1].amount_1;
    }
  }
  return total_1;
}

// 计算结余
balance_1(): number {
  return this.totalIncome_1() - this.totalExpense_1();
}
7.3 月度统计
添加按月统计功能:
// 获取某月的支出
getMonthExpense_1(year: number, month: number): number {
  let total_1: number = 0;
  for (let i_1 = 0; i_1 < this.expenses_1.length; i_1++) {
    let item = this.expenses_1[i_1];
    // 解析日期,判断是否属于指定月份
    // 这里需要完善日期解析逻辑
    total_1 += item.amount_1;
  }
  return total_1;
}
7.4 图表展示
使用Canvas绘制饼图展示各分类占比:
Canvas(this.context)
  .width(300)
  .height(300)
  .onReady(() => {
    this.drawPieChart();
  })

drawPieChart() {
  // 统计各分类金额
  let categoryTotals: Record<string, number> = {};
  for (let item of this.expenses_1) {
    if (!categoryTotals[item.category_1]) {
      categoryTotals[item.category_1] = 0;
    }
    categoryTotals[item.category_1] += item.amount_1;
  }

  // 绘制饼图
  // ...
}
八、用户体验优化
8.1 输入验证
添加输入验证,防止无效输入:
TextInput({ placeholder: '0.00' })
  .width('80%')
  .height(48)
  .margin({ top: 8 })
  .type(InputType.Number)
  .onChange((value_1: string) => {
    let num = parseFloat(value_1);
    // 验证金额范围
    if (num < 0) {
      // 提示用户金额不能为负
      return;
    }
    if (num > 1000000) {
      // 提示用户金额过大
      return;
    }
    this.amount_1 = num || 0;
  })
8.2 操作反馈
添加操作成功提示:
@State showToast_1: boolean = false;
@State toastMessage_1: string = '';

Button('记录')
  .onClick(() => {
    if (this.amount_1 > 0) {
      // 添加记录
      let newExpense_1 = new ExpenseItem_1(this.amount_1, this.category_1, this.note_1, '今天');
      this.expenses_1 = [newExpense_1].concat(this.expenses_1);
      this.amount_1 = 0;
      this.note_1 = '';

      // 显示成功提示
      this.toastMessage_1 = '记录成功';
      this.showToast_1 = true;
      setTimeout(() => {
        this.showToast_1 = false;
      }, 2000);
    } else {
      // 显示错误提示
      this.toastMessage_1 = '请输入有效金额';
      this.showToast_1 = true;
      setTimeout(() => {
        this.showToast_1 = false;
      }, 2000);
    }
  })

// Toast提示组件
if (this.showToast_1) {
  Text(this.toastMessage_1)
    .position({ x: '50%', y: '80%' })
    .translate({ x: '-50%' })
    .padding(12)
    .backgroundColor('#000000')
    .fontColor('#FFFFFF')
    .borderRadius(8)
}
8.3 空状态处理
当记录列表为空时显示提示:
if (this.expenses_1.length === 0) {
  Column() {
    Text('暂无记录')
      .fontSize(16)
      .fontColor('#999999')
    Text('点击上方"记录"按钮添加支出')
      .fontSize(12)
      .fontColor('#CCCCCC')
      .margin({ top: 8 })
  }
  .margin({ top: 50 })
} else {
  List() {
    // 列表内容
  }
}
九、代码规范与最佳实践
9.1 命名规范
遵循ArkTS命名规范:
// 组件名:大驼峰
struct ExpenseTrackerApp { }

// 类名:大驼峰
class ExpenseItem_1 { }

// 状态变量:小驼峰 + _1后缀(避免冲突)
@State amount_1: number = 0;

// 方法名:小驼峰 + _1后缀
totalExpense_1(): number { }

// 常量:全大写下划线
categories_1: string[] = ['餐饮', '购物', ...];
9.2 类型安全
严格使用类型声明:
// 明确类型
@State amount_1: number = 0;
@State category_1: string = '餐饮';
@State expenses_1: ExpenseItem_1[] = [];

// 避免使用any
// 错误: let data: any = {};
// 正确: let data: Record<string, string> = {};

// 函数返回类型
totalExpense_1(): number {
  // ...
}
9.3 组件拆分
对于复杂页面,可以拆分为子组件:
// 总支出展示组件
@Component
struct TotalExpenseCard {
  @Prop total_1: number;

  build() {
    Stack() {
      Circle()
        .width(120)
        .height(120)
        .fill('#E8F0FE')
      Column() {
        Text('总支出')
          .fontSize(14)
          .fontColor('#666666')
        Text('¥' + String(this.total_1))
          .fontSize(28)
          .fontWeight(FontWeight.Bold)
          .fontColor('#0A59F7')
          .margin({ top: 4 })
      }
    }
  }
}

// 使用
TotalExpenseCard({ total_1: this.totalExpense_1() })
十、测试与调试
10.1 单元测试
为关键方法编写单元测试:
describe('ExpenseTrackerApp', () => {
  it('should calculate total expense correctly', () => {
    let app = new ExpenseTrackerApp();
    app.expenses_1 = [
      new ExpenseItem_1(100, '餐饮', '午餐', '今天'),
      new ExpenseItem_1(200, '购物', '衣服', '今天')
    ];
    expect(app.totalExpense_1()).toBe(300);
  });

  it('should add expense correctly', () => {
    let app = new ExpenseTrackerApp();
    app.amount_1 = 50;
    app.category_1 = '交通';
    app.note_1 = '打车';

    // 模拟点击记录按钮
    let initialCount = app.expenses_1.length;
    // ...执行添加逻辑
    expect(app.expenses_1.length).toBe(initialCount + 1);
  });
});
10.2 调试技巧
使用日志输出调试:
import { hilog } from '@kit.PerformanceAnalysisKit';

const TAG = 'ExpenseTrackerApp';

Button('记录')
  .onClick(() => {
    hilog.info(0x0000, TAG, 'Amount: %{public}d', this.amount_1);
    hilog.info(0x0000, TAG, 'Category: %{public}s', this.category_1);

    if (this.amount_1 > 0) {
      let newExpense_1 = new ExpenseItem_1(this.amount_1, this.category_1, this.note_1, '今天');
      this.expenses_1 = [newExpense_1].concat(this.expenses_1);

      hilog.info(0x0000, TAG, 'Expense added, total count: %{public}d', this.expenses_1.length);
    }
  })
10.3 性能分析
使用Profiler分析性能:
- CPU Profiler:分析方法执行时间
- Memory Profiler:检测内存泄漏
- Rendering Profiler:分析UI渲染性能
十一、总结与展望
11.1 项目总结
家庭记账本小应用完整展示了HarmonyOS ArkUI开发的核心技术:
| 技术点 | 应用场景 |
|---|---|
| @State状态管理 | 响应式数据更新 |
| List组件 | 列表数据展示 |
| ForEach循环 | 动态组件生成 |
| TextInput输入 | 用户数据录入 |
| Button交互 | 用户操作触发 |
| 数据模型类 | 结构化数据管理 |
11.2 核心收获
通过本项目开发,可以掌握:
- 声明式UI开发:使用ArkTS构建UI界面
- 状态驱动更新:理解@State装饰器的工作原理
- 列表渲染优化:使用List和ForEach高效渲染列表
- 用户交互处理:处理按钮点击、文本输入等事件
- 数据管理:设计数据模型,实现增删改查操作
11.3 未来展望
后续可以扩展的功能方向:
- 数据持久化:使用Preferences或数据库存储数据
- 图表统计:使用Canvas绘制饼图、柱状图
- 分类管理:支持自定义分类,分类图标
- 预算管理:设置月度预算,超支提醒
- 数据导出:导出Excel或PDF报表
- 多设备同步:使用云服务同步数据
- 智能分析:AI分析消费习惯,提供理财建议
十二、完整代码
完整源代码请参考项目文件:
文件路径: entry/src/main/ets/pages/miniApps/ExpenseTrackerApp.ets
代码行数: 约175行
主要组件:
- ExpenseItem_1: 数据模型类
- ExpenseTrackerApp: 主页面组件
关键方法:
- totalExpense_1(): 计算总支出
- build(): 构建UI界面
开发环境:
- DevEco Studio 4.0+
- HarmonyOS SDK API 10+
- ArkTS 1.0+
参考文档:

讨论HarmonyOS开发技术,专注于API与组件、DevEco Studio、测试、元服务和应用上架分发等。
更多推荐


 1
1 0
0- 0


 已为社区贡献17条内容

所有评论(0)