端云一体化(二):云函数开发与调用
·
学习目标
- 学会创建、开发和调试鸿蒙云函数
- 搞清楚云函数的 event、context、callback 都是啥
- 掌握在 App 里调用云函数的完整流程
- 完成轻食刻的第一个云函数:用户认证
2.1 云函数基础概念
2.1.1 什么是云函数
云函数就是一种不用管服务器的代码运行方式。你只需要写代码,上传上去,华为云会自动帮你运行:
传统服务器              云函数
┌─────────────┐        ┌─────────────┐
│  买服务器   │        │  写代码     │
│  配环境    │   →    │  传上去     │
│  维护运维  │        │  自动跑     │
│  扩容缩容  │        │  按量付费   │
└─────────────┘        └─────────────┘
云函数的特点:
| 特点 | 说明 |
|---|---|
| 事件触发 | 有 HTTP 请求、数据库变化等事件时才执行 |
| 自动扩缩容 | 访问量大自动加实例,量小自动减 |
| 按量付费 | 用多少付多少,不用不花钱 |
| 不用运维 | 不用管服务器状态,华为云帮你管 |
2.1.2 云函数执行流程
端侧发起调用          云侧执行              返回结果
┌─────────┐         ┌─────────┐          ┌─────────┐
│ 构建参数 │ ──────→ │ 解析事件 │          │         │
│ 调用API │         │ 执行业务 │  ──────→ │ 返回JSON│
│         │         │ 访问DB  │          │         │
└─────────┘         └─────────┘          └─────────┘
完整调用链路:
- App 通过 AGC SDK 发起调用
- AGC 网关把请求路由到对应的云函数
- 云函数容器加载代码并执行
- 云函数访问 CloudDB 或其他服务
- 结果经网关返回给 App
2.2 创建第一个云函数
2.2.1 云函数目录结构
cloudfunctions/
└── hello-world/              # 云函数名称
    ├── function-config.json  # 函数配置
    ├── package.json          # 依赖配置
    ├── tsconfig.json         # TypeScript配置
    └── helloWorld.ts         # 函数入口
2.2.2 函数配置文件
创建 function-config.json:
{
  "handler": "helloWorld.handleHello",
  "runtime": "Node.js18",
  "memorySize": 256,
  "timeout": 30,
  "triggers": [
    {
      "type": "http",
      "path": "/hello"
    }
  ]
}
配置项说明:
| 字段 | 说明 | 可选值 |
|---|---|---|
| handler | 函数入口 | 文件名.函数名 |
| runtime | 运行时环境 | Node.js18 / Node.js16 |
| memorySize | 内存大小(MB) | 128 / 256 / 512 / 1024 |
| timeout | 超时时间(秒) | 3-60 |
| triggers | 触发器配置 | http / event |
2.2.3 编写云函数代码
创建 helloWorld.ts:
/**
 * 第一个云函数 - Hello World
 * 演示基本的参数接收和响应返回
 */

interface HelloRequest {
  name?: string;
}

interface HelloResponse {
  success: boolean;
  message: string;
  timestamp: number;
  requestData?: HelloRequest;
}

/**
 * 云函数入口
 * @param event 事件对象,包含请求参数
 * @param context 上下文对象,包含环境信息
 * @param callback 回调函数,用于返回结果
 * @param logger 日志对象,用于记录日志
 */
export const handleHello = async (
  event: any,
  context: any,
  callback: (result: HelloResponse) => void,
  logger: any
): Promise<void> => {
  logger.info('[hello-world] Function started');
  logger.info(`[hello-world] Event: ${JSON.stringify(event)}`);

  try {
    // 1. 解析请求参数
    let body = event.body;
    if (typeof body === 'string') {
      try {
        body = JSON.parse(body);
      } catch (e) {
        logger.warn('[hello-world] Failed to parse body as JSON');
      }
    }

    const params = body || event;
    const name = params.name || 'World';

    logger.info(`[hello-world] Received name: ${name}`);

    // 2. 构建响应
    const response: HelloResponse = {
      success: true,
      message: `Hello, ${name}! Welcome to FastOne Cloud.`,
      timestamp: Date.now(),
      requestData: params
    };

    logger.info('[hello-world] Function completed successfully');
    callback(response);

  } catch (error) {
    logger.error(`[hello-world] Error: ${error.message}`);
    callback({
      success: false,
      message: `Error: ${error.message}`,
      timestamp: Date.now()
    });
  }
};
2.2.4 package.json 配置
{
  "name": "hello-world",
  "version": "1.0.0",
  "description": "Hello World cloud function",
  "main": "helloWorld.ts",
  "dependencies": {
    "@hw-agconnect/cloud-server": "^1.0.0"
  },
  "devDependencies": {
    "typescript": "^5.0.0"
  }
}
2.2.5 tsconfig.json 配置
{
  "compilerOptions": {
    "target": "ES2020",
    "module": "commonjs",
    "strict": true,
    "esModuleInterop": true,
    "skipLibCheck": true,
    "forceConsistentCasingInFileNames": true,
    "outDir": "./dist"
  },
  "include": ["*.ts"],
  "exclude": ["node_modules"]
}
2.3 云函数核心API详解
2.3.1 event 对象结构
interface CloudFunctionEvent {
  // HTTP请求体(POST请求)
  body: string | Record<string, any>;

  // URL查询参数(GET请求)
  queryStringParameters: Record<string, string>;

  // HTTP请求头
  headers: Record<string, string>;

  // HTTP方法
  httpMethod: 'GET' | 'POST' | 'PUT' | 'DELETE';

  // 请求路径
  path: string;

  // 认证信息
  auth?: {
    uid: string;      // 用户ID
    unionId: string;  // 华为账号unionId
    openId: string;   // 华为账号openId
  };
}
2.3.2 context 对象结构
interface CloudFunctionContext {
  // 请求ID,用于链路追踪
  requestId: string;

  // 环境信息
  environment: {
    // 云函数名称
    functionName: string;
    // 内存限制(MB)
    memoryLimitInMB: number;
    // 超时时间(秒)
    timeoutInSeconds: number;
    // 运行时版本
    runtimeVersion: string;
  };

  // 服务配置
  service: {
    // 项目ID
    projectId: string;
    // 应用ID
    appId: string;
  };
}
2.3.3 logger 日志API
// 日志级别
logger.debug(message: string): void;   // 调试日志
logger.info(message: string): void;    // 信息日志
logger.warn(message: string): void;    // 警告日志
logger.error(message: string): void;   // 错误日志

// 使用示例
logger.info(`[function-name] Processing user: ${userId}`);
logger.error(`[function-name] Database error: ${error.message}`);
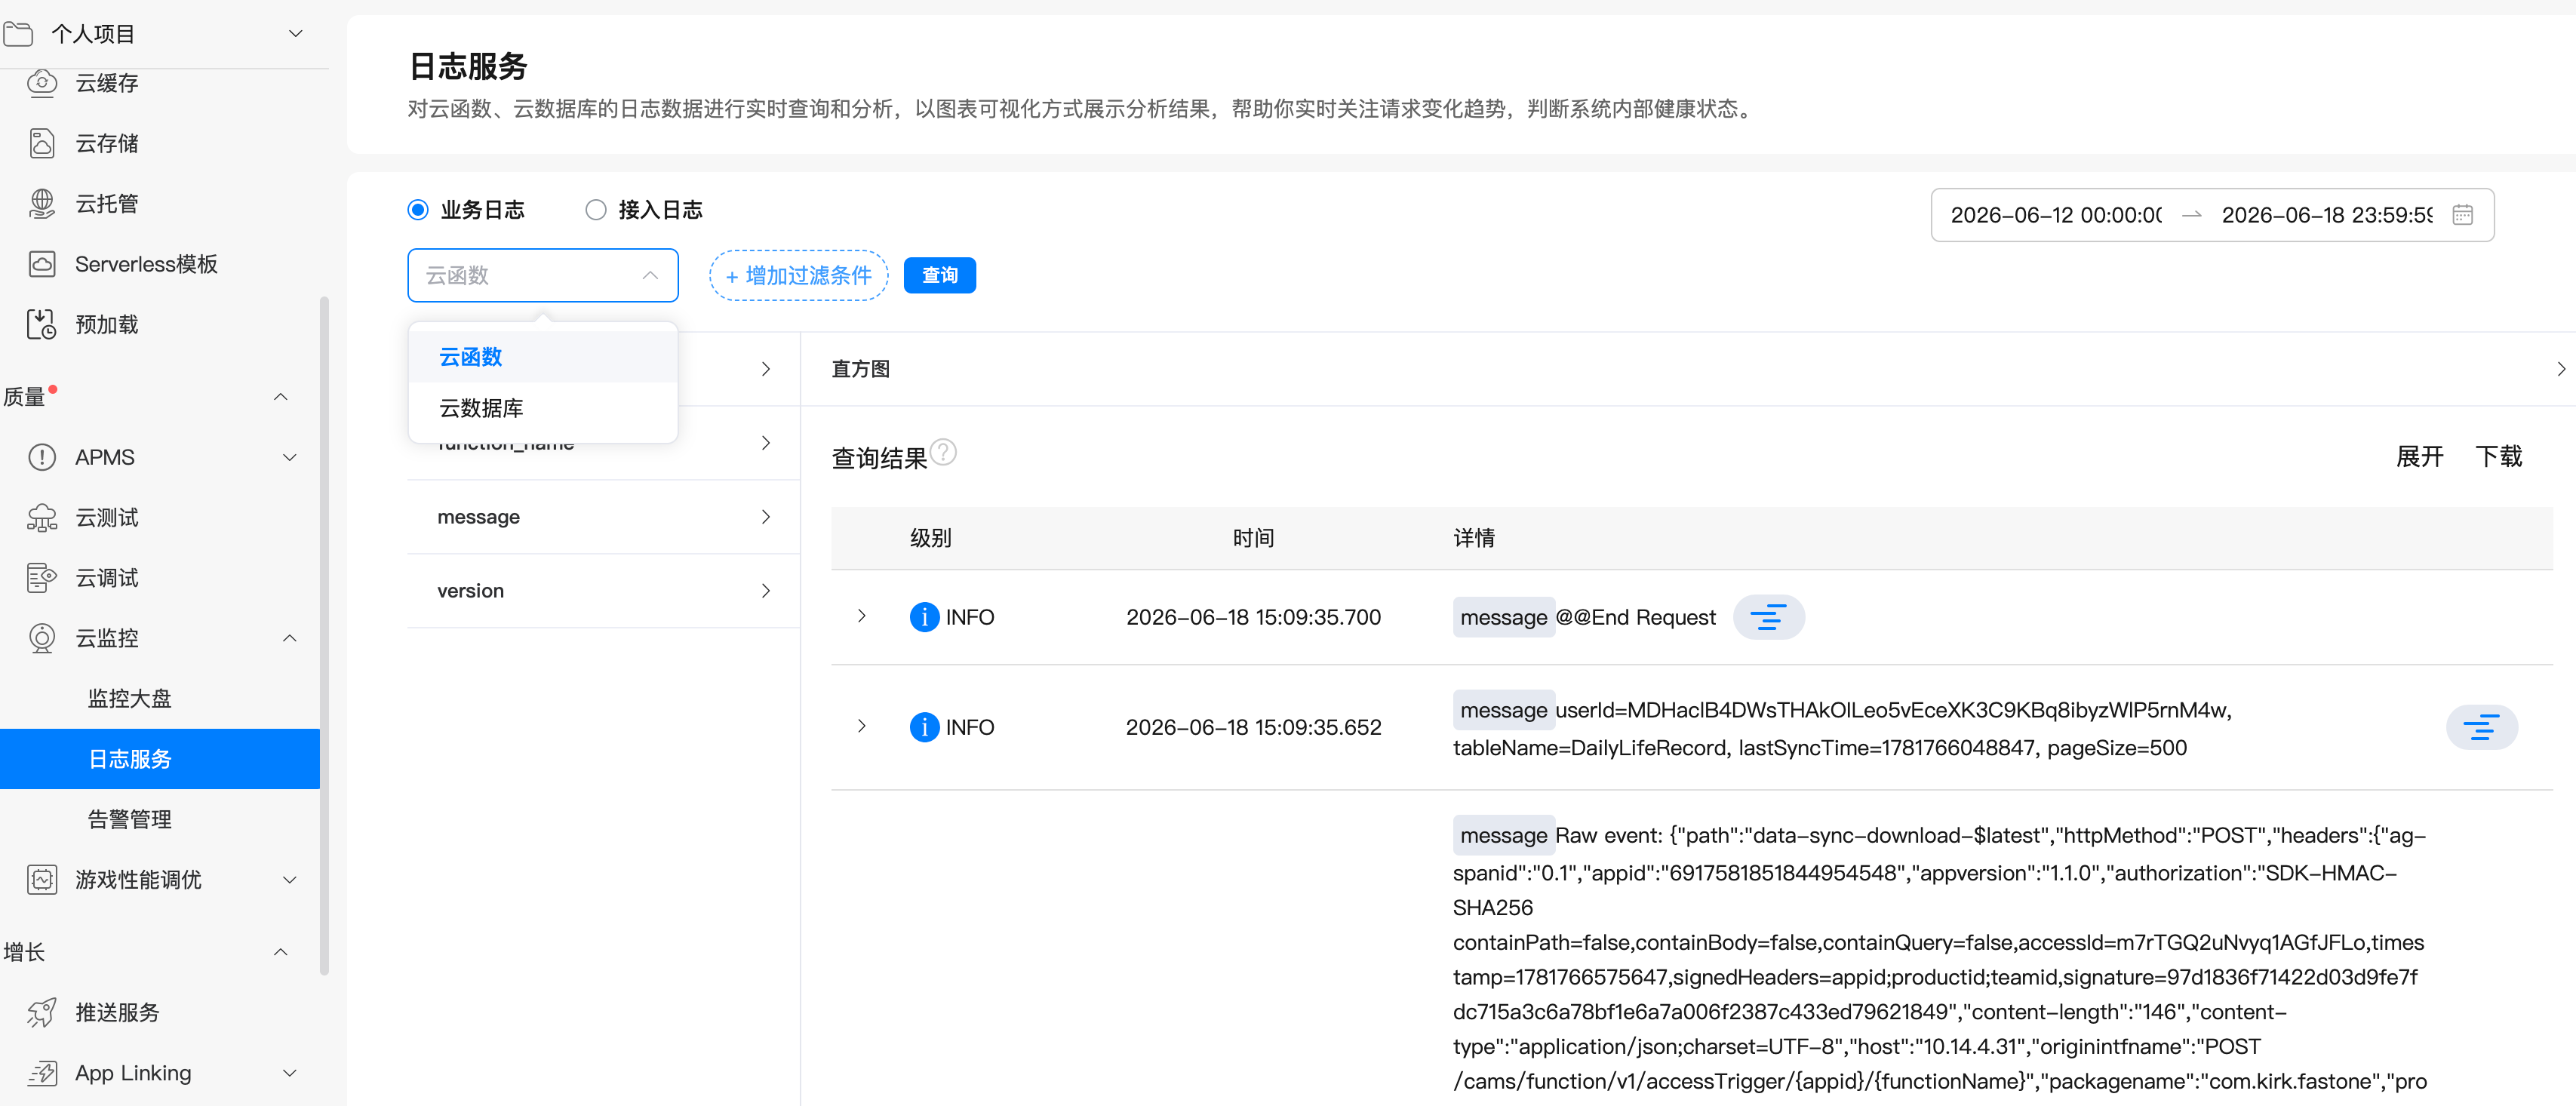
日志查看方式:
AGC控制台 → 质量→ 云监控 → 日志服务 → 选择云函数/云数据库 查看日志
2.4 端侧调用云函数
2.4.1 基础调用方式
import cloud from '@hw-agconnect/cloud';

/**
 * 调用Hello World云函数
 */
async function callHelloWorld(name: string): Promise<string> {
  try {
    // 构建请求参数
    const params = {
      name: name
    };

    // 调用云函数
    const result = await cloud.callFunction({
      name: 'hello-world',    // 云函数名称
      data: params            // 请求参数
    });

    // 处理响应
    console.info('Cloud function result:', JSON.stringify(result));
    return result.message;

  } catch (error) {
    console.error('Failed to call cloud function:', error);
    throw error;
  }
}
2.4.2 封装云函数调用工具
创建 services/CloudFunctionUtil.ets:
import cloud from '@hw-agconnect/cloud';
import { BusinessError } from '@kit.BasicServicesKit';
import { hilog } from '@kit.PerformanceAnalysisKit';

const TAG = 'CloudFunctionUtil';
const DOMAIN = 0x0000;

/**
 * 云函数调用结果
 */
export interface CloudFunctionResult<T> {
  success: boolean;
  data?: T;
  errorCode?: string;
  errorMessage?: string;
}

/**
 * 云函数调用工具类
 */
export class CloudFunctionUtil {
  private static instance: CloudFunctionUtil;

  static getInstance(): CloudFunctionUtil {
    if (!CloudFunctionUtil.instance) {
      CloudFunctionUtil.instance = new CloudFunctionUtil();
    }
    return CloudFunctionUtil.instance;
  }

  /**
   * 调用云函数(带错误处理)
   * @param functionName 云函数名称
   * @param params 请求参数
   * @returns 云函数返回结果
   */
  async call<T>(
    functionName: string,
    params: Record<string, Object> = {}
  ): Promise<CloudFunctionResult<T>> {
    hilog.info(DOMAIN, TAG, `Calling cloud function: ${functionName}`);

    try {
      const result = await cloud.callFunction({
        name: functionName,
        data: params
      });

      hilog.info(DOMAIN, TAG, `Cloud function ${functionName} returned: ${JSON.stringify(result)}`);

      return {
        success: true,
        data: result as T
      };

    } catch (error) {
      let err = error as BusinessError;
      hilog.error(DOMAIN, TAG, `Cloud function ${functionName} failed: code=${err.code}, message=${err.message}`);

      return {
        success: false,
        errorCode: err.code?.toString(),
        errorMessage: err.message
      };
    }
  }

  /**
   * 调用云函数(直接返回数据,失败时抛出异常)
   */
  async callOrThrow<T>(
    functionName: string,
    params: Record<string, Object> = {}
  ): Promise<T> {
    const result = await this.call<T>(functionName, params);

    if (!result.success) {
      throw new Error(result.errorMessage || 'Cloud function call failed');
    }

    return result.data as T;
  }
}
2.4.3 在页面中调用
// pages/TestCloudFunctionPage.ets
import { CloudFunctionUtil } from '../services/CloudFunctionUtil';
import { ToastUtil } from '@pura/harmony-utils';

@Entry
@Component
struct TestCloudFunctionPage {
  private cloudUtil: CloudFunctionUtil = CloudFunctionUtil.getInstance();
  @State resultMessage: string = '';
  @State isLoading: boolean = false;

  build() {
    Column({ space: 16 }) {
      Text('云函数测试')
        .fontSize(24)
        .fontWeight(FontWeight.Bold)

      Button('调用 Hello World')
        .width('80%')
        .onClick(() => this.testHelloWorld())

      if (this.isLoading) {
        LoadingProgress()
          .width(40)
          .height(40)
          .color($r('app.color.primary'))
      }

      if (this.resultMessage) {
        Text(this.resultMessage)
          .fontSize(16)
          .fontColor($r('app.color.text_primary'))
          .padding(16)
          .backgroundColor($r('app.color.background_secondary'))
          .borderRadius(8)
      }
    }
    .width('100%')
    .height('100%')
    .padding(20)
    .backgroundColor($r('app.color.background'))
  }

  async testHelloWorld(): Promise<void> {
    this.isLoading = true;
    this.resultMessage = '';

    try {
      const result = await this.cloudUtil.call<{
        success: boolean;
        message: string;
        timestamp: number;
      }>('hello-world', { name: '轻食刻用户' });

      if (result.success && result.data) {
        this.resultMessage = `✅ ${result.data.message}\n\n⏰ 服务器时间: ${new Date(result.data.timestamp).toLocaleString()}`;
      } else {
        this.resultMessage = `❌ 调用失败: ${result.errorMessage}`;
      }
    } catch (error) {
      this.resultMessage = `❌ 异常: ${(error as Error).message}`;
    } finally {
      this.isLoading = false;
    }
  }
}
2.5 实战:用户认证云函数
2.5.1 需求分析
轻食刻需要实现华为账号登录后的服务端认证:
端侧流程:
1. 调用Account Kit获取授权码
2. 将授权码发送到云函数
3. 云函数验证授权码并获取用户信息
4. 云函数创建/更新用户记录
5. 返回用户信息和登录态
2.5.2 创建用户模型
创建 cloudfunctions/huawei-auth/User.ts:
/**
 * 用户数据模型
 */
export class User {
  // 主键ID
  id: string = '';

  // 华为账号unionId(唯一标识)
  unionId: string = '';

  // 华为账号openId
  openId: string = '';

  // 昵称
  nickName: string = '';

  // 头像URL
  avatarUri: string = '';

  // 身高(cm)
  height: number = 0;

  // 体重(kg)
  weight: number = 0;

  // 目标体重
  targetWeight: number = 0;

  // 性别
  gender: string = '';

  // 年龄
  age: number = 0;

  // 创建时间
  createdAt: Date = new Date();

  // 更新时间
  updatedAt: Date = new Date();

  // 最后登录时间
  lastLoginTime: Date = new Date();
}
2.5.3 数据库操作封装
创建 cloudfunctions/huawei-auth/UserDbWrapper.ts:
import { cloud, CloudDBCollection } from '@hw-agconnect/cloud-server';
import { User } from './User';

const ZONE_NAME = 'fastone';

/**
 * 生成唯一ID
 */
function generateUniqueId(): string {
  const timestamp = Date.now().toString(36);
  const randomPart = Math.random().toString(36).substring(2, 15);
  return `${timestamp}-${randomPart}`;
}

/**
 * User数据库操作封装类
 */
export class UserDbWrapper {
  collection: CloudDBCollection<User>;

  constructor() {
    this.collection = cloud.database({ zoneName: ZONE_NAME }).collection(User);
  }

  /**
   * 根据unionId查询用户
   */
  async queryUserByUnionId(unionId: string): Promise<User[]> {
    const query = this.collection.query().equalTo('unionId', unionId);
    return await query.get();
  }

  /**
   * 插入或更新用户
   */
  async upsertUser(user: User): Promise<void> {
    await this.collection.upsert(user);
  }
}
2.5.4 认证云函数实现
创建 cloudfunctions/huawei-auth/huaweiAuth.ts:
import { cloud, CloudDBCollection } from '@hw-agconnect/cloud-server';
import { User } from './User';

const ZONE_NAME = 'fastone';

/**
 * 生成唯一ID
 */
function generateUniqueId(): string {
  const timestamp = Date.now().toString(36);
  const randomPart = Math.random().toString(36).substring(2, 15);
  return `${timestamp}-${randomPart}`;
}

/**
 * User数据库操作封装类
 */
export class UserDbWrapper {
  collection: CloudDBCollection<User>;

  constructor() {
    this.collection = cloud.database({ zoneName: ZONE_NAME }).collection(User);
  }

  /**
   * 查询用户by unionId
   */
  async queryUserByUnionId(unionId: string): Promise<User[]> {
    const query = this.collection.query().equalTo('unionId', unionId);
    return await query.get();
  }

  /**
   * 插入或更新用户
   */
  async upsertUser(user: User): Promise<void> {
    await this.collection.upsert(user);
  }

  /**
   * 批量插入或更新
   */
  async upsertUsers(users: User[]): Promise<void> {
    await this.collection.upsert(users);
  }
}

/**
 * 华为账号认证云函数入口
 */
export const handleAuth = async (event: any, context: any, callback: any, logger: any) => {
  logger.info('========== [huawei-auth] START ==========');
  logger.info('[huawei-auth] Step 1: Received event');

  try {
    // 1. 解析参数
    logger.info('[huawei-auth] Step 2: Parsing parameters...');
    let body = event.body;
    if (typeof body === 'string') {
        try {
            body = JSON.parse(body);
        } catch(e) {}
    }
    const params = body || event;
    const authorizationCode = params['authorizationCode'] as string;
    const appId = params['appId'] as string;
    const openID = params['openID'] as string;
    const unionID = params['unionID'] as string;
    const nickName = params['nickName'] as string;
    const avatarUri = params['avatarUri'] as string;
    const height = params['height'] as number;
    const weight = params['weight'] as number;
    const targetWeight = params['targetWeight'] as number;
    const gender = params['gender'] as string;
    const age = params['age'] as number;

    logger.info(`[huawei-auth] Step 3: Params - unionID=${unionID}, openID=${openID}, nickName=${nickName}`);

    if (!unionID) {
      logger.error('[huawei-auth] ERROR: Missing unionID');
      callback({ success: false, errorCode: 'AUTH_001', errorMessage: '缺少unionID' });
      return;
    }

    // 2. 初始化数据库操作类
    logger.info('[huawei-auth] Step 4: Initializing database wrapper...');
    const userDb = new UserDbWrapper();
    logger.info('[huawei-auth] Step 5: Database wrapper initialized');

    // 3. 查询用户是否存在
    logger.info('[huawei-auth] Step 6: Querying user by unionId...');
    const existingUsers = await userDb.queryUserByUnionId(unionID);
    logger.info(`[huawei-auth] Step 7: Query completed, found ${existingUsers.length} users`);

    const now = new Date();
    if (existingUsers.length > 0) {
      // 用户已存在,更新信息
      logger.info('[huawei-auth] Step 8: User exists, updating...');
      let existingUser = existingUsers[0];

      // 更新字段
      existingUser.nickName = nickName || existingUser.nickName;
      existingUser.avatarUri = avatarUri || existingUser.avatarUri;
      existingUser.openId = openID || existingUser.openId;
      if (height > 0) existingUser.height = height;
      if (weight > 0) existingUser.weight = weight;
      if (targetWeight > 0) existingUser.targetWeight = targetWeight;
      if (gender) existingUser.gender = gender;
      if (age > 0) existingUser.age = age;
      existingUser.lastLoginTime = now;
      existingUser.updatedAt = now;

      logger.info('[huawei-auth] Step 9: Upserting updated user...');
      await userDb.upsertUser(existingUser);
      logger.info('[huawei-auth] Step 10: User updated successfully');

      callback({
        success: true,
        isNewUser: false,
        user: {
          unionId: existingUser.unionId,
          openId: existingUser.openId,
          nickName: existingUser.nickName,
          avatarUri: existingUser.avatarUri,
          height: existingUser.height,
          weight: existingUser.weight,
          targetWeight: existingUser.targetWeight,
          gender: existingUser.gender,
          age: existingUser.age
        }
      });
    } else {
      // 新用户,创建记录
      logger.info('[huawei-auth] Step 8: New user, creating...');
      const newUser = new User();
      newUser.id = generateUniqueId();
      newUser.unionId = unionID;
      newUser.openId = openID || '';
      newUser.nickName = nickName || '华为用户';
      newUser.avatarUri = avatarUri || '';
      newUser.height = height || 0;
      newUser.weight = weight || 0;
      newUser.targetWeight = targetWeight || 0;
      newUser.gender = gender || '';
      newUser.age = age || 0;
      newUser.createdAt = now;
      newUser.updatedAt = now;
      newUser.lastLoginTime = now;

      logger.info('[huawei-auth] Step 9: Upserting new user...');
      await userDb.upsertUser(newUser);
      logger.info('[huawei-auth] Step 10: New user created successfully');

      callback({
        success: true,
        isNewUser: true,
        user: {
          unionId: newUser.unionId,
          openId: newUser.openId,
          nickName: newUser.nickName,
          avatarUri: newUser.avatarUri,
          height: newUser.height,
          weight: newUser.weight,
          targetWeight: newUser.targetWeight,
          gender: newUser.gender,
          age: newUser.age
        }
      });
    }

    logger.info('========== [huawei-auth] END ==========');

  } catch (error) {
    logger.error(`[huawei-auth] ERROR: ${error.message}`);
    logger.error(`[huawei-auth] Stack: ${error.stack}`);
    callback({
      success: false,
      errorCode: 'AUTH_999',
      errorMessage: `服务器错误: ${error.message}`
    });
  }
};
2.5.5 端侧调用认证云函数
在 AuthService.ets 中调用:
import { AuthUserInfo, LoginResult } from '../model/AuthModels';
import { CloudFunctionUtil } from './CloudFunctionUtil';
import cloud from '@hw-agconnect/cloud';

export class AuthService {
  private cloudUtil: CloudFunctionUtil = CloudFunctionUtil.getInstance();

  /**
   * 登录成功后调用云函数同步用户
   */
  private async callAuthCloudFunction(authData: any): Promise<void> {
    try {
      const params: Record<string, string | number | undefined> = {
        authorizationCode: authData.data?.authorizationCode ?? '',
        appId: APP_ID,
        openID: authData.data?.openID ?? '',
        unionID: authData.data?.unionID ?? '',
        nickName: authData.data?.nickName ?? '',
        avatarUri: authData.data?.avatarUri ?? ''
      };

      const result = await this.cloudUtil.call<{
        success: boolean;
        isNewUser: boolean;
        user: AuthUserInfo;
      }>('huawei-auth', params);

      if (result.success && result.data) {
        console.info(`User sync completed, isNewUser: ${result.data.isNewUser}`);
      }
    } catch (error) {
      console.error('Auth cloud function failed:', error);
    }
  }
}
2.6 云函数调试技巧
2.6.1 本地调试
步骤1:安装本地调试工具
cd CloudProgram/cloudfunctions/hello-world
npm install
步骤2:创建本地测试脚本
创建 test-local.js:
const { handleHello } = require('./dist/helloWorld');

// 模拟event对象
const mockEvent = {
  body: JSON.stringify({ name: '测试用户' }),
  queryStringParameters: {},
  headers: {},
  httpMethod: 'POST',
  path: '/hello'
};

// 模拟context对象
const mockContext = {
  requestId: 'test-request-001',
  environment: {
    functionName: 'hello-world',
    memoryLimitInMB: 256,
    timeoutInSeconds: 30
  }
};

// 模拟logger对象
const mockLogger = {
  debug: (msg) => console.log(`[DEBUG] ${msg}`),
  info: (msg) => console.log(`[INFO] ${msg}`),
  warn: (msg) => console.log(`[WARN] ${msg}`),
  error: (msg) => console.log(`[ERROR] ${msg}`)
};

// 执行函数
handleHello(mockEvent, mockContext, (result) => {
  console.log('\n========== 执行结果 ==========');
  console.log(JSON.stringify(result, null, 2));
}, mockLogger);
步骤3:运行测试
npx tsc
node test-local.js
2.6.2 云端调试
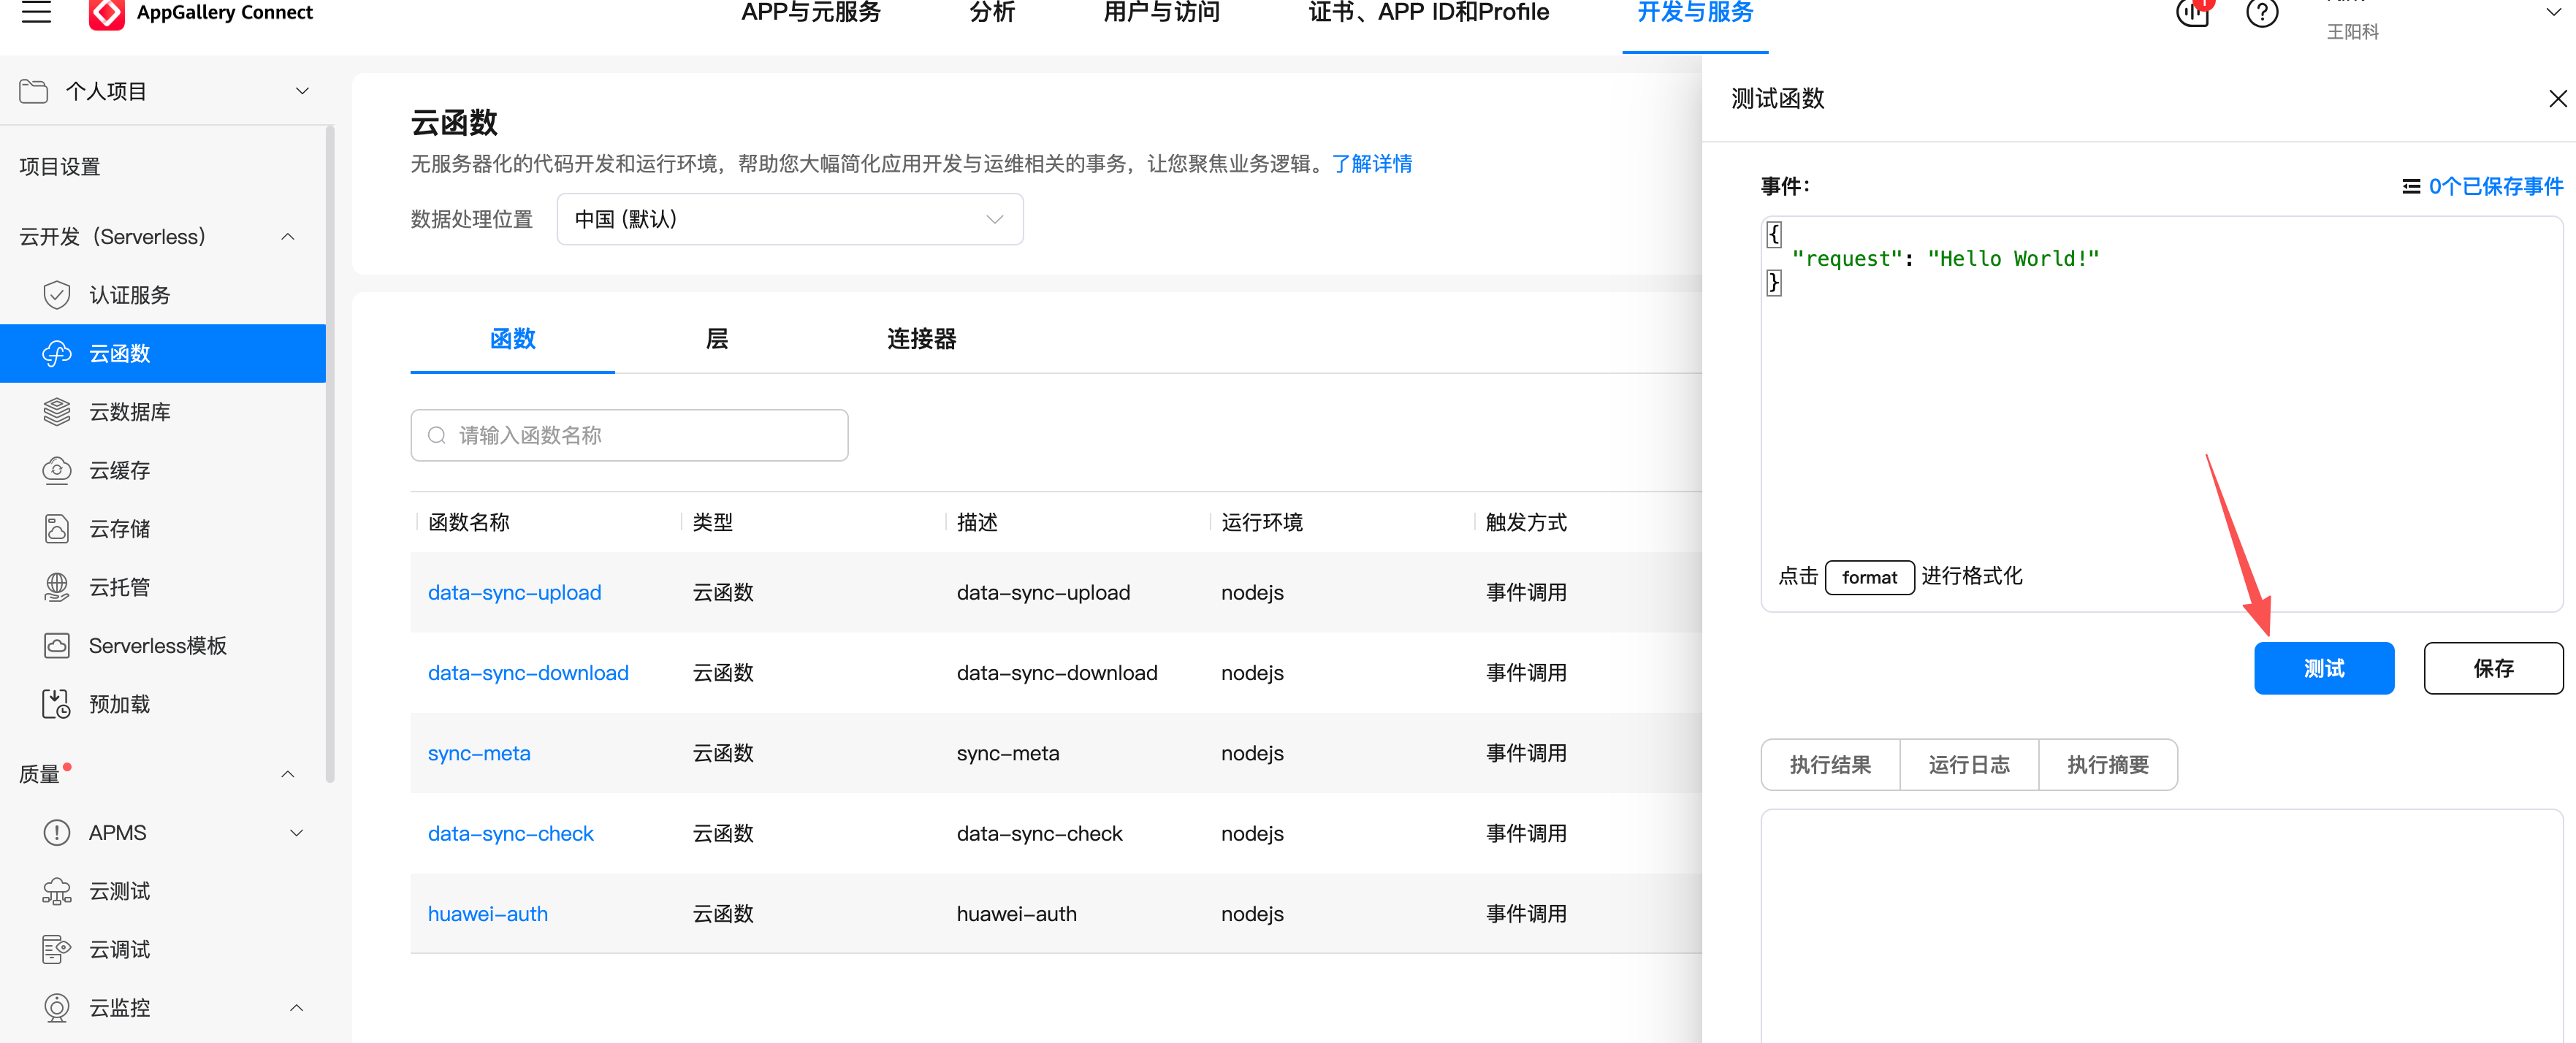
使用AGC控制台测试:
AGC控制台 → 云函数 → 选择函数 → 测试 → 配置测试事件 → 运行
测试事件JSON:
{
  "body": "{\"name\": \"云端测试\"}",
  "httpMethod": "POST",
  "path": "/hello",
  "headers": {
    "Content-Type": "application/json"
  }
}
2.6.3 日志排查
常见问题及排查方法:
| 问题 | 排查方法 | 解决方案 |
|---|---|---|
| 函数超时 | 查看日志中的执行时间 | 优化代码或增加timeout配置 |
| 内存溢出 | 查看内存使用日志 | 增加memorySize或减少数据处理量 |
| 数据库连接失败 | 检查CloudDB配置 | 确认zoneName和权限配置 |
| 参数解析错误 | 打印event对象 | 检查body解析逻辑 |
2.7 本章总结
知识点回顾
- 云函数基础:无服务器计算,事件驱动,自动扩缩容
- 核心对象:event(请求参数)、context(环境信息)、callback(返回结果)、logger(日志记录)
- 开发流程:创建目录 → 编写代码 → 配置函数 → 部署 → 测试
- 端侧调用:使用
cloud.callFunctionAPI,封装工具类统一处理 - 调试方法:本地模拟测试 + 云端控制台测试 + 日志分析
下章预告
第3篇将深入讲解云数据库集成,包括:
- CloudDB对象类型定义与管理
- 端侧直接访问CloudDB
- 云函数中操作CloudDB
- 数据查询与索引优化
练习任务
- 创建自己的
hello-world云函数并部署测试 - 修改用户认证云函数,增加用户积分字段
- 在端侧页面中实现云函数调用,展示返回结果

讨论HarmonyOS开发技术,专注于API与组件、DevEco Studio、测试、元服务和应用上架分发等。
更多推荐
 5
5 0
0- 0


 已为社区贡献19条内容

所有评论(0)