鸿蒙6.0应用开发——自动化测试框架开发
鸿蒙6.0应用开发——自动化测试框架开发
概述
自动化测试框架是一套面向多设备、全场景的端侧测试体系,基于DevEco Studio开发环境和hvigor构建系统,整合了UI测试(@ohos.UiTest)、单元测试(@ohos/hypium)等能力,通过标准化的工程结构、编码规范与执行流程,支撑开发者实现高效高质量验证。
- 单元测试框架:是自动化测试框架基础底座,UI测试脚本和性能测试脚本需基于单元测试框架进行开发,用于定义测试用例及验证执行结果。
- UI测试框架:调用UiTest接口进行UI界面查找和模拟操作。
- 白盒性能测试框架:调用PerfTest接口采集和度量测试应用内指定逻辑执行时的基础性能数据。
本文介绍了单元测试框架和UI测试框架的实现,旨在帮助开发者了解和掌握自动化测试框架的开发流程与实现细节。关键步骤如下:
场景案例
场景描述
本节基于官网codelab《从简单页面开始》介绍自动化测试框架的开发流程与实现细节,主要涵盖单元测试和UI测试两部分,开发者可根据具体业务场景对应用实施自动化测试。
实现原理
-
单元测试
使用单元测试框架通过Mock隔离被测代码与外部依赖,在无需启动完整应用的前提下,对应用逻辑(如工具函数、业务服务等)进行快速、隔离、可重复的验证。本文采用该框架的以下特性来实现单元测试:
特性 使用说明 使用场景 基础流程能力 通过基础流程能力如describe、it等接口定义测试套和测试用例。并对测试套和测试用例设置预置条件和清理条件。 定义测试套和测试用例,以及测试用例执行前需要预置条件和执行后需要清理条件的场景,如:设置定时器和清理定时器。 断言能力 使用如assertEqual等断言接口判断检验实际值是否等于预期值。 检验函数功能是否正常。 Mock能力 使用Mock能力,Mock自定义对象的函数。 函数依赖外部资源或复杂逻辑,如:依赖网络请求返回值。 数据驱动 使用数据驱动能力,对测试套或者测试用例执行若干次。 多个测试用例或测试套有相同类型参数,如:进行压力测试。 -
UI测试
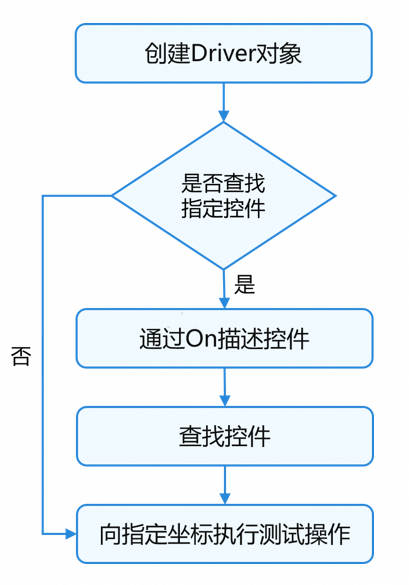
通过DevEco Testing的UIViewer获取屏幕坐标点信息,并使用UI测试框架接口对指定坐标点或指定控件注入模拟的输入事件(如点击、滑动等),实现界面交互和验证的自动化。本文针对不同UI测试场景提供如下实现方案:
场景 实现方案 查找组件 创建On对象,通过id或type描述目标控件,然后使用findComponent()根据目标控件的属性要求查找该控件。 模拟输入 通过inputText()模拟文本输入。 模拟点击 通过Component或Driver中的click属性模拟点击。 模拟触摸屏手指滑动 通过swipe()方法模拟对轮播图的滑动。 等待页面加载 使用waitForIdle()等待当前界面的所有控件空闲后,再进行下一步操作。 UI测试流程图如下:
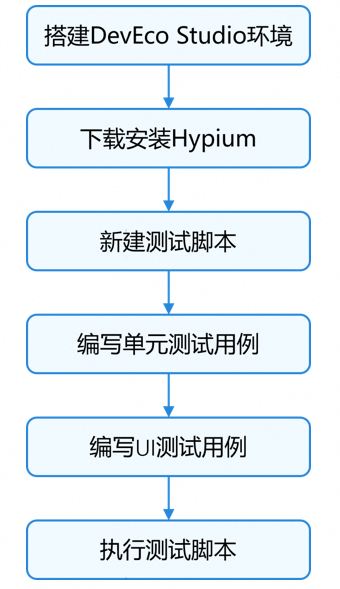
开发步骤
-
搭建DevEco Studio环境
测试脚本基于DevEco Studio编写,开发者需先下载DevEco Studio并完成环境准备。
-
下载安装Hypium
Hypium是OpenHarmony上的测试框架,提供测试用例的编写、执行及结果显示功能,用于OpenHarmony系统应用接口和应用界面的测试。使用DevEco Studio打开测试项目,并按以下方案进行配置。
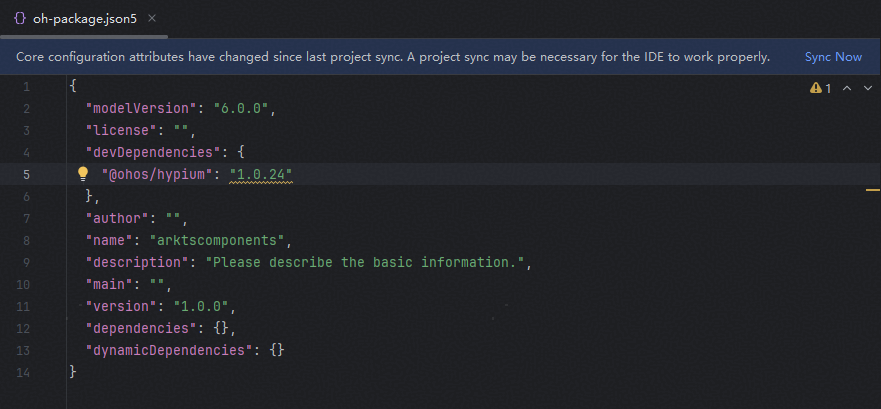
说明
本示例使用的Hypium版本为@ohos/hypium(V1.0.24),若开发者需使用最新版本,请查看@ohos/hypium。
-
方案一:通过ohpm命令下载@ohos/hypium。
ohpm install @ohos/hypium@1.0.24 --save-dev -
方案二:在应用工程的oh-package.json5文件的devDependencies中配置版本号,然后点击编辑器窗口上方的“Sync Now”同步工程,即可使用对应版本的框架功能。
-
-
新建测试脚本
参考创建ArkTS测试用例,导入所需的单元测试框架能力及其他测试脚本中依赖的接口,编写单元测试脚本。
启动被测试页面,检查设备显示的页面是否为预期页面。流程图如下:
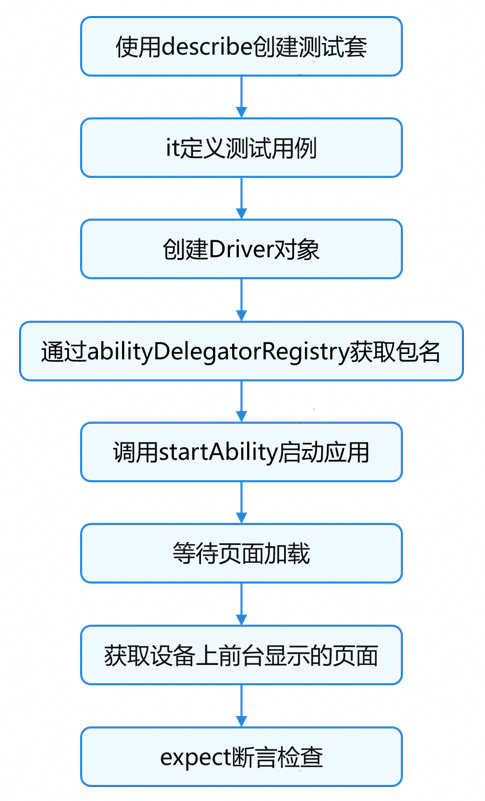
在自动化测试中,常用基础流程能力的it定义测试用例,其参数如下:
参数名 类型 必填 说明 testCaseName string 是 测试用例的名称,用于标识该测试用例。 attribute TestType | Size | Level 是 测试类型,用于标记测试用例的类型。 func Function 是 异步函数(async),包含测试用例的具体逻辑。 使用it创建测试用例后,通过AbilityDelegatorRegistry获取应用包名,构造want启动对象、调用startAbility()启动应用。在应用加载完成后,调用getCurrentTopAbility()获取设备上前台显示页面,并使用expect()和assertEqual()断言当前页面是否为预期启动页面。
const delegator: abilityDelegatorRegistry.AbilityDelegator = abilityDelegatorRegistry.getAbilityDelegator(); export default function UITest() { describe('UITest', () => { /** * Start the application to be tested. */ it('startApp', Level.LEVEL3, async (done: Function) => { hilog.info(0x0000, 'testTag', '%{public}s', "UITest: TestUiExample begin"); // Initialize the Driver object. const driver = Driver.create(); const bundleName = abilityDelegatorRegistry.getArguments().bundleName; // Specify the bundle name and ability name of the application to be tested. const want: Want = { bundleName: bundleName, abilityName: 'EntryAbility' } // Start the application to be tested. await delegator.startAbility(want); // Wait until the application starts. await driver.waitForIdle(4000, 5000); const ability: UIAbility = await delegator.getCurrentTopAbility(); hilog.info(0x0000, 'testTag', '%{public}s', "get top ability"); // Ensure that the top ability of the application is the specified ability. expect(ability.context.abilityInfo.name).assertEqual('EntryAbility'); done(); }) // ... }) } -
编写单元测试用例
-
基础流程能力
使用基础流程能力beforeAll()定义预置条件,afterAll()定义清理条件。预置条件在所有测试用例开始前执行一次,清理条件在所有测试用例结束后执行一次。
let success = -1; let timeout = 0; beforeAll(() => { // Preset increment action before all test cases of the test suite start. success++; // Set a timer before all test cases of the test suite start. timeout = setTimeout(() => { hilog.info(0x0000, 'testTag', '%{public}s', 'setTimeout'); }, 1000); }) beforeEach(() => { // Preset increment action before each test case of the test suite starts. success++; }) afterEach(() => { hilog.info(0x0000, 'testTag', '%{public}s', `success: ${success}`); }) afterAll(() => { hilog.info(0x0000, 'testTag', '%{public}s', 'AfterAll executed'); hilog.info(0x0000, 'testTag', '%{public}s', `success: ${success}`); // Clear the timer After all test cases of the test suite end. clearTimeout(timeout); }) -
断言能力
通过assertUndefined()判断被检验的值是否为undefined,并使用assertEqual()检验实际值是否符合预期值。
it('inputAccountLength', 0, () => {
  let inputAccountLength = CommonConstants.INPUT_ACCOUNT_LENGTH;
  // Check if INPUT_ACCOUNT_LENGTH is not undefined.
  expect(inputAccountLength).not().assertUndefined();
  expect(inputAccountLength).assertEqual(11);
})
检验mainViewModel类中自定义函数返回值的长度及数据类型是否符合预期。
it('getFirstGridData', 0, () => { const firstGridData = mainViewModel.getFirstGridData(); // Verify if the return value of getFirstGridData is eight. expect(firstGridData.length).assertEqual(8); // Verify if the type of firstGridData[0] is 'ItemData'. expect(firstGridData[0] instanceof ItemData).assertTrue(); }) -
Mock能力
对mainViewModel类中的getSwiperImages()函数进行Mock,并设置函数被Mock后的返回值。用例执行完毕后,恢复被Mock对象的实例。
it('getSwiperImages', 0, () => { const swiperImages = mainViewModel.getSwiperImages(); expect(swiperImages).assertInstanceOf('Array'); expect(swiperImages.length).assertEqual(4); // Mock the getSwiperImages function of the mainViewModel class. let mocker = new MockKit(); let getSwiperImages = mocker.mockFunc(mainViewModel, mainViewModel.getSwiperImages); // The result '[]' is returned when the function is called with any arguments passed in. when(getSwiperImages)(ArgumentMatchers.any).afterReturn([]); expect(mainViewModel.getSwiperImages()).assertInstanceOf('Array'); expect(mainViewModel.getSwiperImages().length).assertEqual(0); // Restore the mocked object instances. mocker.clear(mainViewModel); // Verify if the mocked object instances is restored. expect(mainViewModel.getSwiperImages().length).assertEqual(4); }) -
数据驱动
数据驱动需要使用Ability能力,可参考自定义Ability和Resources。文件内容示例可在运行测试用例后,在对应模块的build/{productName}/intermediates/src/ohosTest下查看。
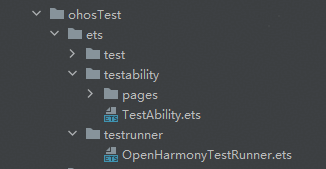
定义Ability后需要在module.json5文件中补充配置字段mainElement、pages和abilities。关于字段的具体说明,请参考module.json5配置文件。
{
  "module": {
    "name": "entry_test",
    "type": "feature",
    "description": "$string:module_test_desc",
    "mainElement": "TestAbility",            // Corresponds to the ability name in the abilities section below.
    "deviceTypes": [
      "phone"
    ],
    "deliveryWithInstall": true,
    "installationFree": false,
    "pages": "$profile:test_pages",          // Corresponds to the test_pages.json file under resources > base > profile.
    "abilities": [                           // Configuration of the ability to add.
      {
        "name": "TestAbility",
        "srcEntry": "./ets/testability/TestAbility.ets",
        "description": "$string:TestAbility_desc",
        "icon": "$media:icon",
        "label": "$string:TestAbility_label",
        "exported": true,
        "startWindowIcon": "$media:icon",
        "startWindowBackground": "$color:start_window_background"
      }
    ]
  }
}
数据驱动能力依据测试数据配置,驱动测试用例的执行次数及每次执行时的参数传递,使用时依赖data.json配置文件。
{
  "suites": [
    {
      "describe": [
        "MainViewModelTest"
      ],
      "stress": 1,
      "items": [
        {
          "it": "testDataDriverAsync",
          "stress": 2,
          "params": [
            {
              "name": "tom",
              "value": 5
            },
            {
              "name": "jerry",
              "value": 4
            }
          ]
        },
        {
          "it": "testDataDriver",
          "stress": 3
        }
      ]
    }
  ]
}
Stage模型在测试工程中的TestAbility目录下TestAbility.ets文件中导入data.json,并在文件中的Hypium.hypiumTest()函数执行前设置参数数据。
export default class TestAbility extends UIAbility {
  abilityDelegator: abilityDelegatorRegistry.AbilityDelegator;

  constructor() {
    super();
    this.abilityDelegator = abilityDelegatorRegistry.getAbilityDelegator();
  }

  onCreate(want: Want, launchParam: AbilityConstant.LaunchParam) {
    hilog.info(0x0000, 'testTag', '%{public}s', 'TestAbility onCreate');
    hilog.info(0x0000, 'testTag', '%{public}s', 'want param:' + JSON.stringify(want) ?? '');
    hilog.info(0x0000, 'testTag', '%{public}s', 'launchParam:' + JSON.stringify(launchParam) ?? '');
    let abilityDelegatorArguments: abilityDelegatorRegistry.AbilityDelegatorArgs;
    abilityDelegatorArguments = abilityDelegatorRegistry.getArguments();
    hilog.info(0x0000, 'testTag', '%{public}s', 'start run testcase!!!');
    // Set the data before Hypium.hypiumTest() is executed.
    Hypium.setData(data);
    Hypium.hypiumTest(this.abilityDelegator, abilityDelegatorArguments, testsuite);
  }

  // ...
}
在data.json文件配置的测试套(MainViewModelTest)中定义测试用例,测试用例名称应与配置文件中items下的it名称一致。
interface ParmObj {
  name: string,
  value: number
}

export default function MainViewModelTest() {
  describe('MainViewModelTest', () => {
    // ...
    it('testDataDriverAsync', 0, async (done: Function, data: ParmObj) => {
      // Use data object to receive parameters passed from data.json.
      hilog.info(0x0000, 'testTag', '%{public}s', `name: ${data.name}`);
      hilog.info(0x0000, 'testTag', '%{public}s', `value: ${data.value}`);
      // The name passed in data.json is either 'tom' or 'jerry'.
      expect(data.name === 'tom' || data.name === 'jerry').assertTrue();
      // Check if the actual value and the expected value '4' are within the allowable error range '1'.
      expect(data.value).assertClose(4, 1);
      done();
    });
    // ...
  })
}
-
-
编写UI测试用例
在UI测试中,开发者可以利用UiTest接口模拟点击、双击、长按、滑动等操作,以验证应用程序中的UI行为。
-
模拟文本输入
通过On对象匹配目标控件,然后使用inputText()模拟文本输入。
it('accountInputText', TestType.FUNCTION, async () => { let driver = Driver.create(); // Match TextInput component by id. let on = ON.id('account'); let accountInput = await driver.findComponent(on); await accountInput.inputText('123456'); let account = await accountInput.getText(); expect(account).assertEqual('123456'); }) -
模拟触摸屏手指操作
使用click()模拟触摸屏手指操作以收起键盘,然后通过findComponent()查找Button控件,点击该按钮进行登录操作。
it('loginButton', TestType.FUNCTION, async () => { let driver = Driver.create(); // Click the location of the confirm button in the input method to collapse the input method. await driver.click(1196, 2511); await driver.waitForIdle(2000, 3000); // Check if the button is displayed. let loginButton = await driver.findComponent(ON.type('Button')); await loginButton.click(); // Wait the application for loading to the main page. await driver.waitForIdle(4000, 5000); })等待Swiper控件加载完成后,使用swipe()模拟触摸屏手指滑动。
it('swiper', TestType.FUNCTION, async () => { let driver = Driver.create(); // Wait the Swiper component for displaying in the current page. await driver.waitForComponent(ON.type('Swiper'), 2000); // Check if the Swiper component exists. await driver.assertComponentExist(ON.type('Swiper')); await driver.waitForIdle(1000, 2000); // Swipe the carousel from right to left. await driver.swipe(1100, 700, 100, 700, 3000); // Wait for the swipe operation to complete. await driver.waitForIdle(1000, 2000); await driver.swipe(1100, 700, 100, 700, 3000); await driver.waitForIdle(1000, 2000); }) -
页面加载等待
使用swipe()切换页面后,通过waitForIdle()和waitForComponent()等待Toggle控件出现来判断页面跳转是否完成。
it('setting', TestType.FUNCTION, async () => {
  let driver = Driver.create();
  await driver.swipe(1100, 1500, 100, 1500, 3000);
  await driver.waitForIdle(1000, 2000);
  // Match the Toggle component in the ListItem component.
  let on = ON.type('Toggle').within(ON.type('ListItem'));
  await driver.waitForComponent(on, 2000);
  await driver.assertComponentExist(on);
  // ...
})
-
-
执行测试脚本
连接目标测试设备(如手机)或模拟器后,在DevEco Studio页面点击对应按钮,或通过命令行执行测试脚本。详细可参考DevEco Studio执行测试脚本和命令行执行测试脚本。
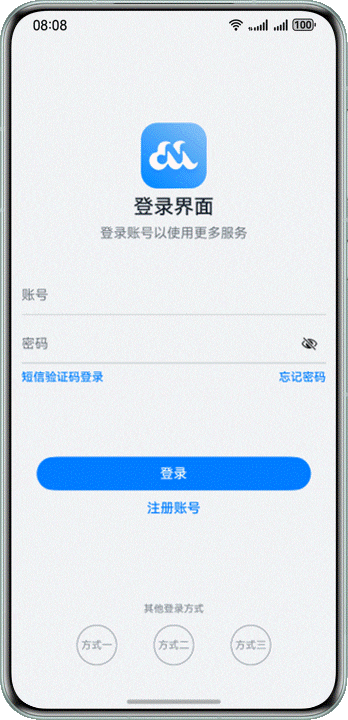
实现效果
自动化测试实现效果如下图所示:

讨论HarmonyOS开发技术,专注于API与组件、DevEco Studio、测试、元服务和应用上架分发等。
更多推荐


 7
7 0
0- 0


 已为社区贡献91条内容

所有评论(0)