HarmonyOS NEXT 密码生成器开发:手把手教你从0到1
·
HarmonyOS NEXT 密码生成器开发:手把手教你从0到1
前言
如果你想学习鸿蒙开发,但不知道从哪里开始,这篇文章就是为你准备的。我们将一起开发一个完整的密码生成器应用,涵盖项目创建、UI搭建、业务逻辑、调试发布全流程。
第一步:创建项目
1.1 打开DevEco Studio
启动DevEco Studio,选择 File → New → Create Project。
1.2 选择模板
在模板选择界面,选择 Empty Ability:
这个模板会生成最基础的项目结构,适合从零开始构建应用。
1.3 填写项目信息
| 配置项 | 值 |
|---|---|
| Project name | MyApplication |
| Bundle name | com.example.myapplication |
| Compile SDK | API 12 (HarmonyOS NEXT) |
| Model | Stage |
点击 Finish 完成创建。
1.4 等待项目同步
首次创建项目会下载依赖,需要等待几分钟。底部状态栏显示"BUILD SUCCESSFUL"后即可开始开发。
第二步:理解项目结构
项目创建完成后,你会看到以下目录结构:
MyApplication/
├── AppScope/                      # 应用级配置
│   ├── app.json5                 # 应用配置文件
│   └── resources/                # 全局资源
│       └── base/
│           ├── element/          # 字符串资源
│           │   └── string.json
│           └── media/            # 图片资源
│
├── entry/                         # 主模块
│   ├── src/main/
│   │   ├── ets/                  # ArkTS源码
│   │   │   ├── entryability/
│   │   │   │   └── EntryAbility.ets  # 应用入口
│   │   │   └── pages/
│   │   │       └── Index.ets         # 主页面 ⭐
│   │   ├── resources/            # 模块资源
│   │   │   └── base/
│   │   │       ├── element/
│   │   │       │   ├── color.json    # 颜色定义
│   │   │       │   └── string.json   # 字符串定义
│   │   │       └── media/            # 图片资源
│   │   └── module.json5          # 模块配置
│   └── build-profile.json5       # 构建配置
│
├── build-profile.json5            # 项目构建配置
├── hvigorfile.ts                  # 构建脚本
└── oh-package.json5               # 依赖管理
关键文件说明
| 文件 | 作用 | 类比Android |
|---|---|---|
app.json5 | 应用全局配置 | AndroidManifest.xml |
module.json5 | 模块配置 | build.gradle |
EntryAbility.ets | 应用入口类 | Application |
Index.ets | 主页面 | MainActivity |
开发重点:90%的代码都在 Index.ets 中编写。
第三步:设计UI布局
3.1 整体布局结构
我们采用纵向布局(Column),从上到下依次是:
Column
├── 标题区
├── 密码显示区
├── 长度调节区
├── 字符类型选择区
└── 操作按钮区
3.2 定义状态变量
打开 Index.ets,在 struct Index 中定义状态:
@Entry
@Component
struct Index {
  // 密码相关
  @State password: string = '点击生成';
  @State passwordLength: number = 12;

  // 字符类型开关
  @State hasUpper: boolean = true;
  @State hasLower: boolean = true;
  @State hasNumber: boolean = true;
  @State hasSymbol: boolean = false;

  // UI状态
  @State showCopyTip: boolean = false;

  // 字符集常量
  readonly upperChars: string = 'ABCDEFGHIJKLMNOPQRSTUVWXYZ';
  readonly lowerChars: string = 'abcdefghijklmnopqrstuvwxyz';
  readonly numberChars: string = '0123456789';
  readonly symbolChars: string = '!@#$%^&*()_+-=[]{}|;:,.<>?';
}
知识点:
@State:状态装饰器,变量变化时UI自动刷新readonly:只读常量,防止意外修改
3.3 标题区实现
build() {
  Column() {
    // 标题
    Text('🔐 密码生成器')
      .fontSize(26)
      .fontWeight(FontWeight.Bold)
      .fontColor('#1C1C1E')
      .margin({ top: 30, bottom: 4 })

    // 副标题
    Text('生成高强度随机密码')
      .fontSize(14)
      .fontColor('#8E8E93')
      .margin({ bottom: 24 })

    // ... 其他组件
  }
  .width('100%')
  .height('100%')
  .backgroundColor('#FFFFFF')
  .padding(20)
  .alignItems(HorizontalAlign.Center)
}
样式说明:
#1C1C1E:iOS标准深灰色#8E8E93:iOS标准浅灰色margin:外边距,{ top: 30, bottom: 4 }表示上边距30,下边距4
3.4 密码显示区
Column() {
  Text(this.password)
    .fontSize(20)
    .fontWeight(FontWeight.Bold)
    .fontColor('#1C1C1E')
    .textAlign(TextAlign.Center)
    .lineHeight(28)
    .width('100%')

  // 强度指示条(条件渲染)
  if (this.password !== '点击生成' && !this.password.startsWith('⚠️')) {
    Row() {
      Row() {
        Text(this.getStrengthText())
          .fontSize(12)
          .fontColor('#FFFFFF')
          .fontWeight(FontWeight.Bold)
      }
      .width(this.getStrengthWidth() + 20)
      .height(22)
      .backgroundColor(this.getStrengthColor())
      .borderRadius(11)
      .justifyContent(FlexAlign.Center)
      .margin({ top: 8 })
    }
    .width('100%')
    .justifyContent(FlexAlign.Center)
  }

  // 复制提示
  if (this.showCopyTip) {
    Text('✓ 已复制到剪贴板')
      .fontSize(12)
      .fontColor('#34C759')
      .margin({ top: 4 })
  }
}
.width('100%')
.padding(20)
.backgroundColor('#F2F2F7')
.borderRadius(16)
.margin({ bottom: 24 })
关键点:
- 条件渲染:
if (condition) { Component },条件为真时才渲染 - 嵌套布局:Row里套Row,实现居中的强度指示条
3.5 长度调节区
Text('密码长度')
  .fontSize(15)
  .fontWeight(FontWeight.Medium)
  .fontColor('#1C1C1E')
  .margin({ bottom: 8 })

Row() {
  Button('-')
    .type(ButtonType.Circle)
    .width(36)
    .height(36)
    .backgroundColor('#007AFF')
    .fontSize(22)
    .fontWeight(FontWeight.Bold)
    .onClick(() => {
      if (this.passwordLength > 4) this.passwordLength--;
    })

  Text(`${this.passwordLength}`)
    .fontSize(28)
    .fontWeight(FontWeight.Bold)
    .fontColor('#1C1C1E')
    .textAlign(TextAlign.Center)
    .width(60)

  Button('+')
    .type(ButtonType.Circle)
    .width(36)
    .height(36)
    .backgroundColor('#007AFF')
    .fontSize(22)
    .fontWeight(FontWeight.Bold)
    .onClick(() => {
      if (this.passwordLength < 24) this.passwordLength++;
    })
}
.width('100%')
.justifyContent(FlexAlign.Center)
.alignItems(VerticalAlign.Center)
.margin({ bottom: 20 })
交互逻辑:
- 点击
-按钮:长度减1,最小为4 - 点击
+按钮:长度加1,最大为24
3.6 字符类型选择区
Text('字符类型')
  .fontSize(15)
  .fontWeight(FontWeight.Medium)
  .fontColor('#1C1C1E')
  .margin({ bottom: 8 })

Column({ space: 10 }) {
  // 大写字母
  Row() {
    Text('A-Z').fontSize(16).fontColor('#1C1C1E')
    Blank()
    Toggle({ type: ToggleType.Switch, isOn: this.hasUpper })
      .selectedColor('#34C759')
      .onChange((value: boolean) => {
        this.hasUpper = value;
      })
  }
  .width('100%')

  // 小写字母
  Row() {
    Text('a-z').fontSize(16).fontColor('#1C1C1E')
    Blank()
    Toggle({ type: ToggleType.Switch, isOn: this.hasLower })
      .selectedColor('#34C759')
      .onChange((value: boolean) => {
        this.hasLower = value;
      })
  }
  .width('100%')

  // 数字
  Row() {
    Text('0-9').fontSize(16).fontColor('#1C1C1E')
    Blank()
    Toggle({ type: ToggleType.Switch, isOn: this.hasNumber })
      .selectedColor('#34C759')
      .onChange((value: boolean) => {
        this.hasNumber = value;
      })
  }
  .width('100%')

  // 特殊符号
  Row() {
    Text('!@#$%').fontSize(16).fontColor('#1C1C1E')
    Blank()
    Toggle({ type: ToggleType.Switch, isOn: this.hasSymbol })
      .selectedColor('#34C759')
      .onChange((value: boolean) => {
        this.hasSymbol = value;
      })
  }
  .width('100%')
}
.padding(16)
.backgroundColor('#F2F2F7')
.borderRadius(16)
.margin({ bottom: 24 })
Toggle组件:
type: ToggleType.Switch:开关样式isOn:绑定状态变量selectedColor:选中时的颜色onChange:状态变化回调
3.7 操作按钮
Button('🔄 生成密码')
  .type(ButtonType.Capsule)
  .width(240)
  .height(52)
  .backgroundColor('#007AFF')
  .fontSize(18)
  .fontWeight(FontWeight.Bold)
  .onClick(() => {
    this.generatePassword();
  })

Button('📋 复制密码')
  .type(ButtonType.Capsule)
  .width(240)
  .height(44)
  .backgroundColor('#34C759')
  .fontSize(16)
  .fontWeight(FontWeight.Medium)
  .margin({ top: 10 })
  .onClick(() => {
    this.copyPassword();
  })
第四步:实现业务逻辑
4.1 密码生成
generatePassword(): void {
  // 1. 组装字符池
  let chars: string = '';
  if (this.hasUpper) chars += this.upperChars;
  if (this.hasLower) chars += this.lowerChars;
  if (this.hasNumber) chars += this.numberChars;
  if (this.hasSymbol) chars += this.symbolChars;

  // 2. 校验
  if (chars.length === 0) {
    this.password = '⚠️ 请选择至少一种字符类型';
    return;
  }

  // 3. 随机生成
  let result: string = '';
  for (let i: number = 0; i < this.passwordLength; i++) {
    const randomIndex: number = Math.floor(Math.random() * chars.length);
    result += chars[randomIndex];
  }
  this.password = result;
  this.showCopyTip = false;
}
4.2 密码强度检测
getStrengthLevel(): string {
  let types: number = 0;
  if (this.hasUpper) types++;
  if (this.hasLower) types++;
  if (this.hasNumber) types++;
  if (this.hasSymbol) types++;

  if (this.passwordLength >= 16 && types >= 3) return 'strong';
  if (this.passwordLength >= 10 && types >= 2) return 'medium';
  return 'weak';
}

getStrengthText(): string {
  const level = this.getStrengthLevel();
  if (level === 'strong') return '🔒 强';
  if (level === 'medium') return '🔐 中';
  return '🔓 弱';
}

getStrengthColor(): string {
  const level = this.getStrengthLevel();
  if (level === 'strong') return '#34C759';
  if (level === 'medium') return '#FF9500';
  return '#FF3B30';
}

getStrengthWidth(): number {
  const level = this.getStrengthLevel();
  if (level === 'strong') return 100;
  if (level === 'medium') return 60;
  return 30;
}
4.3 复制功能
copyPassword(): void {
  if (this.password === '' ||
      this.password === '点击生成' ||
      this.password.startsWith('⚠️')) {
    return;
  }
  this.showCopyTip = true;
  const timer = setTimeout(() => {
    this.showCopyTip = false;
    clearTimeout(timer);
  }, 2000);
}
第五步:配置资源文件
5.1 字符串资源
修改 entry/src/main/resources/base/element/string.json:
{
  "string": [
    {
      "name": "module_desc",
      "value": "密码生成器"
    },
    {
      "name": "EntryAbility_desc",
      "value": "生成高强度随机密码"
    },
    {
      "name": "EntryAbility_label",
      "value": "密码生成器"
    }
  ]
}
5.2 颜色资源
修改 entry/src/main/resources/base/element/color.json:
{
  "color": [
    {
      "name": "start_window_background",
      "value": "#FFFFFF"
    }
  ]
}
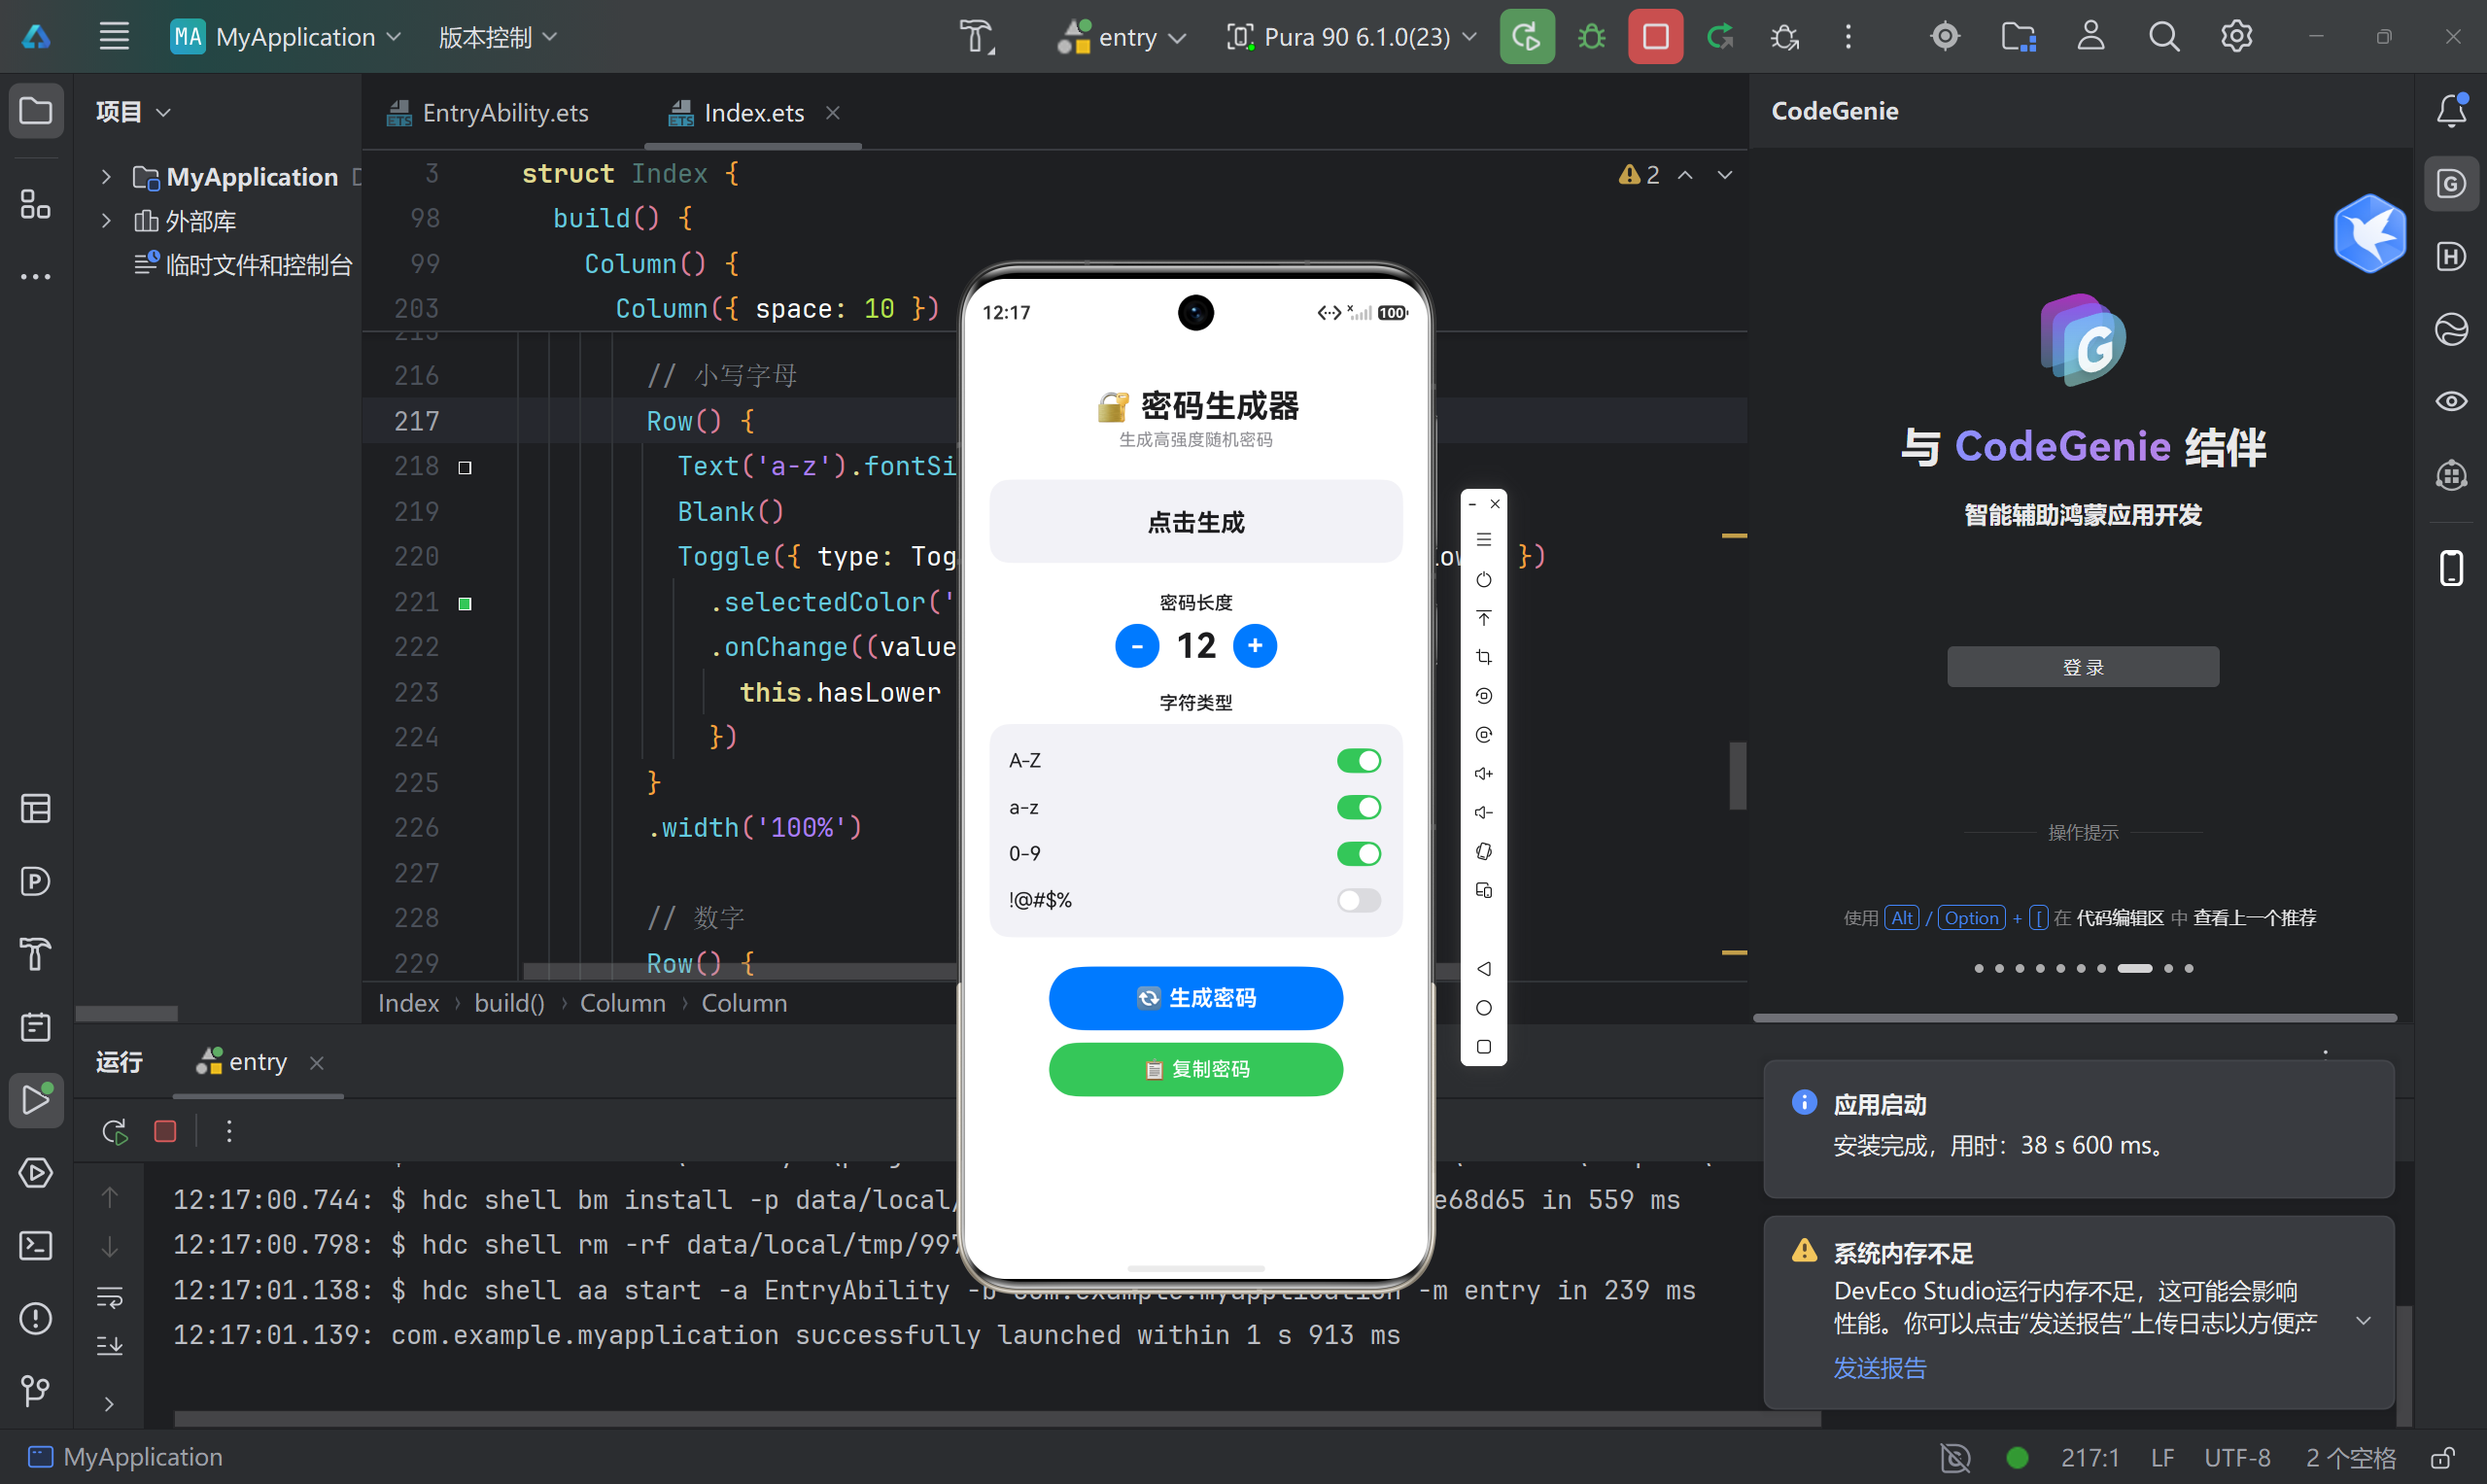
第六步:运行测试
第七步:常见问题解决
问题1:Toggle状态不更新
原因:onChange中没有正确更新状态变量
解决:
Toggle({ type: ToggleType.Switch, isOn: this.hasUpper })
  .onChange((value: boolean) => {
    this.hasUpper = value;  // 必须更新
  })
问题2:强度指示条不显示
原因:条件判断不完整
解决:
if (this.password !== '点击生成' && !this.password.startsWith('⚠️')) {
  // 渲染强度指示条
}
问题3:按钮样式不一致
原因:没有显式指定按钮类型
解决:
Button('生成密码')
  .type(ButtonType.Capsule)  // 统一使用胶囊样式
问题4:应用崩溃
原因:空值校验缺失
解决:
if (chars.length === 0) {
  this.password = '⚠️ 请选择至少一种字符类型';
  return;  // 提前返回
}
总结
知识点回顾
| 类别 | 知识点 | 使用场景 |
|---|---|---|
| 状态管理 | @State | 密码、长度、开关等响应式数据 |
| 布局容器 | Column/Row | 纵向/横向布局 |
| 基础组件 | Text/Button/Toggle | UI元素 |
| 交互处理 | onClick/onChange | 用户操作响应 |
| 条件渲染 | if语句 | 动态显示组件 |
项目亮点
- ✅ 单文件实现全部功能(约200行代码)
- ✅ 完整的密码生成逻辑
- ✅ 实时强度检测
- ✅ 美观的iOS风格UI
- ✅ 完善的错误处理
进阶方向
- 持久化存储:保存用户偏好设置
- 密码历史:记录生成过的密码
- 加密随机数:使用
@ohos.crypto提升安全性 - 暗黑模式:适配系统深色主题
完整代码已上传,有问题欢迎评论区讨论!

讨论HarmonyOS开发技术,专注于API与组件、DevEco Studio、测试、元服务和应用上架分发等。
更多推荐

 24
24 0
0- 0


 已为社区贡献52条内容

所有评论(0)