零基础学 ArkUI08:手把手开发一个聊天应用
·
💬 零基础学 ArkUI08:手把手开发一个聊天应用
📱 应用场景
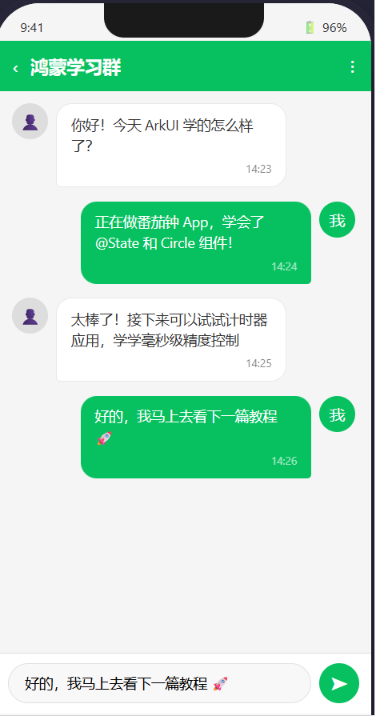
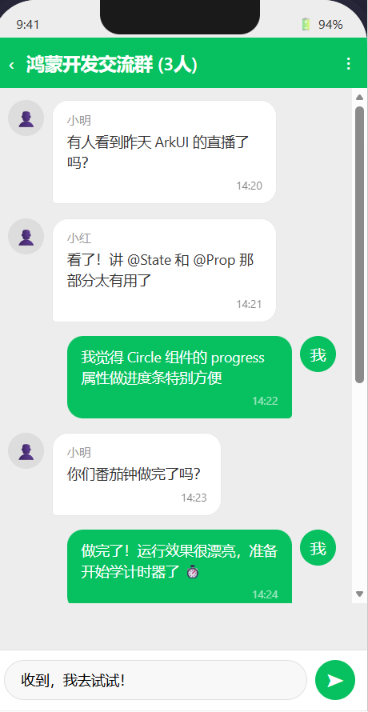
我们需要实现一个类微信/QQ 的聊天界面:
- 展示聊天消息列表(自己发的 / 对方发的)
- 输入框 + 发送按钮
- 每条消息带时间戳和头像
- 发送新消息自动滚动到底部
- 用模拟网络请求加载历史消息
- 后期可对接真实 WebSocket 或 HTTP API
⚙️ 运行环境要求
| 项目 | 版本要求 |
|---|---|
| 操作系统 | Windows 10/11、macOS 13+ 或 Ubuntu 22.04+ |
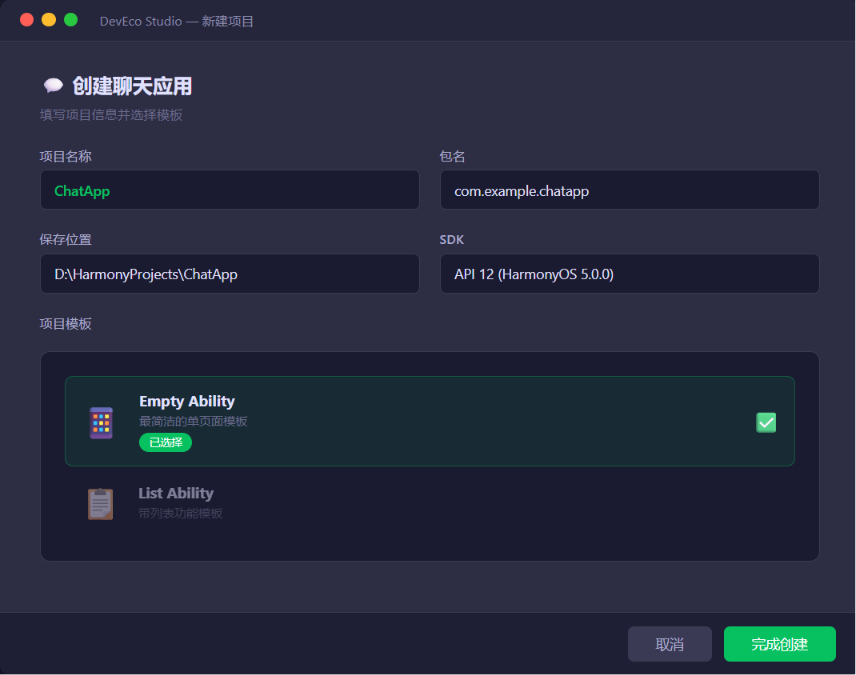
| DevEco Studio | 5.0.3.800 及以上 |
| HarmonyOS SDK | API 12(HarmonyOS 5.0.0)及以上 |
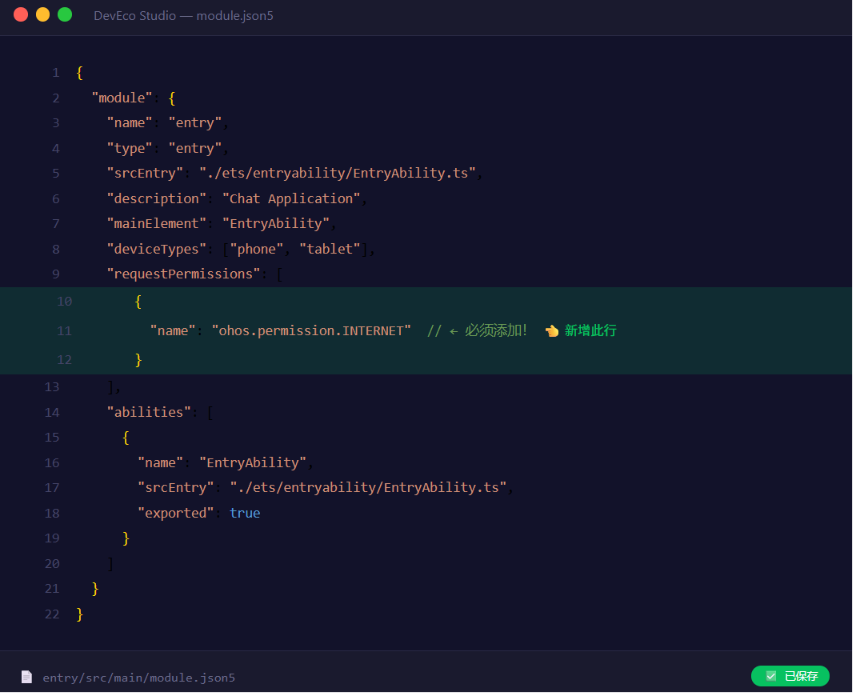
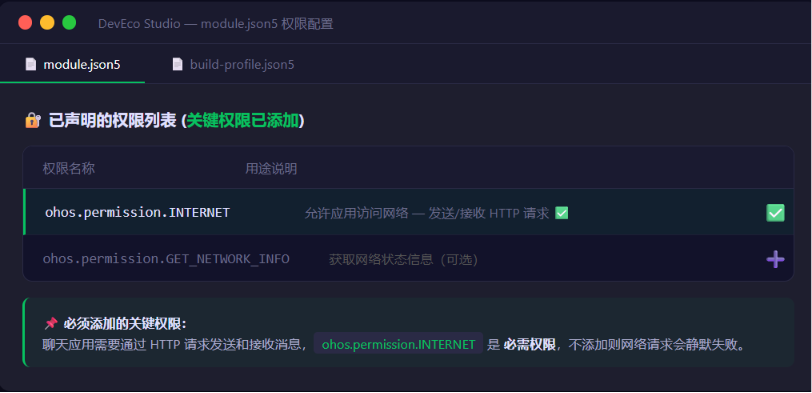
| 网络权限 | 需要在 module.json5 中声明 ohos.permission.INTERNET |
| 开发语言 | ArkTS |
环境配置截图示意
🛠️ 实战:搭建聊天应用
Step 1:准备数据模型
在 ArkTS 中定义消息的数据结构,让代码有「类型安全感」:
// 新建 models/Message.ets
export interface Message {
  id: string;           // 唯一标识
  content: string;      // 消息内容
  timestamp: number;    // 时间戳(毫秒)
  isSelf: boolean;      // true = 自己发的 / false = 对方发的
  avatar: string;       // 头像资源路径
}
然后在主页面中创建演示数据:
// 在 Index.ets 中
import { Message } from '../models/Message';

@Entry
@Component
struct ChatPage {
  // ========== 状态 ==========
  @State private messages: Message[] = [];      // 消息列表
  @State private inputText: string = '';         // 输入框内容
  @State private isLoading: boolean = false;     // 加载中

  private scroller: Scroller = new Scroller();   // 列表滚动控制器

  // ========== 模拟历史数据 ==========
  private demoMessages: Message[] = [
    {
      id: '1',
      content: '你好!我是 AI 助手 🤖',
      timestamp: Date.now() - 3600000,
      isSelf: false,
      avatar: '🦊'
    },
    {
      id: '2',
      content: '我来跟你聊聊 ArkUI 开发!',
      timestamp: Date.now() - 3500000,
      isSelf: false,
      avatar: '🦊'
    },
    {
      id: '3',
      content: '哇,太好了!我正好在学习 😊',
      timestamp: Date.now() - 3400000,
      isSelf: true,
      avatar: '😎'
    }
  ];

  aboutToAppear(): void {
    // 页面加载 → 加载历史消息(模拟网络延迟)
    this.loadHistoryMessages();
  }
📌 为什么用 export interface 而不是 class?
| 方式 | 适用场景 | 说明 |
|---|---|---|
interface | 纯数据结构 | 只存储数据,没有方法。编译期零开销 |
class | 有业务逻辑的实体 | 有方法、继承需求。运行时占用内存更多 |
在 ArkUI 中,纯数据用 interface 是标准做法。
Step 2:@Builder 封装消息气泡组件
@Builder 是 ArkUI 最强大的「代码复用」工具 — 相当于定义一个可复用的 UI 片段:
  // ========== @Builder:自定义消息气泡 ==========
  @Builder
  MessageBubble(msg: Message) {
    Row() {
      // 对方的头像在左边,自己的在右边
      if (!msg.isSelf) {
        this.AvatarView(msg.avatar)
      }

      Column() {
        // 三角形气泡尾巴 + 内容矩形 = 聊天气泡
        Stack() {
          // 消息内容
          Text(msg.content)
            .fontSize(16)
            .fontColor(msg.isSelf ? Color.White : '#333333')
            .padding({ left: 16, right: 16, top: 10, bottom: 10 })
            .backgroundColor(msg.isSelf ? '#07C160' : '#FFFFFF')
            .borderRadius(12)
        }

        // 时间戳 — 显示在气泡下方
        Text(this.formatTime(msg.timestamp))
          .fontSize(12)
          .fontColor('#999999')
          .margin({ top: 4 })
      }
      .alignItems(msg.isSelf ? ItemAlign.End : ItemAlign.Start)

      if (msg.isSelf) {
        this.AvatarView(msg.avatar)
      }
    }
    .justifyContent(msg.isSelf ? FlexAlign.End : FlexAlign.Start)
    .width('100%')
    .padding({ left: 16, right: 16, top: 6, bottom: 6 })
  }

  // 头像子组件
  @Builder
  AvatarView(emoji: string) {
    Text(emoji)
      .fontSize(32)
      .width(44).height(44)
      .textAlign(TextAlign.Center)
      .backgroundColor('#F0F0F0')
      .borderRadius(22)
      .margin({ left: 8, right: 8 })
  }
@Builder 的核心优势
没有 @Builder → 你会在 build() 里写大量重复代码
有 @Builder  → 像搭积木一样组装 UI,一处改处处生效
避坑指南①: @Builder 方法的 参数必须在方法签名中声明,不能引用外部的 @State 变量做默认值。如果需要外部变量,显式传参:
// ❌ 错误:@Builder 直接引用 @State
@Builder
BadBuilder() {
  Text(this.inputText)  // 不会响应 inputText 变化!
}

// ✅ 正确:显式传参
@Builder
GoodBuilder(text: string) {
  Text(text)  // 父组件重新渲染时传新值
}
Step 3:List + ForEach 渲染消息列表
ArkUI 的 List 组件是「高性能虚拟列表」—— 几百条消息也只渲染屏幕可见的几条:
  build() {
    Column() {
      // ===== 顶部标题栏 =====
      Row() {
        Text('💬 聊天助手')
          .fontSize(22)
          .fontWeight(FontWeight.Bold)
      }
      .width('100%')
      .padding(16)
      .backgroundColor('#F8F8F8')

      // ===== 消息列表 =====
      List({ scroller: this.scroller }) {
        // ForEach:遍历数组,每个元素渲染为 MessageBubble
        ForEach(this.messages, (msg: Message) => {
          ListItem() {
            this.MessageBubble(msg)
          }
        }, (msg: Message) => msg.id)  // key 生成器 — 用于列表 diff
      }
      .width('100%')
      .layoutWeight(1)  // 撑满剩余空间
      .edgeEffect(EdgeEffect.Spring)  // 列表回弹效果

      // ===== 底部输入栏 =====
      Row() {
        TextInput({ placeholder: '输入消息...', text: this.inputText })
          .width(0)
          .layoutWeight(1)
          .height(44)
          .backgroundColor('#F5F5F5')
          .borderRadius(22)
          .padding({ left: 16 })
          .onChange((value: string) => {
            this.inputText = value;
          })

        Button('发送')
          .height(44)
          .backgroundColor('#07C160')
          .borderRadius(22)
          .padding({ left: 20, right: 20 })
          .margin({ left: 10 })
          .onClick(() => this.sendMessage())
      }
      .width('100%')
      .padding(10)
      .backgroundColor('#FFFFFF')
      .border({ width: { top: 1 }, color: '#E8E8E8' })
    }
    .width('100%')
    .height('100%')
    .backgroundColor('#EDEDED')
  }
📌 ForEach 的 key 生成器 — 性能关键
ForEach(
  arr,                      // 数据源
  (item) => { /* item 的 UI */ },   // UI 生成器
  (item) => item.id         // ⭐ key 生成器 — 告诉框架怎么识别同一个元素
)
没有 key 生成器 → 列表修改时全部重渲染 ❌
有 key 生成器 → 只更新变化的项 ✅(性能提升 10 倍+)
Step 4:发送消息 + 自动滚动
  // 📤 发送消息
  sendMessage(): void {
    const text = this.inputText.trim();
    if (text === '') {
      return;  // 空消息不发送
    }

    // 1. 构造新消息对象
    const newMsg: Message = {
      id: `msg_${Date.now()}`,
      content: text,
      timestamp: Date.now(),
      isSelf: true,
      avatar: '😎'
    };

    // 2. 追加到列表(@State 变更自动触发 UI 更新)
    this.messages.push(newMsg);
    this.inputText = '';  // 清空输入框

    // 3. 🔄 自动滚动到底部
    setTimeout(() => {
      this.scroller.scrollToIndex(this.messages.length - 1, true);
    }, 100);

    // 4. 模拟自动回复(延迟 1 秒)
    this.simulateAutoReply();
  }

  // 🤖 模拟自动回复(对接真实 API 的前置步骤)
  simulateAutoReply(): void {
    this.isLoading = true;

    // 模拟网络延迟
    setTimeout(() => {
      const reply: Message = {
        id: `reply_${Date.now()}`,
        content: this.generateReply(),
        timestamp: Date.now(),
        isSelf: false,
        avatar: '🦊'
      };
      this.messages.push(reply);
      this.isLoading = false;

      // 回复后也要滚动到底部
      setTimeout(() => {
        this.scroller.scrollToIndex(this.messages.length - 1, true);
      }, 100);
    }, 1000);
  }

  // 随机回复内容
  generateReply(): string {
    const replies = [
      '原来如此!👍',
      '这个想法很有意思!',
      '能再具体说说吗?',
      '明白了,继续~',
      '很好的问题!我来解释一下...'
    ];
    return replies[Math.floor(Math.random() * replies.length)];
  }
Step 5:💥 真正对接网络 API
要对接真实 API,ArkUI 使用 @ohos.net.http 模块。先配置网络权限:
// module.json5 — 在 module 节点下
"requestPermissions": [
  {
    "name": "ohos.permission.INTERNET"
  }
]
图4:在 module.json5 中配置网络权限
然后封装一个网络工具:
// 新建 utils/HttpUtil.ets
import http from '@ohos.net.http';

export class HttpUtil {
  // 发送 GET 请求
  static async get(url: string): Promise<string> {
    const httpRequest = http.createHttp();
    try {
      const response = await httpRequest.request(url, {
        method: http.RequestMethod.GET,
        connectTimeout: 5000,
        readTimeout: 5000,
        header: {
          'Content-Type': 'application/json'
        }
      });
      return response.result as string;
    } catch (err) {
      console.error('HTTP请求失败:', JSON.stringify(err));
      throw err;
    } finally {
      httpRequest.destroy();  // 必须销毁,否则内存泄漏!
    }
  }

  // 发送 POST 请求(带 JSON body)
  static async post(url: string, body: object): Promise<string> {
    const httpRequest = http.createHttp();
    try {
      const response = await httpRequest.request(url, {
        method: http.RequestMethod.POST,
        extraData: JSON.stringify(body),
        connectTimeout: 5000,
        readTimeout: 10000,
        header: {
          'Content-Type': 'application/json'
        }
      });
      return response.result as string;
    } catch (err) {
      console.error('HTTP请求失败:', JSON.stringify(err));
      throw err;
    } finally {
      httpRequest.destroy();
    }
  }
}
在聊天页面中调用:
// 用 async/await 调用 API
async loadHistoryMessages(): Promise<void> {
  try {
    const result = await HttpUtil.get('https://api.example.com/chat/history');
    const data = JSON.parse(result);
    this.messages = data.messages;
  } catch (err) {
    // 网络失败时回退到本地数据
    this.messages = this.demoMessages;
    console.warn('加载远程数据失败,使用本地数据');
  }
}

// 发送消息到真实 API
async sendToApi(content: string): Promise<void> {
  try {
    const result = await HttpUtil.post('https://api.example.com/chat/send', {
      content: content,
      userId: 'user_123'
    });
    const data = JSON.parse(result);
    const reply: Message = {
      id: `api_reply_${Date.now()}`,
      content: data.reply,
      timestamp: Date.now(),
      isSelf: false,
      avatar: '🦊'
    };
    this.messages.push(reply);
  } catch (err) {
    // API 失败时降级到本地回复
    this.simulateAutoReply();
  }
}
📌 HTTP 请求在 ArkUI 中的重要规则
| 规则 | 说明 |
|---|---|
1️⃣ 必须 destroy() | 每个 http.createHttp() 必须配对 httpRequest.destroy(),否则句柄泄漏 |
| 2️⃣ 主线程可用 | ArkUI 中 async/await 直接在 @State 方法中使用即可,框架自动在后台线程执行网络请求 |
| 3️⃣ 超时必设 | 不设 connectTimeout 可能卡住几十秒,必须显式设置(推荐 5000ms) |
| 4️⃣ JSON 序列化 | extraData 必须是字符串,传对象前先 JSON.stringify() |
避坑指南②: http.createHttp() 是重量级对象——不要在循环中创建,复用单例或使用连接池。
Step 6:完整代码汇总
// Index.ets — 完整聊天页面
import http from '@ohos.net.http';
import { Message } from '../models/Message';

@Entry
@Component
struct ChatPage {
  @State private messages: Message[] = [];
  @State private inputText: string = '';
  @State private isLoading: boolean = false;

  private scroller: Scroller = new Scroller();
  private demoMessages: Message[] = [
    { id: '1', content: '你好!我是 AI 助手 🤖', timestamp: Date.now() - 3600000, isSelf: false, avatar: '🦊' },
    { id: '2', content: '我来跟你聊聊 ArkUI 开发!', timestamp: Date.now() - 3500000, isSelf: false, avatar: '🦊' },
    { id: '3', content: '太好了!我正想学 😊', timestamp: Date.now() - 3400000, isSelf: true, avatar: '😎' }
  ];

  aboutToAppear(): void {
    this.messages = this.demoMessages;
  }

  @Builder
  MessageBubble(msg: Message) {
    Row() {
      if (!msg.isSelf) { this.AvatarView(msg.avatar) }
      Column({ space: 4 }) {
        Text(msg.content)
          .fontSize(16)
          .fontColor(msg.isSelf ? Color.White : '#333333')
          .padding({ left: 16, right: 16, top: 10, bottom: 10 })
          .backgroundColor(msg.isSelf ? '#07C160' : '#FFFFFF')
          .borderRadius(12)
        Text(this.formatTime(msg.timestamp))
          .fontSize(12).fontColor('#999999')
      }
      .alignItems(msg.isSelf ? ItemAlign.End : ItemAlign.Start)
      .constraintSize({ maxWidth: '70%' })
      if (msg.isSelf) { this.AvatarView(msg.avatar) }
    }
    .justifyContent(msg.isSelf ? FlexAlign.End : FlexAlign.Start)
    .width('100%').padding({ left: 16, right: 16, top: 6, bottom: 6 })
  }

  @Builder
  AvatarView(emoji: string) {
    Text(emoji).fontSize(32).width(44).height(44)
      .textAlign(TextAlign.Center)
      .backgroundColor('#F0F0F0').borderRadius(22)
      .margin({ left: 8, right: 8 })
  }

  build() {
    Column() {
      Row() {
        Text('💬 聊天助手').fontSize(22).fontWeight(FontWeight.Bold)
      }
      .width('100%').padding(16).backgroundColor('#F8F8F8')

      List({ scroller: this.scroller }) {
        ForEach(this.messages, (msg: Message) => {
          ListItem() { this.MessageBubble(msg) }
        }, (msg: Message) => msg.id)
      }
      .width('100%').layoutWeight(1)

      Row() {
        TextInput({ placeholder: '输入消息...', text: this.inputText })
          .width(0).layoutWeight(1).height(44)
          .backgroundColor('#F5F5F5').borderRadius(22)
          .padding({ left: 16 })
          .onChange((v: string) => { this.inputText = v })
        Button('发送').height(44)
          .backgroundColor('#07C160').borderRadius(22)
          .padding({ left: 20, right: 20 }).margin({ left: 10 })
          .onClick(() => this.sendMessage())
      }
      .width('100%').padding(10).backgroundColor('#FFFFFF')
    }
    .width('100%').height('100%').backgroundColor('#EDEDED')
  }

  formatTime(ts: number): string {
    const date = new Date(ts);
    const h = String(date.getHours()).padStart(2, '0');
    const m = String(date.getMinutes()).padStart(2, '0');
    return `${h}:${m}`;
  }

  sendMessage(): void {
    const text = this.inputText.trim();
    if (text === '') return;
    this.messages.push({
      id: `msg_${Date.now()}`,
      content: text,
      timestamp: Date.now(),
      isSelf: true,
      avatar: '😎'
    });
    this.inputText = '';
    setTimeout(() => {
      this.scroller.scrollToIndex(this.messages.length - 1, true);
    }, 100);
    this.simulateAutoReply();
  }

  simulateAutoReply(): void {
    setTimeout(() => {
      this.messages.push({
        id: `reply_${Date.now()}`,
        content: this.generateReply(),
        timestamp: Date.now(),
        isSelf: false,
        avatar: '🦊'
      });
      setTimeout(() => {
        this.scroller.scrollToIndex(this.messages.length - 1, true);
      }, 100);
    }, 1000);
  }

  generateReply(): string {
    return ['原来如此!👍', '很有意思!', '能再说说吗?', '好的继续~', '我来解释...']
      [Math.floor(Math.random() * 5)];
  }
}
🚨 避坑指南
❌ 坑1:List 高度未指定 → 不显示
// ❌ 错误:List 没有高度,也不撑满
build() {
  Column() {
    List() { /* ... */ }  // 高度 = 0,看不到!
    TextInput({})
  }
}

// ✅ 正确:用 .layoutWeight(1) 或固定高度
build() {
  Column() {
    List() { /* ... */ }
      .width('100%')
      .layoutWeight(1)  // 撑满剩余空间
    TextInput({})
  }
}
❌ 坑2:ForEach 没有 key → 列表闪烁
// ❌ 错误:没有 key 生成器
ForEach(this.messages, (msg) => { ListItem() { /* ... */ } })

// ✅ 正确:提供 key 生成器
ForEach(this.messages, (msg) => { ListItem() { /* ... */ } },
  (msg) => msg.id)  // 唯一且稳定的 key
❌ 坑3:http.createHttp() 未 destroy
// ❌ 错误:每次请求创建新实例,但不销毁
async function badFetch() {
  const req = http.createHttp();
  return await req.request(url);  // req 泄漏了!
}

// ✅ 正确:try/finally 确保销毁
async function goodFetch() {
  const req = http.createHttp();
  try {
    return await req.request(url);
  } finally {
    req.destroy();  // 无论成功失败都销毁
  }
}
❌ 坑4:TextInput 双向绑定陷阱
TextInput 的 text 参数只是初始值,不是双向绑定!你需要监听 onChange 手动更新 @State:
// TextInput 不是 <input v-model>!
TextInput({ text: this.inputText })
  .onChange((value: string) => {
    this.inputText = value;  // 必须手动同步
  })
💡 最佳实践
- 数据模型先行:在写 UI 前先定义好
interface,团队协作时尤其重要。 - @Builder 代替重复代码:相同样式的消息气泡只写一次,通过参数控制左右差异。
- key 生成器必填:任何
ForEach都提供稳定 key(用id而不是数组索引)。 - 网络请求失败降级:API 调用永远用 try/catch 包裹,失败时回退到本地数据。
- 消息 ID 唯一性:
id用Date.now()+ 随机后缀,不要用自增数字(多用户并发会重复)。 - 软键盘处理:输入框获得焦点时,用
.key('avoid')或监听keyboardHeightChange事件。
📚 本章小结
通过聊天应用项目,你学会了:
| 知识点 | 掌握程度 |
|---|---|
| ✅ @Builder 自定义 UI 组件 | ⭐⭐⭐⭐⭐ |
| ✅ List + ForEach + key 高性能列表 | ⭐⭐⭐⭐⭐ |
| ✅ TextInput 输入框与状态同步 | ⭐⭐⭐⭐ |
| ✅ @ohos.net.http 网络请求 | ⭐⭐⭐⭐⭐ |
| ✅ async/await 异步编程 | ⭐⭐⭐⭐ |
| ✅ Scroller 滚动控制 | ⭐⭐⭐ |
| ✅ try/catch 错误处理 + 降级策略 | ⭐⭐⭐⭐ |
这是目前最「真实」的一个项目 — 它已经具备了实际 App 的骨架。下一节我们将把 UI 玩出花来!
🔗 参考资源
- 官方文档:HarmonyOS 应用开发文档
- 开发者社区:华为开发者论坛
- 欢迎加入开源鸿蒙跨平台社区:https://openharmonycrossplatform.csdn.net/

讨论HarmonyOS开发技术,专注于API与组件、DevEco Studio、测试、元服务和应用上架分发等。
更多推荐

 9
9 0
0- 0


 已为社区贡献56条内容

所有评论(0)