鸿蒙PC用Electron框架_组合图表技术实现
欢迎加入开源鸿蒙PC社区:
https://harmonypc.csdn.net/
atomgit仓库地址: https://atomgit.com/m0_66062719/fl_char_tableshow
1. 概述
1.1 组合图表的概念与价值
组合图表是一种将两种或多种不同类型的图表融合在同一个坐标系中的可视化技术。这种图表类型解决了单一图表类型无法同时展示多种数据关系的问题,让用户能够在同一个视图中进行多维度的数据分析。
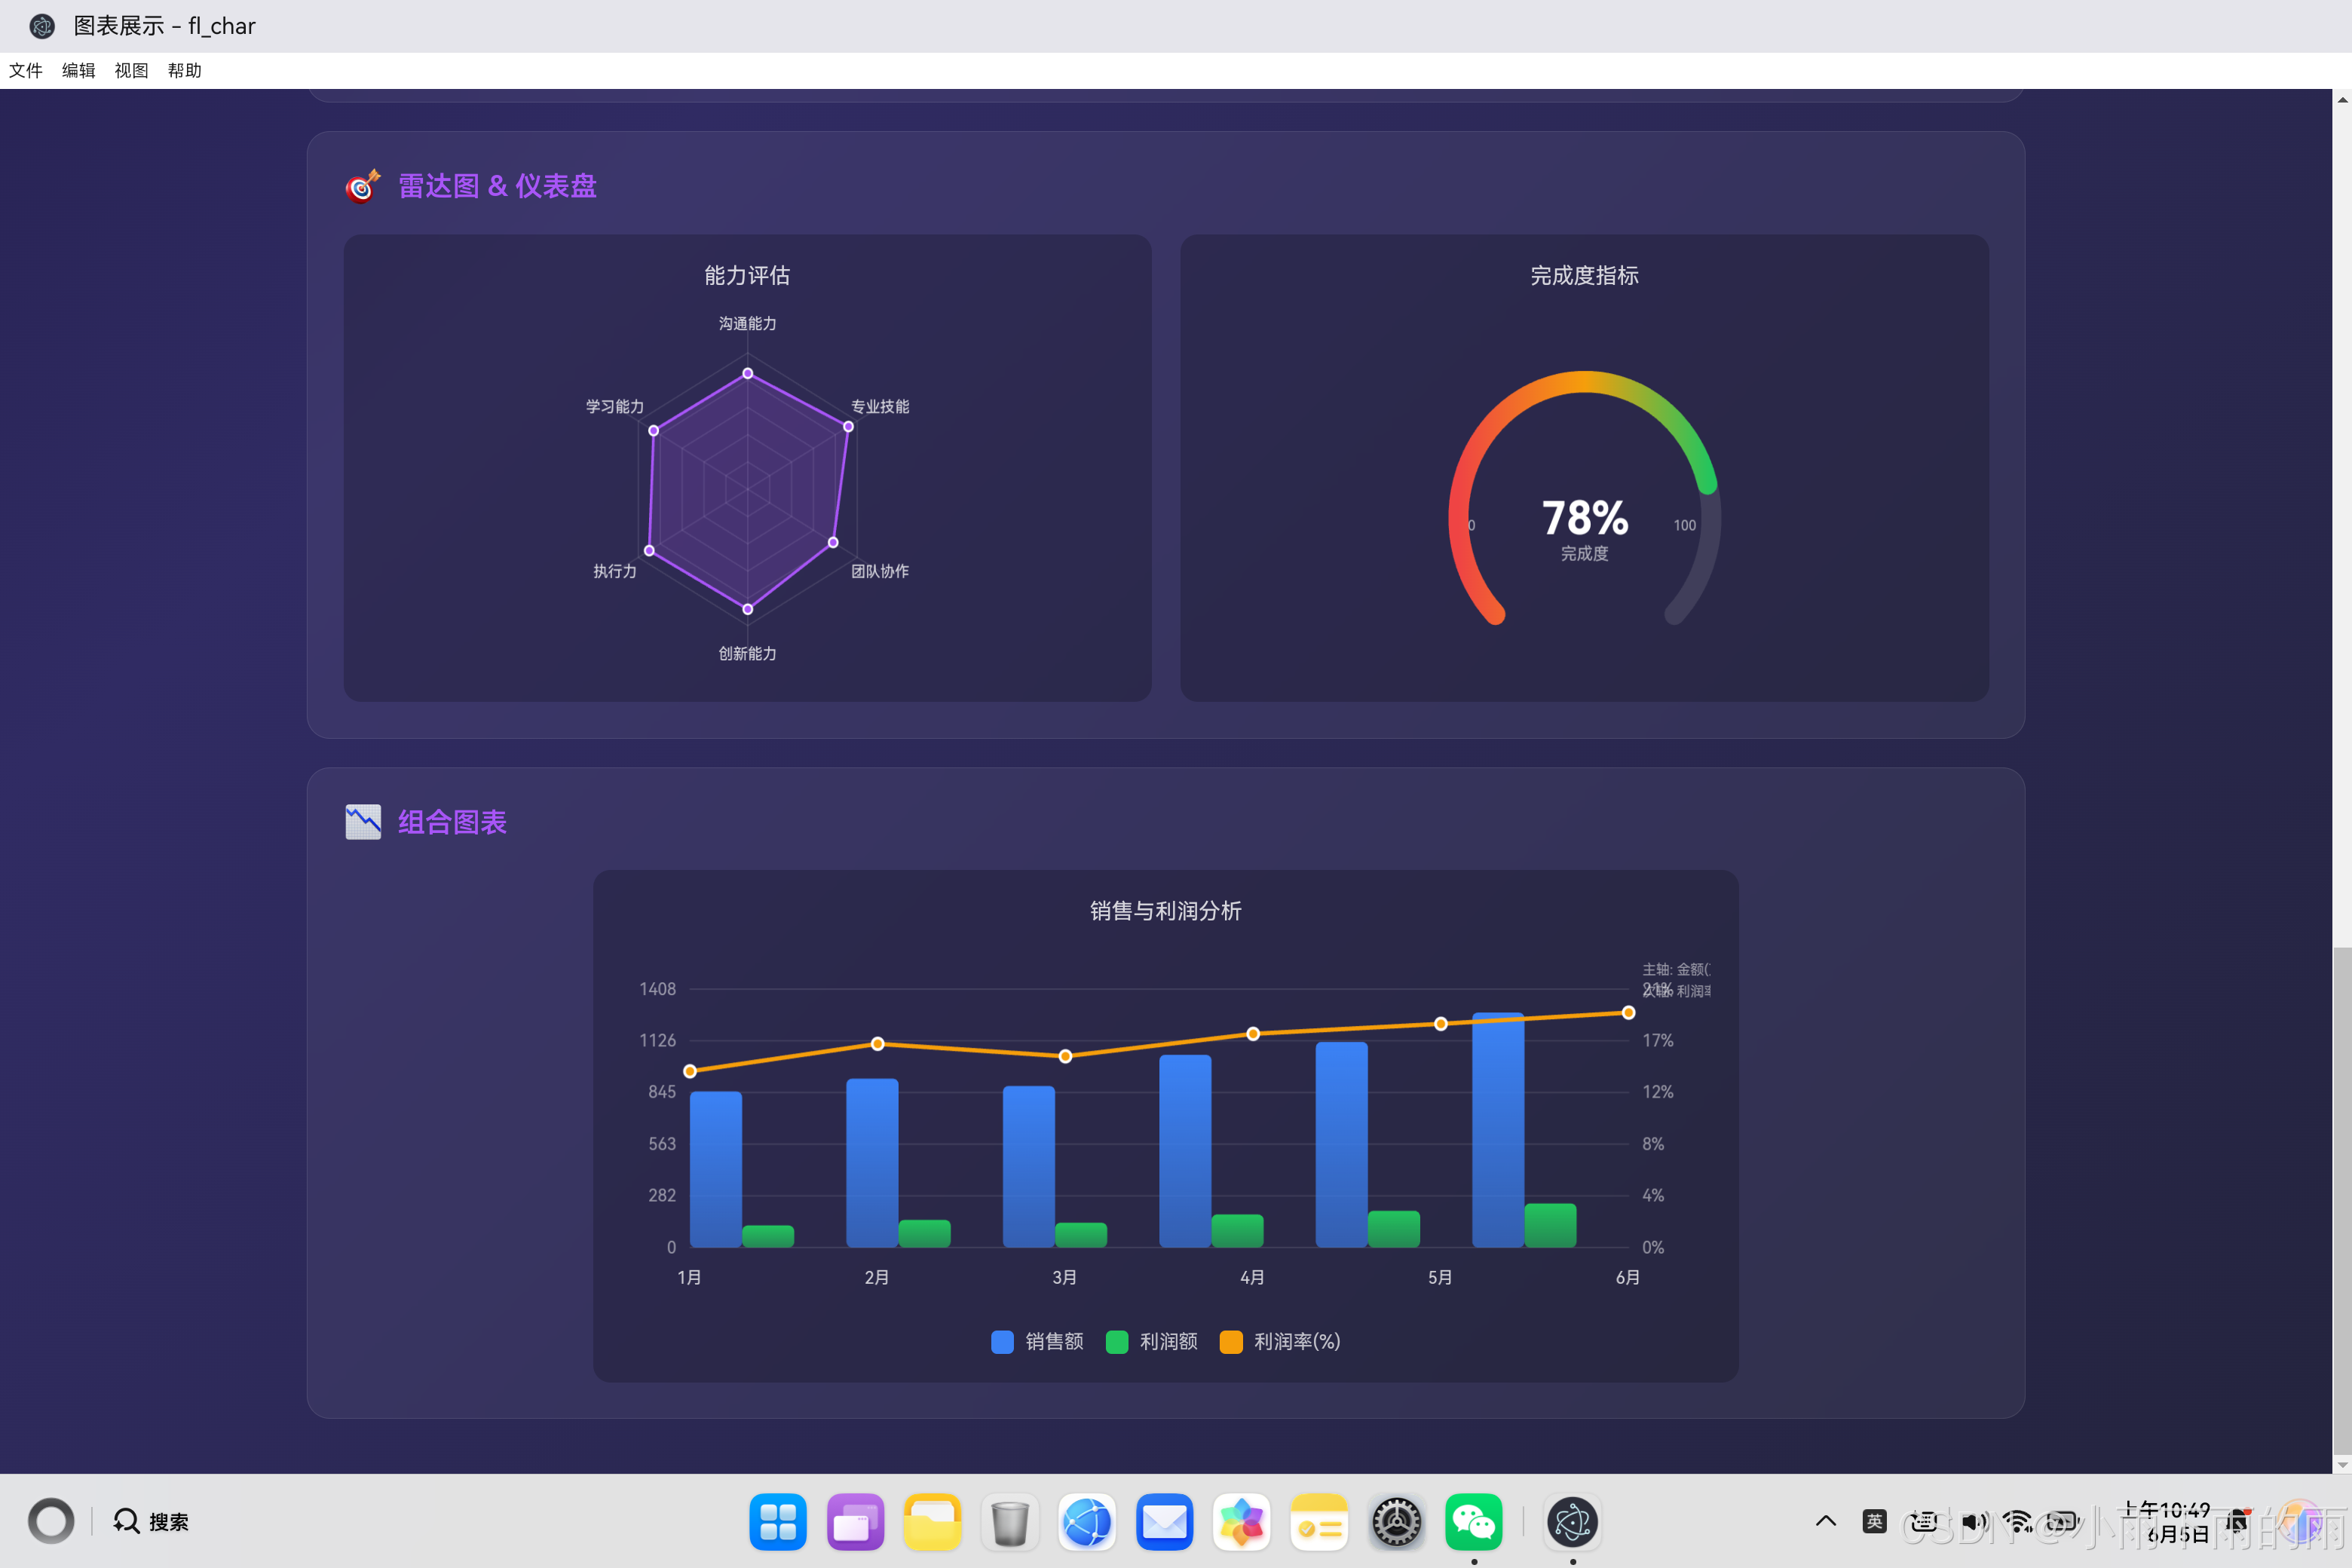
在日常工作中,我们经常遇到这样的情况:一组数据包含绝对值和百分比,比如销售额(用柱状图表示绝对大小)和利润率(用折线图表示百分比趋势)。如果分别用两个图表展示,用户需要在两个图表之间建立联系才能得出完整结论;如果放在一个图表中,柱状图和折线图可以互相参照,数据关系一目了然。这就是组合图表的核心价值——将相关但性质不同的数据放在一起,让关联关系直接可见。
组合图表的另一个重要应用场景是处理不同量纲的数据。比如在销售分析中,销售额用"万元"为单位,数量用"件"为单位,这两个指标的数值范围可能相差数十倍。如果都用柱状图展示,要么销售额的柱子太高看不到数量数据,要么数量数据的柱子太低看不清销售额趋势。通过为不同数据集设置独立的坐标轴(双Y轴),组合图表能够在一个视图中同时展示量纲差异巨大的数据。
从技术实现的角度,组合图表的核心挑战在于协调多种图表类型的绘制,以及管理多Y轴的数据映射。这需要我们在架构设计时充分考虑各种图表类型的特点和共性,建立统一而灵活的抽象。
1.2 组合图表的类型
组合图表有多种形式,每种都有其特定的应用场景。
柱状图+折线图组合是最常见的组合形式。柱状图用于展示绝对数值的大小,折线图用于展示趋势或百分比。这种组合适合销售数据分析,如每月销售额(柱状)和同比增长率(折线)的对比展示。
柱状图+面积图组合适合展示累计数据和趋势。柱状图展示每个时间点的具体数值,面积图则展示累计或累计占比的变化。这种组合在财务分析中常见,如每月支出(柱状)和累计支出(面积)的展示。
折线图+散点图组合适合展示趋势和离散事件的关系。折线图展示数据的连续变化趋势,散点图标记出关键的离散事件或异常值。这种组合在网络监控中常用,如网络流量趋势(折线)和故障发生点(散点)的展示。
多Y轴组合是组合图表的高级形式。两个或多个Y轴分别代表不同的数据范围和单位,允许在同一个视图中展示量纲差异大的数据。这种组合适合复杂的数据分析场景,如同时展示股票价格(几十到几百元)和交易量(几万到几百万股)。
1.3 组合图表的设计原则
组合图表虽然强大,但也不是万能的。设计时需要遵循一些原则,以确保图表清晰易读。
主次分明原则:组合图表中应该有一个主要的图表类型作为视觉焦点,其他类型作为辅助。通常将绝对数值类数据(如销售额)用柱状图展示作为主体,将比率类数据(如增长率)用折线图展示作为辅助。通过调整柱宽、线条粗细、颜色深浅等手段,强化主体数据的视觉地位。
坐标轴协调原则:多Y轴的情况下,不同轴的刻度范围应该根据数据特点合理设置。Y轴的数量应该尽量少(最多两个),避免造成视觉混乱。轴的位置通常将主轴放在左侧,次轴放在右侧,让用户能够自然地关联数据和坐标轴。
颜色区分原则:不同类型的数据应该使用对比度高的颜色来区分。柱状图和折线图即使颜色相同,由于形状不同也足以区分。但如果有多条折线或多个柱状组,就需要使用更加多样的调色板来确保每条数据都能被清晰辨识。
2. 架构设计
2.1 组件架构概览
组合图表的架构需要能够灵活容纳多种图表类型,同时保持代码的整洁和可维护性。
class ComboChart {
    constructor(canvasId, data, options = {}) {
        // 核心属性
        this.canvas = null;
        this.ctx = null;
        this.data = null;
        this.options = {};

        // 尺寸相关
        this.width = 0;
        this.height = 0;
        this.dpr = 1;

        // 布局配置
        this.padding = { top: 30, right: 60, bottom: 50, left: 60 };
        this.chartWidth = 0;
        this.chartHeight = 0;

        // 坐标轴配置
        this.primaryAxis = {};   // 主轴(左侧,柱状图用)
        this.secondaryAxis = {}; // 次轴(右侧,折线图用)

        // 状态管理
        this.hoveredItem = null;
        this.animationProgress = 1;

        // 初始化
        this.init(canvasId, data, options);
    }

    init(canvasId, data, options) {
        this.canvas = document.getElementById(canvasId);
        if (!this.canvas) {
            throw new Error(`Canvas element with id "${canvasId}" not found`);
        }

        this.ctx = this.canvas.getContext('2d');
        this.options = { ...this.getDefaultOptions(), ...options };
        this.setData(data);
        this.resize();
        this.bindEvents();
        this.render();
    }

    getDefaultOptions() {
        return {
            // 布局配置
            padding: { top: 30, right: 60, bottom: 50, left: 60 },

            // 柱状图配置
            barOptions: {
                barWidth: 0.6,
                barSpacing: 0.2,
                barRadius: 4,
                showValues: true,
                gradient: true
            },

            // 折线图配置
            lineOptions: {
                lineWidth: 3,
                pointRadius: 5,
                smooth: false,
                fill: true,
                fillOpacity: 0.2
            },

            // 动画配置
            animate: true,
            animationDuration: 800,

            // 交互配置
            showTooltip: true,
            onClick: null,

            // 网格配置
            showGrid: true,
            gridLines: 5,

            // 轴配置
            showPrimaryAxis: true,
            showSecondaryAxis: true
        };
    }
}
2.2 模块划分
组合图表的功能可以分为以下几个核心模块:
数据解析模块:负责解析和验证输入数据,识别哪些数据系列应该用柱状图展示,哪些应该用折线图展示,以及它们各自使用哪个Y轴。
布局计算模块:负责计算图表的尺寸、坐标轴范围、柱状和折线的位置等。这是最复杂的模块,需要处理双Y轴的映射关系。
柱状图绘制模块:负责绘制柱状图的所有元素,包括柱子、背景、柱子上的数值标签等。
折线图绘制模块:负责绘制折线图的所有元素,包括折线、数据点、填充区域等。
坐标轴绘制模块:负责绘制主轴和次轴的刻度线、刻度标签、轴标题等。
交互处理模块:负责处理鼠标悬停、点击等事件,识别用户指向的数据项并显示提示框。
3. 核心代码实现
3.1 数据解析与轴配置
组合图表的数据解析比单一图表类型更复杂,需要根据数据结构自动判断轴的配置。
class ComboChart {
    // 设置数据
    setData(data) {
        // 验证数据结构
        if (!data || typeof data !== 'object') {
            throw new Error('Invalid data: must be an object');
        }

        if (!Array.isArray(data.labels) || data.labels.length === 0) {
            throw new Error('Invalid data: labels must be a non-empty array');
        }

        // 验证柱状图数据
        if (!Array.isArray(data.barDatasets) || data.barDatasets.length === 0) {
            throw new Error('Invalid data: barDatasets must be a non-empty array');
        }

        // 验证折线图数据
        if (!data.lineDataset) {
            throw new Error('Invalid data: lineDataset is required');
        }

        // 处理柱状图数据
        data.barDatasets.forEach((dataset, index) => {
            if (!Array.isArray(dataset.data)) {
                throw new Error(`Invalid bar dataset at index ${index}: data must be an array`);
            }

            if (!dataset.label) {
                dataset.label = `Bar Series ${index + 1}`;
            }

            if (!dataset.color) {
                dataset.color = this.getDefaultBarColor(index);
            }

            dataset.data = dataset.data.map(v => Number(v) || 0);
        });

        // 处理折线图数据
        if (!data.lineDataset.label) {
            data.lineDataset.label = 'Line Series';
        }

        if (!data.lineDataset.color) {
            data.lineDataset.color = this.getDefaultLineColor();
        }

        data.lineDataset.data = data.lineDataset.data.map(v => Number(v) || 0);

        this.data = data;

        // 计算轴配置
        this.calculateAxisConfig();
    }

    // 计算坐标轴配置
    calculateAxisConfig() {
        // 主轴配置(用于柱状图)
        const allBarValues = this.data.barDatasets.flatMap(d => d.data);
        const primaryMin = 0;
        const primaryMax = Math.max(...allBarValues) * 1.1;

        this.primaryAxis = {
            min: primaryMin,
            max: primaryMax,
            label: this.data.barDatasets[0].unit || ''
        };

        // 次轴配置(用于折线图)
        const lineValues = this.data.lineDataset.data;
        const secondaryMin = 0;
        const secondaryMax = Math.max(...lineValues) * 1.1;

        this.secondaryAxis = {
            min: secondaryMin,
            max: secondaryMax,
            label: this.data.lineDataset.unit || ''
        };
    }

    // 获取默认柱状图颜色
    getDefaultBarColor(index) {
        const colors = ['#3b82f6', '#22c55e', '#f59e0b', '#ef4444', '#a855f7'];
        return colors[index % colors.length];
    }

    // 获取默认折线图颜色
    getDefaultLineColor() {
        return '#f59e0b';
    }
}
数据解析的设计考虑了组合图表的特点。柱状图数据(barDatasets)是一个数组,支持多个柱状系列;折线图数据(lineDataset)是一个单一对象,表示一条折线。这种设计允许灵活扩展,比如未来可能支持多个折线系列。
轴配置的自动计算简化了用户的使用。用户只需要提供数据,不需要手动计算每个轴的范围,系统会自动根据数据的特点设置合理的范围,并留出10%的空间防止数据点紧贴边界。
3.2 布局计算
布局计算是组合图表的核心,决定了柱状和折线在什么位置绘制。
class ComboChart {
    // 计算布局参数
    calculateLayout() {
        // 获取逻辑尺寸
        this.width = this.canvas.width / this.dpr;
        this.height = this.canvas.height / this.dpr;

        // 使用配置的padding或默认值
        this.padding = { ...this.getDefaultOptions().padding, ...this.options.padding };

        // 计算图表区域
        this.chartWidth = this.width - this.padding.left - this.padding.right;
        this.chartHeight = this.height - this.padding.top - this.padding.bottom;

        // 计算分组宽度
        const groupCount = this.data.labels.length;
        this.groupWidth = this.chartWidth / groupCount;

        // 计算柱状图配置
        const barOptions = this.options.barOptions;
        const barCountPerGroup = this.data.barDatasets.length;
        const totalBarWidth = this.groupWidth * barOptions.barWidth;
        this.barWidth = totalBarWidth / barCountPerGroup;
        this.barSpacing = this.groupWidth * barOptions.barSpacing;

        // 计算数据点到像素的映射函数
        this.primaryScale = this.createPrimaryScale();
        this.secondaryScale = this.createSecondaryScale();
    }

    // 创建主轴比例尺(用于柱状图)
    createPrimaryScale() {
        const { min, max } = this.primaryAxis;
        const range = max - min;

        return {
            // 将数据值转换为像素
            toPixels: (value) => {
                const normalized = (value - min) / range;
                return this.padding.top + this.chartHeight - (normalized * this.chartHeight);
            },
            // 将像素转换回数据值
            toValue: (pixels) => {
                const normalized = (this.padding.top + this.chartHeight - pixels) / this.chartHeight;
                return min + normalized * range;
            }
        };
    }

    // 创建次轴比例尺(用于折线图)
    createSecondaryScale() {
        const { min, max } = this.secondaryAxis;
        const range = max - min;

        return {
            toPixels: (value) => {
                const normalized = (value - min) / range;
                return this.padding.top + this.chartHeight - (normalized * this.chartHeight);
            },
            toValue: (pixels) => {
                const normalized = (this.padding.top + this.chartHeight - pixels) / this.chartHeight;
                return min + normalized * range;
            }
        };
    }

    // 计算柱状图的位置
    getBarPosition(groupIndex, seriesIndex) {
        // 计算分组的起始X坐标
        const groupStartX = this.padding.left + groupIndex * this.groupWidth;

        // 计算该系列柱状的X坐标(居中)
        const barX = groupStartX + (this.groupWidth - this.barWidth * this.data.barDatasets.length) / 2
                   + seriesIndex * this.barWidth;

        return barX;
    }

    // 计算折线图数据点的位置
    getLinePointPosition(pointIndex) {
        const x = this.padding.left + (pointIndex / (this.data.labels.length - 1)) * this.chartWidth;
        return x;
    }
}
布局计算的设计考虑了双Y轴的特殊性。主轴比例尺和次轴比例尺各自独立,允许柱状图和折线图使用完全不同的数值范围。比例尺对象提供了双向转换函数,既能将数据值转换为像素用于绘制,也能将像素位置转换回数据值用于交互检测。
3.3 网格与坐标轴绘制
网格和坐标轴是组合图表的参照系,帮助用户理解数据的刻度。
class ComboChart {
    // 绘制完整的背景
    drawBackground() {
        this.drawGrid();
        this.drawAxes();
    }

    // 绘制网格线
    drawGrid() {
        if (!this.options.showGrid) return;

        const ctx = this.ctx;
        const gridLines = this.options.gridLines;

        ctx.strokeStyle = 'rgba(255, 255, 255, 0.1)';
        ctx.lineWidth = 1;

        // 绘制水平网格线
        for (let i = 0; i <= gridLines; i++) {
            const y = this.padding.top + (this.chartHeight / gridLines) * i;

            ctx.beginPath();
            ctx.moveTo(this.padding.left, y);
            ctx.lineTo(this.width - this.padding.right, y);
            ctx.stroke();
        }
    }

    // 绘制坐标轴
    drawAxes() {
        this.drawPrimaryAxis();
        this.drawSecondaryAxis();
        this.drawXAxis();
    }

    // 绘制主轴(左侧Y轴,用于柱状图)
    drawPrimaryAxis() {
        if (!this.options.showPrimaryAxis) return;

        const ctx = this.ctx;
        const { min, max, label } = this.primaryAxis;
        const gridLines = this.options.gridLines;

        ctx.fillStyle = 'rgba(255, 255, 255, 0.6)';
        ctx.font = '11px sans-serif';
        ctx.textAlign = 'right';
        ctx.textBaseline = 'middle';

        // 绘制刻度标签
        for (let i = 0; i <= gridLines; i++) {
            const value = max - ((max - min) / gridLines) * i;
            const y = this.padding.top + (this.chartHeight / gridLines) * i;

            ctx.fillText(Math.round(value).toString(), this.padding.left - 10, y);
        }

        // 绘制轴标签
        if (label) {
            ctx.save();
            ctx.translate(15, this.padding.top + this.chartHeight / 2);
            ctx.rotate(-Math.PI / 2);
            ctx.textAlign = 'center';
            ctx.fillText(label, 0, 0);
            ctx.restore();
        }
    }

    // 绘制次轴(右侧Y轴,用于折线图)
    drawSecondaryAxis() {
        if (!this.options.showSecondaryAxis) return;

        const ctx = this.ctx;
        const { min, max, label } = this.secondaryAxis;
        const gridLines = this.options.gridLines;

        ctx.fillStyle = 'rgba(255, 255, 255, 0.6)';
        ctx.font = '11px sans-serif';
        ctx.textAlign = 'left';
        ctx.textBaseline = 'middle';

        // 绘制刻度标签
        for (let i = 0; i <= gridLines; i++) {
            const value = max - ((max - min) / gridLines) * i;
            const y = this.padding.top + (this.chartHeight / gridLines) * i;

            ctx.fillText(Math.round(value).toString(), this.width - this.padding.right + 10, y);
        }

        // 绘制轴标签
        if (label) {
            ctx.save();
            ctx.translate(this.width - 15, this.padding.top + this.chartHeight / 2);
            ctx.rotate(Math.PI / 2);
            ctx.textAlign = 'center';
            ctx.fillText(label, 0, 0);
            ctx.restore();
        }
    }

    // 绘制X轴
    drawXAxis() {
        const ctx = this.ctx;
        const labelCount = this.data.labels.length;

        ctx.fillStyle = 'rgba(255, 255, 255, 0.8)';
        ctx.font = '11px sans-serif';
        ctx.textAlign = 'center';
        ctx.textBaseline = 'top';

        // 根据标签数量决定显示策略
        if (labelCount <= 6) {
            // 标签较少时全部显示
            this.data.labels.forEach((label, index) => {
                const x = this.getLinePointPosition(index);
                ctx.fillText(label, x, this.height - this.padding.bottom + 10);
            });
        } else {
            // 标签较多时间隔显示
            const step = Math.ceil(labelCount / 6);
            this.data.labels.forEach((label, index) => {
                if (index % step === 0) {
                    const x = this.getLinePointPosition(index);
                    ctx.fillText(label, x, this.height - this.padding.bottom + 10);
                }
            });
        }
    }
}
坐标轴绘制的设计考虑了双Y轴的特殊布局。主轴在左侧,次轴在右侧,分别服务于柱状图和折线图。X轴标签的显示策略根据标签数量自适应调整——当标签较少时全部显示,当标签较多时间隔显示,避免文字重叠。
3.4 柱状图绘制
柱状图绘制是组合图表的核心部分之一,需要处理分组柱状图的布局。
class ComboChart {
    // 绘制柱状图
    drawBars(progress = 1) {
        const ctx = this.ctx;
        const barOptions = this.options.barOptions;

        this.data.barDatasets.forEach((dataset, seriesIndex) => {
            dataset.data.forEach((value, groupIndex) => {
                const x = this.getBarPosition(groupIndex, seriesIndex);
                const barHeight = (this.primaryScale.toPixels(0) - this.primaryScale.toPixels(value)) * progress;
                const y = this.primaryScale.toPixels(value);
                const radius = barOptions.barRadius;

                // 创建渐变
                const gradient = ctx.createLinearGradient(x, y, x, this.primaryScale.toPixels(0));
                gradient.addColorStop(0, dataset.color);
                gradient.addColorStop(1, this.adjustColorBrightness(dataset.color, 0.6));

                ctx.fillStyle = gradient;

                // 绘制圆角矩形
                this.drawRoundedRect(x, y, this.barWidth, barHeight, radius);
                ctx.fill();

                // 绘制数值标签
                if (barOptions.showValues && progress === 1) {
                    ctx.fillStyle = 'rgba(255, 255, 255, 0.9)';
                    ctx.font = 'bold 10px sans-serif';
                    ctx.textAlign = 'center';
                    ctx.textBaseline = 'bottom';
                    ctx.fillText(value.toString(), x + this.barWidth / 2, y - 3);
                }
            });
        });
    }

    // 绘制圆角矩形
    drawRoundedRect(x, y, width, height, radius) {
        const ctx = this.ctx;

        radius = Math.min(radius, width / 2, height / 2);

        ctx.beginPath();
        ctx.moveTo(x + radius, y);
        ctx.lineTo(x + width - radius, y);
        ctx.arcTo(x + width, y, x + width, y + radius, radius);
        ctx.lineTo(x + width, y + height - radius);
        ctx.arcTo(x + width, y + height, x + width - radius, y + height, radius);
        ctx.lineTo(x + radius, y + height);
        ctx.arcTo(x, y + height, x, y + height - radius, radius);
        ctx.lineTo(x, y + radius);
        ctx.arcTo(x, y, x + radius, y, radius);
        ctx.closePath();
    }

    // 调整颜色亮度
    adjustColorBrightness(hexColor, factor) {
        const r = parseInt(hexColor.slice(1, 3), 16);
        const g = parseInt(hexColor.slice(3, 5), 16);
        const b = parseInt(hexColor.slice(5, 7), 16);

        const newR = Math.round(r * factor);
        const newG = Math.round(g * factor);
        const newB = Math.round(b * factor);

        return `rgb(${newR}, ${newG}, ${newB})`;
    }
}
柱状图绘制采用了分组策略。每个分组内的柱状均匀分布,组内间距通过配置参数控制。圆角矩形的绘制需要小心处理,确保圆角不会超出边界。渐变效果从顶部到底部颜色由深变浅,增加立体感。
3.5 折线图绘制
折线图绘制是组合图表的另一个核心部分,需要与柱状图协调位置。
class ComboChart {
    // 绘制折线图
    drawLine(progress = 1) {
        const ctx = this.ctx;
        const lineOptions = this.options.lineOptions;
        const lineData = this.data.lineDataset.data;

        // 计算所有数据点的坐标
        const points = lineData.map((value, index) => {
            const x = this.getLinePointPosition(index);
            const y = this.secondaryScale.toPixels(value);
            return { x, y };
        });

        // 限制绘制的点数(根据动画进度)
        const pointsToDraw = Math.ceil(progress * points.length);
        const partialProgress = (progress * points.length) % 1;

        if (pointsToDraw < 1) return;

        // 绘制填充区域
        if (lineOptions.fill) {
            ctx.beginPath();
            ctx.moveTo(points[0].x, this.secondaryScale.toPixels(0));

            for (let i = 0; i < pointsToDraw; i++) {
                ctx.lineTo(points[i].x, points[i].y);
            }

            if (pointsToDraw < points.length && partialProgress > 0) {
                const prevPoint = points[pointsToDraw - 1];
                const nextPoint = points[pointsToDraw];
                const partialX = prevPoint.x + (nextPoint.x - prevPoint.x) * partialProgress;
                const partialY = prevPoint.y + (nextPoint.y - prevPoint.y) * partialProgress;
                ctx.lineTo(partialX, partialY);
            }

            ctx.lineTo(points[Math.min(pointsToDraw, points.length - 1)].x, this.secondaryScale.toPixels(0));
            ctx.closePath();

            const fillColor = this.hexToRgba(this.data.lineDataset.color, lineOptions.fillOpacity);
            ctx.fillStyle = fillColor;
            ctx.fill();
        }

        // 绘制折线
        ctx.beginPath();
        ctx.moveTo(points[0].x, points[0].y);

        for (let i = 1; i < pointsToDraw; i++) {
            ctx.lineTo(points[i].x, points[i].y);
        }

        if (pointsToDraw < points.length && partialProgress > 0) {
            const prevPoint = points[pointsToDraw - 1];
            const nextPoint = points[pointsToDraw];
            const partialX = prevPoint.x + (nextPoint.x - prevPoint.x) * partialProgress;
            const partialY = prevPoint.y + (nextPoint.y - prevPoint.y) * partialProgress;
            ctx.lineTo(partialX, partialY);
        }

        ctx.strokeStyle = this.data.lineDataset.color;
        ctx.lineWidth = lineOptions.lineWidth;
        ctx.lineCap = 'round';
        ctx.lineJoin = 'round';
        ctx.stroke();

        // 绘制数据点
        if (lineOptions.pointRadius > 0 && progress === 1) {
            for (let i = 0; i < pointsToDraw; i++) {
                // 外层圆环
                ctx.beginPath();
                ctx.fillStyle = '#fff';
                ctx.arc(points[i].x, points[i].y, lineOptions.pointRadius, 0, Math.PI * 2);
                ctx.fill();

                // 内层圆点
                ctx.beginPath();
                ctx.fillStyle = this.data.lineDataset.color;
                ctx.arc(points[i].x, points[i].y, lineOptions.pointRadius - 2, 0, Math.PI * 2);
                ctx.fill();
            }
        }
    }

    // 十六进制颜色转RGBA
    hexToRgba(hex, alpha) {
        const r = parseInt(hex.slice(1, 3), 16);
        const g = parseInt(hex.slice(3, 5), 16);
        const b = parseInt(hex.slice(5, 7), 16);

        return `rgba(${r}, ${g}, ${b}, ${alpha})`;
    }
}
折线图绘制考虑了动画进度。当设置动画时,折线从左到右逐渐出现,与柱状图的生长动画协调。填充区域从折线到底部形成封闭区域,颜色使用与折线相同但降低了不透明度。数据点使用双层圆点设计,与其他图表类型保持一致。
3.6 完整渲染流程
将所有绘制步骤整合在一起,形成完整的渲染流程。
class ComboChart {
    // 完整的渲染流程
    render() {
        this.calculateLayout();

        this.ctx.clearRect(0, 0, this.width, this.height);

        this.drawBackground();
        this.drawBars();
        this.drawLine();
        this.drawLegend();
    }

    // 带动画的渲染
    renderAnimated() {
        if (!this.options.animate) {
            this.render();
            return;
        }

        const startTime = Date.now();
        const duration = this.options.animationDuration;

        const animate = () => {
            const elapsed = Date.now() - startTime;
            const progress = Math.min(elapsed / duration, 1);
            const easedProgress = this.easeOutCubic(progress);

            this.ctx.clearRect(0, 0, this.width, this.height);

            this.calculateLayout();
            this.drawBackground();
            this.drawBars(easedProgress);
            this.drawLine(easedProgress);
            this.drawLegend();

            if (progress < 1) {
                requestAnimationFrame(animate);
            }
        };

        requestAnimationFrame(animate);
    }

    // 绘制图例
    drawLegend() {
        const ctx = this.ctx;
        const items = [];

        // 添加柱状图图例
        this.data.barDatasets.forEach(dataset => {
            items.push({
                type: 'bar',
                label: dataset.label,
                color: dataset.color
            });
        });

        // 添加折线图图例
        items.push({
            type: 'line',
            label: this.data.lineDataset.label,
            color: this.data.lineDataset.color
        });

        // 计算图例位置
        const itemWidth = 100;
        const totalWidth = items.length * itemWidth;
        const startX = (this.width - totalWidth) / 2;
        const y = 12;

        items.forEach((item, index) => {
            const x = startX + index * itemWidth;

            if (item.type === 'bar') {
                // 绘制柱状图例
                ctx.fillStyle = item.color;
                this.drawRoundedRect(x, y - 5, 15, 10, 2);
                ctx.fill();
            } else {
                // 绘制折线图例
                ctx.beginPath();
                ctx.moveTo(x, y);
                ctx.lineTo(x + 15, y);
                ctx.strokeStyle = item.color;
                ctx.lineWidth = 3;
                ctx.stroke();

                // 绘制数据点
                ctx.beginPath();
                ctx.fillStyle = '#fff';
                ctx.arc(x + 7, y, 4, 0, Math.PI * 2);
                ctx.fill();

                ctx.beginPath();
                ctx.fillStyle = item.color;
                ctx.arc(x + 7, y, 2, 0, Math.PI * 2);
                ctx.fill();
            }

            // 绘制标签
            ctx.fillStyle = 'rgba(255, 255, 255, 0.8)';
            ctx.font = '11px sans-serif';
            ctx.textAlign = 'left';
            ctx.textBaseline = 'middle';
            ctx.fillText(item.label, x + 22, y);
        });
    }

    // 缓动函数
    easeOutCubic(t) {
        return 1 - Math.pow(1 - t, 3);
    }

    // 调整尺寸
    resize() {
        const rect = this.canvas.parentElement.getBoundingClientRect();

        this.dpr = window.devicePixelRatio || 1;
        this.width = rect.width;
        this.height = 250;

        this.canvas.width = this.width * this.dpr;
        this.canvas.height = this.height * this.dpr;
        this.canvas.style.width = this.width + 'px';
        this.canvas.style.height = this.height + 'px';

        this.ctx.scale(this.dpr, this.dpr);

        this.calculateLayout();
        this.render();
    }
}
完整渲染流程按照从背景到前景的顺序绘制各个元素。背景(包括网格和坐标轴)在最底层,柱状图在中间层,折线图在最上层。图例根据数据类型使用不同的图标——柱状用小矩形,折线用带点的线段。
4. 交互功能实现
4.1 鼠标悬停检测
组合图表的交互检测比单一图表类型更复杂,需要同时检测柱状和折线。
class ComboChart {
    // 绑定事件
    bindEvents() {
        this.tooltip = null;

        this.canvas.addEventListener('mousemove', (e) => this.handleMouseMove(e));
        this.canvas.addEventListener('mouseleave', () => this.handleMouseLeave());
        this.canvas.addEventListener('click', (e) => this.handleClick(e));
    }

    // 检测悬停的项
    findItemAtPosition(mouseX, mouseY) {
        // 检测柱状图
        const barItem = this.findBarAtPosition(mouseX, mouseY);
        if (barItem) return barItem;

        // 检测折线图
        const lineItem = this.findLinePointAtPosition(mouseX, mouseY);
        if (lineItem) return lineItem;

        return null;
    }

    // 检测悬停的柱状
    findBarAtPosition(mouseX, mouseY) {
        for (let seriesIndex = 0; seriesIndex < this.data.barDatasets.length; seriesIndex++) {
            const dataset = this.data.barDatasets[seriesIndex];

            for (let groupIndex = 0; groupIndex < dataset.data.length; groupIndex++) {
                const value = dataset.data[groupIndex];
                const x = this.getBarPosition(groupIndex, seriesIndex);
                const barHeight = this.primaryScale.toPixels(0) - this.primaryScale.toPixels(value);
                const y = this.primaryScale.toPixels(value);

                if (mouseX >= x && mouseX <= x + this.barWidth &&
                    mouseY >= y && mouseY <= y + barHeight) {
                    return {
                        type: 'bar',
                        seriesIndex,
                        groupIndex,
                        label: this.data.labels[groupIndex],
                        series: dataset.label,
                        value: value,
                        color: dataset.color
                    };
                }
            }
        }

        return null;
    }

    // 检测悬停的折线数据点
    findLinePointAtPosition(mouseX, mouseY) {
        const lineData = this.data.lineDataset.data;
        const pointRadius = this.options.lineOptions.pointRadius + 5; // 增加检测范围

        for (let index = 0; index < lineData.length; index++) {
            const x = this.getLinePointPosition(index);
            const y = this.secondaryScale.toPixels(lineData[index]);

            const distance = Math.sqrt(Math.pow(mouseX - x, 2) + Math.pow(mouseY - y, 2));

            if (distance <= pointRadius) {
                return {
                    type: 'line',
                    index,
                    label: this.data.labels[index],
                    value: lineData[index],
                    color: this.data.lineDataset.color
                };
            }
        }

        return null;
    }

    // 处理鼠标移动
    handleMouseMove(e) {
        const rect = this.canvas.getBoundingClientRect();
        const mouseX = e.clientX - rect.left;
        const mouseY = e.clientY - rect.top;

        const item = this.findItemAtPosition(mouseX, mouseY);

        if (item) {
            this.canvas.style.cursor = 'pointer';
            this.showTooltip(e.clientX, e.clientY, item);
        } else {
            this.canvas.style.cursor = 'default';
            this.hideTooltip();
        }
    }

    // 显示提示框
    showTooltip(mouseX, mouseY, item) {
        if (!this.tooltip) {
            this.tooltip = document.createElement('div');
            this.tooltip.className = 'combo-chart-tooltip';
            this.applyTooltipStyle();
            this.canvas.parentElement.style.position = 'relative';
            this.canvas.parentElement.appendChild(this.tooltip);
        }

        let html = `<strong>${item.label}</strong><br>`;

        if (item.type === 'bar') {
            html += `<span style="color: ${item.color}">●</span> ${item.series}: ${item.value}`;
        } else {
            html += `<span style="color: ${item.color}">●</span> ${this.data.lineDataset.label}: ${item.value}`;
        }

        this.tooltip.innerHTML = html;
        this.tooltip.style.opacity = '1';
        this.tooltip.style.left = (mouseX + 15) + 'px';
        this.tooltip.style.top = (mouseY - 10) + 'px';
    }

    // 隐藏提示框
    hideTooltip() {
        if (this.tooltip) {
            this.tooltip.style.opacity = '0';
        }
    }

    // 处理鼠标离开
    handleMouseLeave() {
        this.canvas.style.cursor = 'default';
        this.hideTooltip();
    }

    // 处理点击
    handleClick(e) {
        const rect = this.canvas.getBoundingClientRect();
        const mouseX = e.clientX - rect.left;
        const mouseY = e.clientY - rect.top;

        const item = this.findItemAtPosition(mouseX, mouseY);

        if (item && this.options.onClick) {
            this.options.onClick(item);
        }
    }

    // 应用提示框样式
    applyTooltipStyle() {
        this.tooltip.style.cssText = `
            position: absolute;
            background: rgba(0, 0, 0, 0.9);
            color: #fff;
            padding: 10px 14px;
            border-radius: 6px;
            font-size: 13px;
            pointer-events: none;
            opacity: 0;
            transition: opacity 0.2s;
            z-index: 1000;
            line-height: 1.5;
        `;
    }
}
交互检测的设计分别处理柱状图和折线图。对于柱状图,检测鼠标是否在某个柱状矩形范围内;对于折线图,检测鼠标是否在某个数据点的附近。由于折线图的数据点较小,检测范围适当扩大以提高可用性。
5. 高级功能
5.1 多折线组合
在实际应用中,可能需要多条折线来展示多个相关指标。
class ComboChart {
    // 扩展支持多折线
    setData(data) {
        // 如果使用多折线版本
        if (data.lineDatasets && Array.isArray(data.lineDatasets)) {
            this.setMultiLineData(data);
            return;
        }

        // 单折线版本的原始逻辑
        this.setSingleLineData(data);
    }

    // 多折线版本的数据设置
    setMultiLineData(data) {
        // 处理柱状图数据
        // ...

        // 处理多折线数据
        this.data.lineDatasets = data.lineDatasets.map((dataset, index) => {
            return {
                ...dataset,
                color: dataset.color || this.getDefaultLineColor(index)
            };
        });

        // 计算所有折线数据的统一范围
        const allLineValues = this.data.lineDatasets.flatMap(d => d.data);
        this.secondaryAxis = {
            min: 0,
            max: Math.max(...allLineValues) * 1.1,
            label: data.lineAxisLabel || ''
        };
    }

    // 绘制多折线
    drawMultipleLines(progress = 1) {
        if (this.data.lineDatasets) {
            this.data.lineDatasets.forEach(dataset => {
                this.drawSingleLine(dataset, progress);
            });
        } else if (this.data.lineDataset) {
            this.drawSingleLine(this.data.lineDataset, progress);
        }
    }

    // 绘制单条折线
    drawSingleLine(dataset, progress) {
        const ctx = this.ctx;
        const lineOptions = this.options.lineOptions;
        const lineData = dataset.data;

        const points = lineData.map((value, index) => {
            const x = this.getLinePointPosition(index);
            const y = this.secondaryScale.toPixels(value);
            return { x, y };
        });

        const pointsToDraw = Math.ceil(progress * points.length);

        if (pointsToDraw < 1) return;

        // 绘制填充
        if (lineOptions.fill) {
            ctx.beginPath();
            ctx.moveTo(points[0].x, this.secondaryScale.toPixels(0));

            for (let i = 0; i < pointsToDraw; i++) {
                ctx.lineTo(points[i].x, points[i].y);
            }

            ctx.lineTo(points[pointsToDraw - 1].x, this.secondaryScale.toPixels(0));
            ctx.closePath();

            ctx.fillStyle = this.hexToRgba(dataset.color, lineOptions.fillOpacity);
            ctx.fill();
        }

        // 绘制折线
        ctx.beginPath();
        ctx.moveTo(points[0].x, points[0].y);

        for (let i = 1; i < pointsToDraw; i++) {
            ctx.lineTo(points[i].x, points[i].y);
        }

        ctx.strokeStyle = dataset.color;
        ctx.lineWidth = lineOptions.lineWidth;
        ctx.stroke();
    }
}
5.2 动态轴范围
在某些场景下,需要根据数据动态调整轴范围,而不是固定使用最大值。
class ComboChart {
    // 使用动态轴范围
    calculateDynamicAxisConfig() {
        // 主轴:考虑正负值
        const allBarValues = this.data.barDatasets.flatMap(d => d.data);
        const barMin = Math.min(0, Math.min(...allBarValues));
        const barMax = Math.max(...allBarValues) * 1.1;

        this.primaryAxis = {
            min: barMin,
            max: barMax
        };

        // 次轴:始终从0开始
        const allLineValues = this.data.lineDatasets ?
            this.data.lineDatasets.flatMap(d => d.data) :
            this.data.lineDataset.data;
        const lineMax = Math.max(...allLineValues) * 1.1;

        this.secondaryAxis = {
            min: 0,
            max: lineMax
        };

        // 重新创建比例尺
        this.primaryScale = this.createPrimaryScale();
        this.secondaryScale = this.createSecondaryScale();
    }
}
6. 实际应用示例
6.1 销售数据分析
const salesData = {
    labels: ['1月', '2月', '3月', '4月', '5月', '6月'],
    barDatasets: [
        {
            label: '销售额(万)',
            data: [850, 920, 880, 1050, 1120, 1280],
            color: '#3b82f6'
        },
        {
            label: '利润额(万)',
            data: [120, 150, 135, 180, 200, 240],
            color: '#22c55e'
        }
    ],
    lineDataset: {
        label: '利润率(%)',
        data: [14.1, 16.3, 15.3, 17.1, 17.9, 18.8],
        color: '#f59e0b'
    }
};

const salesChart = new ComboChart('salesChart', salesData, {
    barOptions: {
        barWidth: 0.7,
        showValues: true
    },
    lineOptions: {
        lineWidth: 3,
        pointRadius: 5,
        fill: true,
        fillOpacity: 0.15
    },
    animationDuration: 1000
});
6.2 运营指标监控
const opsData = {
    labels: ['周一', '周二', '周三', '周四', '周五', '周六', '周日'],
    barDatasets: [
        {
            label: '订单量',
            data: [1200, 1580, 1320, 1450, 1680, 920, 780],
            color: '#a855f7'
        }
    ],
    lineDataset: {
        label: '转化率(%)',
        data: [3.2, 3.8, 3.5, 3.6, 4.1, 2.8, 2.5],
        color: '#ec4899'
    }
};

const opsChart = new ComboChart('opsChart', opsData, {
    gridLines: 4,
    barOptions: {
        barWidth: 0.5,
        showValues: false
    },
    lineOptions: {
        fill: false,
        pointRadius: 4
    }
});
7. 性能优化
7.1 批量绘制
class ComboChart {
    // 批量绘制柱状图
    drawBarsBatched(progress = 1) {
        const ctx = this.ctx;
        const barOptions = this.options.barOptions;

        // 按颜色分组批量绘制
        const colorGroups = {};

        this.data.barDatasets.forEach((dataset, seriesIndex) => {
            if (!colorGroups[dataset.color]) {
                colorGroups[dataset.color] = [];
            }
            colorGroups[dataset.color].push({ dataset, seriesIndex });
        });

        // 为每种颜色创建渐变
        Object.keys(colorGroups).forEach(color => {
            colorGroups[color].forEach(({ dataset, seriesIndex }) => {
                dataset.data.forEach((value, groupIndex) => {
                    const x = this.getBarPosition(groupIndex, seriesIndex);
                    const barHeight = (this.primaryScale.toPixels(0) - this.primaryScale.toPixels(value)) * progress;
                    const y = this.primaryScale.toPixels(value);

                    const gradient = ctx.createLinearGradient(x, y, x, this.primaryScale.toPixels(0));
                    gradient.addColorStop(0, color);
                    gradient.addColorStop(1, this.adjustColorBrightness(color, 0.6));

                    ctx.fillStyle = gradient;
                    this.drawRoundedRect(x, y, this.barWidth, barHeight, barOptions.barRadius);
                    ctx.fill();
                });
            });
        });
    }
}
7.2 离屏Canvas缓存
class ComboChart {
    constructor() {
        this.offscreenCanvas = document.createElement('canvas');
        this.offscreenCtx = this.offscreenCanvas.getContext('2d');
    }

    // 缓存静态内容
    drawStaticToCache() {
        const ctx = this.offscreenCtx;
        this.offscreenCanvas.width = this.width * this.dpr;
        this.offscreenCanvas.height = this.height * this.dpr;
        ctx.scale(this.dpr, this.dpr);

        const mainCtx = this.ctx;
        this.ctx = ctx;

        this.drawBackground();

        this.ctx = mainCtx;
    }

    // 使用缓存渲染
    renderWithCache() {
        this.calculateLayout();
        this.ctx.clearRect(0, 0, this.width, this.height);

        this.drawStaticToCache();
        this.ctx.drawImage(this.offscreenCanvas, 0, 0, this.width, this.height);

        this.drawBars();
        this.drawLine();
        this.drawLegend();
    }
}
8. 总结
本文详细介绍了组合图表组件的完整实现过程,涵盖以下核心知识点:
-
双Y轴协调:理解如何在单一图表中管理多个数值范围,允许量纲差异大的数据共存。
-
布局计算:掌握分组宽度、柱状位置、折线点位置的综合计算方法。
-
多类型绘制协调:实现柱状图和折线图在同一坐标系中的协调绘制。
-
坐标轴设计:为主轴和次轴设计清晰的视觉区分,让用户能够正确理解数据对应的轴。
-
交互检测:实现对多种图表类型的统一交互检测,处理柱状和折线的悬停、点击等事件。
-
性能优化:通过批量绘制和离屏Canvas缓存提升渲染性能。
组合图表是数据可视化中的瑞士军刀,能够应对复杂的数据分析场景。通过本文的学习,读者应该能够掌握组合图表的核心实现原理,并将其应用到销售分析、运营监控等实际项目中。

讨论HarmonyOS开发技术,专注于API与组件、DevEco Studio、测试、元服务和应用上架分发等。
更多推荐


 0
0 0
0- 0


 已为社区贡献79条内容

所有评论(0)