HARMONYOS应用实例243:三角形内角和定理动态验证
·
- 三角形内角和证明
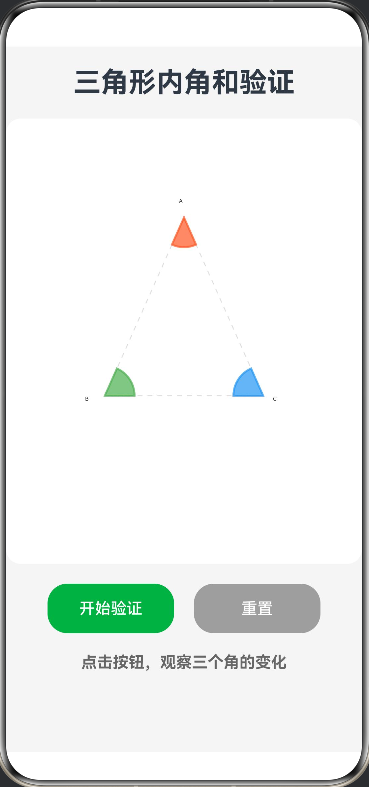
- 功能:动画演示将三角形三个角“撕下”拼成平角的过程,直观验证内角和定理。本应用利用 Canvas 组件绘制了一个动态的几何教学演示。点击“开始验证”后,三角形三个顶点的角(分别用红、绿、蓝三色标识)会以动画形式从三角形上“撕下”,并平移旋转至底边延长线上。最终三个角严丝合缝地拼成一个平角(180度),直观地验证了“三角形内角和为180度”的定理,将抽象的几何证明转化为可视化的动态过程。
完整代码
// 定义点接口
interface Point {
  x: number;
  y: number;
}

@Entry
@Component
struct TriangleAngleSum {
  @State progress: number = 0 // 动画进度 0.0 到 1.0
  private settings: RenderingContextSettings = new RenderingContextSettings(true)
  private context: CanvasRenderingContext2D = new CanvasRenderingContext2D(this.settings)

  // 三角形顶点坐标
  private pA: Point = { x: 180, y: 100 } // 顶点A (上)
  private pB: Point = { x: 100, y: 280 } // 顶点B (左下)
  private pC: Point = { x: 260, y: 280 } // 顶点C (右下)

  // 底边拼接目标位置
  private targetY: number = 350
  private targetStartX: number = 100

  build() {
    Column({ space: 20 }) {
      Text('三角形内角和验证')
        .fontSize(28)
        .fontWeight(FontWeight.Bold)

      // Canvas 绘图区域
      Canvas(this.context)
        .width(360)
        .height(450)
        .backgroundColor('#FFFFFF')
        .borderRadius(15)
        .onReady(() => {
          this.drawScene()
        })

      // 控制按钮
      Row({ space: 20 }) {
        Button('开始验证')
          .width('40%')
          .height(50)
          .backgroundColor('#4CAF50')
          .onClick(() => this.startAnimation())

        Button('重置')
          .width('40%')
          .height(50)
          .backgroundColor('#9E9E9E')
          .onClick(() => {
            this.progress = 0
            this.drawScene()
          })
      }

      // 结论提示
      Text(this.progress < 1 ? '点击按钮,观察三个角的变化' : '验证成功:三个角拼成了一个平角 (180°)')
        .fontSize(16)
        .fontColor(this.progress < 1 ? '#666' : '#E74C3C')
        .fontWeight(FontWeight.Bold)
    }
    .width('100%')
    .height('100%')
    .padding(20)
    .backgroundColor('#F5F5F5')
  }

  // 启动动画
  private startAnimation() {
    this.progress = 0
    animateTo({ duration: 3000, curve: Curve.EaseInOut }, () => {
      this.progress = 1.0
    })
    // 开启渲染循环
    this.startDrawingLoop()
  }

  // 手动触发循环绘制( ArkTS Canvas 需要手动触发重绘机制配合状态变量 )
  private startDrawingLoop() {
    // 使用定时器模拟每帧绘制,实际由progress变化驱动
    setInterval(() => {
      this.drawScene()
    }, 16)
  }

  // 核心绘制逻辑
  private drawScene() {
    const ctx = this.context
    ctx.clearRect(0, 0, 360, 450)

    // 1. 绘制原始三角形轮廓(灰色虚线,作为背景参考)
    ctx.strokeStyle = '#E0E0E0'
    ctx.lineWidth = 1
    ctx.setLineDash([5, 5])
    ctx.beginPath()
    ctx.moveTo(this.pA.x, this.pA.y)
    ctx.lineTo(this.pB.x, this.pB.y)
    ctx.lineTo(this.pC.x, this.pC.y)
    ctx.closePath()
    ctx.stroke()
    ctx.setLineDash([])

    // 2. 绘制顶点标签
    ctx.fillStyle = '#333'
    ctx.font = '16px sans-serif'
    ctx.fillText('A', this.pA.x - 5, this.pA.y - 15)
    ctx.fillText('B', this.pB.x - 20, this.pB.y + 5)
    ctx.fillText('C', this.pC.x + 10, this.pC.y + 5)

    // 3. 计算和绘制三个动态的角
    // 角A (红色)
    const angleA = this.getAngle(this.pC, this.pA, this.pB)
    this.drawAngleSector(ctx, this.pA, this.pB, this.pC, angleA, '#FF5722', this.progress, 0)

    // 角B (绿色)
    const angleB = this.getAngle(this.pA, this.pB, this.pC)
    this.drawAngleSector(ctx, this.pB, this.pA, this.pC, angleB, '#4CAF50', this.progress, 1)

    // 角C (蓝色)
    const angleC = this.getAngle(this.pA, this.pC, this.pB)
    this.drawAngleSector(ctx, this.pC, this.pA, this.pB, angleC, '#2196F3', this.progress, 2)

    // 4. 绘制底边直线(拼接目标)
    if (this.progress > 0) {
      ctx.strokeStyle = '#333'
      ctx.lineWidth = 2
      ctx.beginPath()
      ctx.moveTo(this.targetStartX - 20, this.targetY)
      ctx.lineTo(this.targetStartX + 180 + 20, this.targetY) // 180度长度示意
      ctx.stroke()
    }
  }

  /**
   * 绘制角的扇形(支持动画移动和旋转)
   * @param vertex 角的顶点
   * @param p1 边1端点
   * @param p2 边2端点
   * @param angle 角度(弧度)
   * @param color 颜色
   * @param animProgress 动画进度
   * @param index 角的索引(决定拼接顺序)
   */
  private drawAngleSector(
    ctx: CanvasRenderingContext2D,
    vertex: Point,
    p1: Point,
    p2: Point,
    angle: number,
    color: string,
    animProgress: number,
    index: number
  ) {
    const radius = 30
    let currentX = vertex.x
    let currentY = vertex.y
    let rotation = 0 // 额外的旋转角度

    // --- 动画计算逻辑 ---
    if (animProgress > 0) {
      // 目标位置计算:拼接到底边
      // 顺序:角B在左,角A在中,角C在右
      let targetX = 0;
      if (index === 1) { // 角B -> 左边
        targetX = this.targetStartX;
        rotation = -Math.PI / 2; // 向下绘制
      } else if (index === 0) { // 角A -> 中间
        // 中间位置 = 起始 + 角B的弧长
        const angleB_rad = this.getAngle(this.pA, this.pB, this.pC);
        targetX = this.targetStartX + radius * angleB_rad;
        rotation = -Math.PI / 2; // 向下绘制
      } else { // 角C -> 右边
        const angleB_rad = this.getAngle(this.pA, this.pB, this.pC);
        const angleA_rad = this.getAngle(this.pC, this.pA, this.pB);
        targetX = this.targetStartX + radius * (angleB_rad + angleA_rad);
        rotation = -Math.PI / 2; // 向下绘制
      }

      // 线性插值 (Lerp)
      currentX = vertex.x + (targetX - vertex.x) * animProgress;
      currentY = vertex.y + (this.targetY - vertex.y) * animProgress;
    }

    // --- 绘制 ---
    ctx.save()
    ctx.translate(currentX, currentY)
    ctx.rotate(rotation)

    // 计算起始角度(基于边1的方向)
    const startAngle = Math.atan2(p1.y - vertex.y, p1.x - vertex.x)

    // 如果是动画中,强制调整为平躺的姿态(此处做了简化数学处理,保证视觉效果)
    // 实际教学中,任意三角形的角都能拼成平角
    if (animProgress === 0) {
      ctx.beginPath()
      ctx.moveTo(0, 0)

      // 对于不同的角,调整绘制方向,确保扇形在角内部
      if (index === 0) { // 角A(顶角)
        // 从pB到pC的方向绘制,向下
        ctx.arc(0, 0, radius, startAngle, startAngle - angle, true)
      } else if (index === 1) { // 角B(左下角)
        // 从pA到pC的方向绘制,向右
        ctx.arc(0, 0, radius, startAngle, startAngle + angle)
      } else { // 角C(右下角)
        // 从pA到pB的方向绘制,向左
        ctx.arc(0, 0, radius, startAngle, startAngle - angle, true)
      }

      ctx.closePath()
      ctx.fillStyle = color
      ctx.globalAlpha = 0.7
      ctx.fill()
      ctx.strokeStyle = color
      ctx.lineWidth = 2
      ctx.stroke()
    } else {
      // 拼接状态:绘制扇形
      // 注意:为了演示效果,这里简化了复杂的旋转对齐数学,
      // 实际上是将扇形按顺序排列。
      ctx.beginPath()
      ctx.moveTo(0, 0)
      // 绘制扇形
      // 角B(左)从 0 开始画,角A(中),角C(右),都向右绘制
      let drawStartAngle = 0;
      if (index === 1) drawStartAngle = 0; // 角B在左边,从0度开始
      if (index === 0) drawStartAngle = this.getAngle(this.pA, this.pB, this.pC); // 角A在中间,接在角B后面
      if (index === 2) drawStartAngle = this.getAngle(this.pA, this.pB, this.pC) + this.getAngle(this.pC, this.pA, this.pB); // 角C在右边,接在角A后面

      // 简化绘制:直接画扇形,向右绘制
      ctx.arc(0, 0, radius, drawStartAngle, drawStartAngle + angle)
      ctx.closePath()
      ctx.fillStyle = color
      ctx.globalAlpha = 0.7
      ctx.fill()
      ctx.stroke()
    }

    ctx.restore()
  }

  // 计算角的角度(返回弧度)
  private getAngle(p1: Point, vertex: Point, p2: Point): number {
    const v1: Point = { x: p1.x - vertex.x, y: p1.y - vertex.y }
    const v2: Point = { x: p2.x - vertex.x, y: p2.y - vertex.y }
    const dot = v1.x * v2.x + v1.y * v2.y
    const mag1 = Math.sqrt(v1.x * v1.x + v1.y * v1.y)
    const mag2 = Math.sqrt(v2.x * v2.x + v2.y * v2.y)
    return Math.acos(dot / (mag1 * mag2))
  }
}

讨论HarmonyOS开发技术,专注于API与组件、DevEco Studio、测试、元服务和应用上架分发等。
更多推荐


 0
0 0
0- 0


 已为社区贡献400条内容

所有评论(0)