[鸿蒙原生应用]List页面设计开发
随易App开发实战 :List页面设计开发
项目地址:app_EasyRandom: 随易app (gitee.com)
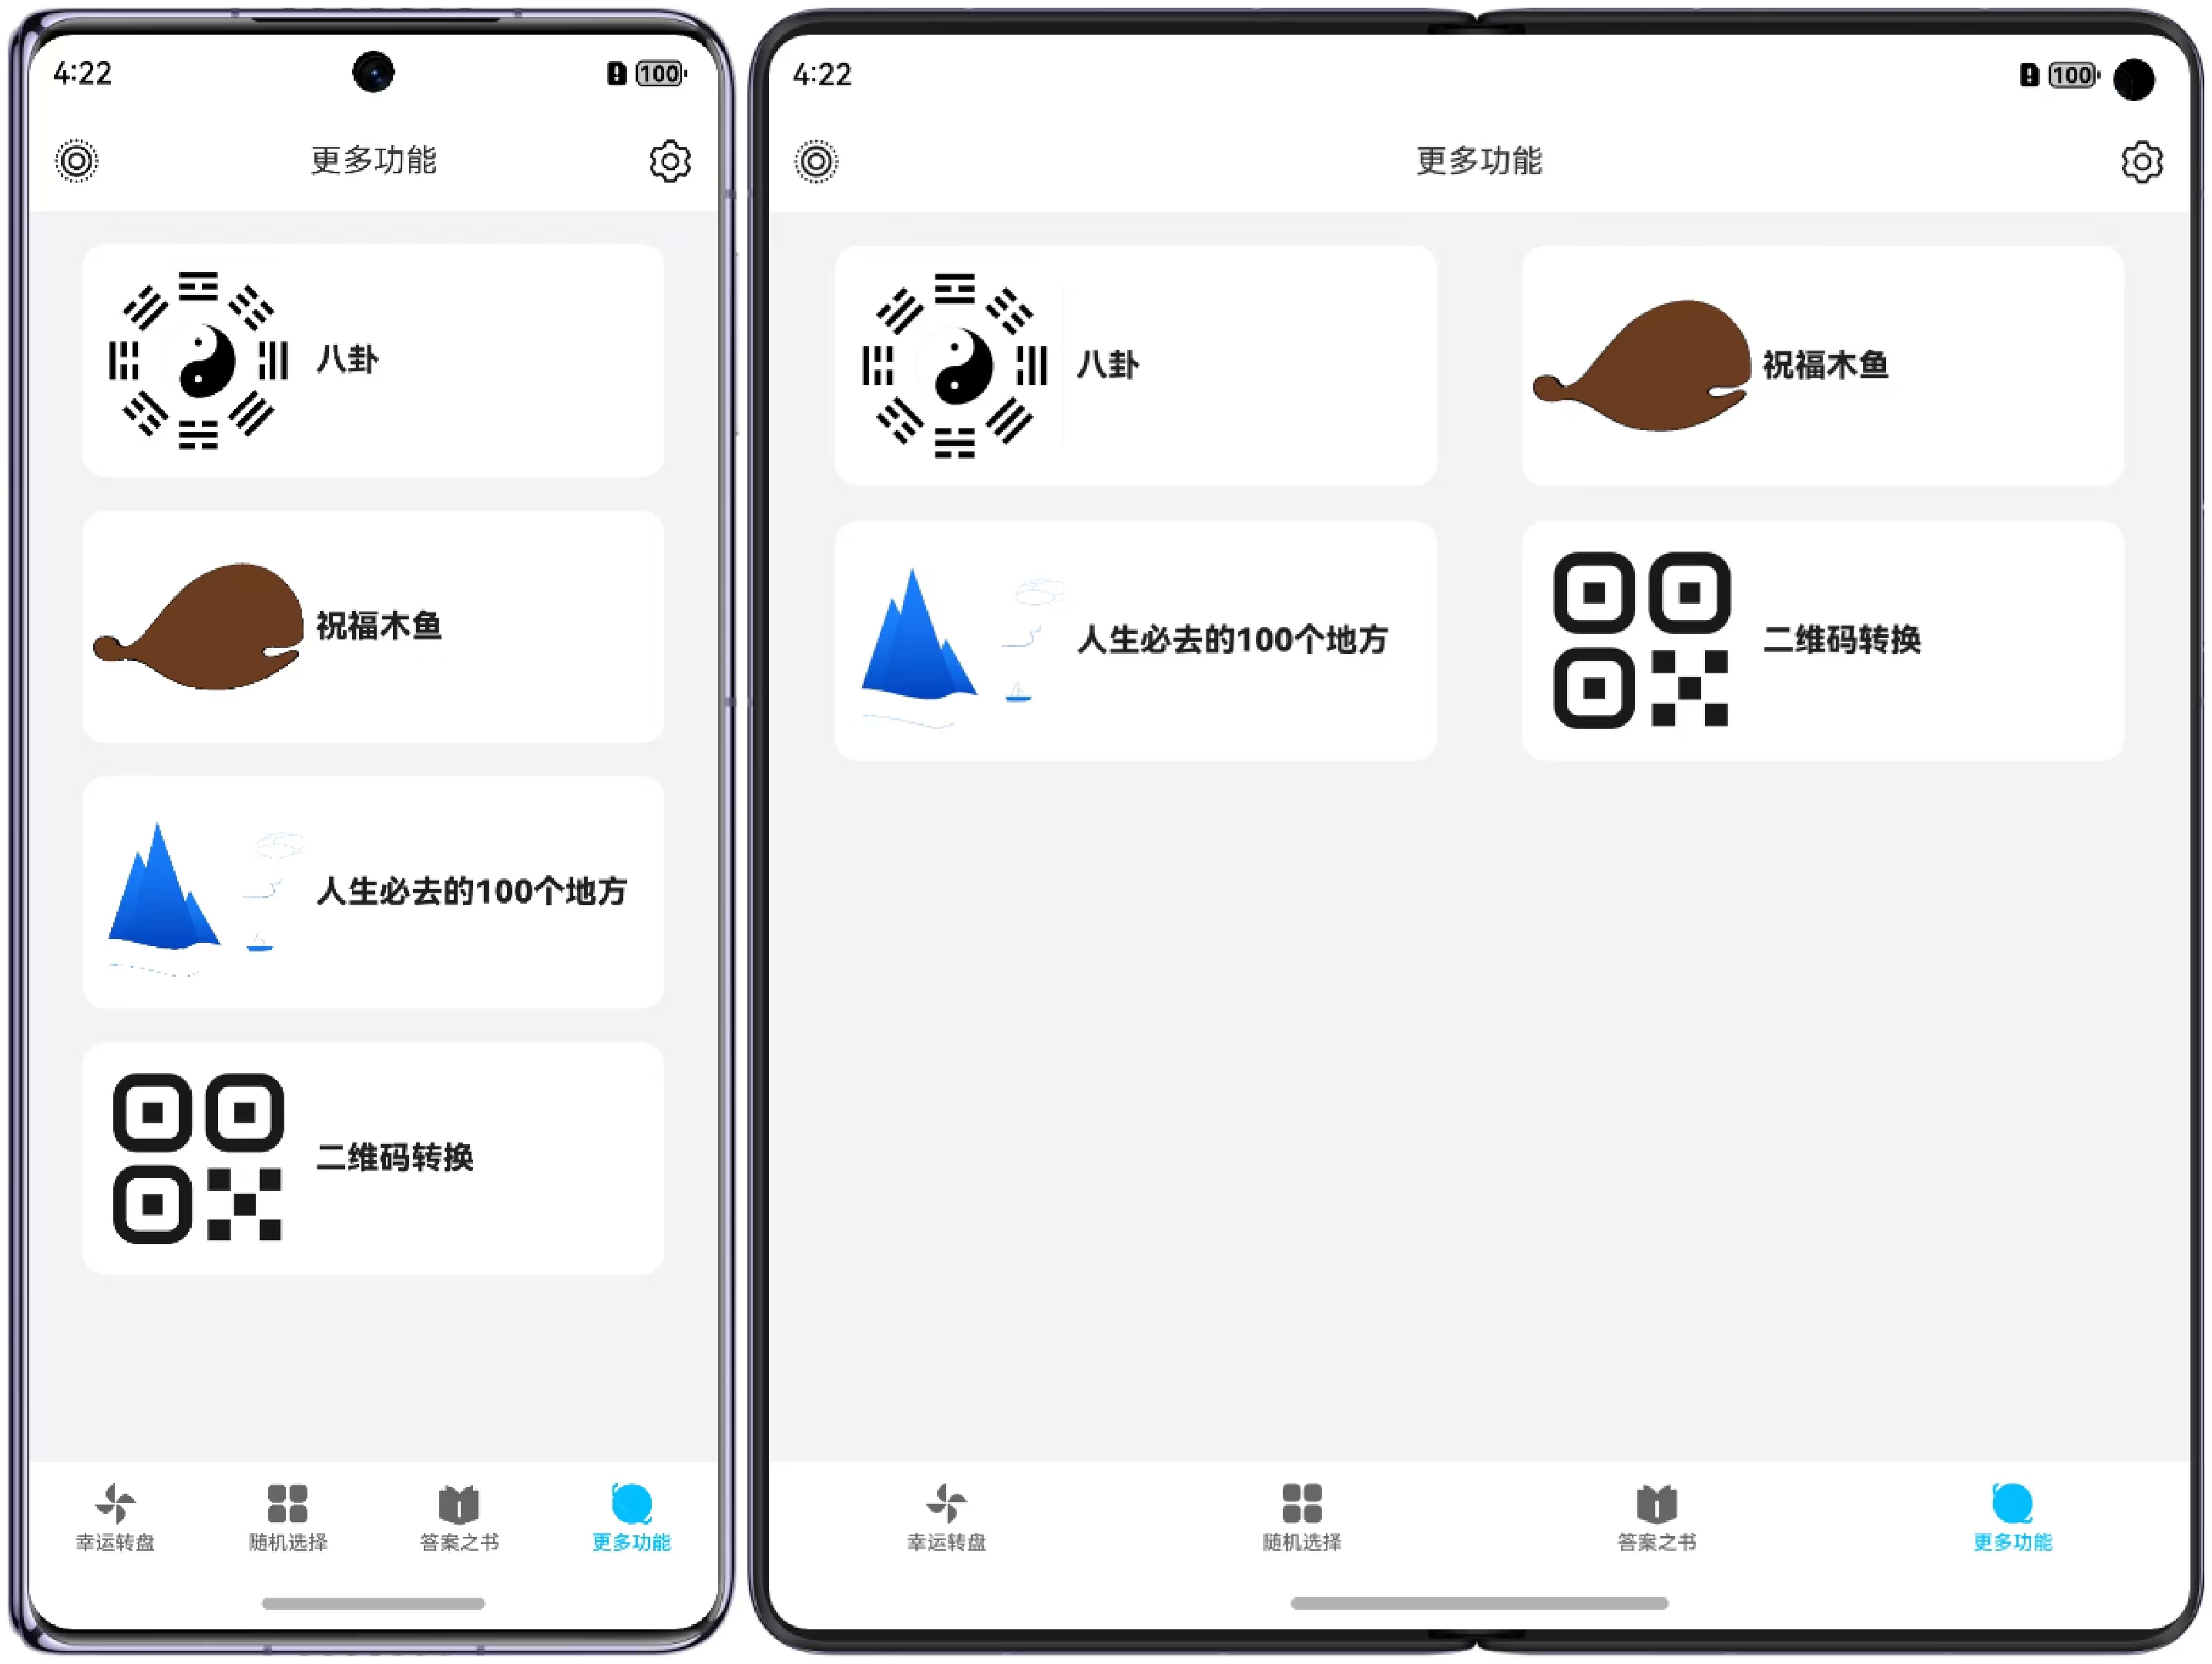
本案例,将通过List组件ForEach循环渲染配合断点功能,设计实现一个完整的响应式的列表渲染的List页面案例,该页面的主体List组件会在大设备中显示3列,在中小设备分别显示2列和3列。希望能助力您的应用开发,完整代码在文章末尾。
相关技术要素
本案例依照本人开发的原生应用随易,本案例完整代码将写在文章最后,项目的完整代码和详情请访问:随易Gitee项目地址(本案例文件位于项目product/default/src/main/ets/pages/MorePage文件中)
项目整体结构
├──common/src/main/ets                       //公共库
│  ├──components                             //公共组件
│  └──utils                                  //公共函数库
├──product/default/src/main/ets              // 代码区
│  ├──entryability                           //页面Ability
│  ├──components                             //子组件
│  ├──constants                              //公共常量
│  ├──datas                                  //页面数据
│  ├──pages                                  //主要页面
│  ├──defaultformability                     //卡片Ability
│  └──widgets                                //卡片组件
└──product/default/src/main/resources        // 资源文件目录
具体实现
1.分析数据结构
首先要进行对于组件的数据类型进行分析,通过统一的数据类型方便后续的循环渲染,数据显示方面需要图片和标题,在功能性上则需要根据需求设计(例如需要路由功能可添加路由路径与参数)。为了后续的样式定义还可以预留一个颜色类型,因此设计如下数据结构并建立示例数据。
class AppItem {
  name: string
  img: Resource
  url: string | null
  params: string | null
  colors: Array<[ResourceColor, number]> | null

  constructor(name: string, img: Resource, url: string, params: string | null,
    colors: Array<[ResourceColor, number]> | null) {
    this.name = name;
    this.img = img;
    this.url = url
    this.params = params
    this.colors = colors
  }
}

let Apps: Array<AppItem> = [
  new AppItem('八卦', $r("app.media.icon_DevineBaGua"),
    'components/DevineBaGua', '', [[0x00beff, 0], [0xffeb00, 0.5], [0xffff00, 1]]),
  new AppItem('祝福木鱼', $r("app.media.MuYu"),
    'components/RollBlessings', '', [[0x00beff, 0], [0xffeb00, 0.5], [0xffff00, 1]]),
  new AppItem('人生必去的100个地方', $r("app.media.icon_RandomPlace"),
    'components/RandomPlaces', '', null),
  new AppItem('二维码转换', $r("app.media.QRcode"),
    'components/TransQR', '', [[0x00beff, 0], [0xffeb00, 0.5], [0xffff00, 1]]),

];
2.页面基础搭建
使用List、ListItem组件配合列表渲染完成组件基础搭建
2.1子组件ListItem封装
通过子组件的封装和统一的数据结构,方便后续的列表渲染。在组件添加onClick事件函数,如此处为组件添加router功能,在数据定义时便可统一给组件的跳转位置和附带参数进行赋值,方便后续的修改添加等。
 @Builder
  ListItem(app: AppItem) {
    Row() {
      Column() {
        Row() {
          Image(app.img)
            .height('96%')
            .margin('2%')
            .aspectRatio(1)
            .border({
              color: Color.Blue,
              width: 0,
              style: BorderStyle.Solid,
              radius: 12
            })
          Text(app.name.toString())
            .opacity(0.88)
            .fontColor(0x000000)
            .fontSize('80%')
            .fontWeight(800)
            .textAlign(TextAlign.Center)
        }
        .position({ left: 0 })
      }
      .width('98%')
      .margin({ left: '1%', right: '1%', top: '5%' })
      .aspectRatio(5 / 2)
      .backgroundColor($r("app.color.view_bgc_1"))
      .border({
        color: Color.Red,
        width: 0,
        style: BorderStyle.Solid,
        radius: 12
      })
    }
    .width('100%')
    .border({
      color: Color.Blue,
      width: 0,
      style: BorderStyle.Solid,
      radius: 12
    })
    .justifyContent(FlexAlign.Center)
    .alignItems(VerticalAlign.Center)

    .onClick(() => {
      router.pushUrl({ url: app.url, params: app.params })
    })
  }
之前规范定义的参数在此便能够充分发挥作用,通过合理的赋值关系方便后续统一的进行列表渲染
2.2 forEach循环渲染
通过forEach循环渲染,我们可以方便的通过数据驱动来修改页面内容,方便后续的更改与维护。
        List() {
          ForEach(this.DataList, (app: AppItem) => {
            ListItem() {
              this.ListItem(app)
            }
          })
        }
2.3 调整组件样式
外观样式比较主观,仅作简单参考(完整示例代码在文章末尾)。List组件的具体开发细节可查看官方文档,在此列举几个重要的属性和用法:
- lanes():列表列数,此属性为后续的响应式布局提供基础,内部传入number类型可决列表的列数
- padding():
3.实现响应式(通过监听断点)
首先要了解ArkUI有很多种实现响应式和监听的方式:可在此链接选择响应式布局-布局能力,这里选择使用断点BreakPoint来实现,断点的基础使用方式如下:
import { BreakpointState, BreakpointSystem } from '@ohos/common'
//以上文件为从官网案例中下载

  @State currentBreakpoint: BreakpointState<string> = BreakpointState.of({ sm: "sm", md: "md", lg: "lg" })
  aboutToAppear() {
  BreakpointSystem.getInstance().attach(this.currentBreakpoint)
  BreakpointSystem.getInstance().start()
  }
  aboutToDisappear() {
  BreakpointSystem.getInstance().attach(this.currentBreakpoint)
   BreakpointSystem.getInstance().stop()
}此响应式的关键点便在于将断点值与上文提到的重要属性lanes()有机结合,使用三元运算符this.currentBreakpoint.value === 'sm' ? 1 : (this.currentBreakpoint.value === 'md' ? 2 : 3)。便可轻松实现小设备显示1列,中设备显示两列,大设备显示三列的效果。可根据实际情况进行调整,使用其它监听方式也同样可以使用此方法完成响应式操作,完整写法如下:
@Entry
@Component
struct MorePage {
  @State DataList: Array<AppItem> = Apps;
  @State currentBreakpoint: BreakpointState<string> = BreakpointState.of({ sm: "sm", md: "md", lg: "lg" })
  @State fontSize: number = 16;

  aboutToAppear() {
    BreakpointSystem.getInstance().attach(this.currentBreakpoint)
    BreakpointSystem.getInstance().start()
  }

  aboutToDisappear() {
    BreakpointSystem.getInstance().attach(this.currentBreakpoint)
    BreakpointSystem.getInstance().stop()
  }

  build() {
    Column() {
        List() {
          ForEach(this.DataList, (app: AppItem) => {
            ListItem() {
              this.ListItem(app)
            }
          })
        }
        .width('100%')
        .height('100%')
        .lanes(this.currentBreakpoint.value === 'sm' ? 1 : (this.currentBreakpoint.value === 'md' ? 2 : 3))
        .padding({ left:this.currentBreakpoint.value=='sm'?6:12,right:this.currentBreakpoint.value=='sm'?6:12})
    }

  }
}项目完整代码可前往app_EasyRandom - 码云 - 开源中国 (gitee.com)
页面完整代码:
import { BreakpointState, BreakpointSystem } from '@ohos/common';
import router from '@ohos.router';

class AppItem {
  name: string
  img: Resource
  url: string | null
  params: string | null
  colors: Array<[ResourceColor, number]> | null

  constructor(name: string, img: Resource, url: string, params: string | null,
    colors: Array<[ResourceColor, number]> | null) {
    this.name = name;
    this.img = img;
    this.url = url
    this.params = params
    this.colors = colors
  }
}

let Apps: Array<AppItem> = [
  new AppItem('八卦', $r("app.media.icon_DevineBaGua"),
    'components/DevineBaGua', '', [[0x00beff, 0], [0xffeb00, 0.5], [0xffff00, 1]]),

  new AppItem('祝福木鱼', $r("app.media.MuYu"),
    'components/RollBlessings', '', [[0x00beff, 0], [0xffeb00, 0.5], [0xffff00, 1]]),

  new AppItem('人生必去的100个地方', $r("app.media.icon_RandomPlace"),
    'components/RandomPlaces', '', null),

  new AppItem('二维码转换', $r("app.media.QRcode"),
    'components/TransQR', '', [[0x00beff, 0], [0xffeb00, 0.5], [0xffff00, 1]]),

];

@Entry
@Component
struct MorePage {
  @State DataList: Array<AppItem> = Apps;
  @State currentBreakpoint: BreakpointState<string> = BreakpointState.of({ sm: "sm", md: "md", lg: "lg" })
  @State fontSize: number = 16;

  aboutToAppear() {
    BreakpointSystem.getInstance().attach(this.currentBreakpoint)
    BreakpointSystem.getInstance().start()
  }

  aboutToDisappear() {
    BreakpointSystem.getInstance().attach(this.currentBreakpoint)
    BreakpointSystem.getInstance().stop()
  }

  @Builder
  ListItem(app: AppItem) {
    Row() {
      Column() {
        Row() {
          Image(app.img)
            .height('96%')
            .margin('2%')
            .aspectRatio(1)
            .border({
              color: Color.Blue,
              width: 0,
              style: BorderStyle.Solid,
              radius: 12
            })
          Text(app.name.toString())
            .opacity(0.88)
            .fontColor(0x000000)
            .fontSize('80%')
            .fontWeight(800)
            .textAlign(TextAlign.Center)
        }
        .position({ left: 0 })
      }
      .width('98%')
      .margin({ left: '1%', right: '1%', top: '5%' })
      .aspectRatio(5 / 2)
      .backgroundColor($r("app.color.view_bgc_1"))
      .border({
        color: Color.Red,
        width: 0,
        style: BorderStyle.Solid,
        radius: 12
      })
    }
    .width('100%')
    .border({
      color: Color.Blue,
      width: 0,
      style: BorderStyle.Solid,
      radius: 12
    })
    .justifyContent(FlexAlign.Center)
    .alignItems(VerticalAlign.Center)

    .onClick(() => {
      router.pushUrl({ url: app.url, params: app.params })
    })
  }

  build() {
    Column() {
        List() {
          ForEach(this.DataList, (app: AppItem) => {
            ListItem() {
              this.ListItem(app)
            }
          })
        }
        .width('100%')
        .height('100%')
        .lanes(this.currentBreakpoint.value === 'sm' ? 1 : (this.currentBreakpoint.value === 'md' ? 2 : 3))
        .padding({ left:this.currentBreakpoint.value=='sm'?6:12,right:this.currentBreakpoint.value=='sm'?6:12})
    }

  }
}

export default MorePage
讨论HarmonyOS开发技术,专注于API与组件、DevEco Studio、测试、元服务和应用上架分发等。
更多推荐

 29
29 0
0- 0


 已为社区贡献4条内容

所有评论(0)