【鸿蒙开发】超全面解读 带你充分掌握---“应用沉浸式效果开发”
·
系列文章目录
【鸿蒙开发】鸿蒙开发基础干货篇–1
【鸿蒙开发】基础干货篇–2 小白入门手册(内含Dev Eco安装教程和汉化插件安装)
【鸿蒙开发】基础干货篇–3 小白入门手册 (内含模拟器保姆级安装使用教程)
【鸿蒙开发】基础干货篇–4 小白入门手册(内含Stage模型工程目录结构和UIAbility 组件详解)
【鸿蒙开发】基础干货篇–5 “一篇带你掌握应用状态”
【鸿蒙开发】基础干货篇–6 “超简单持久化存储PersistentStorage”
【鸿蒙开发】“一篇带你掌握HAP、HAR、HSP”
【鸿蒙开发】基础干货篇–7 “一篇带你掌握三种页面跳转”
文章目录
前言
开发应用沉浸式效果主要指通过调整状态栏、应用界面和导航条的显示效果来减少状态栏导航条等系统界面的突兀感,从而使用户获得最佳的UI体验。
一、界面元素
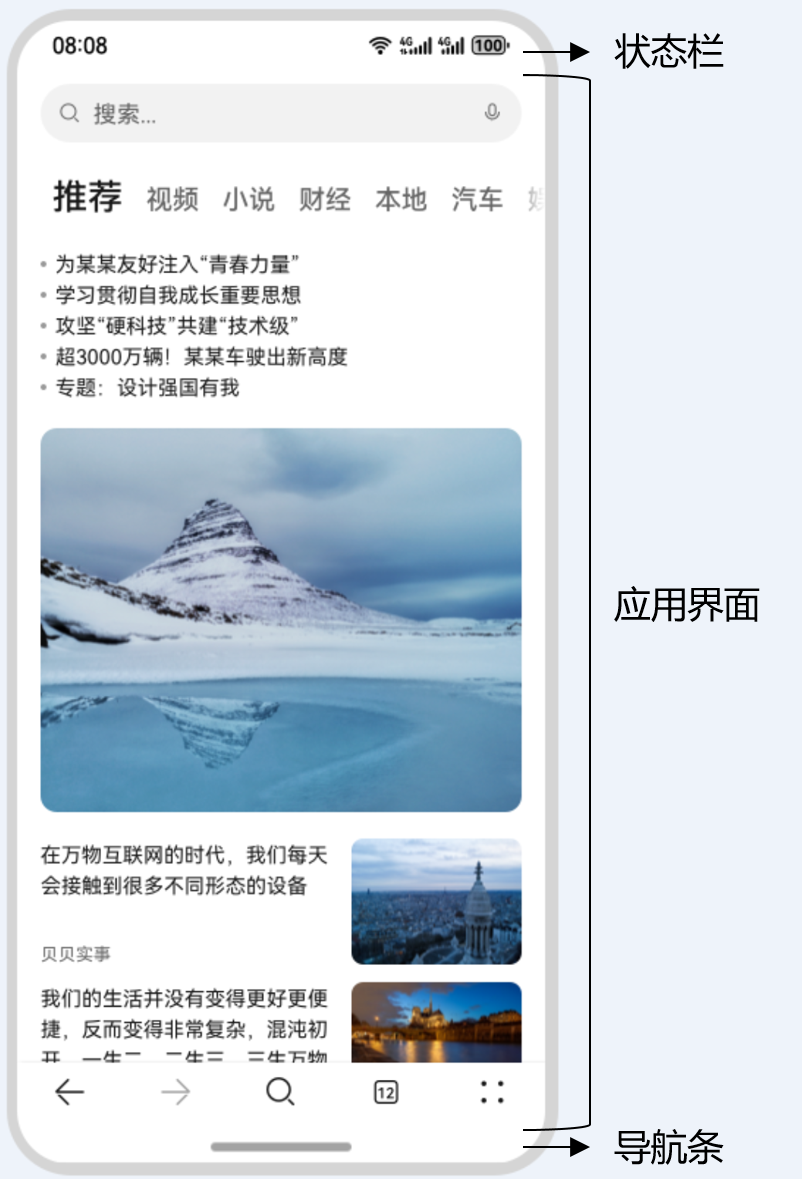
我们使用的绝大多数应用,全屏窗口UI元素包括状态栏、应用界面和底部导航条,其中状态栏和导航条,通常在沉浸式布局下称为避让区;避让区之外的区域称为安全区。
界面元素示意图:
二、设计要素
- UI元素避让处理:导航条底部区域可以响应点击事件,除此之外的可交互UI元素和应用关键信息不建议放到导航条区域。状态栏显示系统信息,如果与界面元素有冲突,需要考虑避让状态栏。
- 沉浸式效果处理:将状态栏和导航条颜色与界面元素颜色相匹配,不出现明显的突兀感。
针对上面的设计要求,我们有两种方式实现应用沉浸式效果。
三、窗口全屏布局方案
窗口全屏布局方案主要涉及以下应用扩展布局,全屏显示,不隐藏避让区和应用扩展布局,隐藏避让区两个应用场景。
1.应用扩展布局,全屏显示,不隐藏避让区
- 调用窗口强制全屏布局接口setWindowLayoutFullScreen()接口设置窗口全屏。界面元素可以延伸到状态栏和导航条。
// EntryAbility.ets
import { AbilityConstant, UIAbility, Want } from '@kit.AbilityKit';
import { window } from '@kit.ArkUI';
import { BusinessError } from '@kit.BasicServicesKit';

export default class EntryAbility extends UIAbility {
  // ...

  onWindowStageCreate(windowStage: window.WindowStage): void {
    windowStage.loadContent('pages/Index', (err, data) => {
      if (err.code) {
        return;
      }

      let windowClass: window.Window = windowStage.getMainWindowSync(); // 获取应用主窗口
      // 1. 设置窗口全屏
      let isLayoutFullScreen = true;
      windowClass.setWindowLayoutFullScreen(isLayoutFullScreen).then(() => {
        console.info('Succeeded in setting the window layout to full-screen mode.');
      }).catch((err: BusinessError) => {
        console.error('Failed to set the window layout to full-screen mode. Cause:' + JSON.stringify(err));
      });
      // 进行后续步骤2、3中的操作
    });
  }
}
- 使用getWindowAvoidArea()接口获取当前布局遮挡区域(例如状态栏、导航条)。
// EntryAbility.ets
// 2. 获取布局避让遮挡的区域
let type = window.AvoidAreaType.TYPE_NAVIGATION_INDICATOR; // 以导航条避让为例
let avoidArea = windowClass.getWindowAvoidArea(type);
let bottomRectHeight = avoidArea.bottomRect.height; // 获取到导航条区域的高度
AppStorage.setOrCreate('bottomRectHeight', bottomRectHeight);

type = window.AvoidAreaType.TYPE_SYSTEM; // 以状态栏避让为例
avoidArea = windowClass.getWindowAvoidArea(type);
let topRectHeight = avoidArea.topRect.height; // 获取状态栏区域高度
AppStorage.setOrCreate('topRectHeight', topRectHeight);
- 注册on(‘avoidAreaChange’)监听函数,动态获取避让区域的变更信息实时数据。
// EntryAbility.ets
// 3. 注册监听函数,动态获取避让区域数据
windowClass.on('avoidAreaChange', (data) => {
  if (data.type === window.AvoidAreaType.TYPE_SYSTEM) {
    let topRectHeight = data.area.topRect.height;
    AppStorage.setOrCreate('topRectHeight', topRectHeight);
  } else if (data.type == window.AvoidAreaType.TYPE_NAVIGATION_INDICATOR) {
    let bottomRectHeight = data.area.bottomRect.height;
    AppStorage.setOrCreate('bottomRectHeight', bottomRectHeight);
  }
});
- 对控件顶部设置padding(具体数值与状态栏高度一致),实现对状态栏的避让;对底部设置padding(具体数值与底部导航条区域高度一致),实现对底部导航条的避让。
// Index.ets
@Entry
@Component
struct Index {
  @StorageProp('bottomRectHeight')
  bottomRectHeight: number = 0;
  @StorageProp('topRectHeight')
  topRectHeight: number = 0;

  build() {
    Row() {
      Column() {
       ...
      }
      .width('100%')
      .height('100%')
      .backgroundColor('#008000')
      // top数值与状态栏区域高度保持一致;bottom数值与导航条区域高度保持一致
      .padding(
      { top: px2vp(this.topRectHeight),
       bottom: px2vp(this.bottomRectHeight)
       })
    }
  }
}
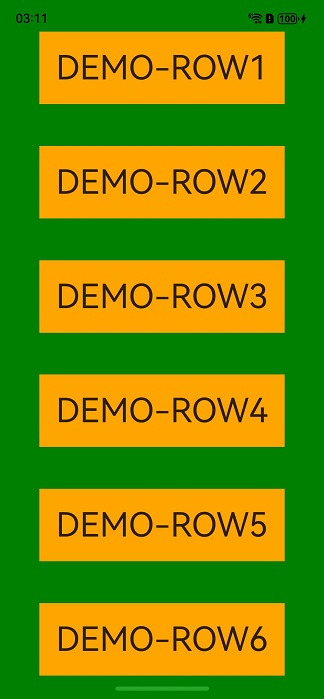
参考示例图:
2.应用扩展布局,隐藏避让区
此场景下导航条会自动隐藏,适用于游戏、电影等应用场景。可以通过从底部上滑唤出导航条。
- 调用setWindowLayoutFullScreen()接口设置窗口全屏。
// EntryAbility.ets
import { AbilityConstant, UIAbility, Want } from '@kit.AbilityKit';
import { window } from '@kit.ArkUI';
import { BusinessError } from '@kit.BasicServicesKit';

export default class EntryAbility extends UIAbility {
  // ...

  onWindowStageCreate(windowStage: window.WindowStage): void {
    windowStage.loadContent('pages/Index', (err, data) => {
      if (err.code) {
        return;
      }

      let windowClass: window.Window = windowStage.getMainWindowSync(); // 获取应用主窗口
      // 1. 设置窗口全屏
      let isLayoutFullScreen = true;
      windowClass.setWindowLayoutFullScreen(isLayoutFullScreen).then(() => {
        console.info('Succeeded in setting the window layout to full-screen mode.');
      }).catch((err: BusinessError) => {
        console.error(`Failed to set the window layout to full-screen mode. Code is ${err.code}, message is ${err.message}`);
      });
      // 进行后续步骤2中的状态栏和导航条的隐藏操作
    });
  }
}
- 调用setSpecificSystemBarEnabled()接口设置状态栏和导航条的具体显示/隐藏状态,此场景下将其设置为隐藏
// EntryAbility.ets
// 2. 设置状态栏隐藏
windowClass.setSpecificSystemBarEnabled('status', false).then(() => {
  console.info('Succeeded in setting the status bar to be invisible.');
}).catch((err: BusinessError) => {
  console.error(`Failed to set the status bar to be invisible. Code is ${err.code}, message is ${err.message}`);
});
// 2. 设置导航条隐藏
windowClass.setSpecificSystemBarEnabled('navigationIndicator', false).then(() => {
  console.info('Succeeded in setting the navigation indicator to be invisible.');
}).catch((err: BusinessError) => {
  console.error(`Failed to set the navigation indicator to be invisible. Code is ${err.code}, message is ${err.message}`);
});
- 在界面中无需进行导航条避让操作。
// Index.ets
@Entry()
@Component
struct Index {
  build() {
    Row() {
      Column() {
       ...
      }
      .width('100%')
      .height('100%')
      .backgroundColor('#008000')
    }
  }
}
四、组件安全区方案
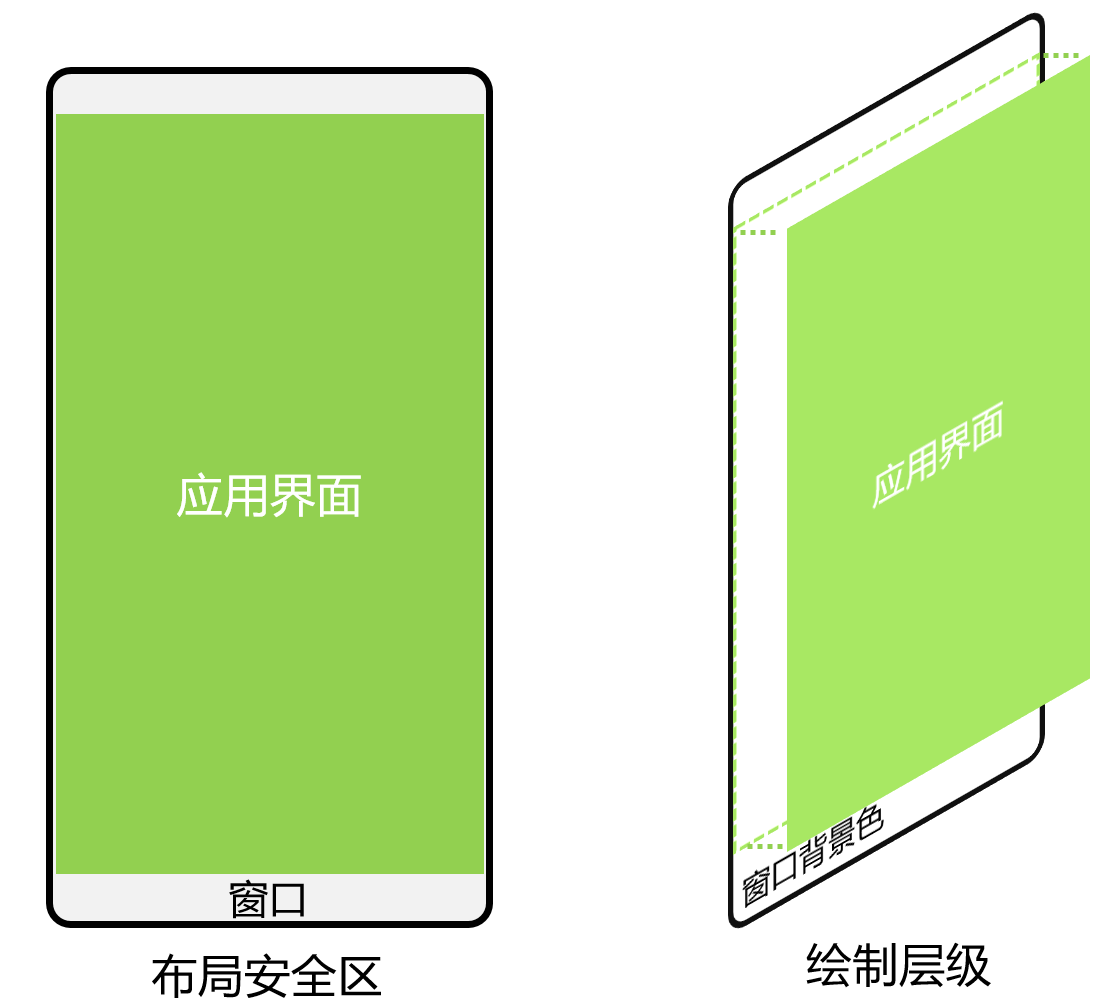
应用在默认情况下窗口背景绘制范围是全屏,但UI元素被限制在安全区内(自动排除状态栏和导航条)进行布局,来避免界面元素被状态栏和导航条遮盖。
针对状态栏和导航条颜色与界面元素颜色不匹配问题,有两种方式实现沉浸式效果。
1.状态栏和导航条颜色相同场景,可以通过设置窗口的背景色来实现沉浸式效果。窗口背景色可通过setWindowBackgroundColor()进行设置。
import { AbilityConstant, UIAbility, Want } from '@kit.AbilityKit';
import { window } from '@kit.ArkUI';

export default class EntryAbility extends UIAbility {
  // ...

  onWindowStageCreate(windowStage: window.WindowStage): void {
    windowStage.loadContent('pages/Index', (err, data) => {
      if (err.code) {
        return;
      }

      // 设置全窗颜色和应用元素颜色一致
      windowStage.getMainWindowSync().setWindowBackgroundColor('#008000');
    });
  }
}
2.状态栏和导航条颜色不同时,可以使用expandSafeArea属性扩展安全区域属性进行调整。
// xxx.ets
@Entry
@Component
struct Example {
  build() {
    Column() {
      Row() {
        Text('Top Row').fontSize(40).textAlign(TextAlign.Center).width('100%')
      }
      .backgroundColor('#F08080')
      // 设置顶部绘制延伸到状态栏
      .expandSafeArea([SafeAreaType.SYSTEM], [SafeAreaEdge.TOP])

    ...
      Row() {
        Text('Bottom Row').fontSize(40).textAlign(TextAlign.Center).width('100%')
      }
      .backgroundColor(Color.Orange)
      // 设置底部绘制延伸到导航条
      .expandSafeArea([SafeAreaType.SYSTEM], [SafeAreaEdge.BOTTOM])
    }
    .width('100%').height('100%').alignItems(HorizontalAlign.Center)
    .backgroundColor('#008000')
    .justifyContent(FlexAlign.SpaceBetween)
  }
}
总结
以上就是今天要讲的内容,本文仅仅简单介绍了应用沉浸式效果开发的使用.

讨论HarmonyOS开发技术,专注于API与组件、DevEco Studio、测试、元服务和应用上架分发等。
更多推荐



 36
36 0
0- 0


 已为社区贡献9条内容

所有评论(0)