HarmonyOS 天气 App 实战(上):项目搭建与天气主页
系列: HarmonyOS 本地工具 App 实战 · 第 1 篇
引言
天气查询是每个智能手机用户日常使用频率最高的功能之一。一个设计精美的天气应用不仅能展示当前温度,还能通过逐日预报、生活指数等功能帮助用户合理安排出行。本文将带你从零开始,使用 HarmonyOS 的 Weather Service Kit 和 Location Kit,结合 ArkUI 声明式开发框架,搭建一个功能完整的天气应用。
通过本文你将学到:
- 如何使用 Weather Service Kit 获取实时天气和逐日预报数据,并在 Kit 不可用时降级到 QWeather REST API
- 如何使用 Location Kit 获取设备当前位置并进行反向地理编码
- 如何使用 Column、Row、Stack 构建天气主页 UI 布局
- 如何使用 @State 管理组件状态并驱动 UI 刷新
- 如何使用 Tabs 构建多页签路由框架
真机验证(2026-06-30):示例工程已在
EMA-AL00U(HarmonyOS 6.1.1)安装并启动。WeatherService采用双源策略:优先调用WeatherServiceKit的weatherService.getWeather(),若 Kit 未开通能力或返回错误,则自动降级到 QWeather REST API(通过@kit.NetworkKit的http模块发起请求),确保真机始终能获取实时天气数据。定位授权失败时,示例会降级到广州默认坐标,天气数据仍正常获取。
环境准备
开通 Weather Service Kit
调用天气接口前,需要在华为开发者后台为当前应用开通 Weather Service Kit,并确保签名 Profile 对应同一个 bundleName。若只导入 Kit、但没有开通服务,getWeather() 会返回错误码 1011900001。这一步属于云端应用配置,无法通过 ArkTS 代码绕过。
好消息是:即使未开通 Weather Service Kit,我们的代码也能正常工作——它会自动降级到 QWeather REST API 获取天气数据。这意味着你可以先跑通项目、看到效果,再去开发者后台开通 Kit 能力以获得更好的集成体验。
建议按以下顺序排查:确认应用包名 → 开通天气服务 → 重新生成调试 Profile → 清理并重新安装应用。不要在能力未开通时用随机数据冒充接口返回值。
| 项目 | 版本 |
|---|---|
| DevEco Studio | 6.1.1 Release |
| API Level | API 24 |
| 设备 | 真机或模拟器 |
依赖配置
本项目使用 HarmonyOS 系统 Kit,无需额外安装第三方依赖。Weather Service Kit、Location Kit 和 NetworkKit 均为系统能力,通过 @kit.* 导入即可使用。
// oh-package.json5
{
  "name": "weather_app",
  "version": "1.0.0",
  "description": "天气查询应用",
  "main": "",
  "author": "",
  "license": "Apache-2.0",
  "dependencies": {},
  "devDependencies": {}
}
权限配置
天气查询需要定位权限来获取当前位置,同时需要网络权限来访问 QWeather REST API。我们同时声明精确定位和粗略定位权限:
// module.json5
{
  "module": {
    "name": "entry",
    "type": "entry",
    "requestPermissions": [
      {
        "name": "ohos.permission.LOCATION",
        "reason": "$string:location_permission_reason",
        "usedScene": {
          "abilities": ["EntryAbility"],
          "when": "always"
        }
      },
      {
        "name": "ohos.permission.APPROXIMATELY_LOCATION",
        "reason": "$string:location_permission_reason",
        "usedScene": {
          "abilities": ["EntryAbility"],
          "when": "always"
        }
      },
      {
        "name": "ohos.permission.INTERNET",
        "reason": "$string:internet_permission_reason",
        "usedScene": {
          "abilities": ["EntryAbility"],
          "when": "inuse"
        }
      }
    ]
  }
}
说明:HarmonyOS 的定位权限采用分级机制。精确定位权限(
ohos.permission.LOCATION)和粗略定位权限(ohos.permission.APPROXIMATELY_LOCATION)需要同时声明——精确定位不自动包含粗略定位。INTERNET权限用于 QWeather REST API 的网络请求,usedScene.when设为inuse表示仅在前台使用时需要。
核心实现
Step 1: 创建项目结构
目标: 使用 DevEco Studio 创建 HarmonyOS 项目,建立清晰的目录结构。
在 DevEco Studio 中选择 “Empty Ability” 模板创建项目,选择 Stage 模型。项目创建完成后,建立以下目录结构:
entry/src/main/ets/
├── entryability/
│   └── EntryAbility.ets          // 应用入口
├── pages/
│   └── Index.ets                 // 多页签主页
├── model/
│   ├── WeatherData.ets           // 天气数据模型
│   ├── TodoData.ets              // 待办数据模型
│   └── BudgetData.ets            // 预算数据模型
├── service/
│   ├── WeatherService.ets        // 天气服务封装(双源降级)
│   └── LocationService.ets       // 定位服务封装
├── views/
│   ├── weather/WeatherPage.ets   // 天气页
│   ├── todo/TodoPage.ets         // 待办页
│   └── budget/BudgetPage.ets     // 记账页
├── db/
│   └── AppDatabase.ets           // 数据库封装
└── common/
    └── Constants.ets             // 常量定义
这种分层结构将数据模型、业务服务和 UI 页面分离,便于后续维护和扩展。当功能增多时,每个模块职责清晰,不会互相干扰。views/ 目录按功能分子目录(weather/、todo/、budget/),对应底部 Tab 的三个页面。
Step 2: 定义数据模型
目标: 定义天气数据的 TypeScript 接口,为后续的数据处理提供类型安全。
// model/WeatherData.ets

/** 当前天气信息 */
export interface CurrentWeather {
  temperature: number;
  weatherDescription: string;
  humidity: number;
  windDirection: string;
  windSpeed: number;
  feelsLikeTemperature: number;
  uvIndex: number;
}

/** 逐日天气预报 */
export interface DailyForecast {
  date: string;
  dayOfWeek: string;
  weatherDescription: string;
  minTemperature: number;
  maxTemperature: number;
  dayWindDirection: string;
  dayWindSpeed: number;
}

/** 天气数据聚合 */
export interface WeatherInfo {
  cityName: string;
  current: CurrentWeather;
  forecasts: DailyForecast[];
  updateTime: string;
}
这些接口与 Weather Service Kit 和 QWeather API 返回的数据结构对应,但经过简化,只保留 UI 展示所需的字段。这样做的好处是:即使底层 Kit 的数据结构发生变化,我们的 UI 层也不受影响。
Step 3: 封装天气服务(双源降级策略)
目标: 将天气数据获取封装为独立服务类,实现 Weather Service Kit 优先、QWeather REST API 兜底的双源降级策略。
// service/WeatherService.ets

import { hilog } from '@kit.PerformanceAnalysisKit';
import { weatherService } from '@kit.WeatherServiceKit';
import { http } from '@kit.NetworkKit';
import { WeatherInfo, CurrentWeather, DailyForecast } from '../model/WeatherData';

const TAG = 'WeatherService';

// QWeather API 配置
const QWEATHER_HOST = 'https://ky6mte27bb.re.qweatherapi.com';
const QWEATHER_KEY = 'ba634213a4234f2bb89cd9eaff3e5978';

/** QWeather 当前天气 API 响应 */
interface QWeatherNowResponse {
  code: string;
  updateTime: string;
  now: QWeatherNowItem;
}

interface QWeatherNowItem {
  temp: string;
  text: string;
  windDir: string;
  windScale: string;
  humidity: string;
  feelsLike: string;
}

/** QWeather 7日预报 API 响应 */
interface QWeatherDailyResponse {
  code: string;
  daily: QWeatherDailyItem[];
}

interface QWeatherDailyItem {
  fxDate: string;
  tempMax: string;
  tempMin: string;
  textDay: string;
  textNight: string;
  windDirDay: string;
  windScaleDay: string;
}

export class WeatherService {
  private static instance: WeatherService;

  static getInstance(): WeatherService {
    if (!WeatherService.instance) {
      WeatherService.instance = new WeatherService();
    }
    return WeatherService.instance;
  }

  async getWeatherByLocation(latitude: number, longitude: number): Promise<WeatherInfo> {
    // 优先使用 WeatherServiceKit,失败时降级到 QWeather API
    try {
      return await this.getWeatherByKit(latitude, longitude);
    } catch (error) {
      let msg = '';
      if (error instanceof Error) {
        msg = error.message;
      }
      hilog.warn(0, TAG, `WeatherServiceKit failed: ${msg}, falling back to QWeather API`);
      return await this.getWeatherByApi(latitude, longitude);
    }
  }

  /** 主方案:通过 HarmonyOS WeatherServiceKit 获取天气 */
  private async getWeatherByKit(latitude: number, longitude: number): Promise<WeatherInfo> {
    const weather = await weatherService.getWeather({
      location: { latitude, longitude },
      limitedDatasets: [weatherService.Dataset.CURRENT, weatherService.Dataset.DAILY]
    });
    if (!weather.current) {
      throw new Error('Weather Service Kit returned no current weather');
    }

    const current: CurrentWeather = {
      temperature: Math.round(weather.current.temperature),
      weatherDescription: weather.current.condition.description,
      humidity: Math.round(weather.current.humidity),
      windDirection: '风力',
      windSpeed: weather.current.wind.level,
      feelsLikeTemperature: Math.round(weather.current.apparentTemperature),
      uvIndex: weather.current.uvIndex.value,
    };

    const forecasts: DailyForecast[] = [];
    const dailyItems = weather.daily?.forecast ?? [];
    dailyItems.slice(0, 7).forEach((item: weatherService.DailyWeather) => {
      const forecast: DailyForecast = {
        date: this.formatDate(item.date),
        dayOfWeek: this.getDayOfWeek(item.date),
        weatherDescription: item.daytimeForecast.condition.description,
        minTemperature: Math.round(item.lowTemperature),
        maxTemperature: Math.round(item.highTemperature),
        dayWindDirection: '风力',
        dayWindSpeed: item.daytimeForecast.wind.level,
      };
      forecasts.push(forecast);
    });

    return {
      cityName: weather.city?.localizedName ?? '当前位置',
      current: current,
      forecasts: forecasts,
      updateTime: weather.current.updateTime.toLocaleTimeString(),
    };
  }

  /** 兜底方案:通过 QWeather REST API 获取天气 */
  private async getWeatherByApi(latitude: number, longitude: number): Promise<WeatherInfo> {
    // 经纬度格式:longitude,latitude(QWeather 要求经度在前)
    const location = `${longitude.toFixed(2)},${latitude.toFixed(2)}`;

    // 依次请求当前天气和7日预报(ArkTS 不支持解构赋值)
    const nowResult = await this.fetchNowApi(location);

    if (nowResult.code !== '200') {
      hilog.error(0, TAG, `QWeather now API returned code: ${nowResult.code}`);
      throw new Error(`QWeather API error: code=${nowResult.code}`);
    }

    const dailyResult = await this.fetchDailyApi(location);
    if (dailyResult.code !== '200') {
      hilog.warn(0, TAG, `QWeather daily API returned code: ${dailyResult.code}, using empty forecasts`);
    }

    const now = nowResult.now;
    const current: CurrentWeather = {
      temperature: Number(now.temp),
      weatherDescription: now.text,
      humidity: Number(now.humidity),
      windDirection: now.windDir,
      windSpeed: Number(now.windScale),
      feelsLikeTemperature: Number(now.feelsLike),
      uvIndex: 0,
    };

    const forecasts: DailyForecast[] = [];
    const dailyItems = dailyResult.daily ?? [];
    dailyItems.slice(0, 7).forEach((item: QWeatherDailyItem) => {
      const dateObj = new Date(item.fxDate);
      const forecast: DailyForecast = {
        date: item.fxDate,
        dayOfWeek: this.getDayOfWeek(dateObj),
        weatherDescription: item.textDay,
        minTemperature: Number(item.tempMin),
        maxTemperature: Number(item.tempMax),
        dayWindDirection: item.windDirDay,
        dayWindSpeed: Number(item.windScaleDay),
      };
      forecasts.push(forecast);
    });

    const updateTime = nowResult.updateTime ?? new Date().toLocaleTimeString();
    return {
      cityName: '当前位置',
      current: current,
      forecasts: forecasts,
      updateTime: updateTime,
    };
  }

  /** 请求当前天气 API */
  private async fetchNowApi(location: string): Promise<QWeatherNowResponse> {
    const url = `${QWEATHER_HOST}/v7/weather/now?location=${location}&lang=zh&key=${QWEATHER_KEY}`;
    const resultStr = await this.fetchApiRaw(url);
    const result: QWeatherNowResponse = JSON.parse(resultStr);
    return result;
  }

  /** 请求7日预报 API */
  private async fetchDailyApi(location: string): Promise<QWeatherDailyResponse> {
    const url = `${QWEATHER_HOST}/v7/weather/7d?location=${location}&lang=zh&key=${QWEATHER_KEY}`;
    const resultStr = await this.fetchApiRaw(url);
    const result: QWeatherDailyResponse = JSON.parse(resultStr);
    return result;
  }

  /** 通用 HTTP GET 请求,返回响应体字符串 */
  private async fetchApiRaw(url: string): Promise<string> {
    const httpRequest = http.createHttp();
    try {
      const response = await httpRequest.request(url, {
        method: http.RequestMethod.GET,
        header: { 'Content-Type': 'application/json' },
        connectTimeout: 10000,
        readTimeout: 10000,
      });

      if (response.responseCode !== 200) {
        hilog.error(0, TAG, `HTTP request failed: ${url} -> ${response.responseCode}`);
        throw new Error(`HTTP ${response.responseCode}`);
      }

      const resultStr: string = typeof response.result === 'string' ? response.result : JSON.stringify(response.result);
      return resultStr;
    } finally {
      httpRequest.destroy();
    }
  }

  private getDayOfWeek(date: Date): string {
    const days = ['周日', '周一', '周二', '周三', '周四', '周五', '周六'];
    return days[date.getDay()];
  }

  private formatDate(date: Date): string {
    return `${date.getFullYear()}-${String(date.getMonth() + 1).padStart(2, '0')}-${String(date.getDate()).padStart(2, '0')}`;
  }
}
封装 WeatherService 的核心思想是双源降级:
- 主方案
getWeatherByKit:调用@kit.WeatherServiceKit的weatherService.getWeather(),指定获取CURRENT和DAILY两个数据集。Kit 返回的数据结构经过转换映射到应用内部的WeatherInfo模型。 - 兜底方案
getWeatherByApi:当 Kit 抛出异常(如能力未开通、网络异常)时,自动降级到 QWeather REST API。通过@kit.NetworkKit的http模块发起 HTTP 请求,解析 JSON 响应。
有几个 ArkTS 特有的细节值得注意:
- 单例模式:
getInstance()确保全局只有一个 WeatherService 实例,避免重复创建 HTTP 连接。 - 显式类型注解:
JSON.parse(resultStr)的返回值必须用const result: QWeatherNowResponse显式标注类型,这是 ArkTS 的强制要求——ArkTS 不允许隐式的any类型。 - 类型守卫而非类型断言:HTTP 响应体使用
typeof response.result === 'string' ? response.result : JSON.stringify(response.result)做类型守卫,而不是response.result as string。ArkTS 推荐使用类型守卫来保证类型安全。 - forEach 替代 map:ArkTS 对函数式 API 的支持有限,使用
forEach+push比map更可靠。
Step 4: 封装定位服务
目标: 使用 Location Kit 获取设备当前位置,并通过反向地理编码获取城市名称。
// service/LocationService.ets

import { geoLocationManager } from '@kit.LocationKit';
import { hilog } from '@kit.PerformanceAnalysisKit';
import { abilityAccessCtrl, bundleManager, Permissions } from '@kit.AbilityKit';

const TAG = 'LocationService';

interface LocationResult {
  latitude: number;
  longitude: number;
}

export class LocationService {
  private static instance: LocationService;

  static getInstance(): LocationService {
    if (!LocationService.instance) {
      LocationService.instance = new LocationService();
    }
    return LocationService.instance;
  }

  async checkAndRequestPermission(context: Context): Promise<boolean> {
    const permissions: Permissions[] = [
      'ohos.permission.LOCATION',
      'ohos.permission.APPROXIMATELY_LOCATION'
    ];
    const atManager = abilityAccessCtrl.createAtManager();

    try {
      const grantStatus = await atManager.checkAccessToken(
        bundleManager.getBundleInfoForSelfSync(bundleManager.BundleFlag.GET_BUNDLE_INFO_DEFAULT).appInfo.accessTokenId,
        permissions[1]
      );

      if (grantStatus === abilityAccessCtrl.GrantStatus.PERMISSION_GRANTED) {
        return true;
      }

      const result = await atManager.requestPermissionsFromUser(context, permissions);
      return result.authResults.some((status: number) => status === 0);
    } catch (error) {
      hilog.error(0, TAG, `Permission check failed: ${JSON.stringify(error)}`);
      return false;
    }
  }

  async getCurrentLocation(): Promise<LocationResult> {
    try {
      const location = await geoLocationManager.getCurrentLocation({
        priority: geoLocationManager.LocationRequestPriority.LOW_POWER,
        scenario: geoLocationManager.LocationRequestScenario.UNSET,
      });
      const result: LocationResult = {
        latitude: location.latitude,
        longitude: location.longitude
      };
      return result;
    } catch (error) {
      hilog.error(0, TAG, `Get location failed: ${JSON.stringify(error)}`);
      throw new Error('Get location failed');
    }
  }

  async getCityName(latitude: number, longitude: number): Promise<string> {
    try {
      const reverseGeocode = await geoLocationManager.getAddressesFromLocation({
        latitude, longitude, locale: 'zh'
      });
      if (reverseGeocode.length > 0) {
        return reverseGeocode[0].locality ?? '未知城市';
      }
      return '未知城市';
    } catch (error) {
      hilog.error(0, TAG, `Reverse geocode failed: ${JSON.stringify(error)}`);
      return '未知城市';
    }
  }
}
定位服务包含三个关键步骤:
- 权限检查与申请:使用
abilityAccessCtrl.createAtManager()创建权限管理器,通过bundleManager.getBundleInfoForSelfSync()获取当前应用的 accessTokenId,然后检查粗略定位权限是否已授予。未授权时同时请求LOCATION和APPROXIMATELY_LOCATION两个权限。 - 获取当前位置:调用
getCurrentLocation获取经纬度坐标,使用LOW_POWER优先级和UNSET场景,适合天气查询这类低频定位场景。 - 反向地理编码:通过
getAddressesFromLocation将坐标转换为可读的城市名称,指定locale: 'zh'获取中文结果。
LocationRequestPriority.LOW_POWER 表示优先低功耗定位,精度稍低但省电,适合天气查询场景。LocationRequestScenario.UNSET 表示不指定特定使用场景,由系统自行选择最优定位方式。
注意:
getCurrentLocation()和getCityName()是分离的两个方法,而非合并为一个方法。这样设计是因为获取坐标和反向编码是两个独立的系统能力调用,分开后调用方可以灵活组合——例如定位失败时仍可使用默认坐标获取天气。
Step 5: 构建天气主页 UI
目标: 使用 ArkUI 的 Column、Row、Stack 组件构建天气主页布局,展示当前天气和逐日预报。
// views/weather/WeatherPage.ets

import { WeatherInfo, CurrentWeather, DailyForecast } from '../../model/WeatherData';
import { WeatherService } from '../../service/WeatherService';
import { LocationService } from '../../service/LocationService';
import { hilog } from '@kit.PerformanceAnalysisKit';

const TAG = 'WeatherPage';

/** 天气描述 → emoji 映射 */
function weatherEmoji(desc: string): string {
  if (desc.includes('雷')) return '⛈️';
  if (desc.includes('雨')) return '🌧️';
  if (desc.includes('雪')) return '🌨️';
  if (desc.includes('雾') || desc.includes('霾') || desc.includes('尘')) return '🌫️';
  if (desc.includes('阴')) return '☁️';
  if (desc.includes('多云')) return '⛅';
  if (desc.includes('晴')) return '☀️';
  if (desc.includes('风')) return '💨';
  return '🌤️';
}

/** 温度条范围 */
interface TempBarRange {
  left: number;
  width: number;
}

@Component
export struct WeatherPage {
  @State cityName: string = '定位中...';
  @State currentTemp: string = '--';
  @State weatherDesc: string = '--';
  @State humidity: string = '--';
  @State windInfo: string = '--';
  @State feelsLike: string = '';
  @State forecasts: DailyForecast[] = [];
  @State isLoading: boolean = false;
  @State errorMsg: string = '';

  // 预报温度范围(用于温度条归一化)
  private minTempAll: number = 0;
  private maxTempAll: number = 0;

  aboutToAppear(): void {
    this.loadWeather();
  }

  async loadWeather(): Promise<void> {
    this.isLoading = true;
    this.errorMsg = '';
    try {
      const context = getContext(this) as Context;
      const locationService = LocationService.getInstance();
      const hasPermission = await locationService.checkAndRequestPermission(context);
      let latitude = 23.1291;
      let longitude = 113.2644;
      if (hasPermission) {
        const location = await locationService.getCurrentLocation();
        latitude = location.latitude;
        longitude = location.longitude;
        this.cityName = await locationService.getCityName(latitude, longitude);
      } else {
        this.cityName = '广州(默认)';
      }

      const weatherInfo = await WeatherService.getInstance().getWeatherByLocation(
        latitude, longitude
      );

      this.cityName = weatherInfo.cityName || this.cityName;
      this.currentTemp = `${weatherInfo.current.temperature}°`;
      this.weatherDesc = weatherInfo.current.weatherDescription;
      this.humidity = `${weatherInfo.current.humidity}%`;
      this.windInfo = `${weatherInfo.current.windDirection} ${weatherInfo.current.windSpeed}级`;
      this.feelsLike = `体感 ${weatherInfo.current.feelsLikeTemperature}°`;
      this.forecasts = weatherInfo.forecasts;

      // 计算预报温度范围
      if (this.forecasts.length > 0) {
        let minV = this.forecasts[0].minTemperature;
        let maxV = this.forecasts[0].maxTemperature;
        for (let i = 1; i < this.forecasts.length; i++) {
          if (this.forecasts[i].minTemperature < minV) {
            minV = this.forecasts[i].minTemperature;
          }
          if (this.forecasts[i].maxTemperature > maxV) {
            maxV = this.forecasts[i].maxTemperature;
          }
        }
        this.minTempAll = minV;
        this.maxTempAll = maxV;
      }
    } catch (error) {
      let errMsg = '天气加载失败';
      if (error instanceof Error) {
        errMsg = error.message;
        hilog.error(0, TAG, `loadWeather failed: ${errMsg}`);
      }
      this.cityName = '加载失败';
      this.errorMsg = errMsg;
    } finally {
      this.isLoading = false;
    }
  }

  /** 温度条:根据 min/max 在全局范围中的位置计算 left/width 百分比 */
  private tempBarRange(minT: number, maxT: number): TempBarRange {
    const range = this.maxTempAll - this.minTempAll;
    if (range <= 0) {
      const result: TempBarRange = { left: 0, width: 100 };
      return result;
    }
    const left = ((minT - this.minTempAll) / range) * 100;
    const width = ((maxT - minT) / range) * 100;
    const result: TempBarRange = { left: left, width: Math.max(width, 6) };
    return result;
  }

  build() {
    Column() {
      // 标题栏
      Row() {
        Text(this.cityName)
          .fontSize(22)
          .fontWeight(FontWeight.Bold)
          .fontColor(Color.White)
        Blank()
        Image($r('sys.symbol.arrow_clockwise'))
          .width(22).height(22).fillColor(Color.White)
          .onClick(() => this.loadWeather())
      }
      .width('100%')
      .padding({ left: 20, right: 20, top: 16 })

      // 当前天气
      Column({ space: 6 }) {
        if (this.errorMsg) {
          Text(this.errorMsg)
            .fontSize(13)
            .fontColor('#FFD0D0')
            .margin({ bottom: 4 })
        }
        // 天气 emoji + 温度
        Row({ space: 8 }) {
          Text(weatherEmoji(this.weatherDesc))
            .fontSize(40)
          Text(this.currentTemp)
            .fontSize(72)
            .fontWeight(FontWeight.Bold)
            .fontColor(Color.White)
        }
        Text(this.weatherDesc)
          .fontSize(18)
          .fontColor('#E0E0E0')
        // 体感温度
        if (this.feelsLike) {
          Text(this.feelsLike)
            .fontSize(14)
            .fontColor('#C0C0C0')
        }
        // 湿度 + 风力
        Row({ space: 24 }) {
          Row({ space: 4 }) {
            Text('💧')
              .fontSize(16)
            Text(this.humidity)
              .fontSize(14).fontColor('#D0D0D0')
          }
          Row({ space: 4 }) {
            Text('🌬️')
              .fontSize(16)
            Text(this.windInfo)
              .fontSize(14).fontColor('#D0D0D0')
          }
        }
        .margin({ top: 4 })
      }
      .margin({ top: 28 })

      Blank()

      // 7 日预报卡片
      Column() {
        Text('7 日预报')
          .fontSize(17)
          .fontWeight(FontWeight.Medium)
          .fontColor('#333333')
          .margin({ bottom: 12 })

        ForEach(this.forecasts, (forecast: DailyForecast) => {
          Row() {
            // 星期
            Text(forecast.dayOfWeek)
              .fontSize(14)
              .fontColor('#444444')
              .width(40)
            // 天气 emoji + 描述
            Text(weatherEmoji(forecast.weatherDescription))
              .fontSize(16)
              .width(24)
            Text(forecast.weatherDescription)
              .fontSize(13)
              .fontColor('#888888')
              .width(40)
            // 最低温
            Text(`${forecast.minTemperature}°`)
              .fontSize(13)
              .fontColor('#AAAAAA')
              .width(32)
              .textAlign(TextAlign.End)
            // 温度条
            Stack() {
              // 底色轨道
              Row()
                .width('100%')
                .height(4)
                .borderRadius(2)
                .backgroundColor('#EEEEEE')
              // 温度范围条
              Row()
                .width(`${this.tempBarRange(forecast.minTemperature, forecast.maxTemperature).width}%`)
                .height(4)
                .borderRadius(2)
                .linearGradient({
                  direction: GradientDirection.Right,
                  colors: [['#74B9FF', 0], ['#E17055', 1]]
                })
                .margin({ left: `${this.tempBarRange(forecast.minTemperature, forecast.maxTemperature).left}%` })
            }
            .layoutWeight(1)
            .height(4)
            .alignContent(Alignment.Start)
            // 最高温
            Text(`${forecast.maxTemperature}°`)
              .fontSize(13)
              .fontColor('#444444')
              .fontWeight(FontWeight.Medium)
              .width(32)
              .textAlign(TextAlign.Start)
          }
          .width('100%')
          .padding({ top: 9, bottom: 9 })
        }, (forecast: DailyForecast) => forecast.date)
      }
      .width('100%')
      .padding({ left: 20, right: 20, top: 16, bottom: 20 })
      .backgroundColor(Color.White)
      .borderRadius({ topLeft: 20, topRight: 20 })
      .shadow({ radius: 8, color: '#15000000', offsetY: -2 })
    }
    .width('100%')
    .height('100%')
    .linearGradient({
      direction: GradientDirection.Bottom,
      colors: [['#3B7DD8', 0], ['#6AAFE8', 0.5], ['#A0CFFF', 0.6]]
    })
  }
}
这段代码是整个天气主页的核心,有几个设计要点值得说明:
天气 emoji 映射:weatherEmoji() 函数根据天气描述中的关键词返回对应的 emoji,如"晴"→☀️、"多云"→⛅、"雨"→🌧️。这比使用系统图标更直观,且无需额外资源文件。
渐变背景:通过 linearGradient 实现从深蓝到浅蓝的渐变,营造天空氛围。颜色从 #3B7DD8 过渡到 #6AAFE8 再到 #A0CFFF,视觉效果自然。
温度条归一化:tempBarRange() 方法将每日的最低/最高温度映射到全局温度范围的百分比位置,计算 left(起始偏移)和 width(条宽度)。这样温度条能直观地展示各天温度在整周范围中的相对位置。Stack 容器用于叠加底色轨道和温度范围条。
错误信息展示:当天气加载失败时,errorMsg 非空,UI 中会显示红色错误提示文字。错误信息同时通过 hilog.error 输出到日志,便于调试。
状态驱动 UI:使用 @State 装饰器声明的变量会在值变化时自动触发 UI 刷新。当 isLoading 从 true 变为 false 时,页面会自动从加载状态切换到天气内容展示,无需手动控制。
布局容器选择:
Column用于纵向排列(页面整体、当前天气区域)Row用于横向排列(标题栏、天气 emoji + 温度、湿度 + 风力、预报条目)Stack用于层叠布局(温度条底色轨道与渐变条叠加)Blank用于占据剩余空间,将预报卡片推到底部
7日预报卡片:底部白色卡片通过 borderRadius({ topLeft: 20, topRight: 20 }) 实现顶部圆角,配合 shadow 产生浮起效果,与蓝色渐变背景形成层次感。
Step 6: 构建多页签主页
目标: 使用 Tabs 组件构建底部多页签导航,包含天气、待办、记账三个页面。
// pages/Index.ets

import { WeatherPage } from '../views/weather/WeatherPage';
import { TodoPage } from '../views/todo/TodoPage';
import { BudgetPage } from '../views/budget/BudgetPage';

@Entry
@Component
struct Index {
  @State currentTabIndex: number = 0;

  build() {
    Tabs({ index: this.currentTabIndex }) {
      TabContent() {
        WeatherPage()
      }
      .tabBar(this.tabBuilder(0, '天气', $r('sys.symbol.sun_max')))

      TabContent() {
        TodoPage()
      }
      .tabBar(this.tabBuilder(1, '待办', $r('sys.symbol.list_bullet')))

      TabContent() {
        BudgetPage()
      }
      .tabBar(this.tabBuilder(2, '记账', $r('sys.symbol.creditcard_fill')))
    }
    .barPosition(BarPosition.End)
    .scrollable(true)
    .barBackgroundColor(Color.White)
    .onChange((index: number) => {
      this.currentTabIndex = index;
    })
  }

  @Builder
  tabBuilder(index: number, title: string, icon: ResourceStr) {
    Column({ space: 2 }) {
      Image(icon)
        .width(22)
        .height(22)
        .fillColor(this.currentTabIndex === index ? '#3B7DD8' : '#999999')
      Text(title)
        .fontSize(11)
        .fontColor(this.currentTabIndex === index ? '#3B7DD8' : '#999999')
        .fontWeight(this.currentTabIndex === index ? FontWeight.Medium : FontWeight.Normal)
    }
    .justifyContent(FlexAlign.Center)
  }
}
Tabs 组件是 HarmonyOS 提供的多页签容器。几个关键配置:
barPosition(BarPosition.End):将 Tab 栏放在底部,符合移动端常见布局习惯。scrollable(true):允许通过左右滑动切换页面。tabBuilder:自定义 Tab 栏样式,每个 Tab 显示图标 + 文字,选中时使用主题色#3B7DD8(与天气页渐变色起始色一致),未选中时使用灰色#999999。- 三个 Tab 分别使用系统 SF Symbols 图标:
sun_max(天气)、list_bullet(待办)、creditcard_fill(记账)。
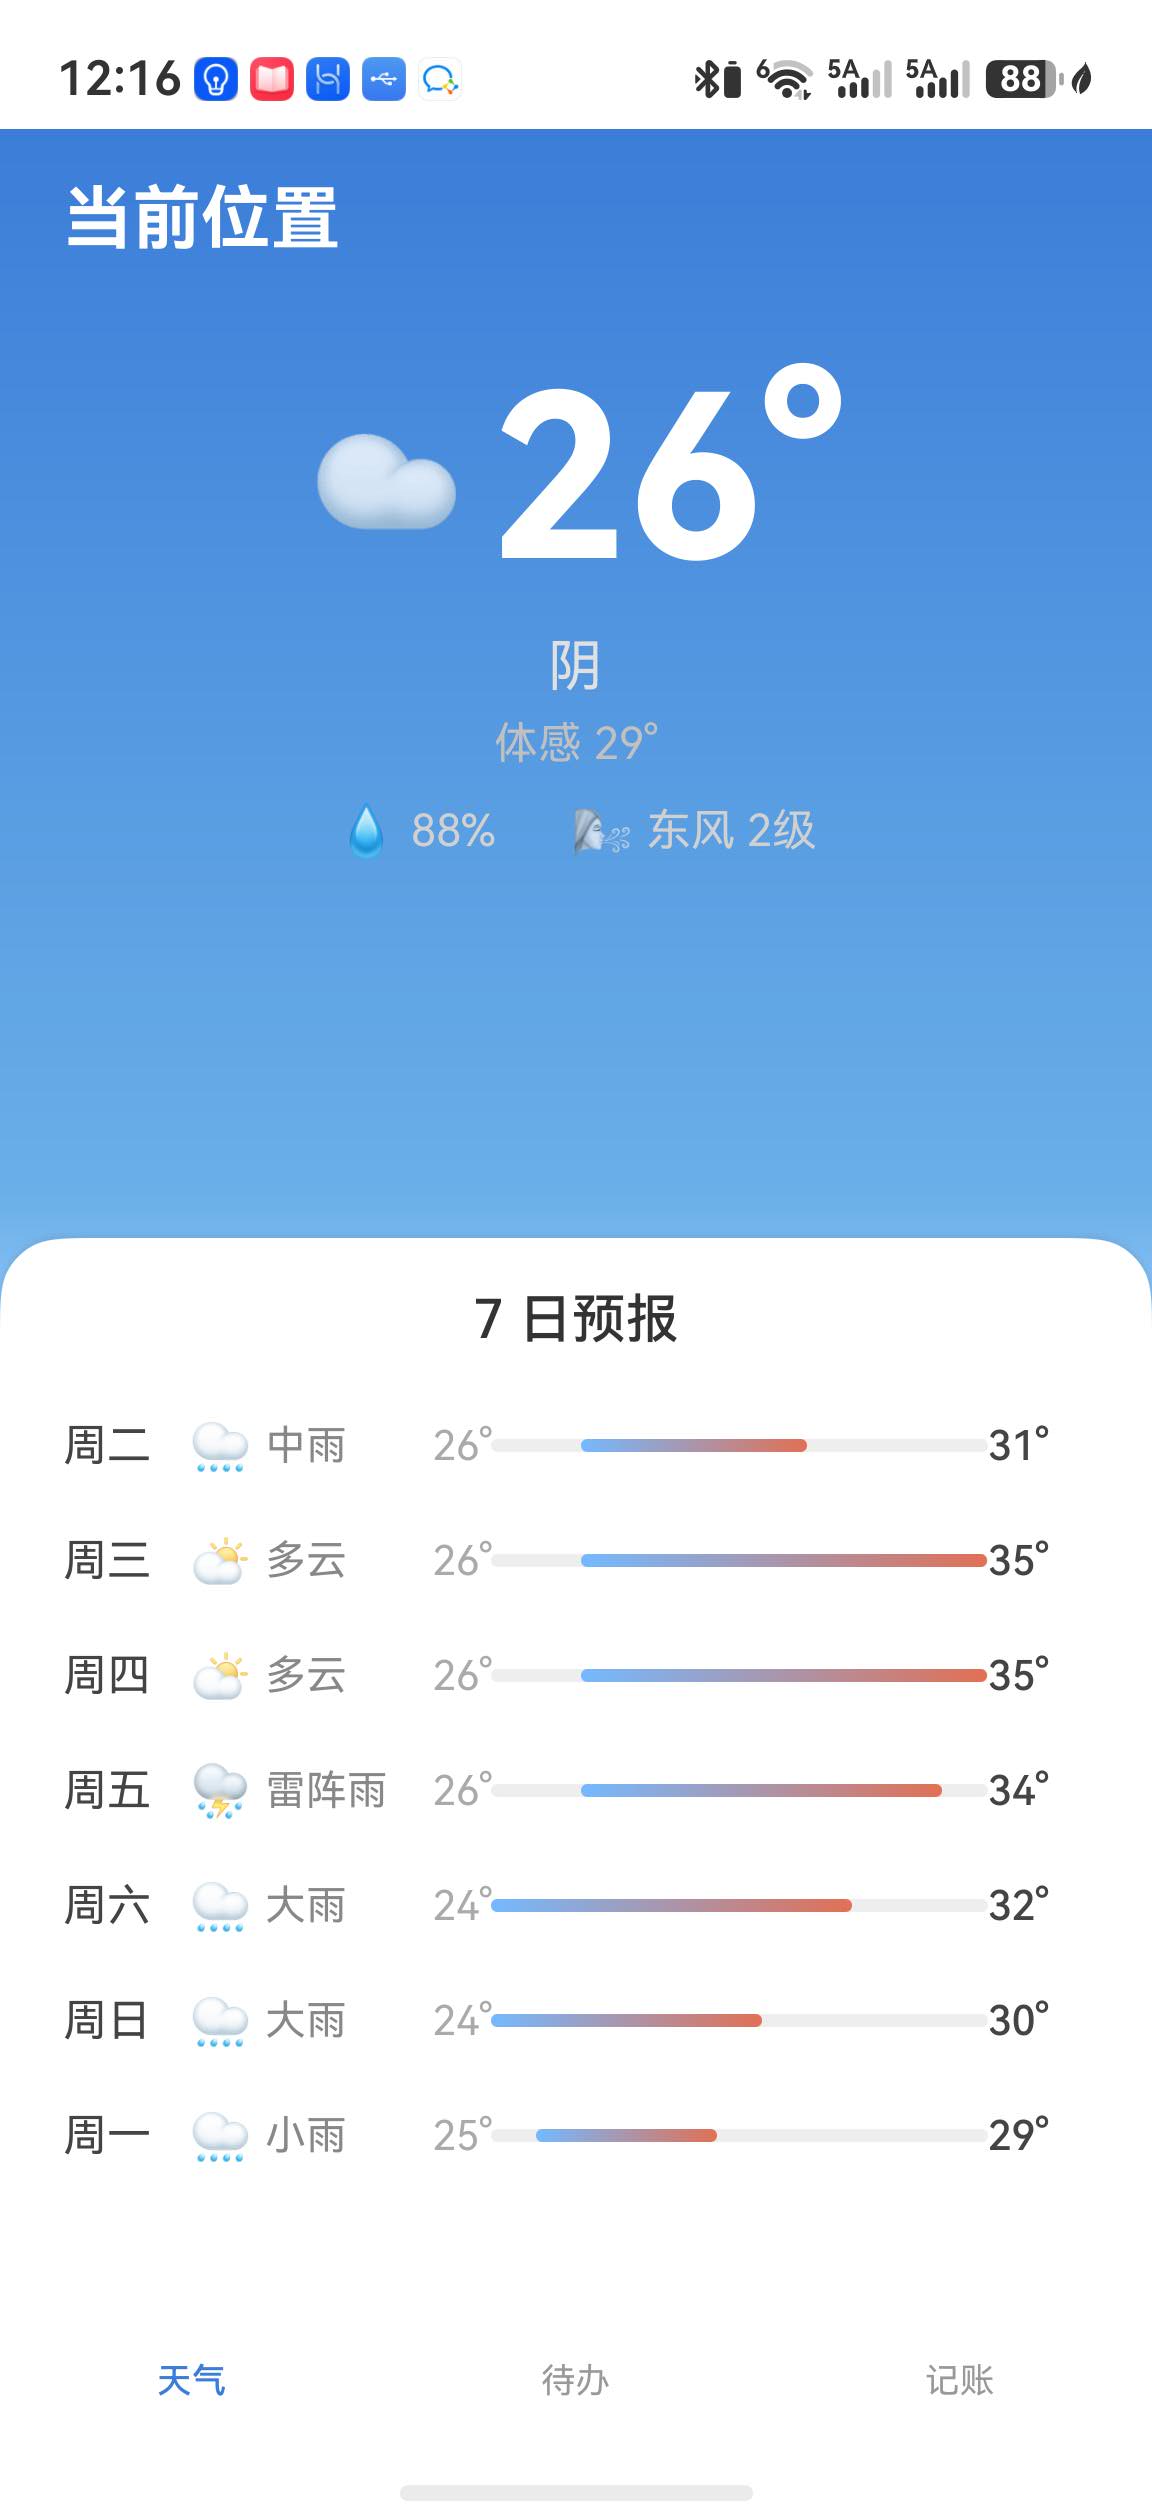
效果展示
完成上述代码后,运行应用即可看到天气主页效果。页面自上而下分为三个区域:
- 标题栏:显示城市名称,右侧有刷新按钮
- 当前天气区域:天气 emoji + 大字温度、天气描述、体感温度、湿度和风力
- 底部预报卡片:白色圆角卡片,展示7天逐日预报,每天包含星期、天气 emoji、描述、归一化温度条
天气预报列表中,每天的温度条采用归一化渐变色设计:底色为浅灰轨道,温度范围条从蓝色 #74B9FF 渐变到橙红色 #E17055,条的起始位置和宽度根据全局温度范围动态计算,直观地展示各天温度在整周中的相对位置。
关键代码解读
Weather Service Kit 双源降级
async getWeatherByLocation(latitude: number, longitude: number): Promise<WeatherInfo> {
  try {
    return await this.getWeatherByKit(latitude, longitude);
  } catch (error) {
    let msg = '';
    if (error instanceof Error) {
      msg = error.message;
    }
    hilog.warn(0, TAG, `WeatherServiceKit failed: ${msg}, falling back to QWeather API`);
    return await this.getWeatherByApi(latitude, longitude);
  }
}
这是双源降级的核心逻辑。getWeatherByKit 调用 weatherService.getWeather(),指定 limitedDatasets: [weatherService.Dataset.CURRENT, weatherService.Dataset.DAILY] 只获取当前天气和逐日预报两个数据集,减少不必要的数据传输。当 Kit 抛出异常时(如能力未开通返回 1011900001),自动降级到 getWeatherByApi 通过 QWeather REST API 获取数据。
QWeather API HTTP 请求
const resultStr: string = typeof response.result === 'string'
  ? response.result
  : JSON.stringify(response.result);
HTTP 响应体的类型处理是 ArkTS 中的一个常见陷阱。response.result 的类型是 string | Object,需要使用 typeof 类型守卫来判断实际类型,而不是使用 as string 类型断言。ArkTS 推荐使用类型守卫来保证运行时类型安全。
JSON.parse(resultStr) 的返回值必须显式标注类型(如 const result: QWeatherNowResponse = JSON.parse(resultStr)),这是 ArkTS 的强制要求——不允许隐式的 any 类型。
Location 权限处理流程
const grantStatus = await atManager.checkAccessToken(
  bundleManager.getBundleInfoForSelfSync(bundleManager.BundleFlag.GET_BUNDLE_INFO_DEFAULT).appInfo.accessTokenId,
  permissions[1]
);
HarmonyOS 的权限管理采用分级机制。这里使用 bundleManager.getBundleInfoForSelfSync() 获取当前应用的包信息,从中提取 accessTokenId 用于权限检查。相比旧版 API 中通过 context.tokenID 获取,这种方式更加规范。
精确定位权限(LOCATION)和粗略定位权限(APPROXIMATELY_LOCATION)需要同时申请——精确定位不自动包含粗略定位。requestPermissionsFromUser 返回的 authResults 中,任意一个权限被授予(status === 0)即视为授权成功。
@State 状态管理
@State cityName: string = '定位中...';
@State currentTemp: string = '--';
@State forecasts: DailyForecast[] = [];
@State 是 ArkUI 最基础的状态装饰器,用于声明组件内部的可变状态。当被 @State 装饰的变量值发生变化时,框架会自动重新执行 build() 方法,更新 UI 显示。
关键规则:
@State仅观察变量的第一层属性变化。对于数组,替换整个数组会触发刷新,但修改数组内部元素不会@State变量应在组件内部声明和修改,不应从外部直接赋值- 初始值应与实际数据类型匹配,避免使用
null或undefined
总结
本文介绍了如何从零搭建一个 HarmonyOS 天气应用,主要实现了:
- 项目结构搭建:按照分层架构组织代码,将数据模型、业务服务和 UI 页面分离
- 数据模型定义:使用 TypeScript 接口定义天气数据结构,提供类型安全保障
- 天气服务封装:实现 Weather Service Kit 优先、QWeather REST API 兜底的双源降级策略,确保真机始终能获取天气数据
- 定位服务实现:使用 Location Kit 获取当前位置,通过反向地理编码获取城市名称,权限失败时降级到默认坐标
- 天气主页 UI:使用 Column、Row、Stack 构建精美布局,天气 emoji 映射、归一化温度条、错误信息展示
- 多页签路由:使用 Tabs 构建底部导航,天气/待办/记账三个页面
关键注意事项:
- Weather Service Kit 需要在开发者后台开通能力,未开通时自动降级到 QWeather API
- 定位权限需要同时声明 LOCATION 和 APPROXIMATELY_LOCATION,精确定位不自动包含粗略定位
- ArkTS 要求
JSON.parse结果显式标注类型,推荐使用typeof类型守卫而非as断言 @State数组的整体替换才会触发 UI 刷新,修改数组内部元素需要重新赋值- 温度条使用归一化计算,让各天温度在全局范围中直观对比
下篇预告
下一篇: HarmonyOS 天气 App 实战(下):天气预警通知与设置页面
下篇将为天气应用添加天气预警推送通知(Notification Kit)、用户设置页面(温度单位切换、自动刷新开关)、以及使用 PersistenceV2 实现设置持久化存储。
–

讨论HarmonyOS开发技术,专注于API与组件、DevEco Studio、测试、元服务和应用上架分发等。
更多推荐


 22
22 0
0- 0


 已为社区贡献4条内容

所有评论(0)