HarmonyOS APP《画伴梦工厂》开发第17篇:视频导出与本地保存——DocumentViewPicker
第2.9篇:视频导出与本地保存——DocumentViewPicker
难度:⭐⭐ 进阶
前置知识:2.5 视频播放器集成
涉及源文件:products/default/src/main/ets/services/VideoExportService.ets
前言
在"画伴梦工厂"中,用户创作的作品最终需要保存为视频文件。HarmonyOS 提供了 DocumentViewPicker(文档选择器)和 systemShare(系统分享)两大能力,让开发者可以轻松实现"保存到本地"和"分享给好友"两个核心功能。
本篇将深入 VideoExportService 的实现,涵盖从 rawfile 资源读取、文件缓存、DocumentViewPicker 保存、到 systemShare 分享的完整链路。
1. 准备工作:PreparedVideoFile 接口
在开始导出前,先定义一个接口来统一描述待导出的视频文件:
export interface PreparedVideoFile {
  path: string;    // 本地文件系统路径
  uri: string;     // 文件 URI(file:// 协议)
  fileName: string; // 文件名
}
这个接口贯穿整个导出流程——无论是从 rawfile 读取还是从本地路径获取,最终都统一为这个结构。
2. 准备视频文件:prepareVideo
prepareVideo 方法负责将视频源(Resource 或文件路径)转换为本地可操作的文件。
export class VideoExportService {
  static async prepareVideo(
    videoUri: Resource | string,
    title: string,
    rawFilePath: string
  ): Promise<PreparedVideoFile> {
    const fileName = VideoExportService.buildFileName(title);

    // 情况一:videoUri 是字符串(本地路径或 URI)
    if (typeof videoUri === 'string') {
      const sourcePath = VideoExportService.toLocalPath(videoUri);
      if (sourcePath !== '') {
        return {
          path: sourcePath,
          uri: fileUri.getUriFromPath(sourcePath),
          fileName: fileName
        };
      }
      throw new Error('当前视频不是本地文件,暂不能导出');
    }

    // 情况二:videoUri 是 Resource(rawfile 资源)
    const context = getContext() as common.UIAbilityContext;
    if (rawFilePath === '') {
      throw new Error('当前视频资源缺少导出路径');
    }
    const content = await context.resourceManager.getRawFileContent(rawFilePath);
    const targetPath = context.cacheDir + '/' + fileName;
    VideoExportService.writeUint8Array(targetPath, content);

    return {
      path: targetPath,
      uri: fileUri.getUriFromPath(targetPath),
      fileName: fileName
    };
  }
}
两种视频源的处理
| 源类型 | 场景 | 处理方式 |
|---|---|---|
string |
本地文件路径或 file:// URI |
直接使用 toLocalPath 转为本地路径 |
Resource |
rawfile 中的内置资源 | 读取 rawfile 内容并写入缓存目录 |
resourceManager.getRawFileContent
当视频是 rawfile 资源时,通过 resourceManager.getRawFileContent(rawFilePath) 读取文件的二进制内容:
const content = await context.resourceManager.getRawFileContent(rawFilePath);
rawFilePath 是 rawfile 中的相对路径,例如 'assets/videos/demo.mp4'。
fileUri.getUriFromPath
fileUri.getUriFromPath 将本地文件路径转换为标准 URI 格式:
C:/path/to/file.mp4 → file://C:/path/to/file.mp4
这个 URI 格式是许多系统 API 所要求的。
3. DocumentViewPicker 保存
3.1 什么是 DocumentViewPicker?
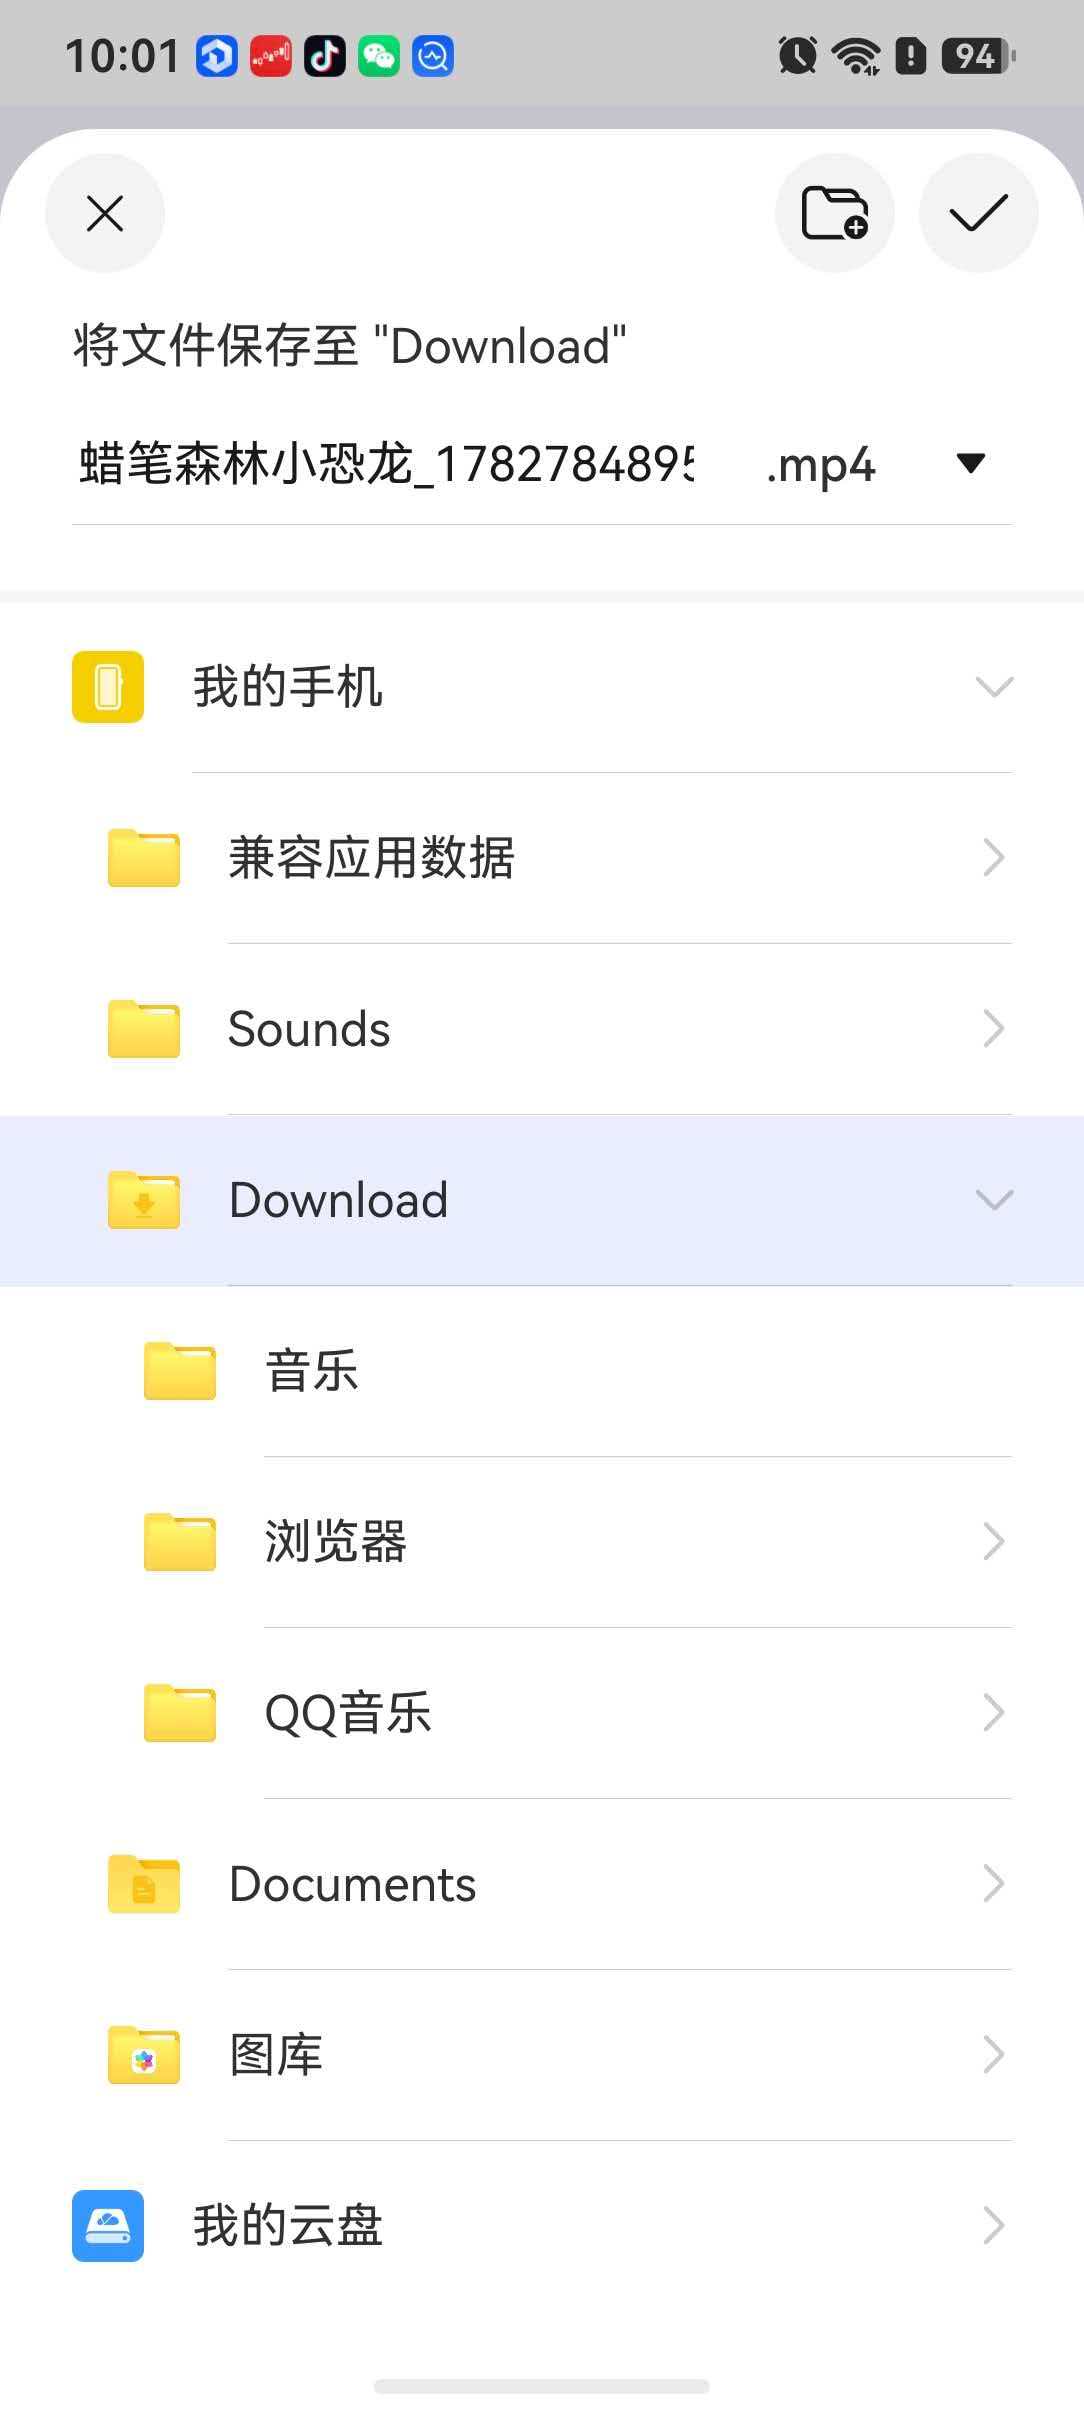
DocumentViewPicker 是 HarmonyOS 提供的系统文档选择器,支持用户选择文件进行打开或保存操作。它的 save 方法会弹出系统文件保存对话框,让用户选择保存位置。
3.2 saveToLocal 实现
static async saveToLocal(
  videoUri: Resource | string,
  title: string,
  rawFilePath: string
): Promise<string> {
  // 1. 准备视频文件
  const prepared = await VideoExportService.prepareVideo(videoUri, title, rawFilePath);

  // 2. 创建 DocumentViewPicker
  const context = getContext() as common.UIAbilityContext;
  const documentPicker = new picker.DocumentViewPicker(context);

  // 3. 配置保存选项
  const options: picker.DocumentSaveOptions = {
    newFileNames: [prepared.fileName],    // 默认文件名
    fileSuffixChoices: ['MP4|.mp4']       // 限定文件类型
  };

  // 4. 打开系统保存对话框
  const savedUris = await documentPicker.save(options);

  if (savedUris.length === 0) {
    throw new Error('未选择保存位置');
  }

  // 5. 将缓存文件拷贝到用户选择的位置
  VideoExportService.copyFileToUri(prepared.path, savedUris[0]);

  return savedUris[0];
}
3.3 DocumentSaveOptions 配置
const options: picker.DocumentSaveOptions = {
  newFileNames: [prepared.fileName],   // 建议的文件名
  fileSuffixChoices: ['MP4|.mp4']      // 文件类型过滤
};
| 配置项 | 值 | 说明 |
|---|---|---|
newFileNames |
['kid_animation_1234567890.mp4'] |
默认文件名,用户可修改 |
fileSuffixChoices |
`['MP4 | .mp4’]` |
fileSuffixChoices 的格式为 "显示名称|.扩展名",例如 'MP4|.mp4'、'PNG Image|.png'。
3.4 保存流程
preparedVideo (缓存目录)
       │
       ▼
DocumentViewPicker.save(options)
       │
       ▼
系统文件保存对话框 ← 用户选择位置
       │
       ▼
savedUris[0] (用户选择的 URI)
       │
       ▼
copyFileToUri(prepared.path, savedUris[0])
       │
       ▼
视频已保存到用户指定位置
4. 文件操作实现
4.1 writeUint8Array:写入二进制数据
private static writeUint8Array(path: string, content: Uint8Array): void {
  const file = fileIo.openSync(
    path,
    fileIo.OpenMode.CREATE |    // 文件不存在则创建
    fileIo.OpenMode.TRUNC |     // 文件存在则截断
    fileIo.OpenMode.READ_WRITE  // 读写模式
  );
  try {
    const buffer = content.buffer.slice(
      content.byteOffset,
      content.byteOffset + content.byteLength
    );
    fileIo.writeSync(file.fd, buffer);
  } finally {
    fileIo.closeSync(file);
  }
}
关键点:
OpenMode.CREATE | TRUNC | READ_WRITE:创建文件、清空内容、读写模式。content.buffer.slice(...):从 Uint8Array 中提取底层的 ArrayBuffer 片段。- 使用
try/finally确保资源释放。
4.2 copyFileToUri:跨 URI 拷贝
private static copyFileToUri(sourcePath: string, targetUri: string): void {
  // 打开源文件(只读)
  const sourceFile = fileIo.openSync(sourcePath, fileIo.OpenMode.READ_ONLY);
  try {
    const stat = fileIo.statSync(sourceFile.fd);
    const buffer = new ArrayBuffer(stat.size);
    const readSize = fileIo.readSync(sourceFile.fd, buffer);

    // 打开目标文件(写入、截断)
    const targetFile = fileIo.openSync(
      targetUri,
      fileIo.OpenMode.WRITE_ONLY | fileIo.OpenMode.TRUNC
    );
    try {
      if (readSize === stat.size) {
        fileIo.writeSync(targetFile.fd, buffer);
      } else {
        fileIo.writeSync(targetFile.fd, buffer.slice(0, readSize));
      }
    } finally {
      fileIo.closeSync(targetFile);
    }
  } finally {
    fileIo.closeSync(sourceFile);
  }
}
这段代码手动完成了"读取 → 写入"的拷贝流程:
openSync以只读模式打开源文件。statSync获取文件大小,创建对应大小的ArrayBuffer。readSync读取文件内容到 buffer。openSync以写入模式打开目标 URI(TRUNC 表示覆盖已有内容)。writeSync写入数据。- 双层
try/finally确保两个文件描述符都被释放。
5. 文件名处理
5.1 构建文件名
private static buildFileName(title: string): string {
  const trimmed = title.trim();
  const baseName = trimmed === ''
    ? 'kid_animation'                     // 默认名称
    : VideoExportService.sanitizeFileName(trimmed);  // 清理后的标题
  return baseName + '_' + Date.now().toString() + '.mp4';
}
文件名格式:{作品标题}_{时间戳}.mp4
示例:我的小汽车_1689123456789.mp4
5.2 文件名清理
private static sanitizeFileName(value: string): string {
  let result = '';
  for (let i = 0; i < value.length; i++) {
    const char = value.charAt(i);
    if (char === '\\' || char === '/' || char === ':' || char === '*' ||
        char === '?' || char === '"' || char === '<' || char === '>' ||
        char === '|') {
      result += '_';  // 非法字符替换为下划线
    } else {
      result += char;
    }
  }
  return result;
}
Windows 文件系统不允许以下字符:\ / : * ? " < > |。sanitizeFileName 将这些字符统一替换为 _,确保生成的文件名在任何文件系统中都合法。
6. systemShare 系统分享
除了保存到本地,还支持通过系统分享面板将视频分享给其他应用。
6.1 showSystemShare
static async showSystemShare(
  videoUri: Resource | string,
  title: string,
  story: string,
  rawFilePath: string
): Promise<void> {
  const context = getContext() as common.UIAbilityContext;
  const data = await VideoExportService.buildSharedData(videoUri, title, story, rawFilePath);
  const controller = new systemShare.ShareController(data);
  const options: systemShare.ShareControllerOptions = {
    selectionMode: systemShare.SelectionMode.SINGLE,   // 单应用分享
    previewMode: systemShare.SharePreviewMode.DETAIL   // 详细预览
  };
  await controller.show(context, options);
}
6.2 构建分享数据
static async buildSharedData(
  videoUri: Resource | string,
  title: string,
  story: string,
  rawFilePath: string
): Promise<systemShare.SharedData> {
  const prepared = await VideoExportService.prepareVideo(videoUri, title, rawFilePath);

  // 视频记录
  const videoRecord: ShareVideoRecord = {
    utd: uniformTypeDescriptor.UniformDataType.MPEG4,  // MIME 类型
    uri: prepared.uri,                                   // 视频 URI
    title: title,
    description: story
  };
  const data = new systemShare.SharedData(videoRecord);

  // 文本记录(同时分享作品描述)
  const textRecord: ShareTextRecord = {
    utd: uniformTypeDescriptor.UniformDataType.PLAIN_TEXT,
    content: title + '\n' + story,
    title: title,
    description: story
  };
  data.addRecord(textRecord);

  return data;
}
分享数据包含两条记录:
- 视频记录:分享视频文件本身。
- 文本记录:分享作品的标题和故事描述。
uniformTypeDescriptor.UniformDataType.MPEG4 和 PLAIN_TEXT 用于标识数据类型,系统分享面板会根据这些类型展示对应的目标应用。
7. 调用示例:Index.ets 中的整合
在页面中,保存和分享通过两个方法触发:
7.1 保存视频
private async saveCurrentVideo(): Promise<void> {
  if (this.exportBusy) {
    return;
  }
  this.exportBusy = true;
  this.showNotice('正在准备保存视频');
  try {
    await VideoExportService.saveToLocal(
      this.getCurrentVideo(),      // 视频源(Resource | string)
      this.getCurrentWorkTitle(),  // 作品标题
      this.getCurrentRawVideoPath() // rawfile 路径
    );
    this.downloadedActive = true;
    this.showNotice('视频已保存');
  } catch (error) {
    this.showNotice('保存失败:' + this.getErrorMessage(error as Error));
  } finally {
    this.exportBusy = false;
  }
}
7.2 分享视频
private async shareCurrentVideo(): Promise<void> {
  if (this.exportBusy) {
    return;
  }
  this.exportBusy = true;
  this.showNotice('正在打开分享');
  try {
    await VideoExportService.showSystemShare(
      this.getCurrentVideo(),
      this.getCurrentWorkTitle(),
      this.getCurrentWorkStory(),
      this.getCurrentRawVideoPath()
    );
    this.sharedActive = true;
    this.showNotice('已打开分享面板');
  } catch (error) {
    this.showNotice('分享失败:' + this.getErrorMessage(error as Error));
  } finally {
    this.exportBusy = false;
  }
}
两者都使用 exportBusy 状态锁防止重复操作,并用 try/catch/finally 确保状态正确恢复。
8. 完整流程总结
┌─────────────────────────────────────────────────────────┐
│                  视频导出完整流程                         │
├─────────────────────────────────────────────────────────┤
│                                                           │
│  视频源(Resource / string)                               │
│       │                                                    │
│       ▼                                                    │
│  prepareVideo()                                            │
│    ├─ resourceManager.getRawFileContent() (若为 Resource)  │
│    ├─ writeUint8Array() → 写入 cacheDir                    │
│    └─ fileUri.getUriFromPath() → 生成 URI                  │
│       │                                                    │
│       ▼                                                    │
│  PreparedVideoFile { path, uri, fileName }                 │
│       │                                                    │
│       ├──→ saveToLocal()                                   │
│       │     ├─ DocumentViewPicker.save(options)            │
│       │     │   ├─ newFileNames: ["视频名.mp4"]             │
│       │     │   └─ fileSuffixChoices: ["MP4|.mp4"]         │
│       │     └─ copyFileToUri() → 保存到用户选择位置          │
│       │                                                    │
│       └──→ showSystemShare()                               │
│             ├─ buildSharedData()                           │
│             │   ├─ SharedData(videoRecord)                 │
│             │   └─ addRecord(textRecord)                   │
│             └─ ShareController.show() → 系统分享面板        │
│                                                           │
└─────────────────────────────────────────────────────────┘
小结
本篇我们实现了完整的视频导出与保存功能:
- prepareVideo:统一处理 Resource 和 string 两种视频源,将视频写入缓存目录。
- DocumentViewPicker.save:通过系统文件保存对话框,让用户自由选择保存位置。
- DocumentSaveOptions:配置默认文件名和文件类型过滤。
- fileIo 文件操作:
openSync/readSync/writeSync/closeSync完成文件拷贝。 - resourceManager.getRawFileContent:读取 rawfile 资源内容。
- sanitizeFileName:清理文件名中的非法字符。
- systemShare:构建包含视频和文本的分享数据,调用系统分享面板。
至此,"画伴梦工厂"从绘画输入、AI 生成、视频播放到视频导出的完整链路已经全部打通。
下一篇预告:敬请期待后续章节

讨论HarmonyOS开发技术,专注于API与组件、DevEco Studio、测试、元服务和应用上架分发等。
更多推荐


 0
0 0
0- 0


 已为社区贡献166条内容

所有评论(0)