鸿蒙原生 ArkTS 布局方式之缩放手势实现 PinchToZoom 实战
一、引言
双指缩放(Pinch-to-Zoom)是移动端应用中最基础也最重要的手势交互之一——图片查看器双指放大细节、地图双指缩放层级、相册双指调整缩略图大小,都依赖于这一核心手势。
在 HarmonyOS NEXT 中,PinchGesture 是专门用于识别双指捏合/扩张缩放手势的 API。与通过 PanGesture 自行计算双指距离变化不同,PinchGesture 直接提供 event.scale 属性,返回当前双指间距相对于起始间距的比例,开发者只需将这个比例应用到组件的 scale 属性上即可实现缩放。
本文通过一个完整的实战项目,系统讲解 PinchGesture 的使用方法、缩放算法、边界控制和多手势组合。
二、核心原理
2.1 PinchGesture API
PinchGesture({ fingers?: number, distance?: number })
| 参数 | 类型 | 默认值 | 说明 |
|---|---|---|---|
fingers |
number | 2 | 参与缩放手势的手指数量,通常为 2 |
distance |
number | 5 | 最小触发距离(vp),防误触 |
2.2 缩放事件对象 GestureEvent
PinchGesture 的回调参数 GestureEvent 中与缩放相关的属性:
| 属性 | 类型 | 说明 |
|---|---|---|
event.scale |
number | 当前双指间距 / 起始双指间距的比例。初始为 1.0,放大时 > 1.0,缩小时 < 1.0 |
event.pinchCenterX/Y |
number | 双指中心点坐标 |
event.fingerList |
FingerInfo[] | 手指列表,包含每根手指的坐标 |
2.3 缩放计算公式
// 基准值 × 当前比例 = 新缩放值
newScale = baseScale × event.scale

// 边界限制
clampedScale = max(minScale, min(maxScale, newScale))
baseScale 在 onActionStart 时记录当前缩放值,event.scale 在 onActionUpdate 中持续更新。用乘法而非加法累积,是因为比例关系是乘法而非加法——2x 放大到 3x 是乘以 1.5,而非加 1。
2.4 缩放的生命周期
手指按下(双指)
  → onActionStart:记录 baseScale = 当前缩放值
  → onActionUpdate(持续触发):
      newScale = baseScale × event.scale
      限制边界后 → this.scaleValue = newScale
  → 手指抬起 → onActionEnd:可选做边界吸附
三、环境
MyApplication/
└── entry/src/main/
    ├── ets/pages/PinchToZoomDemo.ets
    └── resources/base/profile/main_pages.json
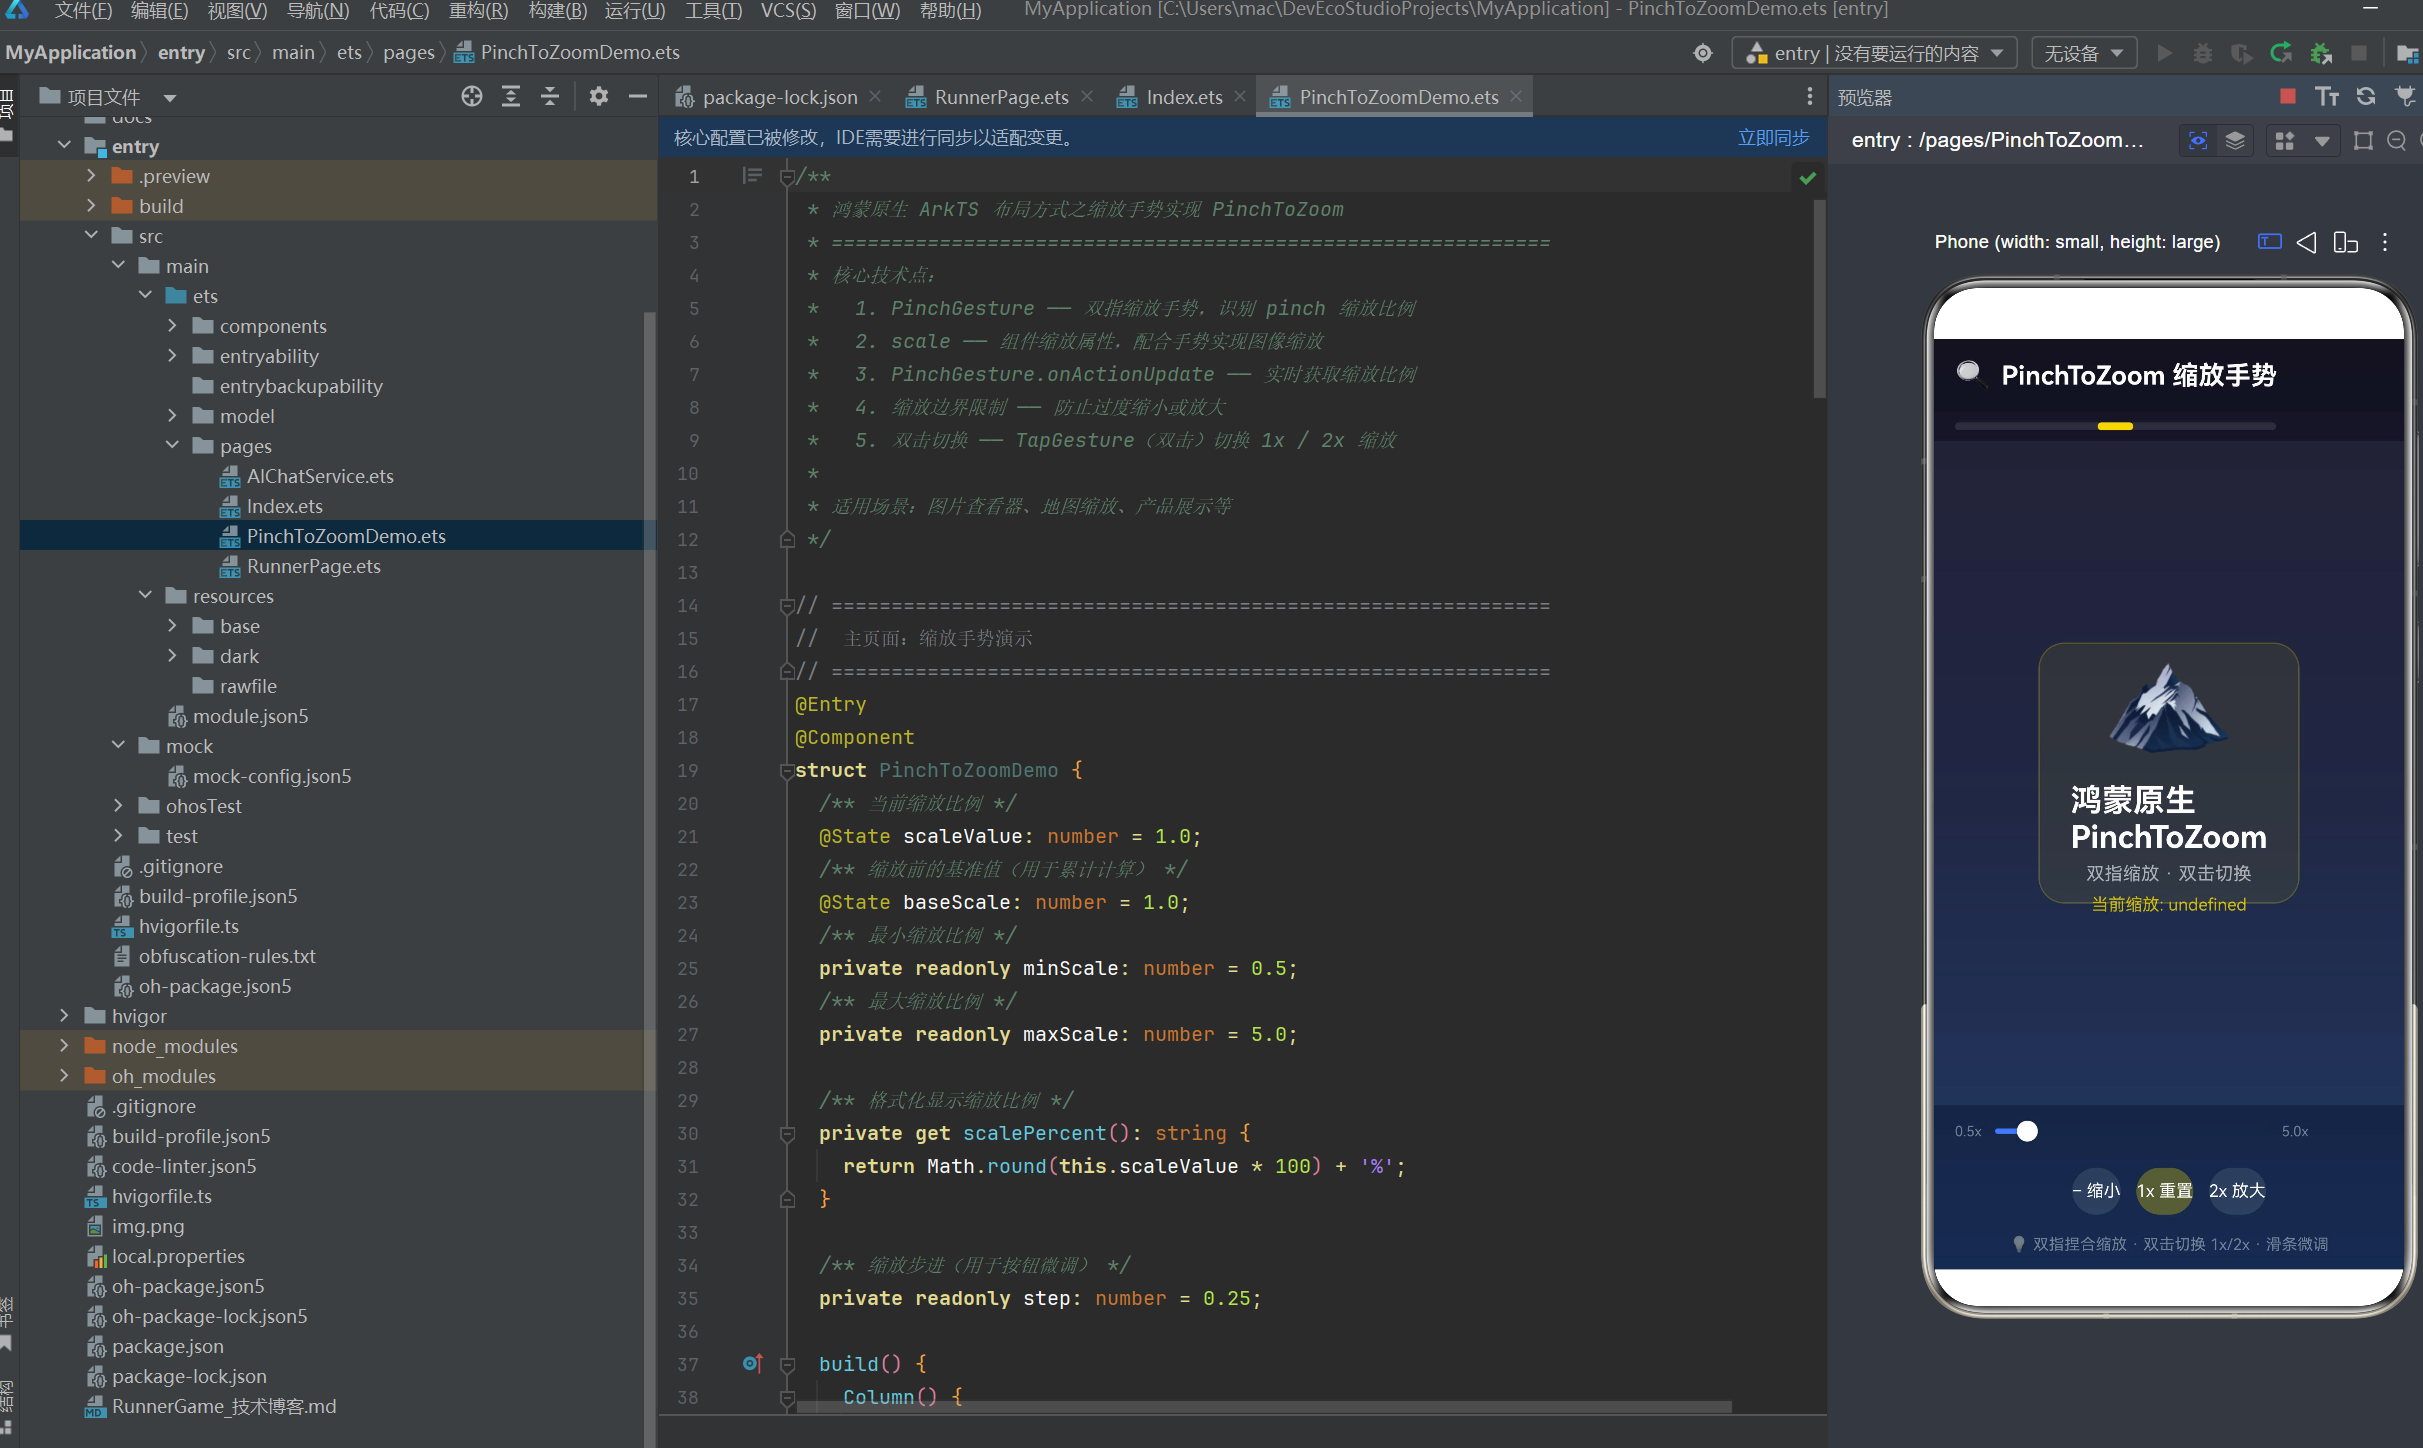
四、完整代码实现
4.1 完整页面代码
@Entry
@Component
struct PinchToZoomDemo {
@State scaleValue: number = 1.0;
@State baseScale: number = 1.0;
private readonly minScale: number = 0.5;
private readonly maxScale: number = 5.0;
private readonly step: number = 0.25;
private get scalePercent(): string {
return Math.round(this.scaleValue * 100) + '%';
}
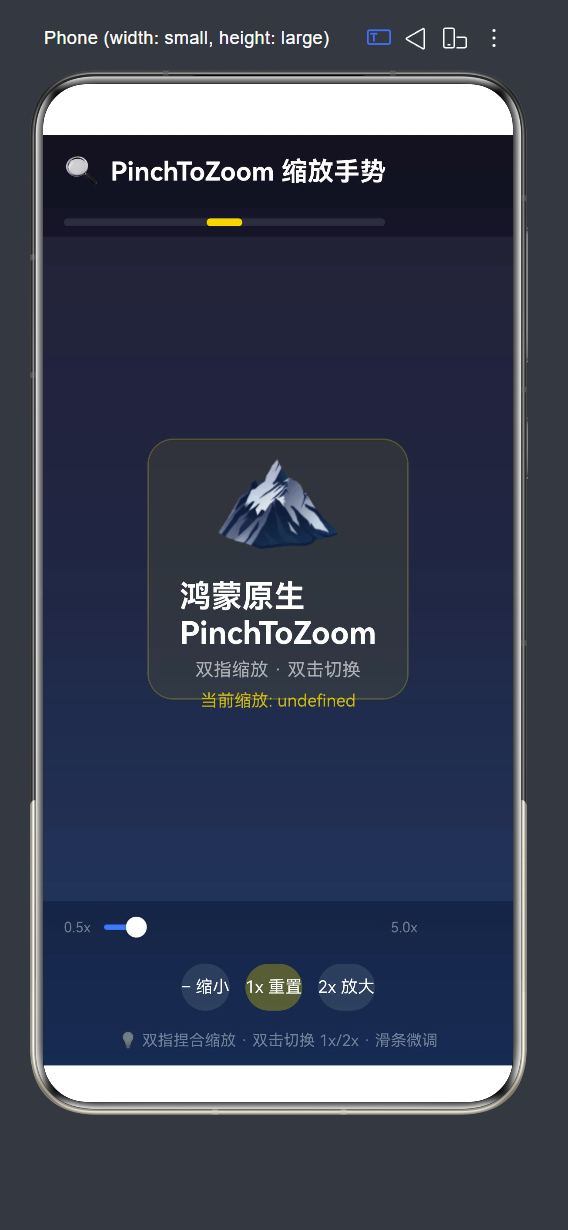
build() {
Column() {
// 顶部标题栏
Row() {
Text('🔍 PinchToZoom 缩放手势')
.fontSize(20).fontWeight(FontWeight.Bold).fontColor('#FFFFFF')
}
.width('100%').height(56).backgroundColor('rgba(0,0,0,0.3)')
// 缩放比例指示器
Row() {
Stack() {
Row().width('100%').height(6)
.backgroundColor('rgba(255,255,255,0.1)').borderRadius(3)
Row()
.width(this.getScaleBarPercent() + '%')
.height(6).backgroundColor('#FFD700').borderRadius(3)
}
.layoutWeight(1)
.margin({ right: 12 })
Text(this.scalePercent)
.fontSize(18).fontColor('#FFD700').width(70).textAlign(TextAlign.End)
}
.padding({ left: 16, right: 16, top: 8, bottom: 8 })
.backgroundColor('rgba(0,0,0,0.2)')
// 可缩放内容区域
Stack() {
Column() {
Text('🏔️').fontSize(80)
Text('PinchToZoom 双指缩放').fontSize(22).fontColor(Color.White)
Text('当前缩放: ' + this.scalePercent)
.fontSize(14).fontColor('rgba(255,215,0,0.8)')
}
.width(200).height(200).borderRadius(20)
.backgroundColor('rgba(255,215,0,0.08)')
.border({ width: 1, color: 'rgba(255,215,0,0.2)' })
.justifyContent(FlexAlign.Center).alignItems(HorizontalAlign.Center)
// === 核心1:应用缩放 ===
.scale({ x: this.scaleValue, y: this.scaleValue })
// === 核心2:双指缩放手势 ===
.gesture(
PinchGesture({ fingers: 2, distance: 5 })
.onActionStart(() => {
this.baseScale = this.scaleValue;
})
.onActionUpdate((event: GestureEvent) => {
const newScale = this.baseScale * event.scale;
this.scaleValue = Math.max(this.minScale,
Math.min(this.maxScale, newScale));
})
)
// === 核心3:双击切换缩放 ===
.gesture(
TapGesture({ count: 2 })
.onAction(() => {
this.scaleValue = this.scaleValue <= 1.2 ? 2.0 : 1.0;
})
)
}
.layoutWeight(1).width('100%').clip(true)
// 底部控制栏
Column() {
// 滑条微调
Row() {
Text('0.5x').fontSize(11).fontColor('rgba(255,255,255,0.4)')
Slider({
value: this.scaleValue, min: this.minScale,
max: this.maxScale, step: 0.01, style: SliderStyle.OutSet
}).width('70%').onChange((v) => { this.scaleValue = v; })
Text('5.0x').fontSize(11).fontColor('rgba(255,255,255,0.4)')
}.padding({ left: 16, right: 16 })
// 快捷按钮
Row({ space: 12 }) {
Button('− 缩小').type(ButtonType.Capsule)
.backgroundColor('rgba(255,255,255,0.1)')
.onClick(() => {
this.scaleValue = Math.max(this.minScale, this.scaleValue - this.step);
})
Button('1x 重置').type(ButtonType.Capsule)
.backgroundColor('rgba(255,215,0,0.3)')
.onClick(() => { this.scaleValue = 1.0; })
Button('2x 放大').type(ButtonType.Capsule)
.backgroundColor('rgba(255,255,255,0.1)')
.onClick(() => {
this.scaleValue = Math.min(this.maxScale, this.scaleValue + this.step);
})
}.padding({ top: 8, bottom: 8 }).justifyContent(FlexAlign.Center)
Text('💡 双指捏合缩放 · 双击切换 1x/2x · 滑条微调')
.fontSize(12).fontColor('rgba(255,255,255,0.4)').margin({ bottom: 12 })
}
.backgroundColor('rgba(0,0,0,0.15)')
}
.width('100%').height('100%')
.linearGradient({
direction: GradientDirection.Bottom,
colors: [['#1a1a2e', 0], ['#16213e', 0.5], ['#0f3460', 1]]
})
}
/** 缩放比例条宽度(0.5→0%, 5.0→100%) */
getScaleBarPercent(): number {
return ((this.scaleValue - this.minScale)
/ (this.maxScale - this.minScale)) * 100;
}
}
4.2 核心算法详解
缩放计算逻辑(onActionUpdate):
// 手指移动时持续触发
.onActionUpdate((event: GestureEvent) => {
  // baseScale 是 onActionStart 时记录的基准值
  // event.scale 是双指间距变化比例(1.0=不变,>1.0=放大,<1.0=缩小)
  const newScale = this.baseScale * event.scale;
  // 边界限制
  this.scaleValue = Math.max(this.minScale,
    Math.min(this.maxScale, newScale));
})
举例说明缩放过程:
起始状态:scaleValue = 1.0

1. 用户双指捏合,间距缩小到起始的 80%
   → onActionStart: baseScale = 1.0
   → onActionUpdate: event.scale = 0.8
   → newScale = 1.0 × 0.8 = 0.8
   → scaleValue = 0.8(缩放至 80%)

2. 用户双指扩张,间距扩大到起始的 150%
   → onActionStart: baseScale = 0.8(假设上次缩放后未重置)
   → onActionUpdate: event.scale = 1.5
   → newScale = 0.8 × 1.5 = 1.2
   → scaleValue = 1.2(缩放至 120%)
为何用乘法而非加法:
| 方式 | 从 1x 到 2x | 从 2x 到 3x | 问题 |
|---|---|---|---|
| 加法 | +1.0 | +1.0 | 每次手势比例增量固定,与当前缩放无关 |
| 乘法 | ×2.0 | ×1.5 | 与当前缩放比例相关,符合自然缩放感 |
乘法符合人类的缩放直觉——用户感知的是"放大到原来的两倍",而非"增加一个固定数值"。
双击切换逻辑:
TapGesture({ count: 2 })
  .onAction(() => {
    // 当前 ≤ 1.2x → 放大到 2x
    // 反之 → 恢复到 1x
    this.scaleValue = this.scaleValue <= 1.2 ? 2.0 : 1.0;
  })
阈值设为 1.2 而非精确 1.0,是因为用户可能通过双指将图片调整到 1.3x、1.5x 等中间值,此时双击应恢复到 1x 而非继续放大。
五、进阶技巧
5.1 多手势共存
PinchGesture 和 TapGesture 可以同时绑定在一个组件上,互不干扰:
// 同时支持缩放和双击
.gesture(PinchGesture({ fingers: 2 }).onActionUpdate(...))  // 缩放
.gesture(TapGesture({ count: 2 }).onAction(...))              // 双击
ArkUI 会根据手势类型自动分发:
- 双指操作 → PinchGesture 识别
- 单指快速点击两次 → TapGesture(count:2)识别
- 两者走不同的识别通道,不会冲突
5.2 缩放参数选择
| 参数 | 推荐值 | 说明 |
|---|---|---|
最小缩放 minScale |
0.5x | 过小会导致内容几乎不可见 |
最大缩放 maxScale |
3.0x ~ 5.0x | 过大会导致像素模糊(图片),过大则失去意义 |
手势距离 distance |
5vp | 防止手指轻微抖动误触 |
缩放步进 step |
0.25x | 按钮微调时的增量 |
5.3 边界吸附
当缩放比例超出一定阈值时,自动吸附到最近的"标准"比例:
.onActionEnd(() => {
  // 缩放结束后,吸附到标准比例
  if (this.scaleValue < 0.75) {
    this.scaleValue = this.minScale;       // 吸附到 0.5x
  } else if (this.scaleValue < 1.25) {
    this.scaleValue = 1.0;                 // 吸附到 1.0x
  } else if (this.scaleValue < 2.5) {
    this.scaleValue = 2.0;                 // 吸附到 2.0x
  } else {
    this.scaleValue = this.maxScale;       // 吸附到 5.0x
  }
})
5.4 图像缩放的最佳实践
当缩放的内容是图片(Image 组件)时,额外注意:
- 图片填充模式:使用
objectFit(ImageFit.Cover)或objectFit(ImageFit.Contain)确保图片适配容器 - 高清图片:3x 以上缩放时,图片需提供高清资源(建议使用矢量图或高分辨率图片)
- 内存管理:超大图片缩放时留意内存占用,必要时使用
Image组件的缩略图加载能力
5.5 边缘情况处理
| 场景 | 处理方案 |
|---|---|
| 双指开始时手指在组件外 | 调整组件尺寸确保手势命中区域覆盖整个可见内容 |
| 快速连续捏合 | onActionStart 每次都会更新 baseScale,多次手势无缝衔接 |
| 缩放 + 拖拽组合 | 使用 GestureGroup(Parallel, PinchGesture, PanGesture) 实现双指缩放 + 单指平移 |
| 旋转 + 缩放组合 | 使用 RotationGesture + PinchGesture 组合 |
六、常见问题
Q1:PinchGesture 和 PanGesture 能同时用吗?
A:可以。PinchGesture(双指)和 PanGesture(单指)走不同的手势识别通道,直接多次调用 .gesture() 绑定即可,互不冲突。
Q2:event.scale 为什么有时会跳变?
A:event.scale 是相对于 onActionStart 时刻的双指间距比例。如果手势过程中手指短暂离开再放回,系统可能重启手势(重新触发 onActionStart),此时 baseScale 更新为当前值,导致比例变化不连续。解决方案是限制手势触发距离或添加平滑处理。
Q3:scale 属性和 transform: scale 的区别?
A:.scale() 是组件属性,直接修改组件的渲染缩放比例,效果等同于 CSS 的 scale。它不影响组件的布局尺寸,仅影响视觉效果。如果需要布局尺寸也随之变化,需同时修改 width/height。
Q4:为什么缩放时内容会超出容器边界?
A:缩放后的内容尺寸超过容器时,需要 .clip(true) 来裁切超出部分,否则内容会溢出。同时应使用 Stack 作为缩放内容的容器,并通过 .clip(true) 限制显示区域。
Q5:如何实现图片查看器的"双击放大/双击缩小"?
A:使用 TapGesture({ count: 2 }) 绑定到图片组件,在 onAction 中切换缩放值:
.gesture(
  TapGesture({ count: 2 })
    .onAction(() => {
      // 当前 < 2x → 放大到 2x,否则恢复到 1x
      this.scaleValue = this.scaleValue < 2.0 ? 2.0 : 1.0;
    })
)
Q6:滑条控制缩放时为什么需要 step: 0.01?
A:手势缩放产生的是连续值(如 1.234x),如果滑条的 step 太大(如 0.25),手势调整后的值会被自动取整,导致缩放不平滑。step: 0.01 可以在保证性能的同时提供足够的精度。
七、总结
本文通过一个完整的 PinchToZoom 实战项目,系统讲解了缩放手势的核心技术:
| 技术 | 实现 | 作用 |
|---|---|---|
| PinchGesture | PinchGesture({ fingers: 2, distance: 5 }) |
双指捏合识别 |
| 缩放计算 | baseScale × event.scale |
乘法累积,跟随自然缩放感 |
| 边界控制 | Math.max(min, Math.min(max, val)) |
防止过度缩放 |
| 缩放应用 | .scale({ x: val, y: val }) |
组件等比缩放 |
| 双击切换 | TapGesture({ count: 2 }) |
1x ↔ 2x 切换 |
| 滑条微调 | Slider + @State |
连续缩放控制 |
核心公式:
onActionStart → baseScale = currentScale
onActionUpdate → newScale = baseScale × event.scale
onActionEnd → 边界吸附(可选)
交互输入 → scaleValue → .scale({ x, y }) → 渲染缩放
双指缩放是移动端应用的标准交互能力。掌握 PinchGesture 与 scale 属性的配合使用,可以为鸿蒙应用中的图片查看、地图浏览、产品展示等场景添加流畅的缩放体验。

讨论HarmonyOS开发技术,专注于API与组件、DevEco Studio、测试、元服务和应用上架分发等。
更多推荐

 2
2 0
0- 0


 已为社区贡献56条内容

所有评论(0)