【私房菜集 HarmonyOS ArkTS 实战系列 02】主 Tab 宿主:用 ArkUI 搭出首页、探索、收藏、我的
【私房菜集 HarmonyOS ArkTS 实战系列 02】主 Tab 宿主:用 ArkUI 搭出首页、探索、收藏、我的
第一篇已经把「私房菜集」的 Stage 模型、页面注册、EntryAbility 和工程分层梳理清楚。本篇继续进入用户真正每天看到的主界面:Index.ets如何承载首页、探索、收藏、我的四个一级入口,BottomNavBar.ets如何把底部导航组件化,以及页面返回时为什么需要按当前 Tab 精准刷新数据。
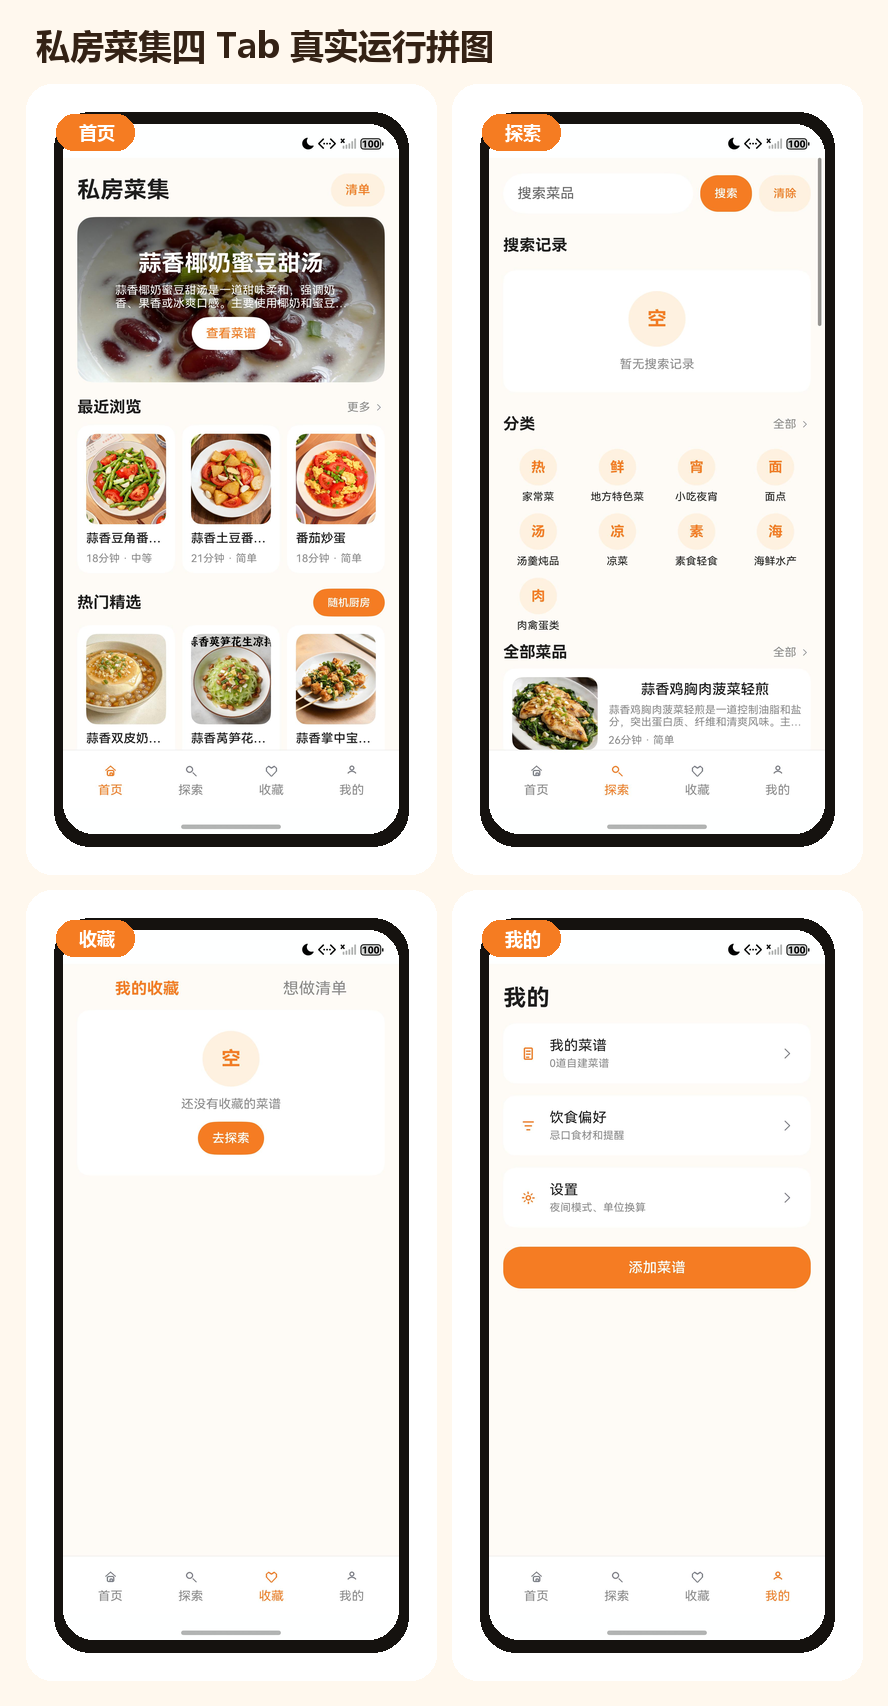
一、主 Tab 解决的不是导航,而是信息架构
菜谱应用看起来可以从首页一路加按钮:搜索入口、收藏入口、添加菜谱入口、设置入口都塞进一个页面。但这样写到后期会出现三个问题。
第一,入口优先级会混乱。首页推荐、搜索分类、收藏清单、个人设置属于不同使用场景,如果全部堆在首页,用户每次都要在一堆卡片里找入口。
第二,状态刷新会变复杂。详情页收藏一道菜后,返回收藏页要刷新;添加自建菜谱后,返回“我的”要刷新;搜索历史变更后,探索页要刷新。如果所有状态都压在一个页面里,刷新边界会越来越模糊。
第三,路由栈会被滥用。一级入口不应该每次点击都 router.pushUrl,否则用户在首页、探索、收藏之间切换几次后,返回键会一层层倒退,体验很不自然。
所以「私房菜集」把首页、探索、收藏、我的放在同一个宿主页面 Index.ets 中。一级入口只切换宿主内部状态,不进入新页面栈;详情页、分类页、添加菜谱、设置页等二级页面才走路由。
二、源码对象总览
| 源码对象 | 作用 |
|---|---|
entry/src/main/ets/pages/Index.ets |
主 Tab 宿主,管理四个一级入口、页面状态和刷新策略。 |
entry/src/main/ets/common/constants/AppTabs.ets |
定义 Tab key、收藏子 Tab key 和底部 Tab 配置。 |
entry/src/main/ets/components/common/BottomNavBar.ets |
底部导航组件,负责图标、文字、选中态和点击回调。 |
entry/src/main/ets/components/common/SectionHeader.ets |
通用分区标题组件,首页和探索页复用。 |
entry/src/main/ets/common/constants/AppRoutes.ets |
二级页面路由常量,主 Tab 内部跳转使用它进入详情、分类、设置等页面。 |
这几个文件的边界比较清晰:Index.ets 负责“当前显示哪个入口”和“当前入口需要什么数据”,BottomNavBar.ets 负责“入口怎么展示”,AppTabs.ets 负责“入口有哪些”。
三、用窄类型限定四个一级入口
主 Tab 的第一层约束不是 UI,而是类型。AppTabs.ets 中把主入口和收藏子入口都声明成联合类型:
export type AppTabKey = 'home' | 'explore' | 'favorite' | 'mine';
export type FavoriteTabKey = 'favorite' | 'todo';

export interface BottomTabItem {
  key: AppTabKey;
  title: string;
  icon: string;
}

export const APP_TABS: BottomTabItem[] = [
  { key: 'home', title: '首页', icon: '⌂' },
  { key: 'explore', title: '探索', icon: '⌕' },
  { key: 'favorite', title: '收藏', icon: '♡' },
  { key: 'mine', title: '我的', icon: '○' }
];
这里没有把 selectedTab 写成普通 string,而是限制为 AppTabKey。这样带来两个实际收益:
switchTab(key: AppTabKey)只能接收四个合法入口,避免传入不存在的页面名。BottomNavBar的onChange回调天然受类型保护,组件不会随便把其他字符串交给宿主页面。
收藏页内部还有“我的收藏 / 想做清单”两个子入口,所以单独定义 FavoriteTabKey。这让主 Tab 和收藏子 Tab 不互相污染:selectedTab 只关心四个一级入口,selectedFavoriteTab 只关心收藏模块内部的二级状态。
四、Index.ets 的状态分组
Index.ets 中的状态不是随便堆的,它基本按页面入口分组:
@State selectedTab: AppTabKey = 'home';
@State selectedFavoriteTab: FavoriteTabKey = 'favorite';
@State homeData: HomeData = {
  hero: {
    id: '',
    title: '',
    description: '',
    categoryId: '',
    categoryName: '',
    coverImage: '',
    durationMinutes: 0,
    difficultyText: '',
    viewCount: 0,
    tags: []
  },
  recent: [],
  popular: []
};
@State exploreData: ExploreData = {
  categories: [],
  hotKeywords: [],
  recipes: []
};
@State favorites: RecipeSummary[] = [];
@State todoList: RecipeSummary[] = [];
@State myRecipes: RecipeSummary[] = [];
@State exploreKeyword: string = '';
@State exploreSearchResults: RecipeSummary[] = [];
@State searchRecords: string[] = [];
@State hasExploreSearch: boolean = false;
@State showMyRecipes: boolean = false;
这段代码可以拆成四组:
- 主入口状态:
selectedTab。 - 收藏模块状态:
selectedFavoriteTab、favorites、todoList。 - 探索模块状态:
exploreData、exploreKeyword、exploreSearchResults、searchRecords、hasExploreSearch。 - 我的模块状态:
myRecipes、showMyRecipes。
这种写法看似普通,但它给后续维护留下了清晰边界。比如搜索逻辑改动时,重点看探索状态;收藏刷新异常时,重点看 favorites / todoList;自建菜谱不显示时,重点看 myRecipes。
五、生命周期:首次进入全量加载,返回页面按需刷新
主宿主页面需要解决两个刷新场景。
首次进入应用时,四个入口都需要准备基础数据,所以 aboutToAppear 里先初始化服务,再做全量刷新:
async aboutToAppear() {
  recipeService.init(getContext(this) as common.UIAbilityContext);
  await this.refreshData();
}

private async refreshData() {
  await this.refreshHomeData();
  await this.refreshExploreData();
  await this.refreshFavoriteData();
  await this.refreshMineData();
}
从详情页、添加菜谱页、设置页返回主页面时,不一定需要全量刷新。onPageShow 只刷新当前 Tab:
async onPageShow() {
  await this.refreshCurrentTab();
}

private async refreshCurrentTab(): Promise<void> {
  if (this.selectedTab === 'home') {
    await this.refreshHomeData();
  } else if (this.selectedTab === 'explore') {
    await this.refreshExploreData();
  } else if (this.selectedTab === 'favorite') {
    await this.refreshFavoriteData();
  } else {
    await this.refreshMineData();
  }
}
这就是主 Tab 宿主的关键价值:刷新逻辑不分散在四个完全独立页面里,而是由同一个宿主根据 selectedTab 判断。它既避免了每次返回都全量查询,也避免了某个入口忘记刷新。
六、四个数据刷新函数各管一段业务
Index.ets 没有把所有数据查询写进一个巨大函数,而是按入口拆成四个刷新函数:
private async refreshHomeData(): Promise<void> {
  this.homeData = await recipeService.getHomeData();
}

private async refreshExploreData(): Promise<void> {
  this.exploreData = await recipeService.getExploreData('popular');
  this.searchRecords = searchService.getSearchHistory();
  await this.runExploreSearch();
}

private async refreshFavoriteData(): Promise<void> {
  this.favorites = await favoriteService.getFavorites();
  this.todoList = await todoService.getTodoList();
}

private async refreshMineData(): Promise<void> {
  this.myRecipes = await recipeService.getUserRecipeSummaries();
}
这里能看出服务层的分工:
- 首页数据来自
recipeService.getHomeData(),里面会聚合今日推荐、最近浏览和热门菜谱。 - 探索数据来自
recipeService.getExploreData('popular'),搜索历史来自searchService。 - 收藏和想做清单分别由
favoriteService、todoService提供。 - 我的菜谱来自
recipeService.getUserRecipeSummaries()。
主页面只负责组合,不直接碰 rawfile、不直接读 Preferences,也不直接解析用户状态 JSON。这正好延续了第一篇里提到的分层原则:页面只组合,服务管业务,仓储管持久化。
七、build:Stack 切换内容,BottomNavBar 固定底部
Index.ets 的 build() 结构非常直接:
build() {
  Column() {
    Stack() {
      if (this.selectedTab === 'home') {
        this.HomeTab()
      } else if (this.selectedTab === 'explore') {
        this.ExploreTab()
      } else if (this.selectedTab === 'favorite') {
        this.FavoriteTab()
      } else {
        this.MineTab()
      }
    }
    .layoutWeight(1)
    BottomNavBar({
      selectedKey: this.selectedTab,
      onChange: (key: AppTabKey) => {
        this.switchTab(key);
      }
    })
  }
  .width('100%')
  .height('100%')
  .backgroundColor($r('app.color.app_bg'))
}
上半部分用 Stack() 承载当前入口内容,并通过 layoutWeight(1) 占满除底部导航之外的剩余空间。底部固定放 BottomNavBar,所以四个入口切换时,导航栏不会重建成另一个页面,也不会进入路由栈。
切换入口时只调用 switchTab:
private async switchTab(key: AppTabKey): Promise<void> {
  this.selectedTab = key;
  await this.refreshCurrentTab();
}
这段逻辑有一个很重要的细节:先改 selectedTab,再刷新当前 Tab。这样 refreshCurrentTab() 读取到的是切换后的入口,而不是旧入口。
八、BottomNavBar:组件只负责展示和回调
底部导航被独立成 BottomNavBar.ets,它接收两个核心输入:当前选中的 key,以及点击后的回调。
@Component
export struct BottomNavBar {
  @Prop selectedKey: AppTabKey;
  onChange: (key: AppTabKey) => void = () => {};
  private items: BottomTabItem[] = APP_TABS;
}
图标资源根据 key 和 active 状态判断:
private iconResource(key: AppTabKey, active: boolean): Resource {
  if (key === 'home') {
    return active ? $r('app.media.ic_home_active') : $r('app.media.ic_home');
  }
  if (key === 'explore') {
    return active ? $r('app.media.ic_search_active') : $r('app.media.ic_search');
  }
  if (key === 'favorite') {
    return active ? $r('app.media.ic_favorite_active') : $r('app.media.ic_favorite');
  }
  return active ? $r('app.media.ic_mine_active') : $r('app.media.ic_mine');
}
真正渲染时遍历 APP_TABS:
Row() {
  ForEach(this.items, (item: BottomTabItem) => {
    Column({ space: 3 }) {
      Image(this.iconResource(item.key, this.selectedKey === item.key))
        .width(22)
        .height(22)
        .objectFit(ImageFit.Contain)
      Text(item.title)
        .fontSize(14)
        .fontColor(this.selectedKey === item.key ? $r('app.color.primary_orange') : $r('app.color.text_secondary'))
    }
    .layoutWeight(1)
    .height(58)
    .justifyContent(FlexAlign.Center)
    .onClick(() => this.onChange(item.key))
  }, (item: BottomTabItem) => item.key)
}
.width('100%')
.padding({ left: 8, right: 8, bottom: 6, top: 4 })
.backgroundColor($r('app.color.card_bg'))
.border({ width: { top: 1 }, color: $r('app.color.divider') })
这个组件没有读取首页数据,也不知道收藏列表怎么来。它只关心三件事:
- 根据
selectedKey决定哪个图标和文字高亮。 - 根据
APP_TABS渲染固定顺序。 - 点击后把
item.key交回宿主页面。
组件边界越简单,后续换图标、改字号、加触感反馈时越不容易影响业务状态。
九、首页入口:推荐流和“清单”快捷切换
首页是默认入口,承载“今天看什么”的场景。顶部标题和清单按钮来自 HomeTab():
Row() {
  Text('私房菜集')
    .fontSize(26)
    .fontWeight(FontWeight.Bold)
    .fontColor($r('app.color.text_primary'))
  Blank()
  Button('清单')
    .height(38)
    .fontSize(14)
    .fontColor($r('app.color.primary_orange'))
    .backgroundColor($r('app.color.primary_orange_light'))
    .onClick(() => {
      this.switchTab('favorite');
      this.selectedFavoriteTab = 'todo';
    })
}
这个“清单”按钮没有跳转新页面,而是直接切到收藏入口,并把收藏子 Tab 改成 todo。它体现了主宿主的一个优势:同一个页面内部可以完成跨入口联动,不需要绕路由。
首页推荐区域则组合了 hero、最近浏览和热门精选:
if (this.homeData.hero.id.length > 0) {
  Column() {
    RecipeHeroCard({ recipe: this.homeData.hero, onRecipeClick: (id: string) => this.openDetail(id) })
  }
  .padding({ left: 16, right: 16 })
}
点击菜谱时才进入详情页:
private openDetail(recipeId: string): void {
  router.pushUrl({
    url: AppRoutes.DETAIL,
    params: { recipeId }
  });
}
这条边界很清晰:一级入口内部切换不入栈,业务详情才入栈。
十、探索入口:搜索、分类和全部菜品放在同一入口
探索页负责“找菜”。它包含搜索框、搜索记录、分类宫格和全部菜品列表。
搜索输入只改变探索状态,不影响首页和收藏:
TextInput({ text: this.exploreKeyword, placeholder: '搜索菜品' })
  .layoutWeight(1)
  .height(46)
  .fontSize(14)
  .backgroundColor($r('app.color.card_bg'))
  .borderRadius(23)
  .onChange((value: string) => {
    this.exploreKeyword = value;
    if (value.trim().length === 0) {
      this.clearExploreSearch();
    } else {
      this.exploreKeyword = value;
    }
  })
提交搜索时先整理关键词,再调用本地搜索服务:
private async submitExploreSearch(): Promise<void> {
  const keyword = this.exploreKeyword.trim();
  if (keyword.length === 0) {
    this.clearExploreSearch();
    return;
  }
  this.searchRecords = searchService.addSearchHistory(keyword);
  this.hasExploreSearch = true;
  await this.runExploreSearch();
}
分类宫格点击时进入分类列表页:
private openCategory(categoryId: string): void {
  router.pushUrl({
    url: AppRoutes.CATEGORY,
    params: { categoryId }
  });
}
探索页的设计重点是把“找菜”的入口集中到一个 Tab 中:搜索历史、分类和全部菜品都在这里,首页就不必承担过多检索功能。
十一、收藏入口:主 Tab 内再拆一个子 Tab
收藏入口内部有两个子状态:我的收藏、想做清单。它没有再拆成两个路由页面,而是在 FavoriteTab() 中用 selectedFavoriteTab 切换:
@Builder
private FavoriteTab() {
  Column() {
    Row() {
      Text('我的收藏')
        .fontSize(18)
        .fontWeight(this.selectedFavoriteTab === 'favorite' ? FontWeight.Bold : FontWeight.Regular)
        .fontColor(this.selectedFavoriteTab === 'favorite' ? $r('app.color.primary_orange') : $r('app.color.text_secondary'))
        .layoutWeight(1)
        .textAlign(TextAlign.Center)
        .onClick(() => {
          this.selectedFavoriteTab = 'favorite';
          this.refreshFavoriteData();
        })
      Text('想做清单')
        .fontSize(18)
        .fontWeight(this.selectedFavoriteTab === 'todo' ? FontWeight.Bold : FontWeight.Regular)
        .fontColor(this.selectedFavoriteTab === 'todo' ? $r('app.color.primary_orange') : $r('app.color.text_secondary'))
        .layoutWeight(1)
        .textAlign(TextAlign.Center)
        .onClick(() => {
          this.selectedFavoriteTab = 'todo';
          this.refreshFavoriteData();
        })
    }
    .width('100%')
    .padding({ top: 18, bottom: 14 })
    if (this.selectedFavoriteTab === 'favorite') {
      this.FavoriteRecipes()
    } else {
      this.TodoRecipes()
    }
  }
  .width('100%')
  .height('100%')
}
这是一种很合适的边界:收藏和想做清单同属于用户行为中心,适合放在同一入口内;但二者展示形态不同,所以用子 Tab 控制内部视图。
十二、我的入口:个人设置和自建菜谱的集中区
“我的”入口承载个人化能力,包括我的菜谱、饮食偏好、设置和添加菜谱。
@Builder
private MineTab() {
  if (this.showMyRecipes) {
    this.MyRecipesView()
  } else {
    Column({ space: 14 }) {
      Text('我的')
        .fontSize(26)
        .fontWeight(FontWeight.Bold)
        .fontColor($r('app.color.text_primary'))
        .width('100%')
      this.MineRow('我的菜谱', `${this.myRecipes.length}道自建菜谱`, () => {
        this.showMyRecipes = true;
        this.refreshMineData();
      }, $r('app.media.ic_note_active'))
      this.MineRow('饮食偏好', '忌口食材和提醒', () => router.pushUrl({ url: AppRoutes.DIET_PREFERENCE }), $r('app.media.ic_filter_active'))
      this.MineRow('设置', '夜间模式、单位换算', () => router.pushUrl({ url: AppRoutes.SETTINGS }), $r('app.media.ic_settings_active'))
      Button('添加菜谱')
        .width('100%')
        .height(48)
        .margin({ top: 8 })
        .backgroundColor($r('app.color.primary_orange'))
        .onClick(() => router.pushUrl({ url: AppRoutes.ADD_RECIPE }))
    }
    .width('100%')
    .height('100%')
    .padding({ left: 16, right: 16, top: 24 })
  }
}
这里有两类入口:
showMyRecipes这种轻量内部视图,仍留在当前 Tab 内部。- 饮食偏好、设置、添加菜谱这种二级功能,通过
router.pushUrl进入独立页面。
这个取舍让“我的”入口既保持轻量,又不会把复杂表单和设置逻辑塞进主宿主。
十三、运行与验收
本篇截图来自本机模拟器真实运行页面,操作路径如下:
hdc shell aa start -a EntryAbility -b com.lesson.myapplicationsfcj
hdc shell uitest uiInput click 186 2635
hdc shell snapshot_display -f /data/local/tmp/sfcj_02_home.jpeg
hdc shell uitest uiInput click 502 2635
hdc shell snapshot_display -f /data/local/tmp/sfcj_02_explore.jpeg
hdc shell uitest uiInput click 818 2635
hdc shell snapshot_display -f /data/local/tmp/sfcj_02_favorite.jpeg
hdc shell uitest uiInput click 1134 2635
hdc shell snapshot_display -f /data/local/tmp/sfcj_02_mine.jpeg
验收重点可以按下面清单检查:
- 应用启动后默认进入首页,底部“首页”高亮。
- 点击“探索”只切换主宿主内容,不进入新页面栈。
- 点击“收藏”显示“我的收藏 / 想做清单”子入口。
- 点击“我的”显示我的菜谱、饮食偏好、设置和添加菜谱入口。
- 从详情页返回首页后,首页最近浏览可以刷新。
- 从详情页收藏菜谱后,返回收藏 Tab 能重新读取收藏列表。
- 点击首页“清单”按钮可以切到收藏入口的想做清单。
十四、问题复盘:主 Tab 不应该过度路由化
主 Tab 最容易出现的错误是把每个一级入口都做成独立页面,然后用 router.pushUrl 切换。这样虽然初期简单,但会带来明显问题:
- 返回键行为不符合一级入口预期。
- 四个入口之间共享状态时需要跨页面同步。
- 底部导航组件容易在多个页面里重复写。
- 当前入口的刷新逻辑会分散到不同页面生命周期中。
当前实现把四个入口放在同一个宿主里,用 selectedTab 控制内容,用 BottomNavBar 处理导航展示,用 refreshCurrentTab() 控制返回刷新。这个结构的优势是边界稳定:一级入口是状态切换,二级功能才是路由跳转。
这套结构也有后续优化空间。例如当前 Index.ets 体量已经比较大,首页、探索、收藏、我的各自的 Builder 后续可以继续拆成独立组件;搜索状态也可以抽到专门的探索页面状态模型中。是否拆分不取决于代码行数,而取决于模块是否已经形成独立职责。
十五、下一篇衔接
主 Tab 宿主解决了“用户从哪里进入各个模块”的问题。入口搭好之后,下一个核心问题是内容从哪里来。
第三篇将进入内容资产工程:dishes.json 如何承载 514 道本地菜谱,RecipeDataSource.ets 如何把 rawfile JSON 映射成页面可以直接消费的 Recipe / RecipeSummary,以及图片路径如何从资源文件变成 ArkUI 可展示的本地菜谱图。

讨论HarmonyOS开发技术,专注于API与组件、DevEco Studio、测试、元服务和应用上架分发等。
更多推荐
 4
4 0
0- 0


 已为社区贡献26条内容

所有评论(0)